


Kako ukloniti zamućenje slika pomoću najmoćnijih aplikacija
Prilično je frustrirajuće saznati da je slika koju ste snimili mutna. Vaša je fotografija mutna jer se subjekt koji slikate pomiče, kamera se trese ili je osvjetljenje na mjestu loše. Osim toga, trenutak u kojem ste snimili fotografiju ne možete vratiti, što je vrlo razočaravajuće. Popravak takve slike čini se nemogućim, ali nije. Srećom, postoje konkretne metode pomoću kojih možete izoštriti mutnu sliku. Uz najbolje aplikacije za popravak slika, možete popraviti svoju mutnu fotografiju. Ovaj vodič će vas naučiti kako izoštriti mutnu sliku bez napora.

Dio 1. Kako ukloniti zamućenje slike online
Ljudi radije koriste internetsku aplikaciju za uklanjanje zamućenja slika jer im to omogućuje uštedu prostora na njihovim uređajima. Također, kada koristite online alat, trebate mu samo pristupiti u svom pregledniku. Zgodno zar ne? Stoga tražimo najbolji mrežni alat za povećanje veličine slike kako bismo popravili zamućenje vaše fotografije.
FVC Free Image Upscaler najbolji je izbor ako tražite način da putem interneta uklonite zamućenje sa slike. Osim toga, besplatan je i siguran za korištenje. Možete mu pristupiti u svim web-preglednicima, uključujući Google, Firefox i Safari. Štoviše, možete poboljšati kvalitetu svoje slike povećanjem od 2x, 4x, 6x i 8x. Također koristi AI (umjetnu inteligenciju) koja automatski otkriva mutne dijelove slike, a zatim ih poboljšava.
Nadalje, FVC Free Image Upscaler omogućuje vam da precizno popravite izgubljene piksele, teksture boja i više detalja. I unatoč tome što je online aplikacija, ima brz proces nadogradnje i ne sadrži reklame koje bi vas mogle ometati. Dakle, ako ste zainteresirani za korištenje besplatnog alata za povećanje slike, slijedite jednostavan vodič u nastavku.
Kako ukloniti zamućenje slika pomoću FVC Free Image Upscalera:
Korak 1. Najprije otvorite preglednik i u okvir za pretraživanje upišite FVC Free Image Upscaler. Također možete izravno kliknuti poveznicu na glavnu stranicu. Zatim pokrenite aplikaciju klikom na gumb Upload Photo. Nakon pokretanja aplikacije prijeđite na sljedeći korak.
Korak 2. Na prvom sučelju kliknite gumb Upload Photo kako biste uvezli sliku koju želite izoštriti. Otvorit će se mape vašeg računala u kojima ćete pronaći fotografiju. Kliknite Open da biste je učitali.

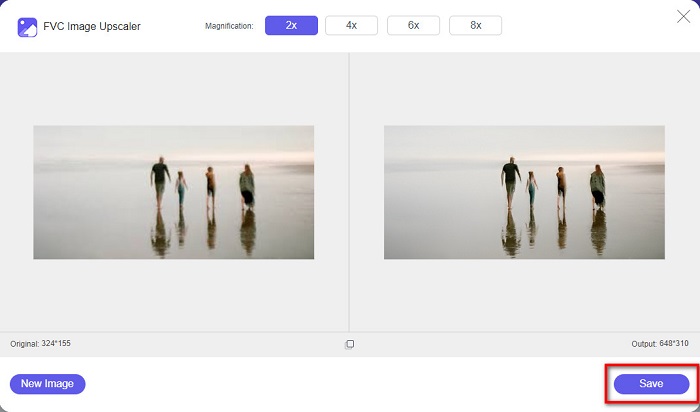
Korak 3. Nakon učitavanja slike odaberite zadani stupanj povećanja koji želite. Možete birati između povećanja 2x, 4x, 6x i 8x. Zatim možete vidjeti pregled rezultata na desnoj strani kako biste uočili razliku u odnosu na izvorni zapis.

Korak 4. Na kraju spremite svoj rezultat klikom na gumb Save u donjem desnom kutu sučelja.
A to su koraci kako poništiti zamućenje slike na mreži. Iz rezultata ćete vidjeti kako vam ovaj besplatni program za povećanje slike može pomoći popraviti kvalitetu vaše slike.
Dio 2. Kako ukloniti zamućenje slike izvan mreže na stolnom računalu
Mnogi profesionalci koriste računalo za uređivanje slika ili videozapisa. Također, mnoge aplikacije za uređivanje fotografija dostupne su samo na stolnim računalima. U ovom ćemo vas dijelu naučiti najbolje metode za uklanjanje zamućenja slike izvan mreže na radnoj površini.
Uklonite zamućenje slike pomoću Photoshopa
Adobe Photoshop vjerojatno je najbolja aplikacija za uređivanje slika koju možete koristiti da biste uklonili zamućenje sa svojih fotografija. Ova izvanmrežna aplikacija ima mnogo alata i funkcija za uređivanje koje možete koristiti za poboljšanje slike. Osim toga, možete pojačati oštrinu fotografije ako kvaliteta nije dobra ili je mutna. Koristeći njezine napredne alate za uređivanje, sigurno možete postići izvrsne rezultate. Osim toga, možete ukloniti osobe ili objekte sa slike, nacrtati crtež ili objekt pomoću alata olovka ili pero, manipulirati bojama fotografije i mnogo više. Uz Adobe Photoshop možete stvoriti fantastične slike koje ste sami uredili. Međutim, Adobe Photoshop nije alat prilagođen početnicima. Potrebno je dobro poznavanje rada s njegovim alatima kako biste izoštrili ili uredili svoju fotografiju. Ipak, pružit ćemo vam korake kako biste mogli koristiti Photoshop za uklanjanje zamućenja. Pokazat ćemo vam i dva načina za korištenje Photoshopa kako biste smanjili zamućenost slike.
Proces uklanjanja zamućenja slike pomoću programa Adobe Photoshop:
Korak 1. Preuzmite Adobe Photoshop na svoje računalo i instalirajte ga. Kada ga preuzmete i instalirate, pokrenite aplikaciju na svom uređaju.
Korak 2. Zatim na glavnom sučelju otvorite sliku koju želite izoštriti. Također možete pritisnuti CTRL + O na tipkovnici kako biste lakše otvorili sliku.
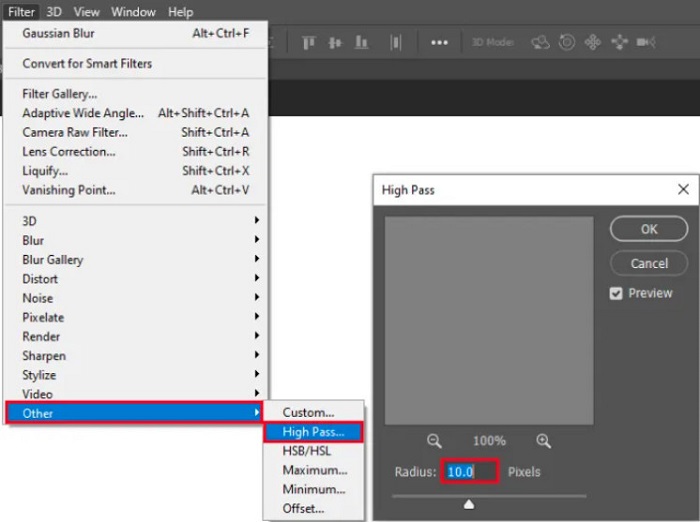
Korak 3. Zatim duplicirajte pozadinski sloj i označite ga. Potom kliknite Filter > Other > High Pass. Postavite High Pass na 10%.
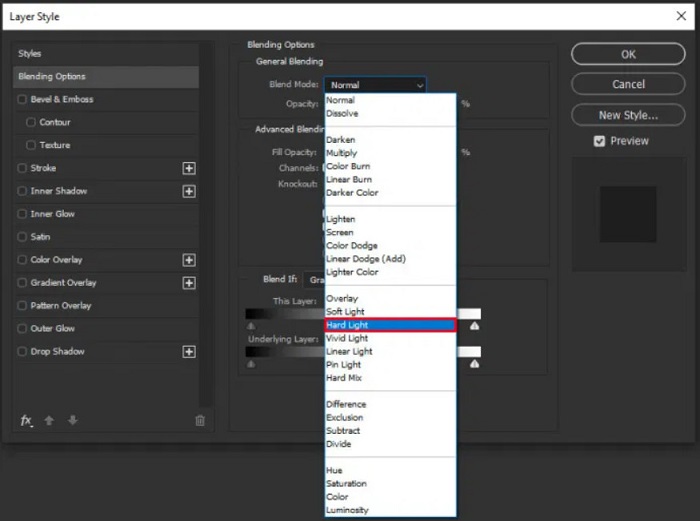
Korak 4. U prozoru Layer Style postavite način stapanja s normalnog na hard light, a zatim promijenite opacity dok fotografija ne postane jasna ili poboljšana.
Ako koristite novu verziju Photoshopa, možete upotrijebiti opciju smanjenja podrhtavanja kamere kako biste izoštrili sliku u Photoshopu.
Korak 1. Uvezite sliku koju želite izoštriti u Photoshop.
Korak 2. Zatim idite na Filter > Sharpen > Shake Reduction.
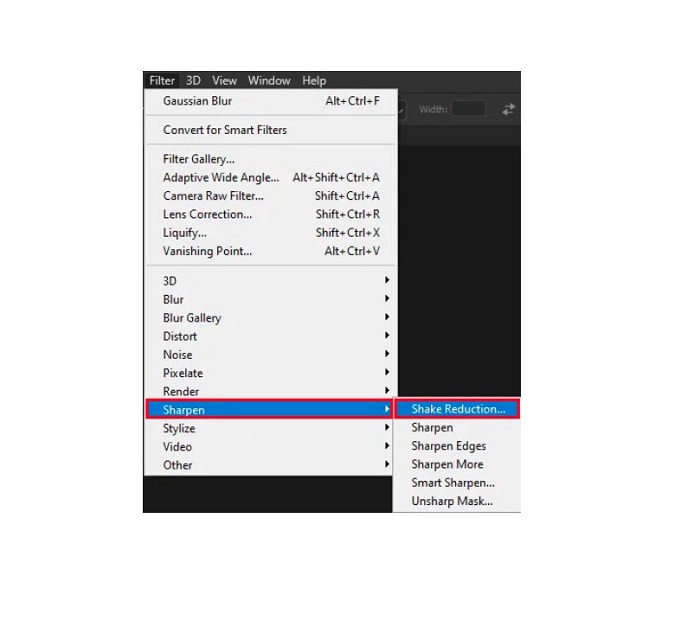
Korak 3. Zatim će Photoshop obraditi vašu sliku, nakon čega možete pregledati rezultat.
Uklonite zamućenje slike pomoću Paint.net
Još jedan besplatan izvanmrežni program za uređivanje fotografija koji možete koristiti je Paint.net. Jedna od snažnih značajki ove aplikacije upravo je izoštravanje slike. Pomicanjem klizača možete podesiti količinu oštrine na slici, čime ona postaje oštra i jasna, a zamućenje se uklanja. Nadalje, jednostavniji je za korištenje od Adobe Photoshopa. Također ima i druge funkcije uređivanja koje možete koristiti za obradu fotografija. Ako ne znate kako koristiti ovu aplikaciju, možete pristupiti njezinim internetskim savjetima i uputama. Osim toga, riječ je o jednom od najpoznatijih programa za uređivanje slika za korisnike sustava Windows jer ima mnogo funkcija za korekciju koje možete koristiti za poboljšanje fotografija. Manji nedostatak Paint.net-a jest da ne možete ispravljati tekst koji ste unijeli nakon primjene efekata. Unatoč tome, ovaj softver omogućuje stvaranje višerazinskih rezultata uređivanja slika.
Kako poništiti zamućenje slike koristeći Paint.net:
Korak 1. Za početak, otvorite svoju sliku u Paint.netu pritiskom na CTRL + O na tipkovnici. Također možete otići na File i odabrati opciju Open. Zatim će se pojaviti datoteke s vašeg računala, gdje ćete odabrati sliku i otvoriti je.
Korak 2. Zatim kliknite Effects > Picture, a potom odaberite Sharpen.
Korak 3. Na panelu Sharpen vidjet ćete klizač kojim ćete podesiti oštrinu slike kako biste uklonili zamućenje. Također možete kliknuti gumb up/down arrow kako biste promijenili razinu oštrine fotografije.
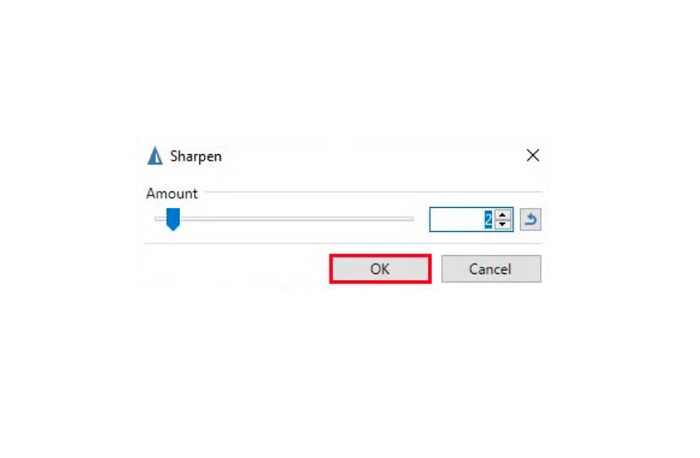
Korak 4. Pritisnite gumb OK i spremite svoj rezultat.
Dio 3. Kako ukloniti zamućenje slike na iPhoneu
Ako ste korisnik iPhone uređaja, također možete preuzeti neke aplikacije za uklanjanje zamućenja slike. Možete birati među aplikacijama iz svoje trgovine App Store za uklanjanje zamućenja slike. Međutim, neke se aplikacije mogu kupiti, što zahtijeva da ih kupite prije upotrebe. Ali u ovom ćemo vas dijelu naučiti kako poništiti zamućenje slike na vašem iPhoneu pomoću besplatne i izvanredne aplikacije.
Foton je jedna od najčešće korištenih aplikacija za uklanjanje zamućenja slika na iPhoneu. Možete je besplatno preuzeti iz AppStorea. Osim toga, ima i druge funkcije uređivanja, poput kolaža, obrezivanja, dodavanja predložaka, razdvajanja i još mnogo toga. Također ima jednostavno sučelje, što je čini aplikacijom prikladnom za korisnike. Pomoću ove aplikacije možete ukloniti zamućenje prilagođavanjem oštrine slike. A ako želite da vaša fotografija izgleda još dojmljivije, možete podesiti kontrast, jasnoću, zasićenost i uklanjanje izmaglice. Štoviše, sigurna je za korištenje, pa ne morate brinuti o sigurnosti svojih slikovnih datoteka. Nedostatak ove aplikacije jest što morate kupiti pro verziju kako biste koristili ostale funkcije.
Kako ukloniti zamućenje slike na iPhoneu:
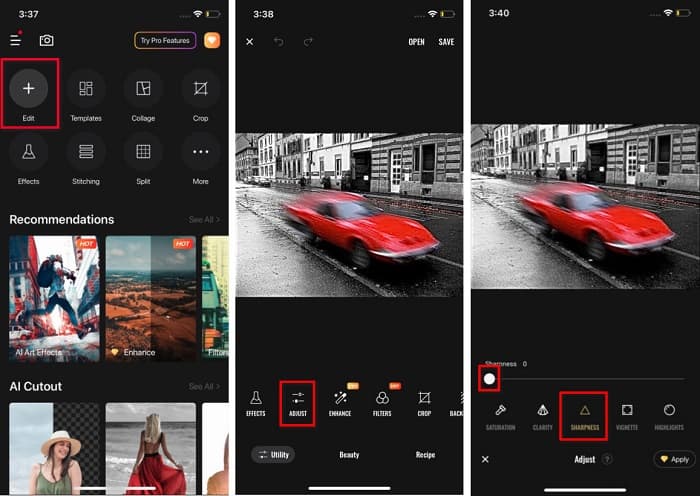
Korak 1. Otvorite App Store na svom iPhoneu, zatim potražite Foton. Instalirajte ga na telefon i otvorite nakon instalacije. Zatim na glavnom sučelju aplikacije dodirnite opciju Edit.
Korak 2. Odaberite sliku koju želite izoštriti; potom ćete biti preusmjereni na drugo sučelje. Dodirnite opciju Adjust ispod slike, zatim prijeđite prstom ulijevo kako biste pronašli funkciju Sharpness.
Korak 3. Na panelu Sharpness povucite klizač na željenu razinu oštrine dok se zamućenost slike ne smanji.
Korak 4. Na kraju dodirnite gumb Save u gornjem desnom kutu sučelja kako biste spremili rezultat na svoj iPhone. Kliknite ovdje da biste saznali kako promijeniti veličinu slike na iPhoneu.
Dio 4. Kako ukloniti zamućenje slike na Android telefonu
Mnogi ljudi također posjeduju Android uređaje, a ako i vi koristite jedan, možete pročitati ovaj dio da biste saznali kako poništiti zamućivanje slike na Androidu. Potražili smo najpopularnije aplikacije za otklanjanje zamućenja fotografija za Android i isprobali ih jednu po jednu. Srećom, pronašli smo aplikaciju koju je najbolje preporučiti.
Snapseed je najbolja aplikacija ako želite izoštriti mutnu sliku na Android uređaju. Pomoću funkcija sharpen i structure možete dodati oštrinu slici i ukloniti mutne dijelove. Osim toga, ima mnogo mogućnosti uređivanja koje vam mogu pomoći poboljšati kvalitetu slike. I kao i ostali alati spomenuti gore, ima jednostavno korisničko sučelje. Stoga, ako ste početnik, možete koristiti ovu aplikaciju za uklanjanje zamućenja. Međutim, prije korištenja aplikacije morate uključiti WiFi.
Kako ukloniti zamućenje slike na Androidu pomoću Snapseeda:
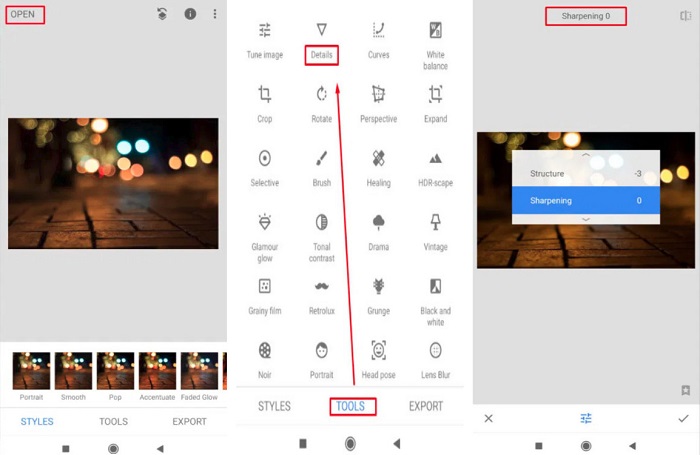
Korak 1. Preuzmite aplikaciju na svoj Android uređaj, a zatim je otvorite. Nakon otvaranja učitajte svoju sliku u aplikaciju.
Korak 2. Zatim na panelu Tools odaberite opciju Details.
Korak 3. Zatim odaberite Sharpen ili Structure svoje slike kako biste postigli razliku na mutnoj fotografiji. Podesite li ove dvije opcije, uklonit ćete zamućenost slike.
Dio 5. Često postavljana pitanja o tome kako ukloniti zamućenje slike
Hoće li se veličina datoteke povećati kada uklonite zamućenje slike?
Da. Kada poništite zamućivanje slike, njezin PPI će se povećati, uzrokujući da veličina datoteke bude veća od izvorne.
Zašto moja slika postaje mutna kada je povećam?
Vjerojatno je to zbog problema s kompresijom. Kada pokušate promijeniti veličinu slike, također povećavate piksele svoje fotografije. Dakle, komprimiranje slike može utjecati na kvalitetu vaše slike.
Mogu li poništiti zamućivanje JPG slike na Adobeu?
Definitivno! Možete koristiti Adobe Photoshop ako želite ukloniti zamućenje JPG slike. Adobe Photoshop podržava standardne formate slika, kao što su PNG, JPG i JPEG
Zaključak
Sada kada znate kako izoštriti mutnu sliku koristeći najjednostavnije metode, možete bez problema poboljšati svoje fotografije. Svi načini koje smo pokazali iznad sigurno će vam pomoći da postignete željeni cilj. No, ako želite uštedjeti prostor na uređaju, preporučujemo da koristite FVC Free Image Upscaler, kojem možete besplatno i online pristupiti.
-
 Kako promijeniti veličinu slike u PowerPointu [Najbrži način za promjenu veličine]
 Naučiti kako promijeniti veličinu slika u PowerPointu bitno je, posebno ako ga želite koristiti u svojoj prezentaciji. Pročitajte ovaj članak da biste saznali kako to učiniti.
-
 1440p slika – Sveobuhvatne informacije koje će vam trebati [Ažurirano 2022.]
 Želite li znati o 1440p slikama? Ili gdje ga možete nabaviti? Prebaciti sliku na 1440p? Pročitajte ovo da biste ih sve upoznali.
-
 Vodič za uklanjanje piksela slike pomoću 3 najbolja alata za uklanjanje piksela fotografija
 Imate li problema s rukovanjem pikseliziranim slikama? Danas smo riješili problem i možete koristiti alate koje smo ovdje dodali.