


Kako snimati na PS4 putem zadanih postavki i najbolje alternative
PS4 ili PlayStation 4 već od samog izlaska impresionira mnoge igrače svojom snažnom izvedbom i odličnim performansama. Čak i danas zauzima važno mjesto u životima brojnih gamera zahvaljujući velikom izboru igara i mogućnostima koje nadilaze samo igranje. Kada na PS4 igrate svoje omiljene naslove, sasvim je prirodno da poželite snimiti epske trenutke i podijeliti ih s drugima, zar ne? Koji god bio vaš razlog, važno je znati kako snimati na PS4. Upravo zato smo tu da vam pomognemo!
U ovom ćemo postu raščlaniti korake koje trebate slijediti kako biste snimili svoj gameplay na svojoj omiljenoj konzoli koristeći zadani način, zajedno s najboljim alternativama koje možete koristiti! Dakle, obratite pozornost i pažljivo pratite kako biste bili sigurni da ste sve ispravno shvatili.

Dio 1. Kako snimiti zaslon PS4 u punoj kvaliteti bez ograničenja osim na zadani način
Budući da PS4 ima vremensko ograničenje snimanja, prvo ćemo prijeći na najbolju alternativu. Ako želite snimati svoje gaming sesije na konzoli, FVC Screen Recorder je pouzdano rješenje. Riječ je o desktop programu specijaliziranom za snimanje igranja, kao i ekrana, videa, zvuka, mobitela i još mnogo toga. Uz podršku za bezgubitno snimanje u 60 sličica u sekundi, možete snimati svoje igranje glatko i u visokoj kvaliteti. Posebno je koristan svima koji žele snimati neograničene količine gameplaya. Osim toga, FVC Screen Recorder nudi mogućnosti uređivanja i dijeljenja snimaka na raznim platformama poput YouTubea, Twittera, Facebooka, Instagrama i drugih.
Ono što je još zanimljivije je da nudi postavke u kojima možete prilagoditi svoje snimke svojim potrebama. Dakle, bilo da se radi o prilagodbi izlaznih postavki, čišćenju glasa uz poništavanje buke ili uključivanju vaše web kamere u način rada slika u slici, ovaj alat vas pokriva! Također, uz značajke poput snimanja fotografija, brzog dijeljenja s popularnim web-mjestima i poboljšanja, ovaj snimač zaslona i dalje je svestran alat za igrače. Stoga, evo kako snimiti zaslon PS4 bez ikakvih vremenskih ograničenja.
Korak 1. Najprije preuzmite odgovarajuću verziju ovog snimača igara na svoje računalo i otvorite je. Prije nego što počnete snimati, provjerite je li vaš PS4 povezan s istim računalom putem udaljene reprodukcije (screencast remote play).
Besplatno preuzimanjeZa Windows 7 ili novijiSigurno preuzimanje
Besplatno preuzimanjeZa MacOS 10.7 ili novijiSigurno preuzimanje
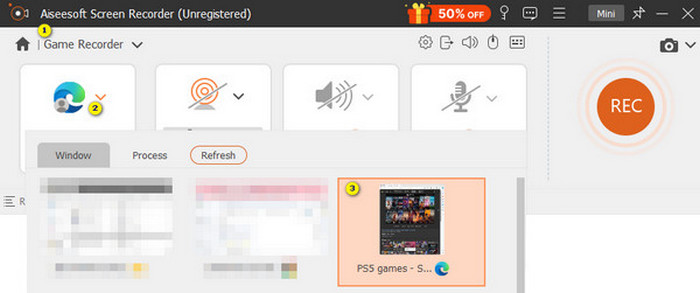
Korak 2. Kada se program za snimanje pokrene, imat ćete nekoliko opcija. Za ovu svrhu kliknite na alat Game Recorder. Zatim odaberite prozor u kojem se prikazuje vaš PS4 klikom na strelicu u prvom polju za odabir. Nakon toga slobodno prilagodite ostale postavke prema vlastitim željama.
Korak 3. Nakon podešavanja kliknite gumb REC da biste započeli snimanje. Kada završite, pritisnite gumb Stop. Program će vas zatim prebaciti u prozor u kojem možete dodatno urediti svoju snimku. Možete je skratiti, napraviti snimku zaslona ili podesiti glasnoću ako želite. Potom kliknite gumb Done da biste nastavili i spremili izlaznu datoteku.

Korak 4. Kada se video spremi, pojavit će se novi prozor. Desnim klikom na snimljeni gameplay možete odabrati napredne postavke koje želite primijeniti. Također ga, ako želite, možete podijeliti na željenoj platformi. Tako se snima PS4 ekran bez ikakvog ograničenja.

Dio 2. Kako snimati na PS4 na zadani način
Osim programa treće strane, kao što je ovaj snimač igara, PS4 ima i ugrađeni snimač. Sada ćemo prijeći na korake korištenja ugrađenog PS4 snimača.
Korak 1. Uključite svoj PS4 i odaberite igru koju želite snimati. Zatim uđite u igru i počnite igrati. Kada ste spremni započeti snimanje, jednostavno dvaput brzo pritisnite tipku Share na svom kontroleru.
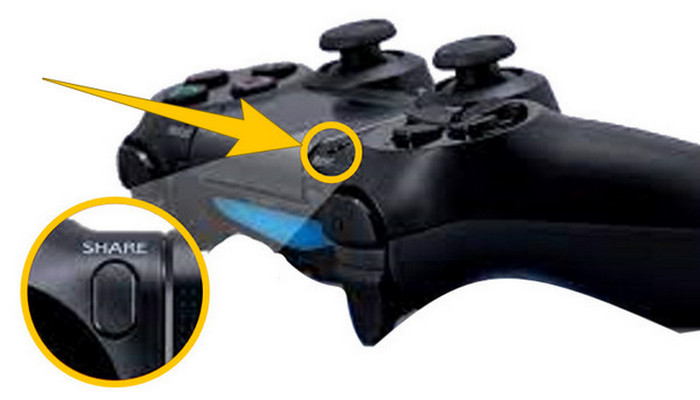
Korak 2. Bit ćete obaviješteni da je snimanje započelo. No kako zaustaviti snimanje gameplaya na PS4 kada završite? Da biste to učinili, samo dulje pritisnite tipku Share.
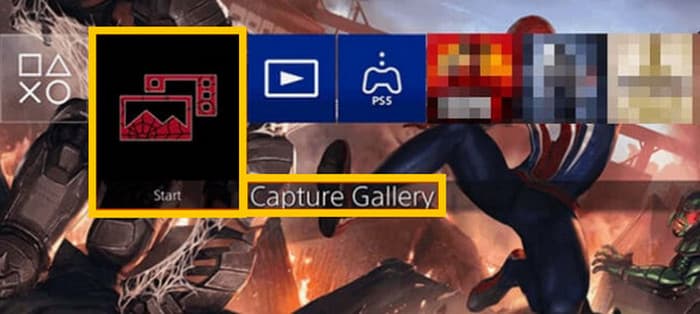
Korak 3. Nakon toga svoju snimku možete pogledati tako da otvorite glavni izbornik (Main Menu), a zatim iz ponuđenih opcija odaberete Capture Gallery.
Dio 3. Kako snimiti igru na PS4 pomoću kartice za snimanje
Još jedna popularna alternativa zadanom PS4 snimaču je uporaba kartice za snimanje. Naravno! Kartica za snimanje pomoći će vam da povežete svoj PS4 s drugim uređajima i omogućit će vam snimanje svega na vašem PS4. Ako niste znali za ovo, da, nastavite čitati i slijedite upute koje dajemo u nastavku.
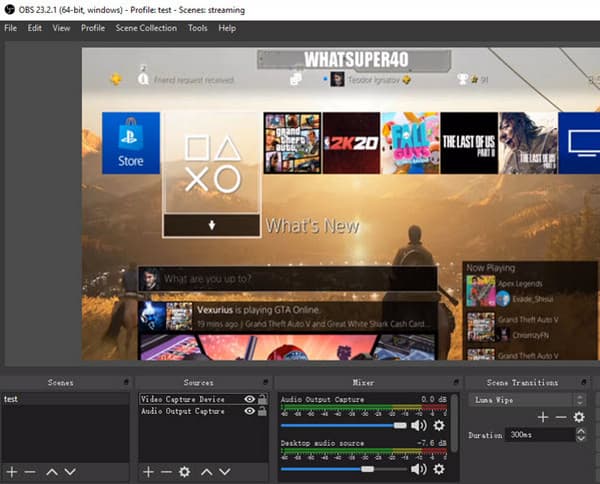
Korak 1. Spojite karticu za snimanje (capture card) na svoj PS4, računalo i TV monitor putem HDMI kabela. Zatim provjerite ima li vaše računalo instaliran OBS kako bi snimanje funkcioniralo.

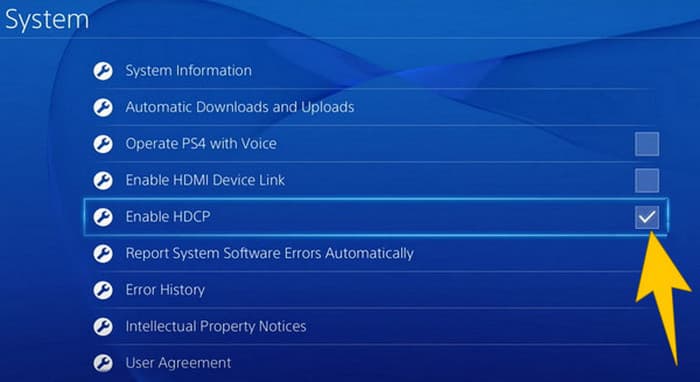
Korak 2. Sada podesite svoj PS4 tako da odete u Settings, zatim odaberete System, pa System Information. Ondje označite opciju Enable HDCP.
Korak 3. Pokrenite OBS, zatim idite na Source Section>Plus>Video Capture Device, a potom kliknite gumb OK. Sada možete kliknuti gumb Start Recording i početi igrati kako biste snimili gameplay. Da biste završili snimanje, u bilo kojem trenutku kliknite gumb Stop Recording.
Dio 4. Često postavljana pitanja o snimanju na PS4
Kako zaustaviti snimanje igranja na PS4?
Da biste zaustavili snimanje igranja pomoću zadanog snimača vašeg PS4, samo trebate dugo pritisnuti gumb Dijeli. Nakon što pritisnete ovu tipku, na zaslonu ćete vidjeti opciju Zaustavi snimanje. Pritisnite ga da biste ga primijenili.
Trebam li poseban softver za korištenje kartice za snimanje na svom PS4?
Da. U osnovi trebate poseban program poput OBS-a kako bi kartica za snimanje ispravno radila s vašim PS4. Osim toga, trebat će vam i zaslon te odgovarajući kabeli i konektori, poput HDMI i USB kabela, kako biste uspješno snimali ekran putem capture carda.
Koja su ograničenja za snimanje na PS4 na ugrađeni snimač?
Istina je da ugrađena značajka snimanja na PS4 ima ograničenja snimanja. Najčešća ograničenja su u duljini i kvaliteti snimljenog igranja.
Zaključak
To su upute o tome kako snimati na PS4. Možete snimati pomoću ugrađene funkcije konzole, kartice za snimanje i specijaliziranog softvera namijenjenog snimanju ekrana. No nemojte zanemariti ograničenja ugrađenog snimača, koja vas sprječavaju da snimate dulje i kvalitetnije videozapise. Isto tako, i kartice za snimanje mogu imati ograničenja povezana s hardverom i kapacitetom pohrane vašeg računala. Stoga, ako ne želite da vam ta ograničenja stvaraju probleme, odaberite FVC Screen Recorder kao svoje najbolje rješenje.
-
 Kako snimiti epske vratolomije, spojke ili tutorijale na Minecraftu
 Želite li znati kako snimiti svoje vratolomije na Minecraftu? Zatim pročitajte ovaj članak kako vam nudimo.
-
 Kako snimati na PS5 na 2 ultimativna načina bez ograničenja
 Ovaj će vam članak pokazati sjajne načine da naučite kako snimati igranje na PS5. Zadani i neograničeni načini nalaze se u ovom vodiču za članke! Pa pročitajte sada!
-
 Detaljan vodič o tome kako reproducirati MKV datoteke na PS4 [ažurirano 2024.]
 Čitajući ovaj članak naučit ćete neke načine kako igrati MKV na PS4 i kako pretvoriti video datoteku u slučaju da se video neće reproducirati.