


Kép átméretezése a Powerpointban a minőség romlása nélkül
Manapság sokan mindent digitálisan mutatnak be, nem pedig a hagyományos módon – már a járvány előtt is így volt. Ahogy a jövő felé haladunk, a technológia és a szoftverek segítségével minden könnyebbé válhat az üzleti bemutatók, vizuális segédanyagok, ötletek, értékesítési anyagok stb. prezentálásában, és mindezt megteheti a PowerPointban. Ezt az előadószoftvert használhatja az eszközén a fenti célokra – ráadásul sok felhasználó megoldást keres arra, hogyan méretezze át a képet ebben a programban. Szeretné megtanulni, hogyan lehet átméretezni egy képet PowerPointban? Olvassa tovább ezt a cikket, mert összegyűjtöttük mindazt az információt, amit erről a témáról tudnia kell.
1. rész: Kép átméretezése a PowerPointban 2 hatékony felhasználási mód használatával [egyedileg és többszörösen]
Ha minden dián módosítja a kép hosszát és magasságát, beállíthat egy pontos méretet, vagy módosíthatja a képarányt a keret húzásával. Bár itt természetesen megteheti, némi torzulás történik a kép méretének megváltoztatásakor. Tehát, ha tudni szeretné, hogyan lehet átméretezni a képeket több dián a PowerPointban vagy külön-külön, kövesse az alábbi lépéseket. Kövesse ennek megfelelően, és kevesebb mint egy perc alatt átméretezi.
3 módszer a kép átméretezésére a PowerPointban [egyedileg és kötegesen]
1. Kép átméretezése a keret húzásával
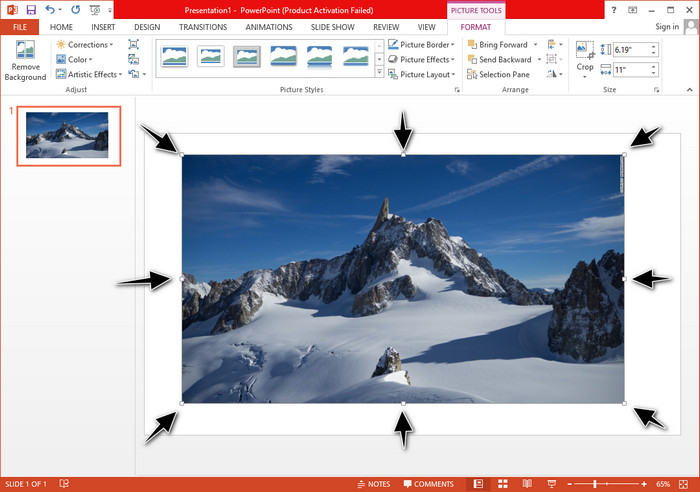
Miután feltöltötte a képet a PowerPointba, apró pontokat fog látni rajta. Ezek a képen lévő pontok állíthatóak, ami azt jelenti, hogy szabadon átméretezheti a fotót az Ön specifikációja szerint. Miután megváltoztatta a hosszt, a magasság nem követi a méret beállítását.
2. Kép átméretezése a magasság és a szélesség módosításával
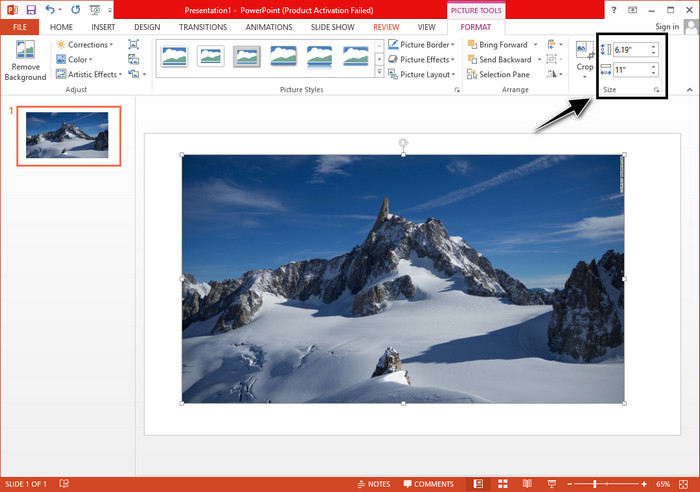
Amikor feltölti a képet a PowerPointba, kattintson a Formátum fülre a kép adott méretre való módosításához. A felső részen felveheti a pontos magasságát és hosszát. Ha azonban megváltoztatta az egyik mérést, a másik automatikusan be lesz állítva, mivel a fő képarány aktív.
3. Kép csoportos átméretezése PowerPointban
Mit kell tennie, ha több képet szeretne módosítani egyetlen PowerPoint-dián? Ehhez először fel kell töltenie a fotókat a diára. Miután több képet is elhelyezett a dián, nyomja le és tartsa lenyomva a Control billentyűt, majd jelölje ki az összes képet, amelyet át szeretne méretezni. Ezután kövesse a fent bemutatott átméretezési módszerek valamelyikét: húzza a keretet, vagy módosítsa a numerikus értékeket.
2. rész: Kép átméretezése a PowerPointban ingyenes torzítás nélkül [Webszolgáltatás]
Hogyan lehet úgy átméretezni a képet PowerPointban, hogy ne torzuljon? Használhatja a FVC Free Image Upscaler eszközt, amely automatikusan átméretezi a feltöltött fotót, amelyet PowerPoint-prezentációban szeretne használni. Annak ellenére, hogy online eszközről van szó, teljesítménye jobb, mint a PowerPoint saját átméretezője, mert PPI-t hoz létre, hogy megakadályozza a kép elmosódását még akkor is, ha át kell méreteznie. Kíváncsi rá, vagy szeretné használni ezt az eszközt, és máris elkezdené a képei átméretezését? Ebben az esetben kövesse az alábbi lépéseket, amelyek segítségével a lehető legegyszerűbben megtanulhatja az eszköz használatát.
A FVC Free Image Upscaler használatának előnyei a fotó átméretezésére:
◆ Ezt a fotóátméretezőt ingyen használhatja, minőségromlás nélkül.
◆ A feltölthető formátumok széles skáláját támogatja.
◆ Hatékony mesterséges intelligencia technológiával rendelkezik, amely segíthet a fényképek átméretezésében.
◆ Ezt a webes megoldást az asztali számítógépén található bármely keresőmotorral elérheti.
◆ Használat előtt nincs szükség telepítésre vagy letöltésre.
A torzítás nélküli átméretezés lépései az FVC Free Image Upscaler használatával:
1. lépés. Nyissa meg ennek az átméretezőnek a weboldalát erre a linkre kattintva.
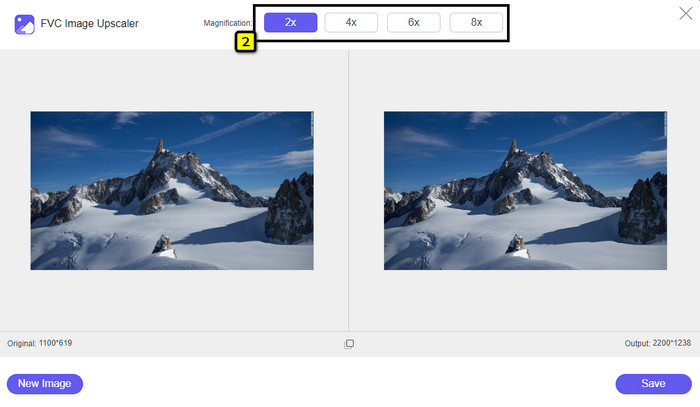
2. lépés. Amikor megnyílik a weboldal, kattintson az Upload Photo gombra, hogy hozzáadja azt a fotót, amelyet át szeretne méretezni és PowerPoint-prezentációban használni.
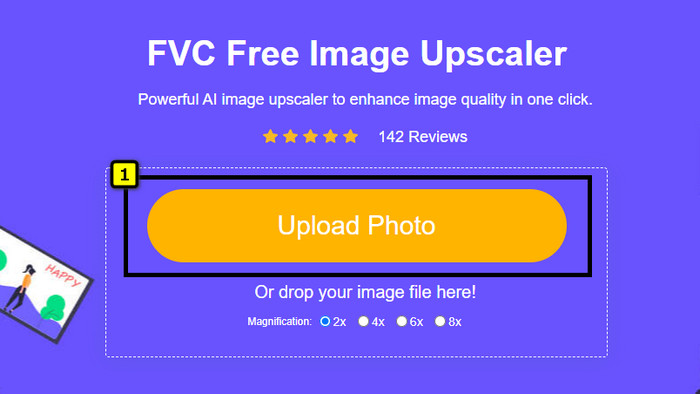
3. lépés. A kép feltöltése után várja meg, amíg betöltődik. Válassza ki a kívánt nagyítást a képre, a következő opciók közül: 2x, 4x, 6x vagy 8x.
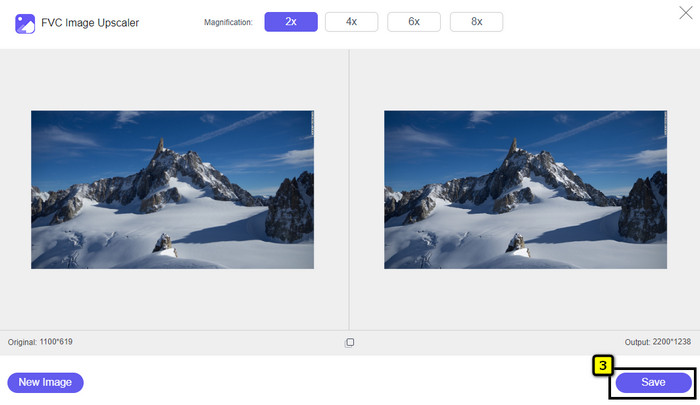
4. lépés. Kattintson a Save gombra, hogy exportálja az itt átméretezett képet. Ilyen egyszerű: a kép torzítás és elmosódás nélkül kerül a helyi meghajtójára.
3. rész. GYIK a kép átméretezéséről a PowerPointban
Mekkora a fénykép maximális hossza és magassága a Powerpointban?
Ha a képet a Powerpoint maximális méretére méretezi át szélesvásznúként, a képpontot 1280 x 720 képpontra állíthatja. De amikor a képernyőn jeleníti meg, akkor követnie kell a 16:9-es képarányt, ami 1920 x 1080 px.
Van valami parancsikon a fénykép átméretezésére a PowerPointban?
A kép magasságának módosításához tartsa lenyomva a Shift billentyűt, majd kattintson a felfelé mutató nyílra a magasság növeléséhez és a lefelé mutató nyílra a magasság csökkentéséhez. Azok számára, akik meg akarják változtatni a kép szélességét, ismét lenyomva tarthatják a Shift billentyűt, majd a jobbra nyilat megnyomásával növelhetik, a balra mutató nyilat pedig csökkenthetik a szélesség igénye szerint.
Miért lett elmosódott a képem, miután átméreteztem a PowerPointban?
Amikor a kép átméretezése előtt áll a PowerPointban, a kép ki van húzva, és előfordulhat, hogy a kép elmosódott lesz. De ha olyan képszerkesztőt szeretne, amely képes pixeleket létrehozni, miközben módosítja a méretet, akkor elkerülheti, hogy a PowerPointban pixeles kép legyen.
Használhatok GIF-eket a Powerpointhoz?
Igen, a PowerPoint minden diáján használhat GIF-eket. Ha azonban a GIF mérete nem a kívánt méretben van előnyben részesítve, akkor át kell méreteznie. Az átméretezett GIF eredménye pedig elmosódott vagy pixeles lett.
Következtetés
Összefoglalva: háromféle technikát is elsajátíthat a PowerPointban lévő képek átméretezésére, ha követi az ebben a bejegyzésben leírt útmutatót. Noha a programban egyszerűen elvégezhető az átméretezés, előfordulhat, hogy a kép torzul, amikor a méreteit megváltoztatja. Ezt a problémát megoldhatja az általunk bemutatott online eszközzel, mert itt az átméretezett képek nem torzulnak. Az általunk leírt lépések segítségével azt is megtanulhatja, hogyan méretezze át a képet a FVC Free Image Upscaler használatával.
-
 A legjobb Photo Resizer alkalmazás online, offline, Android és iPhone-on
 Melyek a legjobb fényképátméretező alkalmazások? Kattintson az oldalra, hogy megismerje az öt leghatékonyabb fényképátméretező alkalmazást, amellyel javíthatja vagy átméretezheti a fájlt.
-
 Kép átméretezése – Adobe Kép átméretezése [Online és Offline]
 Ha Adobe átméretező képet keres, akkor mi megtaláljuk a megoldást. Tekintse meg alaposan ezt a bejegyzést, hogy megtudja, hogyan lehet átméretezni a képeket az Adobe segítségével számítógépén.
-
 A fénykép átméretezése a Facebookhoz [Gyors és egyszerű lépések]
 Ha problémába ütközik egy nagy méretű kép feltöltése a Facebookra, van megoldásunk. Fejezd be ezt a cikket, hogy megtudd, hogyan lehet átméretezni a fényképeket a Facebook számára.