


Legjobb videoátméretezők a videók tökéletes méretre szabásához a projekthez
A videó átméretezők olyan szoftverek, amelyek segítségével az emberek megváltoztathatják a videofájlok méretét és alakját. Az egyik leggyakoribb dolog, amit a videóátméretezők tehetnek, a videók kivágása. Ez azt jelenti, hogy ki kell venni a videokockából egy új, kisebb képkockaméretet. Ez számos dologban hasznos lehet, például a videótartalom optimalizálása különböző eszközökhöz vagy közösségi média platformokhoz, a keret nem kívánt részeinek kivágása vagy több kivágott videó kombinálása új kompozíciók készítéséhez.
A videószerkesztőknek, a közösségimédia‑felületekért felelős munkatársaknak és mindazoknak, akik rendszeresen tartalmat készítenek, gyakran kell átméretezniük a videókat. A videós tartalmak egyre népszerűbbek, ezért a videó‑átméretezők mára elengedhetetlen eszközzé váltak mindenkinek, aki gyakran dolgozik videófájlokkal. Ha hasonló helyzetben van, és szeretné maximálisan kihasználni a videó‑átméretezők lehetőségeit, ez a cikk önnek szól. Fedezze fel az általunk összeválogatott programokat a videók átméretezéséhez.

1. rész. A legerősebb videóátméretezők különféle funkciókkal
Ha szereti a nagy teljesítményű videoátméretezőket, amelyek képesek a videók kivágására Windows és Mac OS rendszeren, akkor a következő eszközökre támaszkodhat. Ezek a programok garantálják az eredményt és a minőségi kimenetet. Minden további nélkül tekintse meg az alábbi videó átméretezőket.
1. Video Converter Ultimate
Az FVC Video Converter Ultimate egy népszerű szoftver, amely számos videó‑konvertálási és szerkesztési funkciót kínál, többek között a videók átméretezését és levágását. A program segítségével egyszerűen állíthatja a videók képarányát és felbontását a számos előre beállított opció egyikével. A szoftver támogatja az összes fontosabb videóformátumot, többek között az MP4, AVI, MKV formátumokat és sok mást, és egyszerre több videót is át tud méretezni.
Sőt, az FVC videóvágási funkciója is rendkívül hatékony, lehetővé téve a felhasználók számára, hogy könnyen eltávolítsák a videokockák nem kívánt részeit. Ez különféle célokra hasznos lehet, mint például a levéldobozok eltávolítása, a videók különböző képarányokra való átméretezése vagy a nem kívánt elemek eltávolítása a keretből. Mondanom sem kell, hogy képarány-váltóként is működik. Eközben áttekintheti a legfontosabb jellemzőit.
Főbb funkciók:
◆ Videó átméretezése különböző felbontásokra.
◆ Kiváló minőségű kimenet.
◆ Gyors és kötegelt feldolgozás.
1. lépés. Ahhoz, hogy elkezdje használni az FVC Video Converter Ultimate programot a videók levágásához, le kell töltenie és telepítenie kell a programot a számítógépére. Csak kattintson az operációs rendszerének megfelelő Ingyenes letöltés gombra, és kövesse a képernyőn megjelenő utasításokat a program telepítéséhez.
Ingyenes letöltésWindows 7 vagy újabb rendszerreBiztonságos letöltés
Ingyenes letöltésMacOS 10.7 vagy újabb rendszerhezBiztonságos letöltés
2. lépés. Miután a program telepítve van, nyissa meg, majd kattintson a Toolbox fülre, hogy elérje az eszköztárat.
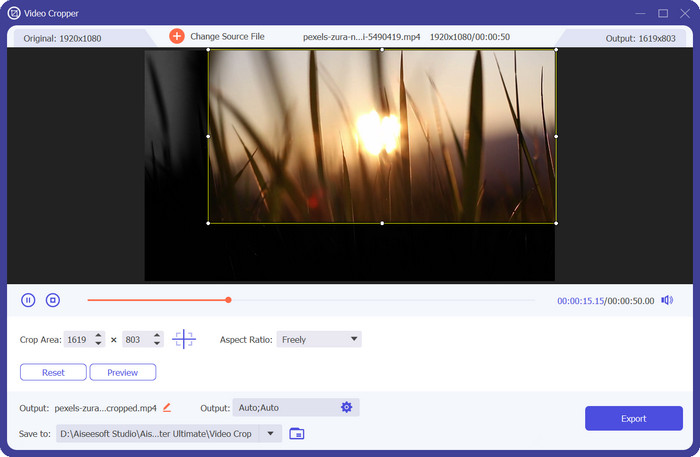
3. lépés. Ott válassza a Video Cropper lehetőséget a vágóeszköz megnyitásához. Kattintson a plusz jelre a Video Cropper opció feltöltési területén, hogy hozzáadja a levágni kívánt videót.
4. lépés. Ezután válassza ki a videó képarányát. A Snapchathez legjobb arány a 9:16 (függőleges). A videó előnézete alatt található egy legördülő menü, ahol kiválaszthatja a kívánt képarányt.
5. lépés. Ha elégedett az eredménnyel, kattintson az Export gombra a felület jobb alsó sarkában, hogy elmentse a levágott videófájlt. Ezután elküldheti a követőinek, vagy közzéteheti Snapchat‑en, hogy megmutassa barátainak, milyen ügyesen szerkeszti a videókat.
2. Premier
A Premiere Pro segítségével a felhasználók körbevághatják a videókat új kompozíciók létrehozásához, eltávolíthatják a nem kívánt elemeket a keretből, vagy átméretezhetik a videókat különböző platformokhoz vagy eszközökhöz. A szoftver támogatja az összes főbb videóformátumot, és számos előre beállított lehetőséget kínál az átméretezéshez és a kivágáshoz, valamint fejlett eszközöket kínál a vágási keret testreszabásához és az eredmények valós idejű előnézetéhez. Ezen kívül más hasznos funkciókat is kínál, például színkorrekciót, speciális effektusokat és hangszerkesztést. Azt is megtudhatja, hogyan módosíthatja a keretméretet a Premiere-ben, mivel ez a program támogatja ezt a funkciót. Most megtudhatja, hogyan vághat ki egy videót a Premiere-ben alább, és ismerje meg a legfontosabb jellemzőit.
Főbb funkciók:
◆ Videófelbontás-váltóként működik.
◆ Hangsávok szerkesztése és keverése.
◆ Különleges effektusok széles skáláját kínálja.
Íme a lépések a képarány módosításához premierben vagy videók kivágásában:
1. lépés. Importálja a videoklipet a Premiere Pro‑ba a File > Import menüpontra kattintva, majd válassza ki a videófájlt. Húzza át a videoklipet a Project panelről az idővonalra.
2. lépés. Válassza ki az idővonalon lévő videoklipet rá kattintva. Lépjen az Effects Control panelre, amely a felület bal felső sarkában található.
3. lépés. Keresse meg a Motion effektet az Effects Control panelen, majd kattintson a háromszög ikonra a kibontásához. Állítsa a Scale beállítást a videó átméretezéséhez. Ezzel a teljes videóképkocka méretét módosítja.
4. lépés. A videó levágásához kattintson a Crop effect opcióra az Effects Control panelen, majd bontsa ki. A csúszkák segítségével állítsa be, mennyit szeretne levágni a videókeret egyes oldalaiból. Pontosabb vezérléshez konkrét értékeket is beírhat a szövegmezőkbe.
5. lépés. Nézze meg az előnézetet a Program Monitor ablakban. Ha nem elégedett a kimenettel, módosítsa tovább a vágási értékeket, amíg el nem éri a kívánt megjelenést. Ha elkészült, exportálja a levágott videót a File > Export menüpontra kattintva, és válassza ki a kívánt kimeneti formátumot és beállításokat.

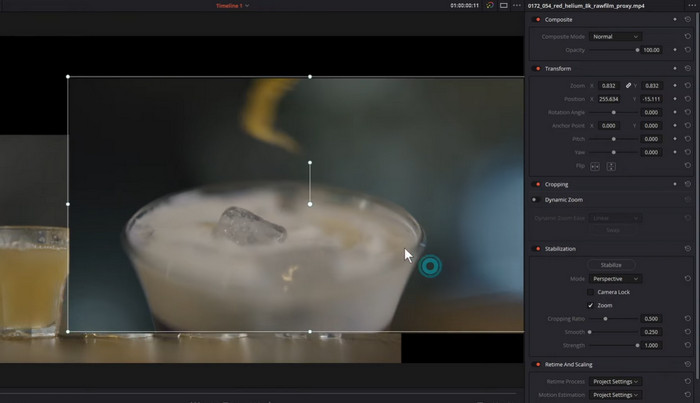
3. DaVinci Resolve
A DaVinci Resolve egy átfogó videószerkesztő szoftver, amely fejlett funkciókat kínál a professzionális videószerkesztők és színezők számára. A DaVinci Resolve egyik kiemelkedő tulajdonsága a precíz és rugalmas vágási képesség, amely lehetővé teszi a felhasználók számára, hogy könnyedén beállítsák videóik keretét és képarányát.
A vágási képességein kívül a DaVinci Resolve számos más hatékony funkciót kínál, beleértve a színkorrekciót, a hangszerkesztést és a speciális speciális effektusokat. Akár nagyjátékfilmet szerkeszt, akár közösségimédia-tartalmat hoz létre, akár vállalati videót készít, a DaVinci Resolve az elképzelése megvalósításához szükséges eszközöket és rugalmasságot kínálja. Erről az eszközről többet tudhat meg a kulcsfontosságú funkciókból és a videó DaVinci Resolve-ban történő kivágásáról szóló útmutatón keresztül.
Főbb funkciók:
◆ Állítsa be a keretet és a képarányt.
◆ Támogatja a főbb videóformátumokat.
◆ Fusion vizuális effektus a kompozícióhoz, 3D nyomon követéshez és kulcsoláshoz.
1. lépés. Nyissa meg a DaVinci Resolve‑ot, és hozzon létre egy új projektet. Importálja a videoklipet a Media Poolba az Import gombra kattintva, majd válassza ki a videófájlt.
2. lépés. Húzza a videoklipet a Media Pool ablakból az idővonalra. Válassza ki az idővonalon lévő videoklipet rá kattintva. Ezután menjen a felület jobb oldalán található Inspector panelre.
3. lépés. Az Inspector panelen kattintson a Crop gombra a vágási vezérlők megjelenítéséhez. Állítsa be a vágó fogantyúkat, hogy eltávolítsa a videókeret nem kívánt részeit. Az Inspector panelen található csúszkákkal számszerűen is megadhatja a vágási értékeket.
4. lépés. Játssza le a videót az előnézeti ablakban, hogy megtekinthesse a levágott verziót. Ha nem elégedett az eredménnyel, finomítsa tovább a vágási értékeket, amíg el nem éri a kívánt megjelenést.
5. lépés. Ha végzett, exportálja a levágott videót az alsó sávban található Deliver fülre kattintva. Válassza ki a kívánt kimeneti formátumot és beállításokat, majd kattintson az Add to Render Queue gombra a videó exportálásához.
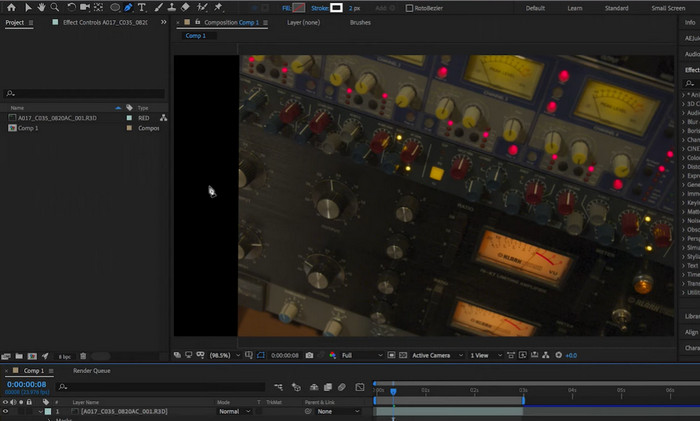
4. After Effects
Az Adobe After Effects egy iparágvezető videószerkesztő szoftver, amely sokoldalúságáról és hatékony szolgáltatásairól ismert. Kiemelkedő funkciói közé tartozik a vágási képessége, amely lehetővé teszi a felhasználók számára, hogy pontosan és egyszerűen állítsák be videóik keretét és képarányát. Az After Effects segítségével a felhasználók levághatják videóikat, hogy eltávolítsák a keret nem kívánt részeit, beállíthatják a képarányt a különböző képernyőkhöz igazítva, vagy akár egyedi videókompozíciókat is készíthetnek. Legyen szó professzionális videószerkesztőről, mozgógrafikus tervezőről vagy hobbiról, az After Effects vágási képességei nélkülözhetetlen eszközzé teszik a videószerkesztéshez és -kompozícióhoz.
1. lépés. Indítsa el az After Effects‑et, és hozzon létre egy új kompozíciót. Adja hozzá a videoklipet a projekthez a File > Import > File menüpontra kattintva. Válassza ki a videófájlt, majd kattintson az Open gombra.
2. lépés. Húzza a videoklipet a Project panelről az idővonalra. Válassza ki a videóréteget az idővonalon rá kattintva. Az Effect Controls panelen nyissa le a Motion legördülőt a Motion vezérlők megjelenítéséhez.
3. lépés. Állítsa be a Scale and Position értékeket, hogy a videót a kívánt méretre és pozícióra vágja.
4. lépés. A videót a Crop effekttel is levághatja. Ehhez menjen az Effect > Video Effects > Transform > Crop menüpontra. Húzza a Crop effektet a videórétegre.
5. lépés. Az Effect Controls panelen a Crop Left, Crop Right, Crop Top és Crop Bottom csúszkákkal állítsa be a vágási értékeket. Játssza le a videót a Kompozíció panelen, hogy megtekinthesse a levágott verziót.
6. lépés. Ha elkészült, exportálja a levágott videót a Composition > Add to Render Queue menüpontra kattintva. Válassza ki a kívánt kimeneti formátumot és beállításokat, majd kattintson a Render gombra a videó exportálásához. Így lehet videókat levágni After Effects‑ben.
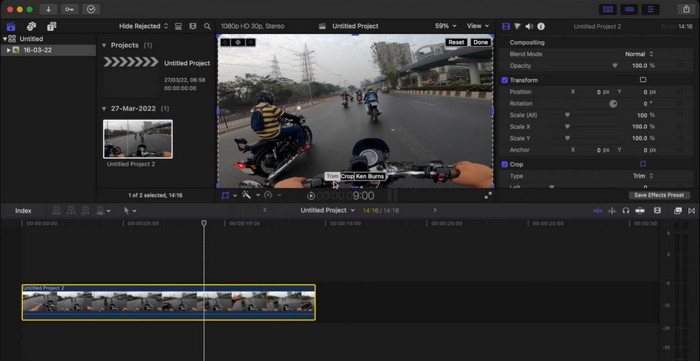
5. Final Cut Pro
Ha szeretné megtanulni, hogyan vághat le egy videót Mac számítógépen, a Final Cut Pro egy hatékony videószerkesztő szoftver, amelyet kizárólag Mac felhasználók számára terveztek. Intuitív kezelőfelületével és fejlett funkcióival a Final Cut Pro megkönnyíti a felhasználók számára, hogy professzionális minőségű videókat készítsenek, a rövid klipektől a teljes hosszúságú filmekig. Segítségével egy közösségi média poszton vagy egy filmes remekművön dolgozhat. A Final Cut Pro vágóeszközei számos lehetőséget kínálnak a tökéletes kompozíció eléréséhez.
Ezért, ha Ön Mac-felhasználó, aki precízen és egyszerűen szeretne kiváló minőségű videókat készíteni, a Final Cut Pro vágási képességei nélkülözhetetlen eszközzé teszik a professzionális eredmények eléréséhez. Sőt, az alábbiakban bemutatjuk, hogyan módosíthatja a videó felbontását a Final Cut Pro-ban és főbb funkcióiban.
Főbb funkciók:
◆ Támogatja a harmadik féltől származó beépülő modulokat.
◆ Robusztus audio-videó szerkesztő eszközök.
◆ Speciális videószerkesztő eszközök.
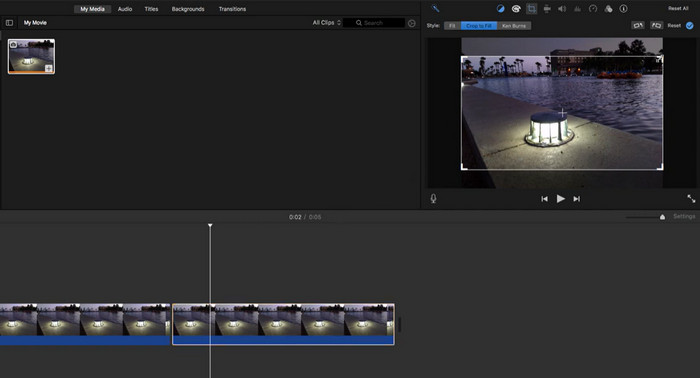
1. lépés. Indítsa el a Final Cut Pro‑t, és nyissa meg azt a projektet, amely a levágni kívánt videoklipet tartalmazza. Válassza ki a videoklipet az idővonalon rá kattintva.
2. lépés. Kattintson a Crop gombra a Viewer ablak bal felső sarkában. Alternatívaként megnyomhatja a Command+4 billentyűkombinációt is a Crop eszköz megnyitásához.
3. lépés. Használja a videókeret körül megjelenő fogantyúkat a vágás beállításához. A Crop Inspector ablakban a vágás méretére és pozíciójára vonatkozó értékeket kézzel is megadhatja.
4. lépés. A levágott videó képarányának módosításához lépjen a Crop Inspector ablak Video Properties szakaszába, és válassza ki a kívánt képarányt a legördülő menüből.
5. lépés. Játssza le a videót a Viewer ablakban, hogy megtekinthesse az eredményt. Ha elégedett vele, mentheti a módosításokat.
6. lépés. A levágott videó mentéséhez menjen a File > Share menüpontra, és válassza ki a kívánt kimeneti formátumot és beállításokat. Végül kattintson a Share gombra a videó exportálásához.
2. rész. Ingyenes videó átméretező eszközök
Igaz, az előző eszközök segítenek levágni a videó oldalait, vagy eltávolítani a videó nem kívánt részeit. Ennek ellenére kissé nehézkes lehet a navigálásuk. Ennek ellenére több más program is megfelel az Ön preferenciáinak. Ezért kutattunk és olyan egyszerű alternatívákat választottunk, amelyeket érdemes lehet megnézni.
1. iMovie
Az iMovie segítségével vághatja, metszeheti és effektekkel láthatja el a videóit, továbbá módosíthatja a színüket, hangjukat és sebességüket. Szöveget, áttűnéseket és zenét is hozzáadhat a videókhoz, sőt, előre elkészített sablonokkal látványos filmelőzeteseket is készíthet. Az Apple termékekkel és szolgáltatásokkal való zökkenőmentes integrációnak köszönhetően az iMovie megkönnyíti a videók megosztását a közösségi médiában, az iCloudban vagy közvetlenül az Apple‑eszközeire. A programról bővebben is tájékozódhat a fő funkciók és a használati útmutató áttanulmányozásával. Ha az iMovie‑t szeretné videók levágására használni, kövesse az alábbi lépéseket.
Főbb funkciók:
◆ Tartalmazzon különféle címsablonokat.
◆ Sima átmenetek hozzáadása a videoklipek között.
◆ Előre megtervezett filmelőzetesek.
1. lépés. Nyissa meg az iMovie‑t a Mac gépén. Importálja a levágni kívánt videót a File > Import Media menüpont kiválasztásával, majd válassza ki a videófájlt.
2. lépés. Húzza a videoklipet az iMovie felületének alján található idővonalra. Az idővonalon lévő klipre kattintva jelölje ki azt.
3. lépés. Kattintson a Crop gombra az előnézeti ablak jobb felső sarkában. A gomb egy négyzetre hasonlít, amelyen két azonos irányba mutató nyíl látható.
4. lépés. Egy vágó téglalap jelenik meg a videoklipen. A téglalap széleinek húzásával kiválaszthatja a videó megtartani kívánt részét.
5. lépés. A téglalapot úgy is mozgathatja, hogy rá kattint, majd a kívánt helyre húzza. Miután kijelölte a megtartani kívánt részt, kattintson a Done gombra a vágás alkalmazásához.
6. lépés. Játssza le a levágott videót az előnézeti ablakban, hogy megnézze, hogyan néz ki. Ha elégedett az eredménnyel, mentse a projektet a File > Save menüponttal, majd exportálja a levágott videót a File > Share menüpontra kattintva.
2. VLC
A VLC Media Player egy sokoldalú médialejátszó, sok olyan funkcióval, amelyeket emberek milliói használnak szerte a világon. A VLC Media Player a legismertebb médialejátszó, mert könnyen használható, és minden olyan eszközzel rendelkezik, amelyre szüksége van a videók lejátszásához, streameléséhez és még szerkesztéséhez is. A VLC Media Player azonban több, mint egy videószerkesztő. Különféle médiaformátumokat is támogat, beleértve a hangot, a videót és a streaminget, és gyakorlatilag bármilyen típusú fájlt le tud játszani. Ráadásul ingyenes és nyílt forráskódú,
Főbb funkciók:
◆ Több platformot támogat.
◆ Speciális lejátszásvezérlők.
◆ Média rögzítése és konvertálása.
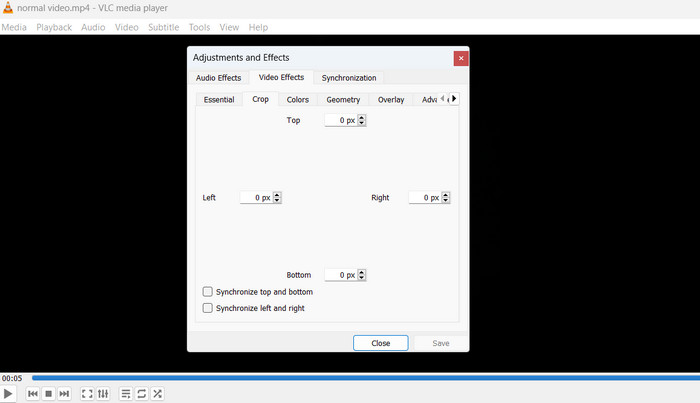
1. lépés. Ha szeretné megtanulni, hogyan lehet videót levágni VLC‑vel, kattintson a Media menüre a VLC Media Player felső menüsorában. Válassza az Open File opciót, és válassza ki a levágni kívánt videófájlt.
2. lépés. Amikor a videó lejátszása megkezdődött, lépjen a felső menüsorban a Tools menüpontra. Ezután kattintson az Effects and Filters lehetőségre. Kattintson a Video Effects, majd a Geometry fülre.
3. lépés. A Crop mező bejelölésével aktiválja a vágási funkciót. A Crop melletti csúszkákkal módosíthatja a levágandó területet. A pixelek számát kézzel is beírhatja a mezőkbe.
4. lépés. Ha elégedett a vágás eredményével, kattintson a Close gombra a módosítások mentéséhez. Végül mentse a levágott videót: a felső menüsorban kattintson a Media menüpontra, válassza a Convert/Save opciót, majd adja meg a célmappát és a fájlformátumot.
3. Kézifék
A Handbrake egy kiváló nyílt forráskódú videó‑transzkóder, amellyel a felhasználók könnyedén konvertálhatják, tömöríthetik és akár vághatják is a videóikat. Ez az ingyenes szoftver lenyűgöző funkciókészlettel rendelkezik, ami miatt amatőrök és profi videósok körében egyaránt népszerű választás. A Handbrake emellett széles körű videoszerkesztő eszköztárat kínál, például vágást (trimming), átméretezést, feliratok hozzáadását, a képkockasebesség módosítását és a levágást (cropping). Így teljes körű megoldást nyújt a videószerkesztéshez. A szoftver használata is könnyen elsajátítható: letisztult, egyszerű felülete megkönnyíti a tájékozódást a kezdők és a haladók számára is. Nézze át az alábbi lépéseket, és tanulja meg, hogyan használhatja a Handbrake‑et a videók méretének módosítására.
Főbb funkciók:
◆ Videó minőségének beállítása.
◆ Várólista exportálás.
◆ Speciális kódolási beállítások.
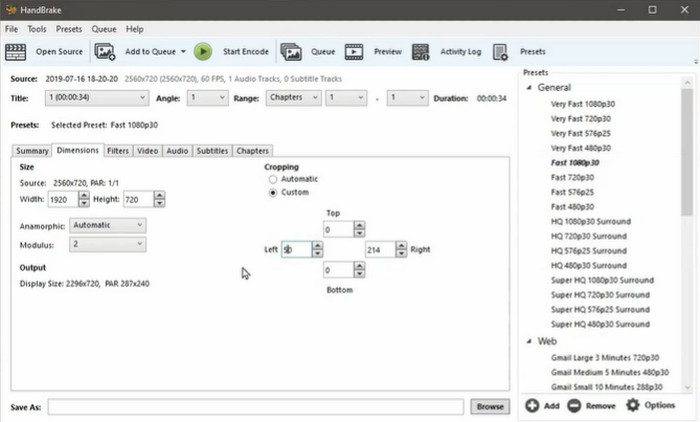
1. lépés. Töltse le és telepítse a Handbrake‑et a hivatalos weboldalról. Ezután nyissa meg a Handbrake‑et, és kattintson az Open Source gombra, hogy betöltse a levágni kívánt videófájlt.
2. lépés. Miután a videó betöltődött, válassza a Crop fület az ablak jobb oldalán. A Crop szakaszban a csúszkákkal állíthatja a vágási területet, vagy kézzel is beírhatja a pixelek számát.
3. lépés. Ha elégedett a vágással, kattintson a Start gombra az átkódolási folyamat elindításához.
4. lépés. Az átkódolás befejezése után a levágott videó a megadott célmappában lesz elmentve.
4. OpenShot
Az OpenShot egy ingyenes és nyílt forráskódú szoftver a videók szerkesztéséhez. Funkciók és eszközök széles skálájával rendelkezik, amelyek segítségével videókat készíthet és szerkeszthet. Működik Windows, macOS és Linux operációs rendszerekkel, és könnyen használhatóvá készült, még azok számára is, akik korábban nem szerkesztettek videókat. Összességében az OpenShot egy hatékony és rugalmas videószerkesztő program, amely eszközök és funkciók széles skáláját kínálja a felhasználóknak olyan videók készítéséhez és szerkesztéséhez, amelyek úgy néznek ki, mint a szakemberek. Nyílt forráskódú szoftverként szintén ingyenesen használható. Ez nagyszerű választássá teszi azok számára, akik alacsony költséggel rendelkeznek videószerkesztéssel.
Főbb funkciók:
◆ Több sávot és réteget tartalmaz.
◆ Beépített címszerkesztővel rendelkezik.
◆ 3D animációs eszközökkel érkezik.
A gyakorlati élmény érdekében kövesse az alábbi útmutatót a videó OpenShot alkalmazásban történő kivágásához:
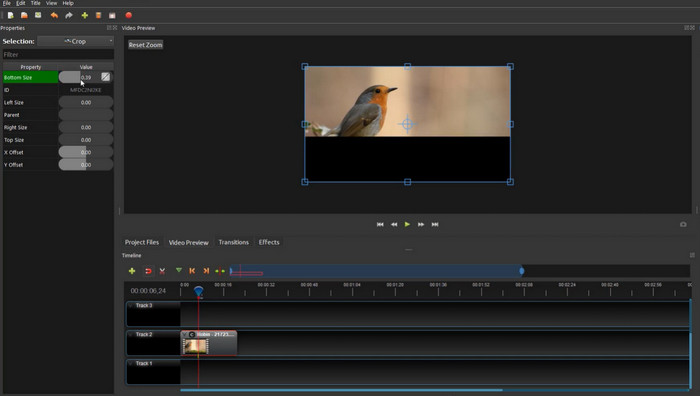
1. lépés. Töltse le az OpenShot programot a hivatalos weboldalról, majd telepítse. Indítsa el az OpenShotot, és hozzon létre egy új projektet.
2. lépés. Kattintson az Import Files gombra, majd válassza ki a levágni kívánt videófájlt. Húzza a videófájlt a Projektfájlok (Project Files) szakaszból az Idővonal (Timeline) területre. Az idővonalon kattintson a videófájlra a jobb egérgombbal, és válassza a Properties lehetőséget.
3. lépés. A Properties ablakban válassza a Crop fület. A vágási terület módosításához használja a csúszkákat, vagy írja be a pixelértékeket.
4. lépés. Ha elégedett a vágással, kattintson az Export Video gombra a videó exportálásához egy másik helyre.
3. rész. Melyiket válasszam
Az alábbi összehasonlító táblázat segítségével segítünk kiválasztani a megfelelő videóátméretezőt az igényeinek megfelelően.
| Eszköz | Minőség | Sebesség | Felhasználói felület | Kötegelt feldolgozás |
| Video Converter Ultimate | Jó | Gyors | Intuitív | Igen |
| Bemutató | Jó | Gyors | Szakmai | Igen |
| DaVinci Resolve | Jó | Gyors | Szakmai | Igen |
| Utóhatás | Jó | Gyors | Szakmai | Igen |
| Final Cut Pro | Jó | Gyors | Szakmai | Igen |
| iMovie | Jó | Gyors | Egyszerű | Igen |
| VLC | Átlagos | Gyors | Egyszerű | Nem |
| Kézifék | Jó | Lassú | Egyszerű | Igen |
| OpenShot | Átlagos | Lassú | Egyszerű | Igen |
4. rész. GYIK a videó átméretezőkkel kapcsolatban
Használhatok videó átméretezőt a videóm képarányának módosítására?
Igen, sok videó átméretező lehetővé teszi a videó képarányának módosítását. Hasznos lehet, ha át kell méretezned a videódat egy adott platformhoz vagy eszközhöz.
Hogyan lehet megváltoztatni a képarányt a Resolve-ban?
A videó képarányát úgy módosíthatja, hogy kiválasztja a klipet az idővonalon, a jobb oldalon lévő Ellenőrző panelre lép, és a Méretezés részben módosítja a Méretezés vagy Vágás értékeket. A képarány módosításához vízszintesen vagy függőlegesen nyújthatja vagy tömörítheti a videót.
Vághatok videókat a Google Diákban?
A videókat nem lehet közvetlenül körülvágni a Google Diákban. Bár a Google Diák lehetővé teszi videók hozzáadását a prezentációhoz, ez elsősorban egy eszköz, és nem kínál speciális videószerkesztési funkciókat, például a vágást.
Következtetés
A videó‑átméretezők olyan hatékony eszközök, amelyek lehetővé teszik a videók méretének módosítását, a képarány megváltoztatását és a fájlformátumok közötti konvertálást. Bár számos videó‑átméretező áll rendelkezésre, mindegyiknek megvannak a maga erősségei és gyengeségei. Ha összehasonlítja a különböző videó‑átméretezőket, és azt választja, amelyik a legjobban megfelel az igényeinek, biztos lehet benne, hogy a videói optimálisan fognak megjelenni azokon a platformokon és eszközökön, ahol meg szeretné osztani őket.
-
 Az 5 legjobb GIF-átméretező, amely minden platformon elérhető [2023]
 Szeretné tudni, hogy milyen GIF-átméretezőket használhat? Ebben az esetben az alábbi információk azokról az átméretezőkről szólnak, amelyeket minden platformon használhat GIF-jein.
-
 Könnyű körbevágás: A TikTok-videó körbevágása a teljes elkötelezettség érdekében
 Egyszerű oktatóanyagunk segítségével megtudhatja, hogyan vághatja le TikTok-videóit! Tetszetősebb videókat készíthet néhány érintéssel és simítással.
-
 Könnyű körbevágás: A TikTok-videó körbevágása a teljes elkötelezettség érdekében
 Egyszerű oktatóanyagunk segítségével megtudhatja, hogyan vághatja le TikTok-videóit! Tetszetősebb videókat készíthet néhány érintéssel és simítással.