

Photoshopで透かしを削除する方法の詳細ガイド
Photoshop はカジュアルユーザーからプロまで幅広く利用されている高機能な写真編集ツールです。「写真からウォーターマークを削除できるのか」と疑問に思っているなら、その答えは「はい」です。Photoshop には豊富なレタッチ機能が備わっており、ウォーターマークを削除するには十分な性能があります。これらのツールを使えば、画像から不要な文字やロゴ、オーバーレイなどを効果的に取り除くことができます。本ガイドでは、写真のPhotoshop でウォーターマークを削除する方法を解説します。あわせて、Photoshop に代わる優れた代替ツールも紹介します。さっそく、ウォーターマークのないクリーンな画像を実現するための選択肢を見ていきましょう。

パート1. Photoshopで透かしを削除する6つのツール
Photoshop では、写真の透かしを削除する方法が複数用意されており、それぞれ制御、精度、使いやすさのレベルが異なります。
このセクションでは、写真から透かしを削除するのに役立つPhotoshopの最も効果的なツールを6つご紹介します。スポット修復ブラシやコンテンツに応じた塗りつぶしなどの自動補正ツールから、コピースタンプツールやパッチツールなどのより実践的なオプションまで、それぞれの方法は画像の複雑さや背景に応じて特定の目的を果たします。
また、AI技術を活用した「ジェネレーティブフィル」や新しい「削除ツール」といった高度なツールもご紹介しています。Photoshopで透かしを削除する手順は以下のとおりです。
方法1. スポット修復ブラシツールを使用する
Photoshopのスポット修復ブラシツールは、透かしを素早く簡単に削除できる頼りになるソリューションの一つです。初心者にもプロにも最適なツールです。不要な透かしの上にペイントすると、周囲のピクセルがインテリジェントにブレンドされます。Photoshopでスポット修復ブラシツールを使って透かしを削除する方法は以下の通りです。
手順 1. Photoshop を起動し、ファイルタブから開くを選択して、削除したいウォーターマークが入った写真を読み込みます。
手順 2. 写真が読み込まれたら、左側のツールバーからスポット修復ブラシツールを選択します。
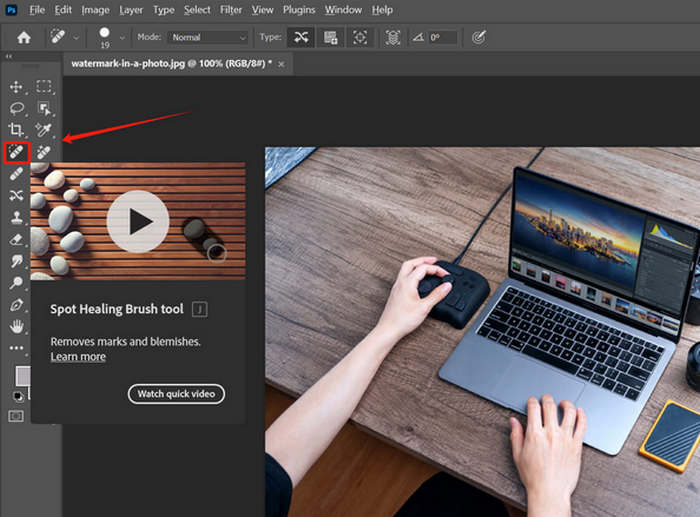
手順 3. 画面上部のメニューでブラシサイズをウォーターマークより少し大きめに調整します。そのままウォーターマーク部分をなぞって塗りつぶします。Photoshop が周囲のピクセルをもとに自動で馴染ませてくれます。
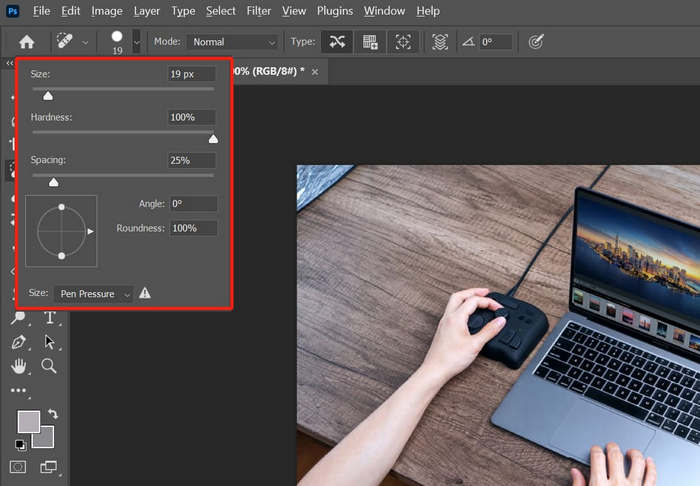
結果が不自然に見える場合は、ブラシの硬度を下げて、より柔らかい効果を実現します。
方法2. クローンスタンプツールを使用する
より高度なコントロールと精度を求めるユーザーには、クローンスタンプツールが定番の人気ツールです。このPhotoshopツールを使うと、画像の不要な部分を手動でサンプリングし、透かし領域にクローンすることができます。多少の時間とスキルは必要になるかもしれませんが、最終的な仕上がりを完全にコントロールできるため、複雑な背景やパターン化された背景の透かしを削除するのに最適な方法です。Photoshopでクローンスタンプツールを使用して透かしを削除する手順は次のとおりです。
削除したい透かしが含まれている写真をすでにインポートしていると仮定します。
手順 1. 左側のツールバーからコピースタンプツールを選択します。
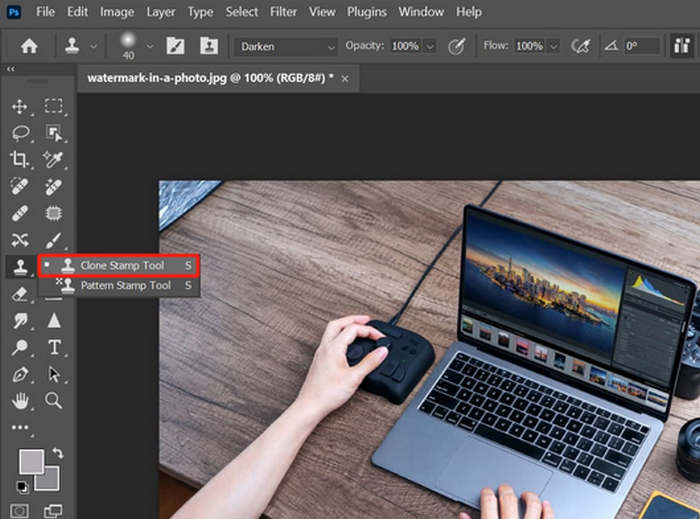
手順 2. Alt キーを押しながら、ウォーターマークの近くにあるきれいな部分をクリックしてサンプリングします。
手順 3. Alt キーを離し、ウォーターマーク部分を塗りつぶすようにペイントします。
方法3. パッチツールを使用する
Photoshopの透かし除去ツールとして、パッチツールも挙げられます。このツールは、選択範囲の柔軟性とピクセル置換の精度を兼ね備えています。透かしの周囲を描画し、選択範囲を置換したい領域までドラッグするだけです。大きな透かしや不規則な形状の透かしを扱う際に最適で、操作性とコントロール性のバランスが取れています。以下は、Photoshopでパッチツールを使用して透かしを除去する方法のガイドです。
手順 1. ツールバーの修復ツールグループの中からパッチツールを選択します。
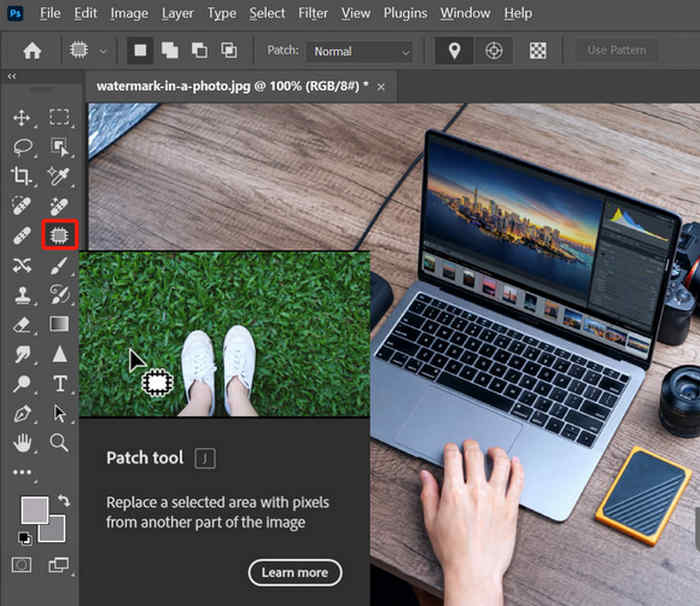
手順 2. 次に、ウォーターマークの周囲をフリーハンドで囲むように選択します。
手順 3. 続いて、その選択範囲を質感が似ている近くのきれいな部分までドラッグします。マウスを離すと、Photoshop が自動的にその領域をパッチ処理します。
背景が不明な場合は、ズームインしてブレンドを確認し、必要に応じて繰り返します。
方法4. コンテンツに応じた塗りつぶしを使用する
Photoshopで写真の透かしを削除する次の方法は、「コンテンツに応じた塗りつぶし」です。この方法は、周囲の領域を分析し、透かしを削除した部分の空間を塗りつぶします。特に、空、壁、葉など、背景が一定である場合に効果的です。調整可能な設定とライブプレビューにより、ユーザーはシームレスなブレンドを実現するための微調整が可能です。以下は、Photoshopで「コンテンツに応じた塗りつぶし」を使用して透かしを削除する詳細な手順です。
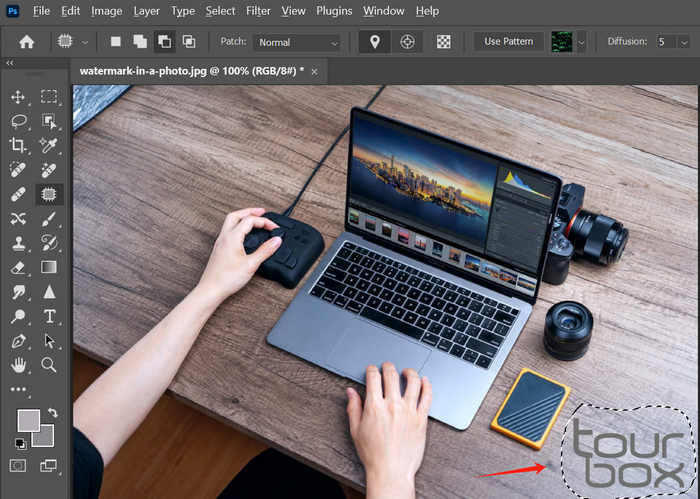
手順 1. 長方形選択ツールなどの選択ツールを使って、ウォーターマーク部分を選択します。
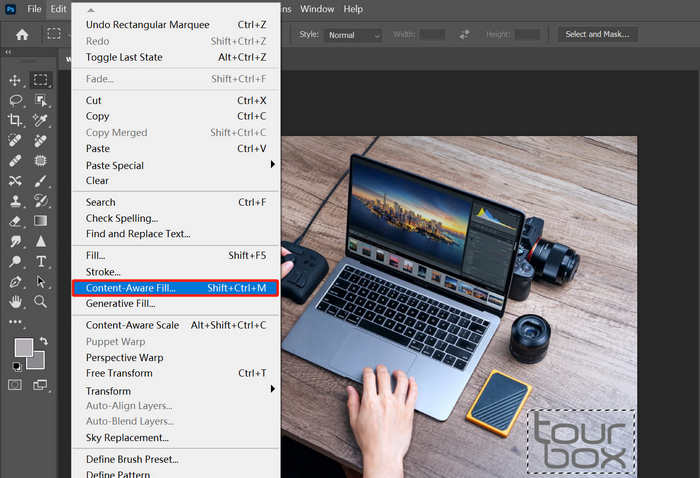
手順 2. 編集メニューからコンテンツに応じた塗りつぶしを選択します。新しいパネルが表示されるので、必要に応じてサンプリング範囲オプションや塗りつぶし設定をプレビューしながら調整します。
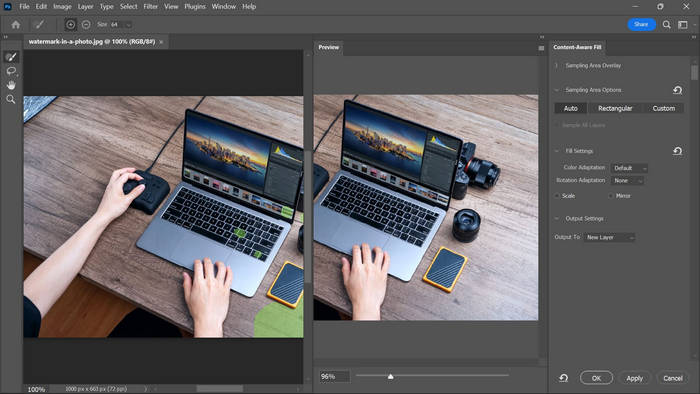
手順 3. 最後に、OKをクリックして変更を適用します。
選択を元に戻すには、Ctrl+d または Command+d をクリックします。
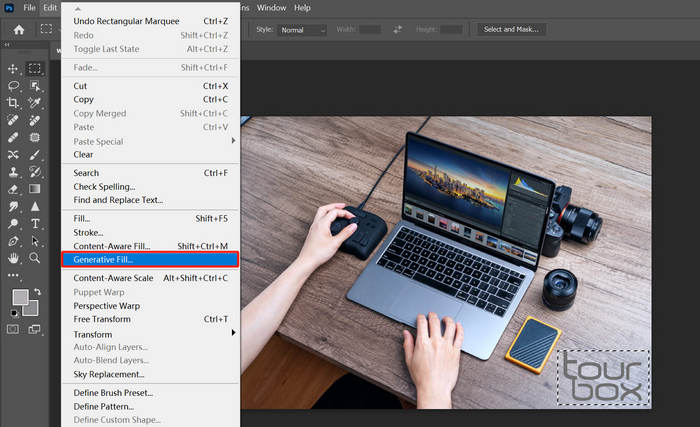
方法5. ジェネレーティブフィルの使用
標準ツールでは不十分な場合、Photoshopには写真の透かしを削除できるAI搭載ツール「ジェネレーティブフィル」があります。この高度な手法は、機械学習を用いて透かしがあった領域をインテリジェントに再構築し、細部までこだわった環境やテクスチャのある環境でも、最も自然でリアルな仕上がりを実現します。以下は、Photoshopのジェネレーティブツールを使って透かしを削除する手順です。
手順 1. まず、画像をキャンバス上にドラッグ&ドロップして開きます。
手順 2. カラー範囲や投げなわツールを使って、ウォーターマークを選択します。
手順 3. 次に、ウィンドウメニューからコンテキストタスクバーを表示します。
手順 4. そこで生成塗りつぶし(Generative Fill)ボタンをクリックし、生成を実行します。
手順 5. しばらく待つと、3 つの候補が生成されます。その中から好みの仕上がりを選択します。
方法6. 削除ツールを使用する
Photoshop の「削除ツール(Remove Tool)」は、画像からウォーターマークを削除するのに使える、もうひとつの強力な機能です。その名前が示す通り、不要な要素を簡単に消去するために設計されています。左側のツールバーからツールを選択し、ブラシサイズを調整して、ウォーターマークの上を直接なぞるだけで OK です。より詳しい Photoshop でのウォーターマーク削除手順については、以下を参照してください。
手順 1. ツールバーから削除ツール(Remove Tool)を選択します。
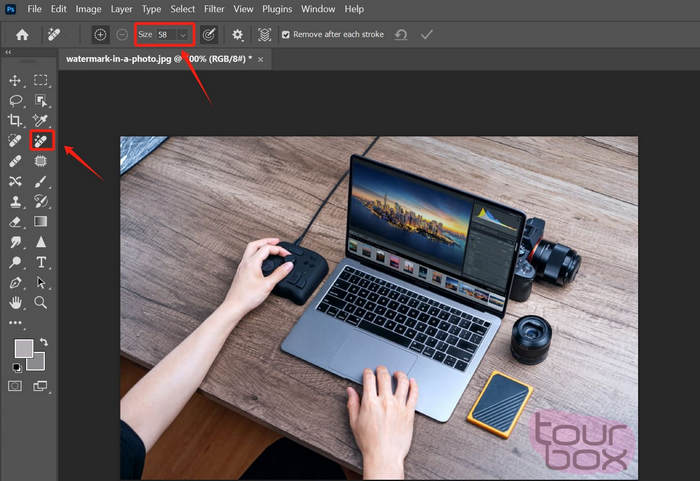
手順 2. その後、必要に応じてブラシサイズを調整し、ウォーターマーク部分を塗りつぶすようになぞります。
手順 3. マウスボタンを離すと、Photoshop が自動的にその領域を削除し、周囲になじむように補完します。
この方法は、迅速かつ簡単なだけでなく、写真内の人物や物体などの他の邪魔なものを取り除くのにも効果的です。
パート2. Photoshopの透かし除去ツールの代替品 - 作業を簡素化
Photoshop は高機能な分、操作が複雑で初心者にはやや扱いづらい場合があります。そこで、特に写真からウォーターマークを削除する用途において、Photoshop に近い機能を備えた代替ツールとしておすすめなのが、FVC Free Watermark Removerです。これは主に写真からウォーターマークを簡単に取り除けることで知られる Web ベースのツールです。FVC は JPG/JPEG、PNG、BMP など一般的な画像形式に対応しており、さまざまな形式の画像から柔軟にウォーターマークを削除できます。さらに、ウォーターマークを選択・消去する方法も複数用意されています。多角形選択で輪郭を描いたり、投げなわツールを使ったり、ブラシでウォーターマーク部分をなぞったりできます。これにより、ウォーターマークの形状やサイズに合わせて、選択範囲を細かく調整しやすくなっています。
主な特徴:
• 写真からテキスト、画像、ロゴの透かしを削除します。
・JPG、JPEG、PNG、BMP 形式に対応。
• 透かしを削除した後も元の画像の品質を維持します。
• ブラシ、なげなわ、または多角形のアウトラインを使用して透かし領域を選択します。
• 透かしを削除する前または削除した後に画像をトリミングします。
• 消しゴムツールを使用して領域を消去し、再選択します。
• Windows および macOS と互換性があります。
以下では、FVC を使って Photoshop の代わりにウォーターマークを削除する手順を紹介します。
手順 1. まず、ツールの公式サイトにアクセスする必要があります。そのため、検索エンジンで「FVC Free Watermark Remover」と検索してください。
手順 2. サイトを開いたら、画像をアップロードボタンをクリックして、ウォーターマークを削除したい写真を読み込みます。
手順 3. 画面上部にある複数のオプションから、ウォーターマークを削除するのに使いたいツールを選びます。ここでは例としてブラシツールを使用し、カーソルを動かしてウォーターマーク部分を塗りつぶしました。選択範囲を覆い終えたら、上部の削除ボタンをクリックし、その後保存をクリックして画像をダウンロードします。
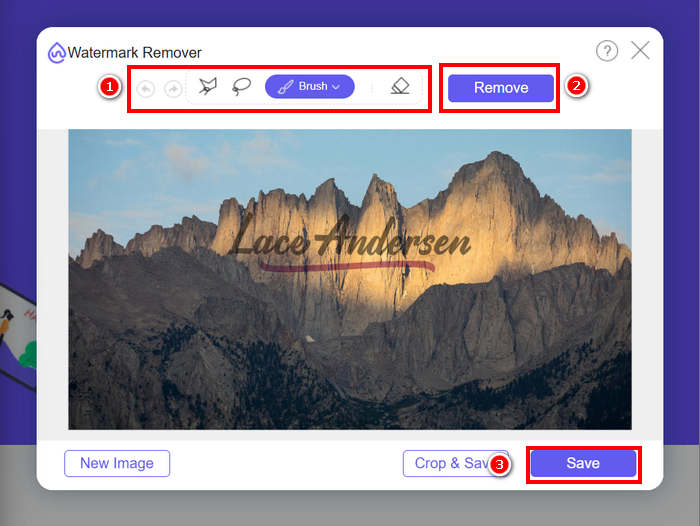
透かしを削除する際は、透かしの形状に合ったツールを選択してください。小さな形状や凹凸のある形状の場合は、ブラシツールが最適です。透かしが曲線や丸みを帯びている場合は、なげなわツールの方が適しています。直線や角のある形状の場合は、多角形ツールを使用するとより正確な制御が可能です。
パート3. Photoshopで写真から透かしを削除する方法に関するよくある質問
透かしを削除するときに最良の結果を得るには、どの Photoshop ツールを使用すればよいですか?
透かしの形状と配置によって異なります。小さな透かしやシンプルな透かしの場合は、スポット修復ブラシをご利用ください。より細かいコントロールが必要な場合は、コピースタンプツールまたはパッチツールが最適です。複雑な背景の場合は、生成塗りつぶしツールや削除ツールなどのAI搭載ツールを使用すると、より自然な仕上がりになることが多いです。
透かしを削除するのに Photoshop よりも簡単な代替手段はありますか?
はい、Photoshopで透かしを削除するのが難しい場合は、FVC Free Watermark Removerのようなよりシンプルなツールを試してみてください。これはウェブベースのツールで、ブラシ、アウトライン、または投げ縄を使って透かしを囲むことで透かしを削除でき、その後は自動的に透かしが削除されます。
Photoshop で写真から水滴を除去するにはどうすればよいでしょうか?
「イメージ」>「色調補正」>「レベル補正」と進むと簡単に調整できます。レベル補正ウィンドウでスライダーを調整して水滴を明るくし、周囲を暗くすることで、水滴を効果的に分離できます。
結論
まとめると、Photoshop には写真からウォーターマークを削除するための有効な機能がいくつか用意されています。しかし、それぞれに制限があったり、初心者にはややわかりにくかったりする面もあります。そこでおすすめなのが、誰でも簡単かつ効率的に使える FVC Image Watermark Remover です。ぜひ一度試してみてください。
-
 Photoshop で切り抜く方法: 初心者向けガイド [2025]
 このわかりやすいガイドで、Photoshop で画像をトリミングする方法を学びましょう。また、写真をトリミングするための領域の選択方法、アスペクト比の調整方法なども学びます。
-
 3つの方法を使用して写真の画像をシャープにする方法[クイックチュートリアル]
 鮮明でない画像に問題がありますか?ここでは、追加した 3 つの方法を使用して、Photoshop で画像をシャープにする方法を紹介します。
-
 Photoshopで透かしを追加する方法【初心者向けガイド】
 Photoshopのビデオに透かしを追加する方法を知りたいですか?その場合、この記事はあなたが知る必要があることをあなたに提供します。