


完全なレビュー: Google ドライブは写真を圧縮しますか?
一部のウェブサイトでは、挿入する画像の幅と高さに制限があります。そのため、画像のサイズを拡大または縮小する必要がある状況に遭遇することは避けられません。画像を扱うとなると、まず思い浮かぶのは、この業界のエキスパートであるPhotoshopでしょう。Photoshopは豊富な機能で知られています。プロにとって、Photoshopは画像のサイズ変更に最適な選択肢であることは間違いありません。しかし、初心者にとっては、必要な機能が見つからずに困ってしまうかもしれません。
それなら大丈夫です。この記事では、Photoshopで画像を縮小する方法について、最も詳しいガイドを用意しています。もっと急ぎの作業がある場合は、この記事で紹介している別の画像編集ツールの利用も検討してみてください。

パート1. Photoshopで画像のサイズを変更する方法
まず、Photoshop を使用して画像のサイズを変更する方法を見てみましょう。
画像のサイズを変更する手順と縮小する手順は若干異なる場合があることにご注意ください。そのため、このステップバイステップガイドは2つのパートに分かれています。画像のサイズを縮小するための具体的なガイドラインは、次のセクションで説明します。
ステップ1. Photoshop を起動し、ファイル > 開く を選択して、サイズ変更したい画像を選びます。
ステップ2. メニューからイメージ > 画像解像度(Image Size)を選択します。
ステップ3. 画像解像度(Image Size)ダイアログボックスで、希望するピクセル数、ドキュメントサイズ、または解像度を入力します。
ステップ4. 確認する前に、再サンプル(Resampling Method)を選択します。
Bicubic(バイキュービック): なめらかなグラデーションに最適で、ピクセルの平均値を計算して高精度な結果を得られます。
Bicubic Smoother(バイキュービック法(滑らか)): 特にノイズのある画像を拡大する際に適しており、よりソフトな見た目になります。
ステップ5. OKをクリックして変更を適用します。
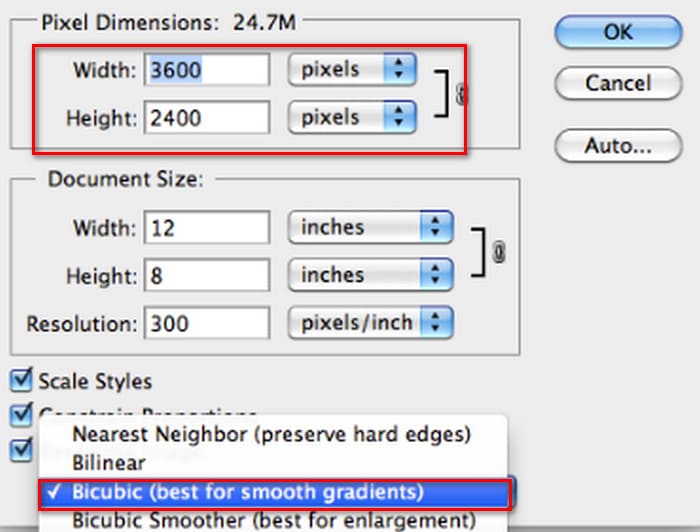
画像の幅と高さを変更できました。ただし、これにより画像ファイルのサイズが大きくなる可能性があるのでご注意ください。アスペクト比に注意しながら、画像ファイルのサイズがプラットフォームの要件を満たしていることを必ずご確認ください。
パート2. Photoshopで画像を縮小する方法
このセクションでは、Photoshop で画像のサイズを縮小する方法に焦点を当てます。
ステップ1. Photoshop を起動し、ファイル > 開く に進んで編集したい画像を選択します。
ステップ2. イメージ > 画像解像度(Image Size)を選択します。すると、画像解像度(Image Size)ダイアログボックスが開きます。
ステップ3. 用途に応じて、ピクセル数、ドキュメントサイズ、または解像度の新しい値を入力します。
ステップ4. 再サンプル(Resampling Method)を選択します。
Bicubic(バイキュービック): なめらかなグラデーションに適しており、周囲のピクセル情報を用いて高精度な結果を生成します。
Bicubic Sharper(バイキュービック法(シャープ)): 画像サイズを縮小しつつ、シャープなディテールを保ちたい場合に推奨されます。もしシャープさが強すぎると感じたら、通常の Bicubic に戻してください。
ステップ5. OKをクリックして変更を適用し、画像のサイズを変更します。
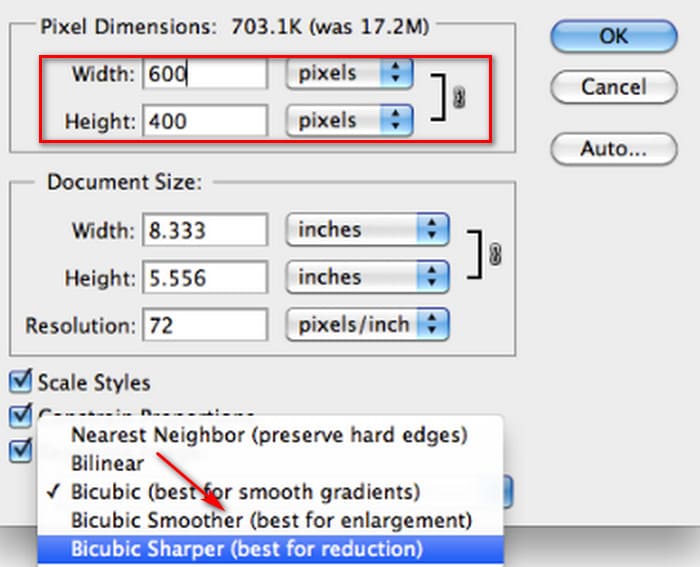
これで、元の画像のサイズを縮小できました。ただし、最初の部分と同様に、操作完了後には画像ファイルのサイズが大きく変化していることに気付くでしょう。これは主に、サイズが小さく圧縮されたことに反映されています。
画質が低下している可能性がある点には注意が必要です。もし見づらいと感じるほど劣化している場合は、画像高画質化ツールを使って再度修正することができます。
パート3. Photoshopで画像サイズを一括変更する方法
Photoshopで画像のサイズを変更するには、かなりの手順が必要です。処理が必要な画像がたくさんある場合、それらを一つずつPhotoshopにドラッグして編集するのは非常に時間がかかり、面倒です。幸いなことに、画像のサイズを一括で縮小する別の方法があります。
Photoshop で画像サイズを一括縮小する方法を説明します。
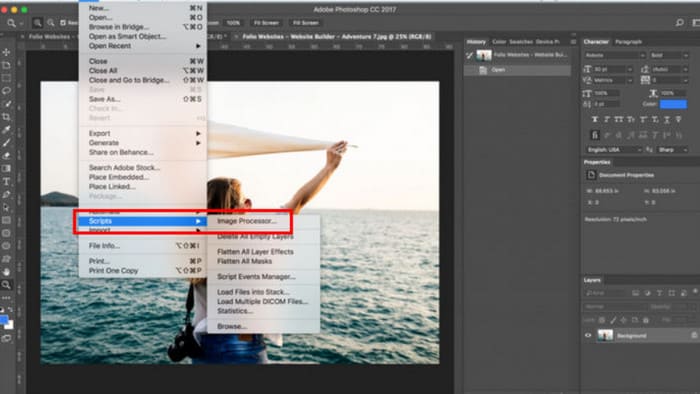
ステップ1. まず、一括圧縮したい写真をすべて1つのフォルダーにまとめます。
ステップ2. Photoshop を起動し、ファイルメニューからスクリプトを選び、イメージプロセッサー(Image Processor)を選択します。
ステップ3. 処理する画像の選択(Select the images)の下にあるフォルダーを選択(Select Folder)をクリックし、圧縮したい写真を取り込みます。
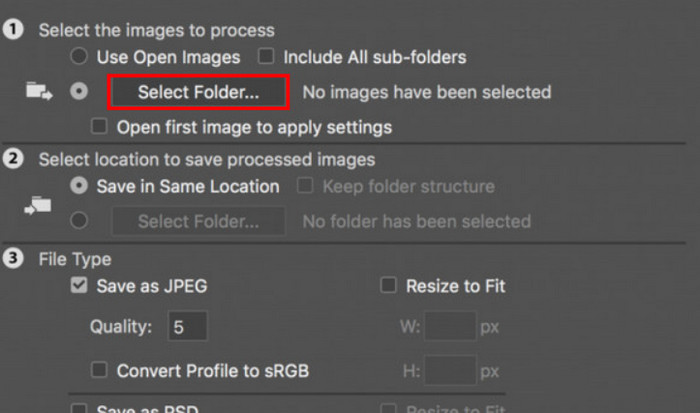
ステップ4. Photoshop は元のフォルダー内に、新しく圧縮画像用のフォルダーを自動で作成します。
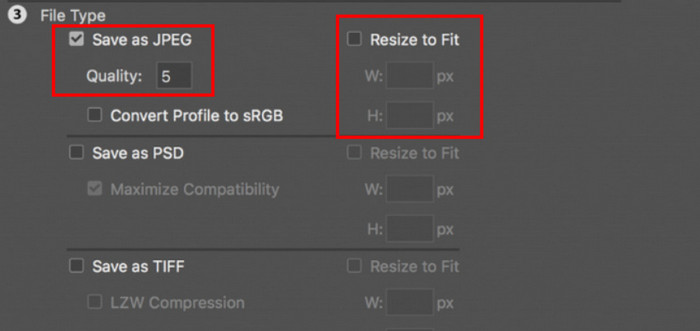
ステップ5. ファイルタイプ(File Type)の項目でフィットするようにサイズ変更(Resize to Fit)にチェックを入れ、リサイズ後の画像の最大幅と最大高さを指定します。
パート4. Photoshopの代替オンライン画像サイズ縮小ソフト - FVC画像圧縮ソフト
Photoshop のインターフェイスは、初心者や急いで画像処理をしたい人には依然として複雑に感じられるかもしれません。また、画像サイズを小さくするまでの手順も少なくありません。より手軽な代替ツールとして、FVC Free Image Compressorがあります。ブラウザーから処理したい画像をアップロードするだけで、自動的に画像サイズを圧縮してくれます。さらに、Webページ上でアスペクト比の手動調整、回転、反転といった操作も行えます。
もう一つ無視できない問題があります。Photoshopを定期的に使用するにはサブスクリプションが必要です。しかし、Adobe製品は高価です。FVC Free Image Compressorは完全に無料のオンラインツールです。画像のバッチ処理について考えたことはありますか?FVC Free Image Compressorの開発者はこの点を見逃していません。現在、このプラットフォームでは最大40枚の画像をバッチ処理できます。
ステップ1. FVC Free Image Compressor の公式サイトにアクセスします。
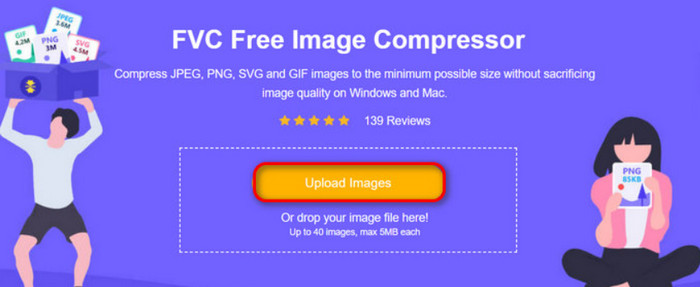
ステップ2. Upload Imagesをクリックして、圧縮したい写真を選択・アップロードします。
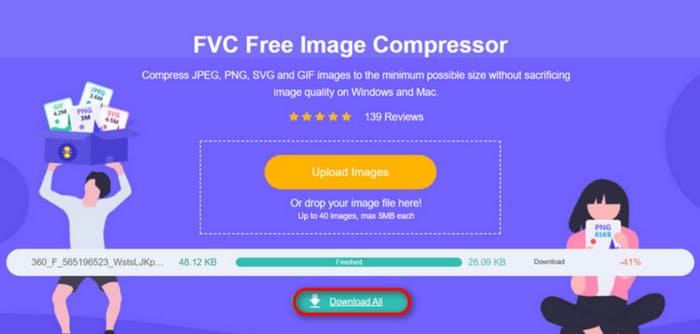
ステップ3. 圧縮処理が完了したら、更新後のファイルサイズをプレビューします。その後、Download Allをクリックして、圧縮された画像を端末に保存します。
圧縮結果を見て、画像の鮮明さがほとんど失われていないことに驚かれましたか?FVC Free Image Compressorは、画像の解像度とサイズの完璧なバランスを見つけるために、最も高度で効率的な圧縮技術を使用しています。
初心者でもプロでも、FVC Free Image Compressor が Photoshop の最良の代替品であることがわかります。
パート5:Photoshopで画像を縮小する方法に関するよくある質問
品質を損なわずに Photoshop で画像を縮小するにはどうすればよいですか?
Photoshopで歪みなく画像サイズを縮小するには、操作時に「再サンプル」を選択することが重要です。また、アスペクト比を調整する際には、シャープネスの変化に注意することも重要です。
切り取らずに写真を小さくするにはどうすればいいでしょうか?
画面上の表示サイズを変更したい場合は、画像リサイズツールを使うことができます。また、画像ファイル自体を圧縮するという方法もあります。これによって、ファイルサイズを大幅に小さくできます。
1 MB未満の写真を作成するにはどうすればよいでしょうか?
専用の画像圧縮ツールを使用することもできます。特におすすめなのは、PhotoshopやFVC Free Image Compressorなど、圧縮レベルを調整したり、ダウンロード前に圧縮後の画像サイズをプレビューしたりできるツールです。
結論
ここまででPhotoshopで画像を縮小する方法を理解できたら、ぜひ自分でも試してみてください。各ステップごとに画像を用意しているので、細部まで確認しながら進められます。もし、わざわざPhotoshopを端末にインストールしたくない、あるいは複雑なインターフェイスに抵抗がある場合は、FVC Free Image Compressor を使ってみてください。操作手順がシンプルで使いやすく、しかも無料です。
-
 PremiereProと無料オンラインでMXFを圧縮する方法
 より小さなファイルサイズでMXFを圧縮する方法は? Adobe Premiere ProでMXFファイルを圧縮する方法は?この投稿では、MXFファイルを圧縮する2つの方法を共有しています。
-
 MOVファイルを簡単に圧縮する方法:6つの無料オプション
 MOVを圧縮するには、この記事で紹介する6つのオプション(デスクトップソフトウェア3つとオンラインプラットフォーム3つ)を参考にしてください。それぞれの使い方をここでご紹介します。
-
 MP4ビデオをより小さなサイズに圧縮する方法
 MP4ビデオはアップロードするには大きすぎますか?ビデオサイズを縮小したいですか? MP4ファイルを無制限に小さいサイズに圧縮する3つの効率的な方法を次に示します。