


3つの効果的な方法を使用してiPhoneで画像のサイズを変更する方法[無料]
iPhone に保存したウェブ上の画像は、アスペクト比やサイズの関係で、必ずしもすべてが壁紙やホーム画面に適しているわけではありません。不適切なサイズの写真を壁紙やホーム画面に設定すると、ぼやけて表示されたり、画面にフィットせず左右に黒い帯が出てしまうことがあります。面倒ですよね。幸いなことに、App Store からフォトリサイズアプリをダウンロードしたり、「ショートカット」アプリを使ったり、iPhone に標準搭載されている写真編集機能を活用したりできます。iPhone で写真のサイズを変更する方法を手早く知りたいなら、本記事を数分読むだけで、端末で起きているサイズの問題を理解し、解決できるようになります。

パート 1. iPhone で画像のサイズを変更する 3 つの効果的な方法 [ダウンロード可能 & 内蔵]
ショートカットを使う【内蔵】

ショートカットは、ローカルファイル内の画像のサイズ変更など、さまざまな機能を iOS ユーザー自身が作成して使えるようにするアプリです。iOS 13 以降にはこのアプリが最初からインストールされていますが、導入時期が新しいため、古いバージョンにはこのような高機能アプリは搭載されていません。ただし、iPhone や iPad の App Store から無料でダウンロードできます。ここでは、このアプリを使って iPhone の画像サイズを変更する方法を、以下の手順で説明します。
ステップ 1. iPhone でアプリを開き、右上のプラスボタンをタップして、画像サイズ変更用のショートカットを追加します。
ステップ 2. 三本線の点をタップしてショートカット名を入力します。ここでは「Resizing Photo」などと名付けてもよいでしょう。共有シートに表示をオンにしておくと、画像を共有するときにこのショートカットを選ぶだけで自動的にサイズ変更されるようになります。
ステップ 3. 共有シートの種類で「Anything」のチェックを外し、イメージのみに設定します。その後、完了をタップして作成した設定を保存します。
ステップ 4. 実際にこの機能を使う前に、プラスアイコンを押し、メディアを選択してから画像のサイズを変更をタップします。必要に応じて長辺や短辺の長さを設定し、[完了]を押して保存します。これで、画像を共有するたびに、このショートカットを使って自動的にリサイズすることができます。
フォトアプリ【内蔵】を使う
もうひとつ、iPhone のどのバージョンでも自由に使える標準アプリが写真アプリです。長年にわたり、iPhone ユーザーにとって頼れる画像編集・補正ツールとなってきたこのアプリを、ここで触れないわけにはいきません。サイズ変更のやり方を知っている人もいれば、知らない人もいるでしょう。そこで、iPhone で写真サイズを変更する方法が分からないユーザーのために、このチュートリアルをご用意しました。
ステップ 1. 写真アプリを開き、サイズ変更したい写真をタップします。
ステップ 2. リサイズしたい画像を選んだら、編集をタップします。
ステップ 3. 右上のトリミングアイコンをタップし、さらに四角形のようなボタンをタップします。
ステップ 4. ここで、さまざまなアスペクト比のプリセットから選択できるので、好みの比率を選び、完了をタップして変更を保存します。
画像サイズの使い方【ダウンロード可能】
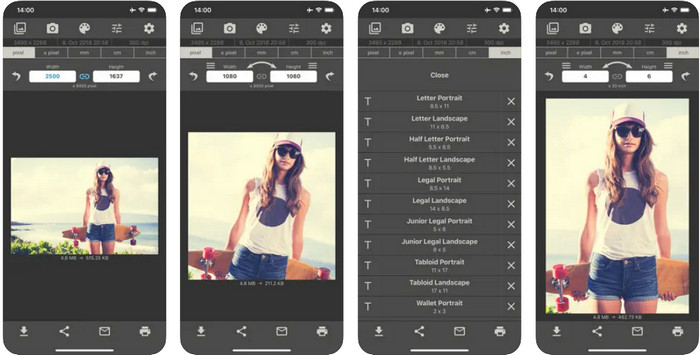
Image Sizeは、iOS にダウンロードして、iPhone の壁紙用に手軽に画像サイズを変更できるサードパーティアプリです。先ほど紹介した 2 つの方法と違い、このアプリは事前に App Store からダウンロードする必要があります。iOS 標準アプリではありませんが、ほとんどの iOS バージョンでインストールしてすぐに利用できます。無料アプリのため、使用中に多数の広告ポップアップが表示されますが、もし気にならなければ、以下の手順に沿ってこのフォトリサイズアプリを iPhone で使ってみてください。
ステップ 1. このフォトリサイズアプリを iOS にインストールし、起動します。
ステップ 2. 画像アイコンをタップして、このアプリでサイズ変更したい画像を読み込みます。
ステップ 3. 画面上部に、現在の画像サイズが表示されているので、高さと幅を好みの数値に変更します。
ステップ 4. ダウンロードボタンをタップして、リサイズした画像を保存します。
パート 2. 広告やインストール プロセスなしでオンラインで画像のサイズを変更する最良の方法
FVC Free Image Upscaler を使えば、AI の力を借りて、あらゆる画像のサイズを自動的に変更できます。リサイズの豊富な経験は必要なく、このアプリだけで実現可能です。何百万人ものユーザーが、このアプリで画像のリサイズ、アップスケール、補正、さらには画質の向上まで一度に行っています。このツールの魅力は、無料で使えることです。すごいと思いませんか。まさにその通りで、このアプリはオールインワンの画像編集ツールと言えます。ここでは、写真をリサイズする手順を示しますので、それに沿ってこのツールを使ってみてください。
ステップ 1. このウェブツールは、このリンクをクリックすると開けます。クリックすると、新しいタブが表示されます。
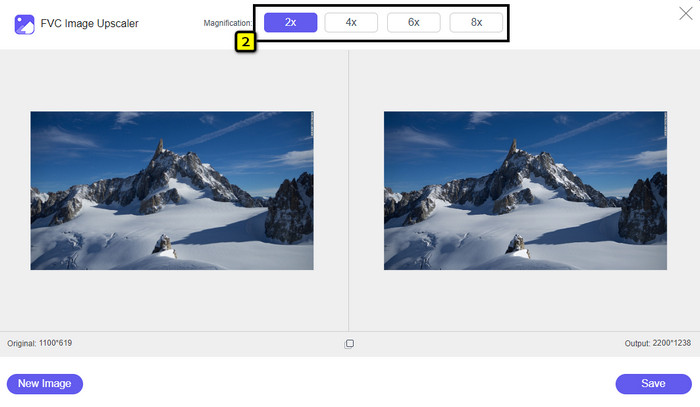
ステップ 2. リサイズしたい画像を追加するには、画像を追加をクリックします。画面に表示されるファイルフォルダから画像を探し、開くを押して読み込みます。

ステップ 3. このアプリがアップロードした画像を読み込みますので、適用したい拡大倍率を選択します。選んだ倍率に応じて、画像は自動的に新しいサイズへとリサイズされます。
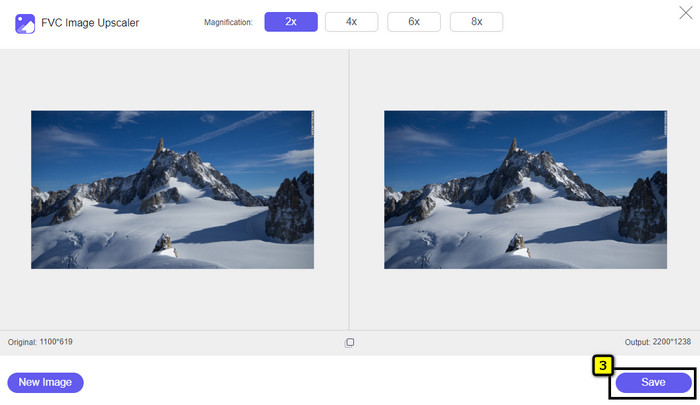
ステップ 4. 画像の調整が終わったら、保存を押して、リサイズ後の画像をローカルドライブにダウンロードします。
パート 3. iPhone で画像のサイズを変更する方法に関する FAQ
iPhoneの壁紙に最適なサイズは?
iPhone SE, 6, 6 plus, 7, 7 plus, 8, 8 plus をお使いの方へ 壁紙として使用する画像の標準サイズは、1136 x 640 から 1920 x 1080 px の間である必要があります。これは、iPhone デバイスで壁紙として使用する画像の標準的な長さと高さです。ただし、iPhone XR、11、および 13 を使用している場合は、828 x 1792 または 3073 x 1420 ピクセルの表示サイズを使用できるようになりました。
iPhoneで画像のサイズを変更する代わりにトリミングすることの欠点は何ですか?
画像をトリミングすると、画像の寸法が切り取られることがわかります。はい、画像サイズは変更されますが、全体的な外観はサイズ変更と同じではありません。リサイズ中は、画像の端を切ったりせずに、画像の高さと長さを自由に変更できます。したがって、写真を壁紙として使用して収まるようにする場合は、iPhone でトリミングするのではなく、サイズを変更することをお勧めします。
iPhoneでサイズを変更した後、画像を大きくするとぼやけてしまうのはなぜですか?
この記事に含まれるこれらのアプリケーションと方法では PPI が作成されないため、iPhone でサイズ変更された画像が引き伸ばされます。したがって、この種の問題が発生したくない場合は、ここに含まれているオンライン ツールを使用して、iPhone で画像のサイズを変更するときに PPI を作成する必要があります。
結論
ここまで紹介してきたツールを使えば、iPhone で写真のサイズを簡単に変更できます。アプリを追加でダウンロードしなくても、端末に標準搭載されているアプリを利用することが可能です。より細かくサイズを指定したい場合は、ここで紹介した専用アプリをダウンロードして使ってください。一方、画質を落とさずにリサイズしたいなら、オンラインツールの利用がおすすめです。第 2 部では、そのオンラインツールの使い方を詳しく解説していますので、そちらもあわせてお読みください。
-
 すべてのプラットフォームで利用可能な最高のGIFリサイザーの5つ[2022]
 使用できるGIFリサイザーを知りたいですか?その場合、以下の情報は、すべてのプラットフォームのGIFで使用できるリサイザーについて説明しています。
-
 画像のサイズを変更する方法 – Adobe 画像のサイズ変更 [オンラインおよびオフライン]
 アドビのサイズ変更画像を探している場合は、解決策があります。この投稿をよく読んで、PC で Adobe を使用して画像のサイズを変更する方法を学んでください。
-
 Facebookの写真のサイズを変更する方法[すばやく簡単な手順]
 Facebook に大きなサイズの画像をアップロードするのに問題がある場合は、解決策があります。 Facebook 用に写真のサイズを変更する方法については、この記事を最後までご覧ください。