


3가지 최상의 솔루션으로 이미지를 빠르게 픽셀 해제하는 방법
이미지 언픽셀화는 픽셀화되어 버린 이미지나, 작은 사각형으로 비트맵 형태가 되어 버린 이미지에 메이크오버를 적용할 때 필요한 해결책입니다. 많은 사용자가 이미지를 수정하고, 조정하고, 변경하고, 향상시키는 일을 번거롭게 생각합니다. 솔직히 예전에는 정말 그랬습니다. 하지만 지금은 아닙니다. 우리가 활용할 수 있는 첨단 기술 덕분에, 올바른 도구만 사용한다면 이 작업은 매우 쉽게 해결됩니다.
사진의 픽셀화를 제거할 올바른 도구가 없습니까? 다행스럽게도 이 기사는 사진의 픽셀화를 편집하는 데 도움이 될 수 있는 최고의 소프트웨어 3개와 문제를 해결하기 위한 각각의 자습서를 제공합니다.
1부. Best Choice Photo Editor를 사용하여 온라인에서 이미지를 픽셀화 해제하는 방법[권장]
FVC Free Image Upscaler는 이미지를 온라인에서 무료로 언픽셀화할 수 있는 완전 자동 온라인 도구입니다. 이 도구는 여러분이 가진 어떤 웹 브라우저에서든 열 수 있으며, 실행을 위한 런처를 별도로 다운로드할 필요가 없으므로 접속하는 즉시 사용할 수 있습니다. 웹에서 이용하는 소프트웨어이긴 하지만, 픽셀을 제거해 이미지를 선명하게 만드는 성능과 파워는 온라인이든 오프라인이든 전문 이미지 편집기와 견줄 만합니다. 이 도구를 사용하는 것이 어렵다고 생각할 수도 있지만, 실제로는 전혀 그렇지 않습니다. 아직도 확신이 서지 않는다면, 아래에 제시된 사용 방법을 읽거나 따라 해 보면서 이 도구를 얼마나 손쉽게 활용할 수 있는지 직접 확인해 보십시오.
1단계. 기기에서 사용하는 어떤 웹 브라우저에서든 도구 이름을 검색하거나 이 링크를 클릭해 메인 웹사이트를 열어 웹 도구에 접속합니다.
2단계. 웹 도구에 접속했다면, 픽셀화된 이미지를 업로드하기 위해 Add Image를 클릭합니다. 화면에 파일 탐색 창이 뜨며, 로컬 드라이브에 저장된 이미지를 찾아 선택한 뒤 Open을 눌러 업로드합니다.
3단계. 다음으로, 이미지에 적용하고 싶은 배율 옵션을 선택해 이미지의 외관을 부드럽게 만들어 더 이상 작은 사각형이 보이는 비트맵처럼 보이지 않도록 합니다.
4단계. 이렇게 간단합니다. Save를 클릭해 언픽셀화된 버전을 로컬 드라이브에 다운로드합니다.
파트 2. Windows 및 Mac에서 2가지 방법을 사용하여 오프라인에서 이미지 픽셀화 해제하는 방법 [쉬움]
Pixbim - Windows에서 사진을 픽셀화 해제
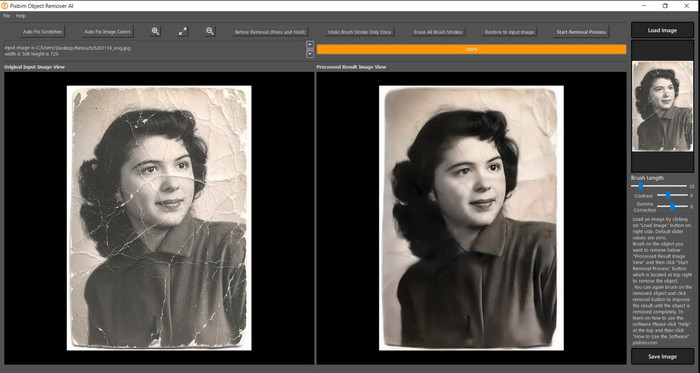
Pixbim은 이 문제를 해결하기 위해 Windows에 내려받아 사용할 수 있는 가장 강력한 AI 기반 이미지 언픽셀화 프로그램 중 하나입니다. 이 편집기는 픽셀화된 이미지를 빠르고 효율적으로 복원해 주기 때문에 이 글에서 꼭 언급할 가치가 있습니다. Pixbim에서는 AI가 알아서 각종 파라미터를 조정해 주므로 사용자가 설정 때문에 어려움을 겪을 일이 거의 없습니다. 다만 이러한 기능과 성능 덕분에, 무료 체험 기간 이후 계속 사용하려면 라이선스 키를 구매해야 하며, PC에 설치해 사용하고 싶은 사용자에게는 다소 비싸게 느껴질 수 있습니다.
1단계. 소프트웨어를 다운로드했다면, 다음 단계로 진행하기 위해 프로그램을 실행합니다.
2단계. Load Image를 눌러 여기에서 선명하게 만들고 싶은 픽셀화된 이미지를 추가합니다.
3단계. 그다음, 원하는 결과값에 맞게 슬라이더(sliders)를 드래그하여 각 파라미터를 조정합니다.
4단계. 이미지 조정을 마쳤다면, 결과물을 저장하여 내보냅니다.
Movavi 사진 편집기 [Windows 및 Mac]
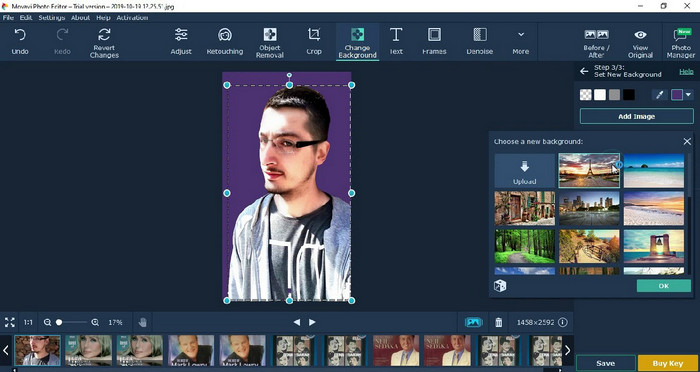
많은 사용자가 이미지 편집의 다재다능함 덕분에 이미 Movavi Photo Editor를 사용해 보았습니다. Pixbim과 마찬가지로, 이 프로그램 역시 AI의 신경망을 활용해 이미지의 손실된 픽셀을 복원할 수 있습니다. 이 편집기가 있다면 자르기, 회전, 필터 추가, 픽셀 보정 등 기본 편집부터 고급 편집까지 다양한 작업을 할 수 있습니다. 하지만 데스크톱용 프리미엄 버전을 구매하지 않으면 이러한 기능을 모두 사용할 수는 없습니다.
그것은 많은 사람들에게 상당히 비싼 Pixbim과 거의 비슷한 가격입니다. 그러나 편집기를 구입할 예산이 있다면 이것이 필요할 수 있습니다. 다음 단계에 따라 이 앱으로 이미지를 픽셀화 해제하는 방법을 알아보세요.
1단계. Windows 또는 Mac OS에 애플리케이션을 다운로드합니다.
2단계. 소프트웨어를 실행한 뒤, 언픽셀화하고 싶은 사진을 여기에 업로드합니다.
3단계. 이미지를 업로드했으면, Magic Enhance를 클릭해 AI가 이미지를 자동으로 보정하도록 합니다.
4단계. 이미지를 내보내고 결과를 감상합니다.
3부. 이미지를 U픽셀화하는 방법에 대한 FAQ
내보낸 픽셀화되지 않은 이미지에 워터마크가 있는 이유는 무엇입니까?
응용 프로그램의 무료 평가판 버전을 사용하는 경우 내보낼 때 워터마크가 남을 가능성이 있습니다. 따라서 워터마크 없이 이미지를 내보내려면 내보낸 이미지에 워터마크를 남기지 않기 때문에 애플리케이션의 라이센스를 구매하거나 FVC 무료 이미지 업스케일러를 사용할 수 있습니다.
흐릿함과 픽셀화의 차이점은 무엇인가요?
많은 기사에서 일부 요인으로 인해 흐릿함과 픽셀이 동일하지 않음이 입증되었습니다. 흐릿한 이미지는 고속 동작을 캡처하거나 흔들리는 카메라로 사진을 찍는 이유입니다. 픽셀화되는 동안 스냅샷을 확대하면 픽셀화가 시작되고 작은 사각형이 있는 비트맵이 표시됩니다.
이미지를 픽셀화하는 요인은 무엇입니까?
몇 가지 이유는 이미지를 픽셀로 바꾸는 것입니다. 일반적인 원인은 래스터 이미지를 확대할 때입니다. PNG, JPG, GIF 등과 같은 래스터 형식은 이러한 컨테이너에 저장된 개체의 모양을 구성하는 작은 사각형으로 구성됩니다. 일반적으로 이미지를 확대하면 시각적으로 표시되는 색상 데이터를 포함하는 픽셀로 알려진 사각형이 있음을 알 수 있습니다. 특히 픽셀화가 발생할 때 많은 편집자에게 문제가 될 수 있습니다.
이미지 노이즈를 어떻게 고칠 수 있습니까?
직접 촬영한 이미지에서도 흔히 겪을 수 있는 또 다른 문제이며, 그 해결책 역시 이 글 안에 있습니다. 이 링크를 클릭해 이미지 노이즈를 제거하는 방법을 간편하게 읽고, 문제를 해결하고, 배워 보세요.
결론
이처럼 간단한 절차만으로, 웹에서 사용하거나 다운로드할 수 있는 최고의 이미지 편집기의 도움을 받아 이미지를 손쉽게 언픽셀화할 수 있습니다. 이 문제는 이제 해결되었습니다! 앞으로 다시 픽셀화 문제가 생기더라도, 이 글을 참고해 도움을 받으실 수 있습니다. 여러분이 필요로 하는 최적의 도구, 예를 들어 FVC Free Image Upscaler와 같은 프로그램은 이미 여기 준비되어 있습니다. 이미지의 겉모습에서 픽셀화를 바로잡아 다른 사람의 눈에 거슬리지 않도록 조정하는 것이 가장 좋습니다. 이 온라인 이미지 편집기를 사용해 이제 픽셀화와는 작별을 고하세요.
-
 모든 이미지를 향상 및 개선하는 데 사용할 수 있는 7가지 이미지 업스케일러[2022]
 이미지 업스케일러가 필요하십니까? 운 좋게도 이 기사에서는 데스크탑에서 액세스하고 다운로드할 수 있는 최고의 소프트웨어를 다룹니다.
-
 2022년에 반드시 사용해야 하는 5가지 이미지 해상도 향상제 [최신 선택]
 어떤 이미지 해상도 향상 프로그램을 사용해야 하는지 모르십니까? 이미지 해상도를 사용하고 향상시키는 5가지 도구를 검토하면서 이 기사를 읽으십시오.
-
 모바일 장치의 사진 해상도를 높이는 4가지 앱 [최선의 선택]
 1080p, 4k 등을 얻으려면 사진 해상도를 높이는 앱이 필요합니다. 아래 목록으로 쉽게 할 수 있습니다!