


인쇄를 위해 사진을 확대하는 방법에 대한 가장 뛰어난 방법
사진을 크게 만드는 방법에는 두 가지가 있습니다. 첫 번째는 업스케일링, 즉 이미지의 픽셀 수를 늘려서 사진을 확대하는 방법입니다. 또 다른 방법은 사진의 실제 크기, 즉 가로·세로 치수를 변경하여 확대하는 것입니다. 이 가이드에서는 사진을 확대하는 이 두 가지 방법을 모두 보여 드리겠습니다. 필요에 따라 어떤 방법이 적합한지 알 수 있을 것입니다. 이 안내글을 읽고 인쇄용, 온라인, 오프라인에서 사용할 이미지를 위해 이미지를 크게 만드는 방법을 배워 보세요.

부품 1. 인쇄를 위해 온라인에서 품질 저하 없이 이미지 확대
이미지의 품질을 확대한다는 말을 처음 들었을 때 복잡하게 들립니다. 하지만 이 글을 읽고 나면 확실히 쉬울 것입니다. 사진을 확대하는 데 도움이 되는 수많은 응용 프로그램이 있습니다. 하지만 문제는 너무 많아서 하나를 선택하기가 어렵다는 것입니다. 다행히 이미지를 무료로 쉽게 확대할 수 있는 애플리케이션을 찾았습니다.
FVC Free Image Upscaler는 온라인에서 사용할 수 있는 훌륭한 사진 확대(업스케일) 애플리케이션입니다. 온라인 앱의 장점은 프로그램을 따로 설치할 필요가 없어 저장 공간을 절약할 수 있다는 점입니다. 이 온라인 도구를 사용하면 이미지를 2배, 4배, 6배, 8배까지 확대할 수 있습니다. 또한 AI 기반 업스케일링 기술을 사용해 이미지의 저화질 부분을 자동으로 감지한 뒤 그 품질을 향상시켜 줍니다.
또한 직관적인 사용자 인터페이스를 가지고 있어 초보자도 쉽게 사용할 수 있습니다. 또한 저장하기 전에 출력 결과를 확인할 수 있는 미리보기 효과가 있습니다. FVC 무료 이미지 업스케일러는 Google, Firefox 및 Safari와 같은 모든 웹 브라우저에서 무료로 사용할 수 있습니다.
FVC 무료 이미지 업스케일러를 사용하여 인쇄하기 위해 사진을 확대하는 방법
1단계. 웹 브라우저를 열고 검색창에 FVC Free Image Upscaler를 검색하세요. 이 링크를 클릭하면 바로 메인 페이지로 이동할 수 있습니다.
2단계. 메인 화면에서 Upload Photo 버튼을 눌러 확대하고 싶은 이미지를 추가합니다. 또는 드래그 앤 드롭 방식으로 이미지를 업로드할 수도 있습니다.
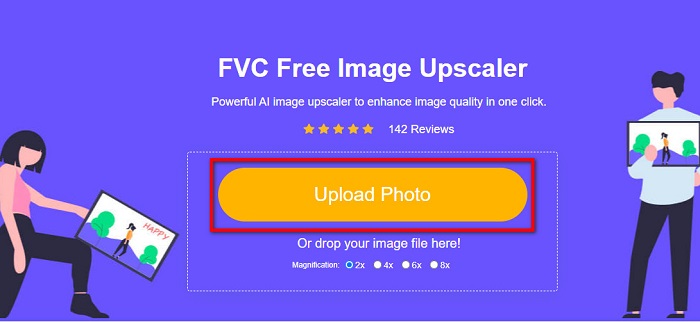
3단계. 파일이 업로드되면 다른 화면으로 이동합니다. 여기서 이미지에 적용할 확대 배율을 선택합니다. 2x, 4x, 6x, 8x 중에서 고를 수 있습니다. 원본 이미지의 화질이 낮을수록 더 높은 배율을 선택하는 것이 좋습니다.
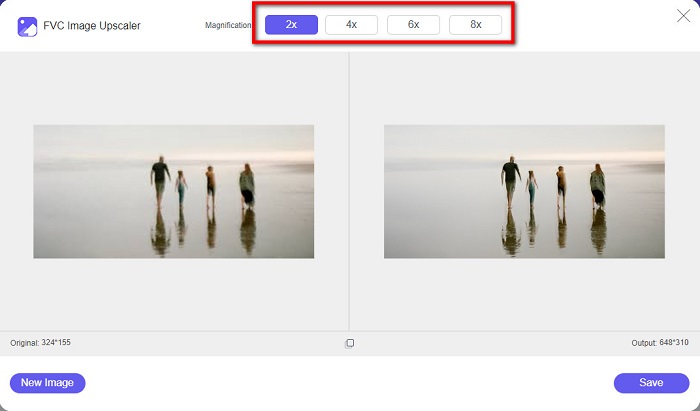
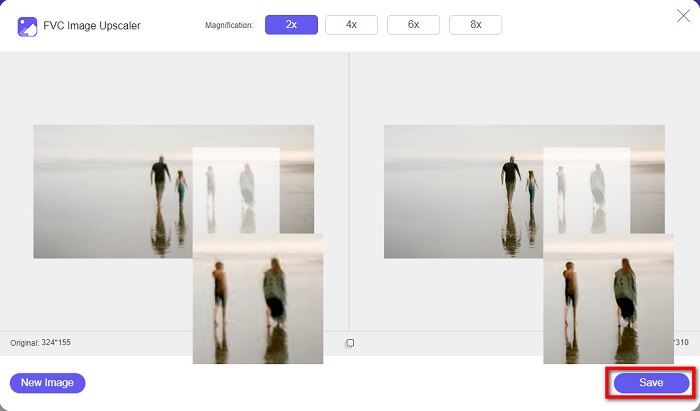
4단계. 왼쪽 이미지 위에 커서를 올려 두면 확대 후 결과를 미리 볼 수 있습니다. 변화가 보이나요? 결과가 마음에 들면 인터페이스 오른쪽 아래에 있는 Save 버튼을 눌러 결과물을 기기에 저장합니다.
FVC 무료 이미지 업스케일러를 사용하여 온라인으로 인쇄하기 위해 사진을 확대하는 방법에 대한 쉬운 단계입니다. 파이처럼 쉽죠? 그러나 이미지 크기를 변경하여 사진을 확대하려면 다음 부분을 읽으십시오.
부품 2. 품질 손실 없이 Photoshop에서 이미지를 확대하는 방법
사진을 확대하는 방법을 검색할 때 이 응용 프로그램을 접했을 것입니다. 그리고 Adobe Photoshop은 인터넷에서 가장 저명한 사진 편집 응용 프로그램입니다. Adobe Photoshop은 다양한 플랫폼에 게시하기 위해 이미지를 자주 편집하는 전문가가 주로 사용합니다. 이 응용 프로그램의 도구와 기능을 사용하면 확실히 놀라운 결과물을 생성할 수 있습니다. 하지만 Adobe Photoshop으로 이미지를 확대할 수도 있다는 사실을 알고 계셨습니까? 예, 당신은 그 권리를 읽었습니다. 또한 품질을 잃지 않고 사진을 확장하는 데 적합한 도구입니다. Adobe Photoshop을 사용하면 해상도를 변경하거나 이미지의 너비와 높이를 수동으로 입력하여 이미지를 확대할 수 있습니다. Adobe Photoshop은 프로 앱이지만 확대 기능은 사용이 간편합니다. 더 이상 고민하지 않고 Photoshop을 사용하여 무손실로 이미지를 확대하는 단계입니다.
1단계. 먼저 컴퓨터에 Adobe Photoshop을 설치합니다. Windows와 macOS 등 대부분의 운영체제에서 사용할 수 있습니다. 설치가 완료되면, 확대하고 싶은 이미지를 불러옵니다.
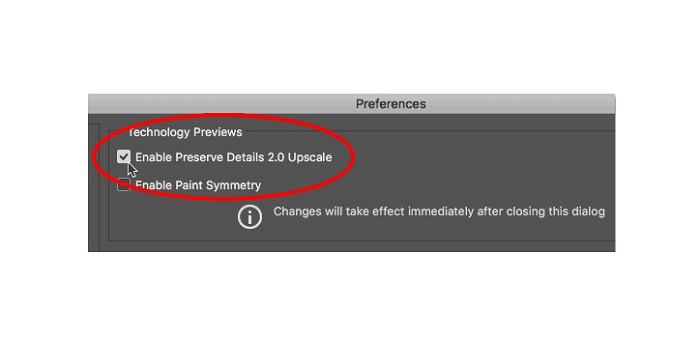
2단계. 다음으로 Preserve Details 2.0 기능을 활성화합니다. Windows 컴퓨터를 사용 중이라면 메뉴 바의 Edit 패널로 이동합니다. Mac 기기를 사용 중이라면 Photoshop CC 메뉴에서 Preferences를 선택한 다음 Technology Previews 버튼을 클릭합니다. 그러면 Technology Previews 옵션이 표시된 환경 설정 대화 상자가 열립니다. Enable Preserve Details 2.0 Upscale 항목 옆의 체크 박스를 선택하세요. 그런 다음 OK를 눌러 Technology Previews 대화 상자를 닫습니다.
3단계. 다음으로, 상단 메뉴에서 Image 메뉴로 가서 Image Size 옵션을 선택해 Image Size 대화 상자를 엽니다.
4단계. 포토샵에서 이미지를 확대하거나 업스케일링할 때는 이미지의 물리적 크기, 즉 픽셀을 추가하거나 제거하게 됩니다. 따라서 Resample 옵션이 선택되어 있는지 반드시 확인하세요.
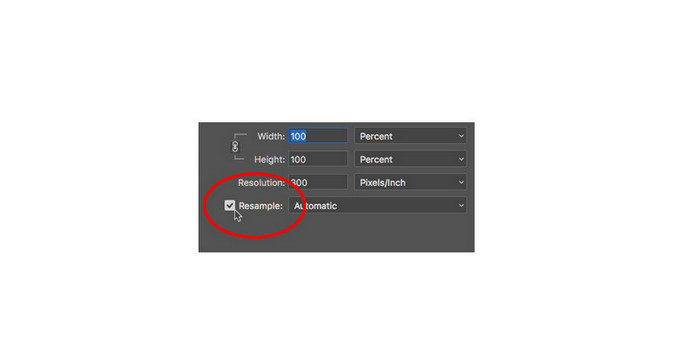
5단계. 그다음, 원하는 크기에 맞게 사진의 height(세로)와 width(가로)를 입력하여 변경합니다. 기본 설정에서는 가로와 세로가 서로 연결되어 있기 때문에, 가로 값을 변경하면 세로 값도 비율에 맞춰 자동으로 변경됩니다.
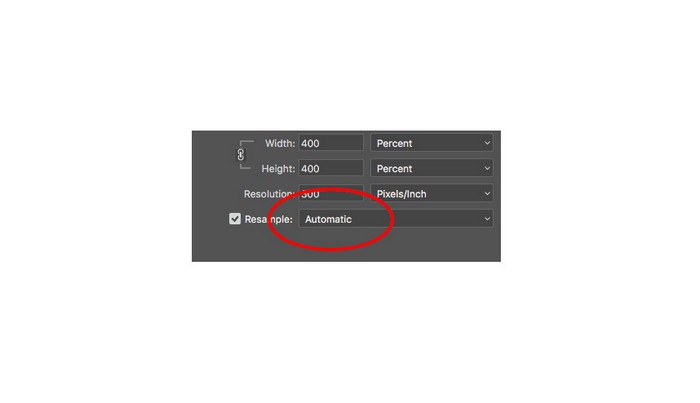
6단계. 마지막으로 Resample Method를 Preserve Details 2.0으로 변경합니다. 기본 리샘플링 방식은 Automatic으로 설정되어 있습니다. 하지만 Resample이 Automatic일 때 포토샵이 항상 Preserve Details 2.0을 선택해 주지는 않으므로, Automatic을 클릭해 Resample 옵션을 연 다음 Preserve Details 2.0을 직접 선택해 주세요.
7단계. 이제 결과를 미리 볼 차례입니다. Preserve Details 2.0을 선택하면 왼쪽의 미리 보기 영역이 업데이트되어 업스케일된 이미지가 어떻게 보이는지 확인할 수 있습니다. 미리 보기 창 안에서 마우스로 이미지를 드래그해 이미지의 여러 부분을 살펴보세요.
다음 단계를 따르면 품질을 잃지 않고 인쇄하기 위해 사진을 확대하는 방법을 확실히 배울 수 있습니다.
관련 항목:
절대 놓치면 안 될 온라인·오프라인 GIF 확대 도구 Top 4
3부. 품질 저하 없이 이미지를 확대하는 방법에 대한 FAQ
온라인에서 JPG 파일 크기를 확대할 수 있습니까?
FVC Free Image Upscaler를 사용해 JPG 이미지의 파일 크기를 변경할 수 있습니다. JPG 이미지를 더 크게 만들고 싶다면 확대 배율을 6배나 8배로 설정해 보세요.
Adobe Photoshop에서 PNG 파일을 지원합니까?
예. PNG 파일은 Adobe Photoshop을 비롯한 많은 플랫폼에서 지원됩니다. PNG, JPG, JPEG, BMP 및 WebP와 같은 거의 모든 이미지 파일 형식을 Adobe Photoshop으로 가져올 수 있습니다.
내 이미지를 확대하면 파일 크기에 영향을 줍니까?
예, 그렇습니다. 이미지의 총 픽셀 수 또는 모든 인치의 픽셀 수를 조정하기 때문에 이미지의 파일 크기가 증가합니다. 그러나 이미지의 너비와 높이를 낮추면 파일 크기도 작아집니다.
결론
지금까지 화질 저하 없이 이미지를 크게 만드는 방법을 알아보았습니다. 온라인이든 오프라인이든, 이 두 가지 방법을 사용하면 품질을 유지한 채 이미지를 확대할 수 있습니다. 다만 더 간단하게 사진을 확대하고 싶다면, 사용자 친화적인 애플리케이션인 FVC Free Image Upscaler 사용을 추천합니다.
-
 두 가지 방법으로 Illustrator에서 이미지 크기를 조정하는 방법
 Illustrator에서 이미지 크기를 조정하는 가장 좋은 방법을 알아봅니다. 시작하려면 PC에서 Adobe Illustrator 앱을 다운로드하여 열고 다음의 간단한 단계를 따르십시오.
-
 웹 및 오프라인에서 이미지 크기를 조정하는 6가지 방법 [100% 작동]
 여기에 추가된 튜토리얼을 통해 이제 원하는 크기에 따라 이미지 크기를 쉽게 조정할 수 있습니다. 여기에서 방법을 알아보세요!
-
 무료 및 설치 없이 iPhone에서 사진 크기를 조정하는 가장 좋은 방법
 iPhone에서 사진 크기를 조정하는 것은 배우기 어려울 수 있습니다. 운 좋게도 이 문서에서는 그림의 크기를 쉽게 변경하는 방법에 대한 자습서를 제공합니다.