

빠르고 쉬운 수정 – Photoshop에서 이미지를 자르는 방법
포토샵은 초보자에게 꽤 복잡하게 느껴질 수 있으며, 꼭 알아두어야 할 유용한 기능도 매우 많습니다. 이미지 자르기는 사소한 기능이 절대 아닙니다. 구도를 개선하고, 피사체를 강조하며, 가로세로 비를 조정하고, 해상도를 최적화하고, 창의성을 표현하고, 스토리텔링을 강화하고, 실수를 수정하며, 특정 플랫폼에 맞게 이미지를 조정하기 위해 반드시 익혀야 하는 핵심 기능입니다. “포토샵에서 이미지를 어떻게 자르지?” 하고 궁금해하고 있다면, 지금 딱 알맞은 곳에 와 있습니다. 이 가이드는 포토샵에서 크롭하는 방법을 단계별로 자세히 설명하도록 구성되어 있습니다. 간단한 안내가 필요한 초보자든, 고급 기법까지 익히고 싶은 사용자든 모두 도움이 될 것입니다. 이제 포토샵의 정밀한 크롭 기능을 활용해 시각 요소를 변신시키고, 여러분의 창의적인 아이디어를 현실로 만들어 봅시다.

1부. Photoshop에서 이미지를 자르는 방법?
다음은 Photoshop에서 이미지를 자르는 방법에 대한 단계별 가이드입니다.
1단계. 포토샵을 실행한 뒤, 상단 메뉴의 File(파일) 탭으로 이동하여 자르려는 이미지를 불러옵니다.

2단계. 왼쪽 툴바에서 Crop Tool(크롭 도구)을 선택합니다.
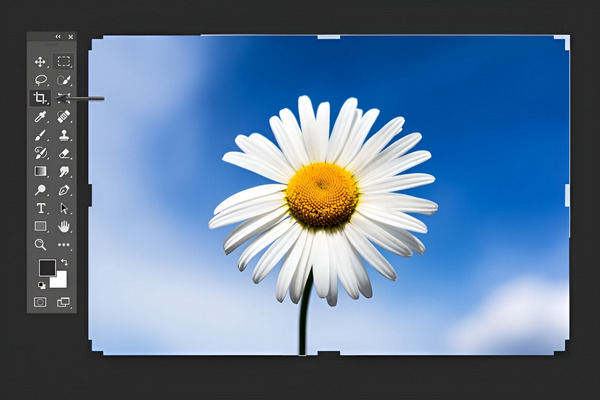
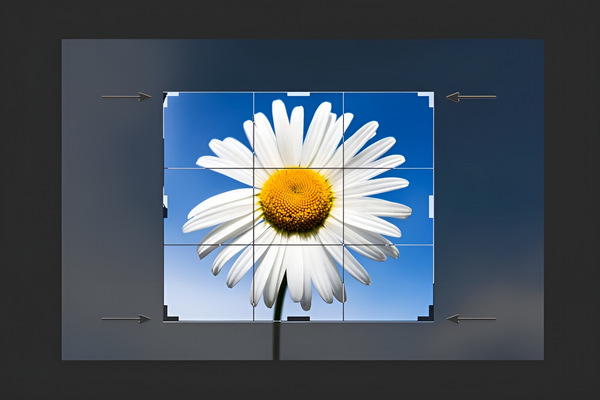
3단계. 이제 사진 위에 크롭 영역을 드래그해 그리거나, 모서리와 가장자리 핸들을 드래그해 잘라낼 범위를 지정합니다. 또는 화면 상단 옵션 바에서 크롭 도구 옵션을 사용할 수 있습니다. 필요하다면 여기에서 구체적인 크기나 가로세로 비를 직접 입력할 수도 있습니다.
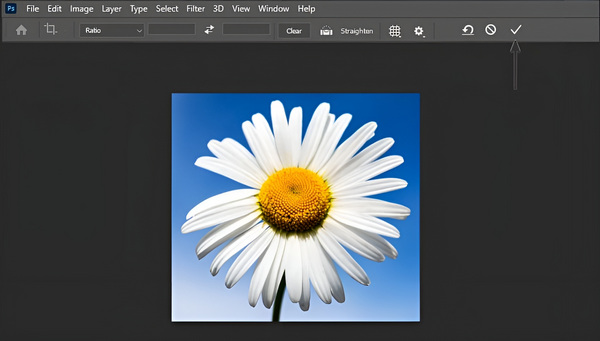
4단계. 원하는 결과가 나왔다면 상단의 Check(확인) 버튼을 클릭합니다. 그런 다음 File(파일) 메뉴로 가서 Save as(다른 이름으로 저장) 옵션을 선택해 잘라낸 이미지를 저장합니다.
Photoshop의 자르기는 비파괴적이므로 언제든지 돌아가서 자르기를 다시 조정하거나 원본 이미지로 되돌릴 수 있습니다. 자르기 도구를 다시 선택하고 필요에 따라 수정하면 됩니다. 또한 Photoshop에서는 이미지를 내보내려고 할 때 이미지의 크기를 조정하고 압축할 수 있습니다.
2부. Photoshop에서 자르기가 회색으로 표시되는 이유는 무엇입니까? - 이유와 해결책
Photoshop의 자르기 도구는 몇 가지 이유로 회색으로 표시될 수 있습니다. 레이어 패널에서 레이어를 선택하지 않았거나 이미지가 배경 레이어인 경우 자르기 도구가 비활성 상태로 유지될 수 있습니다. 아래 표에는 자르기가 회색으로 표시되는 이유와 이를 해결할 수 있는 해결 방법이 나와 있습니다.
| Photoshop에서 회색으로 표시된 자르기 도구의 가능한 이유 | 솔루션 |
| 1. 활성 레이어 없음 | 자르기 도구를 활성화하려면 레이어 패널에서 레이어가 선택되어 있는지 확인하세요. |
| 2. 배경 레이어 | 자르기 잠금을 해제하려면 배경 레이어를 두 번 클릭하고 일반 레이어로 변환하세요. |
| 3. 텍스트 또는 도형 레이어 선택 | 자르기 도구가 작동하려면 텍스트나 모양 레이어 대신 픽셀 기반 레이어를 선택하세요. |
| 4. 잠긴 레이어 | 자르기 도구를 활성화하려면 레이어 패널에서 레이어를 선택하고 잠금을 해제하세요. |
| 5. 이미지는 스마트 개체입니다 | 자르기를 활성화하려면 스마트 개체를 두 번 클릭하고 필요한 사항을 변경한 후 저장합니다. |
| 6. 비어 있거나 숨겨진 레이어 | 자르기 도구를 활성화하려면 레이어에 보이는 콘텐츠가 포함되어 있고 숨겨져 있지 않은지 확인하세요. |
| 7. 특정 모드에서 잠긴 배경 레이어 | 자르기 도구의 잠금을 해제하려면 배경 레이어의 혼합 모드를 조정하세요. |
3부. 온라인에서 이미지를 자르지 않고 이미지를 작게 만드는 팁
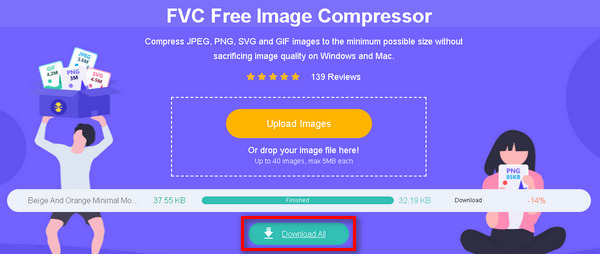
이미지를 자르지 않고 크기만 줄이고 싶다면, 온라인 이미지 압축 도구나 리사이저를 사용해야 합니다. 현재 누구나 쉽게 사용할 수 있는 최고의 이미지 압축 도구 중 하나가 바로 FVC Free Image Compressor입니다. 이 도구는 매우 직관적이며, JPEG, PNG, SVG, GIF 이미지를 화질 저하 없이 용량만 줄이도록 설계되어 있습니다. 또한 고급 최적화 및 압축 알고리즘을 사용해 가능한 최고의 압축률을 구현합니다.
주요 특징:
일괄 압축: 사용자는 최대 40장의 이미지를 한 번에 압축할 수 있으며, 각 이미지의 최대 용량은 5MB입니다. 이 도구는 눈에 띄는 화질 저하 없이 효율적인 압축을 보장합니다.
자동 압축: 업로드된 모든 사진은 자동으로 압축되므로 과정이 빠르고 효율적입니다. 사용자는 이미지를 업로드하고, 압축이 끝난 뒤, 별도의 조작 없이 결과물을 다운로드하기만 하면 됩니다.
폭넓은 호환성: FVC Free Image Compressor는 JPEG, PNG, SVG, GIF 등 다양한 이미지 포맷을 지원합니다. 출력 형식은 PNG입니다. GIF를 압축하는 방법은 이 글을 참고하세요: compress the GIF.
회원가입 불필요: 일부 도구와 달리, FVC Free Image Compressor는 회원 가입, 로그인, 계정 생성 등을 요구하지 않습니다. 번거로움이 전혀 없으며, 숨겨진 비용 없이 완전히 무료로 사용할 수 있는 도구입니다.
개인정보 보호: 사용자는 업로드한 이미지가 안전하게 보호된다는 점을 신뢰할 수 있습니다. 이 도구는 업로드된 사진에 대한 무단 접근을 차단해 프라이버시를 보장합니다.
사용자 후기: 이용자들은 빠른 압축 속도, 간단한 인터페이스, 그리고 화질을 유지하면서 파일 크기를 효과적으로 줄여 주는 성능을 높이 평가하고 있습니다.
온라인으로 이미지 자르기를 위한 단계별 가이드:
1단계. 먼저 공식 웹사이트에 접속합니다.
2단계. 이제 Upload Images(이미지 업로드) 버튼을 클릭하여 이미지를 불러옵니다.

3단계. 압축 과정이 완료될 때까지 잠시 기다립니다. 완료되면 상태 표시줄을 통해 처리 완료 여부와 새로 압축된 이미지 용량 정보를 확인할 수 있습니다. 마지막으로 Download(다운로드) 버튼을 눌러 이미지를 저장합니다.
FVC Free Image Compressor는 실제로 웹사이트 속도 향상, 이미지 공유, 저장 공간 절약 등 다양한 목적을 위해 이미지 크기를 최적화하려는 개인에게 신뢰할 수 있는 솔루션입니다. 사용자 친화적인 인터페이스, 자동 압축, 고품질 출력 유지에 대한 노력이 돋보입니다.
4부. Photoshop에서 이미지 자르기에 대한 FAQ
Photoshop CC에서 자르기 도구는 어디에 있습니까?
Photoshop CC에서는 화면 왼쪽의 도구 모음에서 자르기 도구를 찾을 수 있습니다. 자르기 프레임처럼 보이는 아이콘으로 표시됩니다. 찾을 수 없으면 키보드의 C 키를 눌러 자르기 도구를 활성화하세요.
빠른 선택 도구를 사용하여 Photoshop에서 어떻게 자르나요?
Quick Selection(빠른 선택) 도구는 기본적으로 선택 영역을 만들기 위한 도구이지, 직접적으로 자르기 위한 도구는 아닙니다. 이 도구를 활용해 이미지를 자르려면 다음 단계를 따르세요:
1. 먼저 Quick Selection 도구를 사용해 원하는 부분을 선택합니다.
2. 선택이 끝나면 상단 메뉴의 Select(선택) 메뉴로 가서 “Inverse”(반전)을 선택해 선택 영역을 반전시킵니다.
3. Windows에서는 Ctrl + Shift + I, Mac에서는 Cmd + Shift + I를 눌러서도 선택 반전을 할 수 있습니다.
4. 마지막으로 Image(이미지) 메뉴에서 Crop(자르기)을 선택하면, 방금 지정한 영역을 기준으로 이미지가 자동으로 잘립니다.
Photoshop에서 선택 항목을 어떻게 자르고 이동합니까?
포토샵에서 선택 영역을 잘라내고 이동하려면 다음 단계를 따르세요:
1. 사각형 선택 도구(Rectangular Marquee), 올가미(Lasso) 등 원하는 선택 도구를 사용해 영역을 지정합니다.
2. Windows에서는 Ctrl + X, Mac에서는 Cmd + X를 눌러 선택 영역을 잘라냅니다.
3. 이미지에서 원하는 위치로 이동합니다.
4. Windows에서는 Ctrl + V, Mac에서는 Cmd + V를 눌러 잘라낸 선택 영역을 새 위치에 붙여넣습니다.
Photoshop에서 여러 이미지를 한 번에 자를 수 있나요?
Photoshop에는 여러 이미지를 동시에 자르는 기능이 내장되어 있지 않습니다. 그러나 이미지 배치에 대한 자르기 프로세스를 자동화하는 작업을 생성할 수 있습니다. 하나의 이미지에 자르기 동작을 기록한 다음 파일 메뉴 아래의 배치 명령을 사용하여 이미지 폴더에 적용합니다.
Photoshop에서 원본 해상도를 잃지 않고 이미지를 자르는 방법이 있습니까?
예, Photoshop에서는 내용 인식 자르기 기능을 사용하여 원래 해상도를 유지하면서 캔버스를 확장할 수 있습니다. 이를 통해 픽셀을 영구적으로 삭제하지 않고 이미지를 자를 수 있으므로 나중에 품질 저하 없이 자르기를 다시 조정할 수 있는 유연성이 제공됩니다.
결론
이제 여러분은 포토샵에서 크롭하는 방법을 충분히 익혔습니다. 초보자든 전문가든, 이 가이드는 기본 사용법부터 문제 해결, 그리고 화질 손실 없이 이미지 크기를 조절하는 팁 도구까지 모두 다루고 있습니다. 이제 창의력을 발휘할 준비가 되었다면, 포토샵이 지닌 잠재력을 직접 탐색해 보세요.
-
 비디오 품질을 손상시키지 않고 MP4 파일을 자르는 방법 [2025]
 귀하에게 맞춰 제공되는 쉬운 단계를 통해 MP4 자르기 방법을 알아보세요. 따라서 우리는 귀하가 사용할 수 있는 최고의 자르기 도구를 제공하므로 속도를 유지하십시오.
-
 Photoshop에서 이미지를 잘라내는 단계별 가이드
 포토샵을 사용하고 있나요? 이 기사가 당신을 위한 것일 수도 있습니다. Photoshop에서 이미지를 빠르고 쉽게 잘라내는 방법을 알아보세요. 지금 읽고 뭔가를 발견해보세요.
-
 Photoshop에서 사진의 워터마크를 제거하는 방법 [단계]
 Photoshop은 널리 사용되는 편집 도구 중 하나입니다. 여기에서 Photoshop을 사용하여 사진에서 워터마크를 제거하는 무료 자습서를 받으십시오. 또한 다른 방법을 찾으십시오.