


PowerPoint에서 그림을 압축하는 가장 좋은 방법
PPT는 처음에는 그다지 크지 않을 수 있지만, 온갖 선명한 사진, 고화질 비디오, 그리고 긴 텍스트를 삽입하면 엄청난 파일이 될 수 있습니다. 완성된 PPT를 이메일이나 소셜 미디어를 통해 다른 사람들에게 보내려고 하면 파일 크기 제한에 부딪히게 됩니다. 공개된 PPT의 이미지가 너무 크면 페이지 전체 콘텐츠가 로딩되는 데 지연이 발생할 수 있습니다. 이는 청중이 우리에 대해 갖는 인상에 영향을 미칩니다.
그렇다면 이런 종류의 문제를 해결하기 위해 어디서부터 시작해야 할까요? 우선 PowerPoint에서 사진 압축하기를 시도해 보세요. Windows와 Mac용 PowerPoint 모두 이미지 압축 기능을 제공합니다. 이 가이드에서는 이를 적용하는 방법을 자세히 설명하겠습니다. 더 복잡한 이미지에 대한 다른 요구가 있을 수 있다는 점을 고려하여, 가장 전문적인 서드파티 압축 도구도 함께 추천해 드립니다. 모두 당신이 최대한 매끄러운 프레젠테이션을 만들 수 있도록 돕기 위한 것입니다.

1부. Windows에서 PowerPoint의 그림을 압축하는 방법
PC부터 시작해 보겠습니다.
Windows 컴퓨터에서 PowerPoint로 사진을 압축하는 방법은 다음과 같습니다.
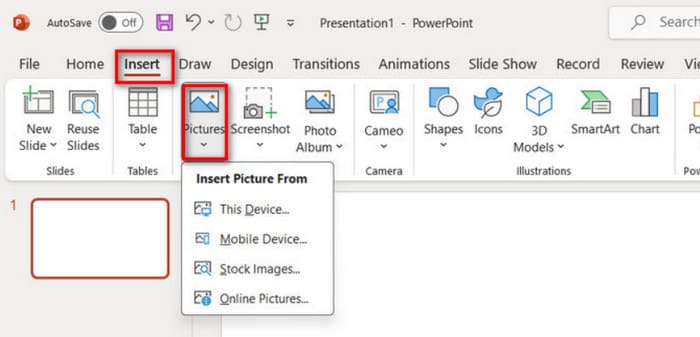
1단계. PowerPoint를 열고 삽입 > 그림으로 이동한 뒤, 압축하려는 이미지를 추가합니다.
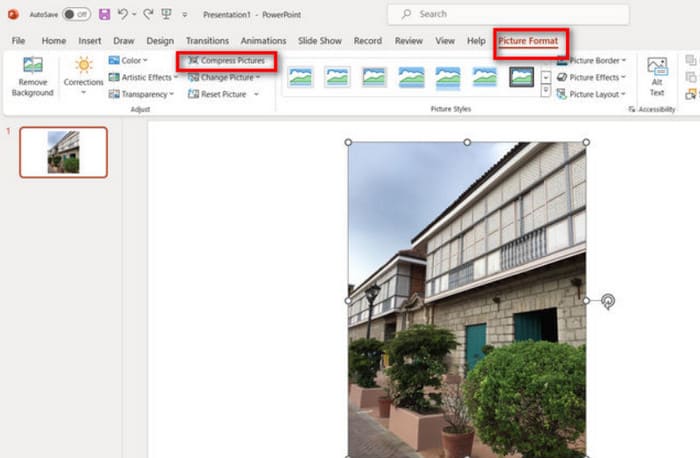
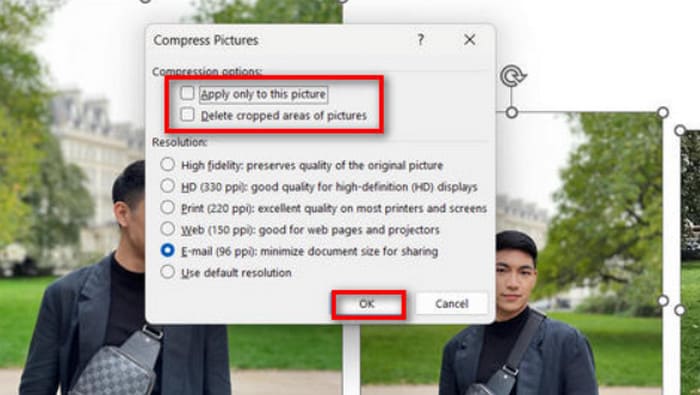
2단계. 이미지를 선택한 다음, 그림 서식 탭에서 그림 압축을 클릭합니다.
3단계. 압축 옵션과 대상 해상도를 선택합니다. PowerPoint에서 제공하는 옵션은 유연하며, 압축 후 그림의 해상도를 원하는 대로 설정할 수 있습니다.
4단계. 선택한 이미지에만 변경 사항을 적용하려면 이 그림에만 적용을 체크한 후 확인합니다.
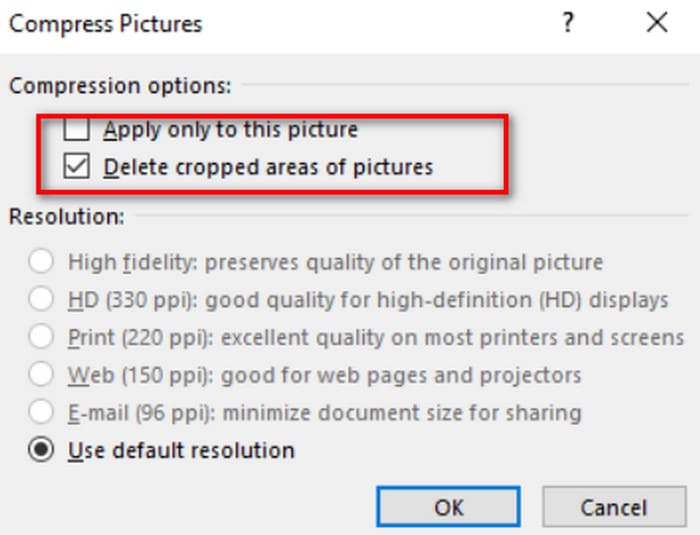
위 단계는 현재 사진을 압축할 때 적용됩니다. 이미 잘라낸 사진인 경우, "잘린 사진 영역 삭제" 옵션을 켜는 것을 잊지 마세요. 이렇게 하면 현재 사진의 파일 크기도 어느 정도 줄어듭니다.
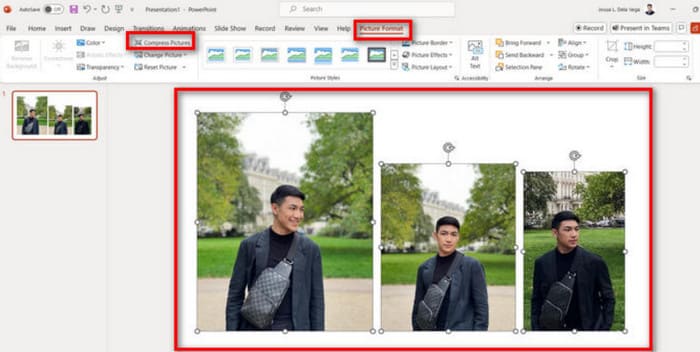
Windows에서 여러 이미지를 동시에 압축하려면 계속 읽어보세요.
PPT에서 그림을 압축하는 방법은 다음과 같습니다.
1단계. 삽입 탭으로 이동해 그림을 선택하고 이미지를 가져옵니다.
2단계. 모든 사진을 마우스 오른쪽 버튼으로 선택한 뒤, 그림 서식 탭으로 이동해 그림 압축을 클릭합니다.
3단계. 압축 설정을 선택합니다. 프레젠테이션의 모든 이미지를 압축하려면 이 그림에만 적용의 체크를 해제합니다. 설정이 완료되면 확인을 클릭합니다.
2부. Mac에서 PowerPoint로 사진 압축하기
Mac 컴퓨터의 PowerPoint는 이미지 크기 압축도 지원합니다. Mac 사용자라면 이 하위 섹션을 참조하세요.
MacBook에서 PowerPoint에서 그림을 압축하는 방법은 다음과 같습니다.
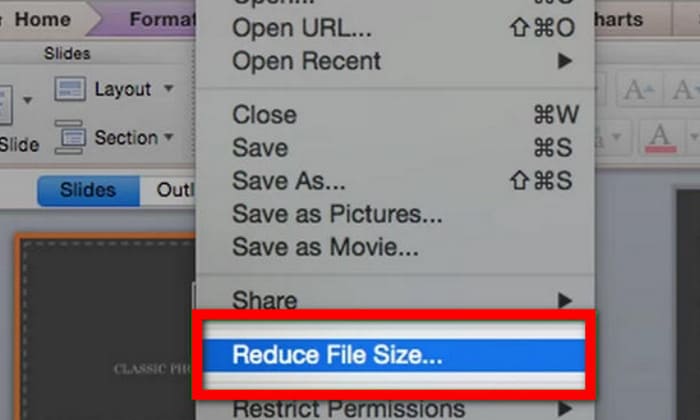
1단계. PowerPoint 파일을 연 뒤, 파일 메뉴로 가서 파일 크기 줄이기를 선택합니다.
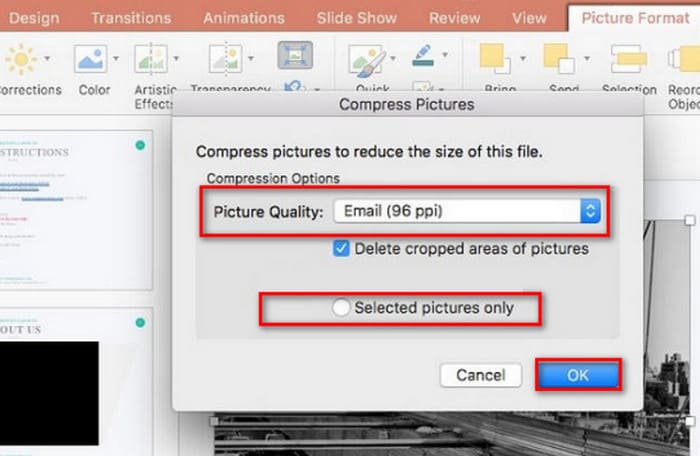
2단계. 팝업 대화 상자에서 그림 품질 드롭다운에서 전자 메일(96 ppi)를 선택하고 자른 영역의 그림 삭제를 체크합니다.
3단계. 선택한 그림만을 선택한 뒤 확인을 클릭합니다.
Mac에서 여러 사진의 크기를 동시에 압축하려면 다음 단계를 따르세요.
1단계. 파일 메뉴에서 파일 크기 줄이기를 선택합니다.
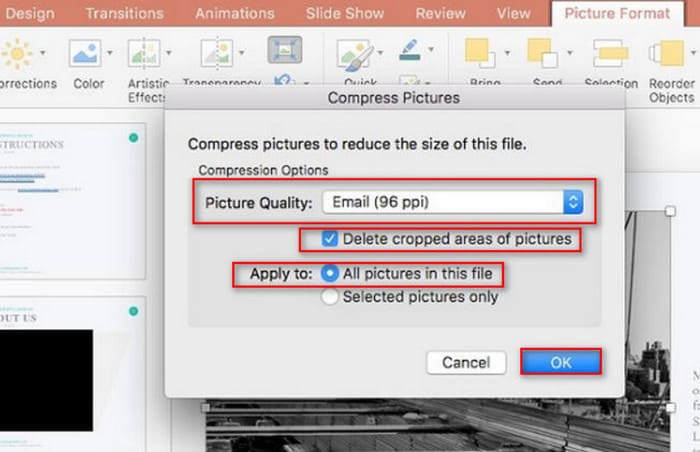
2단계. 그림 품질 아래에서 전자 메일(96 ppi)을 선택합니다. 그리고 자른 영역의 그림 삭제를 체크합니다.
3단계. 이 파일의 모든 그림을 선택한 다음 확인을 클릭합니다.
3부. 타사 도구를 사용하여 PowerPoint 이미지를 압축하는 방법
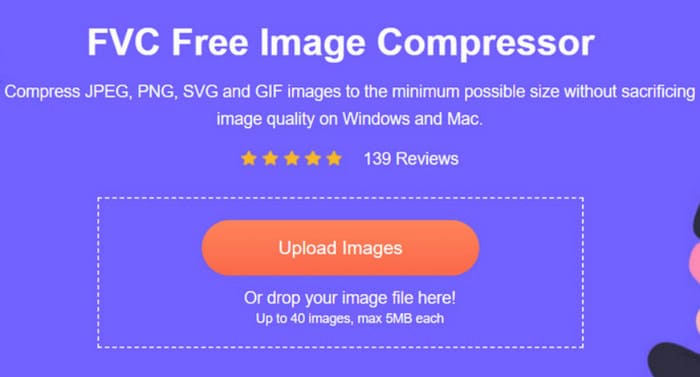
PowerPoint의 사진 압축 기능은 사용하기 쉽고 효율적이지만, 사진 품질에 크게 영향을 줄 수 있습니다. 이는 PPT가 전문적으로 보이지 않게 만들고, 화면에 충분히 선명하게 표시되지 않을 수 있습니다. 그래서 FVC Free Image Compressor와 같은 전문 도구 사용을 권장합니다. 먼저 PPT에 삽입하려는 이미지를 이 온라인 플랫폼에 업로드하세요. 클릭 한 번으로 원하는 크기까지 압축할 수 있습니다. 이 플랫폼에는 회전, 뒤집기, 이미지 크기 조절과 같은 기본 편집 기능도 내장되어 있습니다. 모든 편집이 끝나면 이미지를 컴퓨터에 저장한 뒤 PPT에 삽입하면 됩니다. 이 과정 전체에서 어떤 소프트웨어도 다운로드하거나 설치할 필요가 없습니다. 브라우저만 열면 됩니다. 더 놀라운 점은 FVC Free Image Compressor가 완전히 무료라는 것입니다.
FVC 무료 이미지 압축기를 이용해 PowerPoint에서 사진을 압축하는 방법은 다음과 같습니다.
1단계. 브라우저에서 FVC Free Image Compressor를 엽니다.
2단계. Upload Images를 클릭해 압축하려는 파일을 추가합니다.
3단계. 압축은 자동으로 시작됩니다. 이후 결과를 확인하고 Download를 클릭해 용량이 줄어든 이미지를 저장합니다.
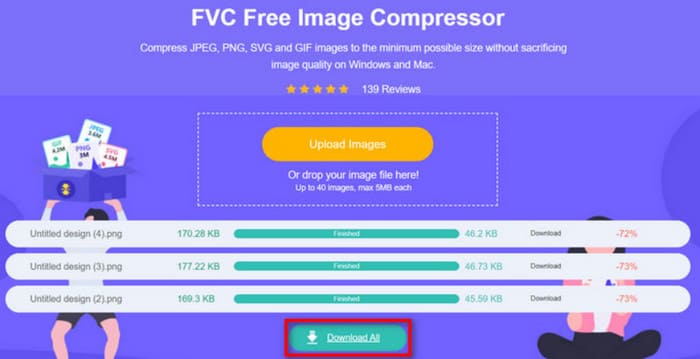
압축이 완료되면 FVC Free Image Compressor는 압축된 이미지의 비율과 압축 전후의 크기를 화면에 표시합니다.
압축률이 매우 높음에도 불구하고 이미지 품질에는 큰 영향이 없다는 사실에 놀라실 것입니다. FVC 무료 이미지 압축기는 고급 최적화 및 압축 알고리즘을 사용합니다.
4부. PowerPoint에서 사진 압축에 대한 FAQ
내 PowerPoint 파일 크기가 왜 이렇게 큰가요?
많은 사람들이 PowerPoint 파일을 만들 때 고해상도 이미지를 삽입하는 데 익숙할 것입니다. 또한 적절한 위치에 비디오 애니메이션과 전환 효과를 삽입하는 것도 좋습니다. 이러한 모든 디자인 요소는 파일 크기를 증가시킵니다. PowerPoint를 저장 및 전송하기 쉬운 형식으로 만들려면 삽입된 이미지나 비디오를 압축하는 것이 좋습니다. 하지만 이 점을 명심하고 사진의 시각적 품질을 너무 낮추지 않도록 주의하세요.
파워포인트에서 그림을 압축하려면 어떻게 해야 하나요?
PowerPoint 자체에도 이미지 압축 기능이 있습니다. 이를 사용하려면 압축할 그림을 선택한 뒤 상단 작업 표시줄에서 그림 서식 > 그림 압축을 찾으면 됩니다.
그림을 압축하려면 어떻게 해야 하나요?
전문적인 이미지 압축 도구는 매우 많습니다. Adobe Photoshop, FVC Free Image Compressor, Google Photos, TinyPNG 등에서 선택할 수 있습니다. GIF 압축 도구를 찾고 있다면 EZgif, VEED.io, FreeConvert 등을 확인해 보세요.
결론
이 가이드에서는 Windows 사용자든 Mac 사용자든 관계없이 PowerPoint에서 사진을 압축하는 방법을 찾을 수 있습니다. PowerPoint에 기본 그림 압축 기능이 있긴 하지만, 그림 품질과 파일 크기 사이의 더 나은 균형을 찾는 데는 충분하지 않을 수 있습니다.
더욱 효율적인 파워포인트 이미지 압축을 위해 FVC Free Image Compressor와 같은 전문 도구를 사용해 보세요. 사용하기 쉽고 로딩 속도도 빠릅니다. 이미지 처리 방법도 위에서 설명했습니다.
-
 PowerPoint에서 그림 크기를 조정하는 방법 [크기를 변경하는 가장 빠른 방법]
 PowerPoint에서 그림 크기를 조정하는 방법을 배우는 것은 특히 프레젠테이션에서 사용하려는 경우 필수적입니다. 방법을 알아보려면 이 기사를 읽으십시오.
-
 PowerPoint에서 비디오가 재생되지 않는 문제를 해결하는 방법 | 빠른 가이드
 PowerPoint 비디오가 재생되지 않습니까? 현재 재생되지 않는 삽입된 비디오에 대한 좌절감을 당사의 최고의 5가지 솔루션으로 쉽게 해결해 보세요.
-
 YouTube 용 비디오를 압축하는 2 가지 방법
 YouTube 동영상이 크고 업로드 속도가 느립니까? 온라인과 컴퓨터에서 두 가지 방법으로 YouTube 용 비디오 파일 크기를 더 작게 압축하면됩니다.