

전문가 수준의 결과를 위해 iPhone에서 사진을 흐리게 하는 4가지 방법
빠르게 변화하는 스마트폰 사진 세계에서 아이폰은 강력한 성능을 자랑하며, 사용자가 소중한 순간을 손쉽게 담을 수 있도록 다양한 기능을 제공합니다. 아이폰의 사진 편집 기능 중 자주 간과되는 보석 같은 기능이 바로 이미지 흐리기(블러)입니다. 이 기법은 사진에 깊이감과 드라마틱한 분위기, 그리고 약간의 전문적인 느낌까지 더해 줄 수 있습니다. 이 글에서는 아이폰에서 사진을 흐리게(블러 처리)하는 방법을 단계별로 자세히 설명하며, 인물 모드 활용부터 온라인 도구, 서드파티 앱 사용까지, 손끝에서 펼쳐지는 창의적인 가능성의 세계를 열어 보이겠습니다.
1부. iPhone에서 사진을 흐리게 하는 방법
인물 모드
iPhone의 인물 사진 모드는 사진 품질에 깊이를 더하기 위해 설계된 특수 기능입니다. 얕은 피사계 심도를 만들어 피사체가 배경보다 돋보이게 합니다. iPhone에서 사진의 배경을 흐리게 할 수 있습니까?와 같은 질문은 Apple 생태계에 처음 입문하는 사람이 흔히 묻는 질문입니다. iOS는 최신 7 Plus 모델에 세로 모드를 도입했기 때문에 iPhone에서 사진을 흐리게 하는 것이 가능합니다. 이 작업을 수행하는 단계는 아래에 나열되어 있습니다.
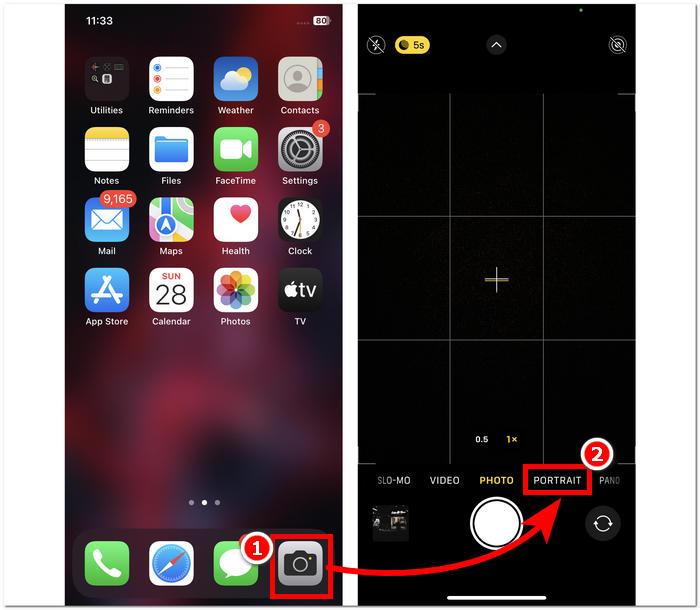
1단계. 아이폰에서 카메라 앱을 엽니다.
2단계. 카메라 설정에서 인물(포트레이트) 모드를 선택합니다.
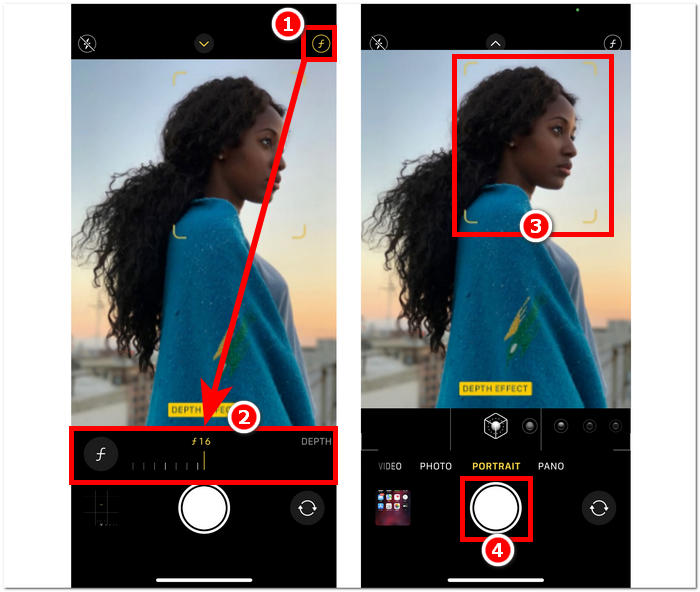
3단계. 화면 오른쪽 상단에 있는 f 아이콘을 탭한 뒤, 사진에 적용하고 싶은 심도(배경 흐림 정도)를 조절합니다.
4단계. 원하는 심도가 설정되면 피사체를 탭해 초점을 맞춘 다음, 마지막으로 셔터 버튼을 눌러 사진을 촬영합니다.
아이폰에서 인물 모드를 활용하는 것은 사진의 피사계 심도(Depth of Field)가 어떤 영향을 미치는지 이해하고 카메라 앱 인터페이스에 익숙해지면 매우 간단합니다. 또한, 나중에 마음이 바뀌더라도 이미지의 흐림을 되돌리는 것도 쉽게 할 수 있습니다.
인물 모드 제외
인물 모드 없이 iPhone에서 사진을 흐리게 만드는 방법은 무엇입니까? 세로 모드가 없는 iPhone을 사용하여 사진을 흐리게 만드는 것은 7 Plus 이상 모델에 세로 모드가 도입되었기 때문에 어려울 수 있습니다. 따라서 우리는 iPhone에 인물 사진 모드가 없는 사용자를 위한 방법을 찾습니다. 이는 팁이나 해킹에 가깝고 사용자의 수작업이 필요합니다. 효과적으로 수행하면 세로 모드와 비슷한 결과를 얻을 수 있습니다.
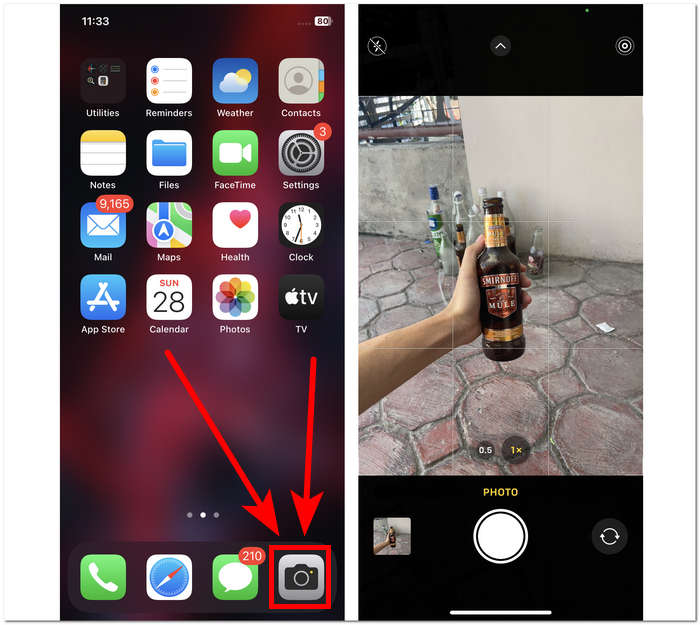
1단계. 아이폰에서 카메라 앱을 엽니다.
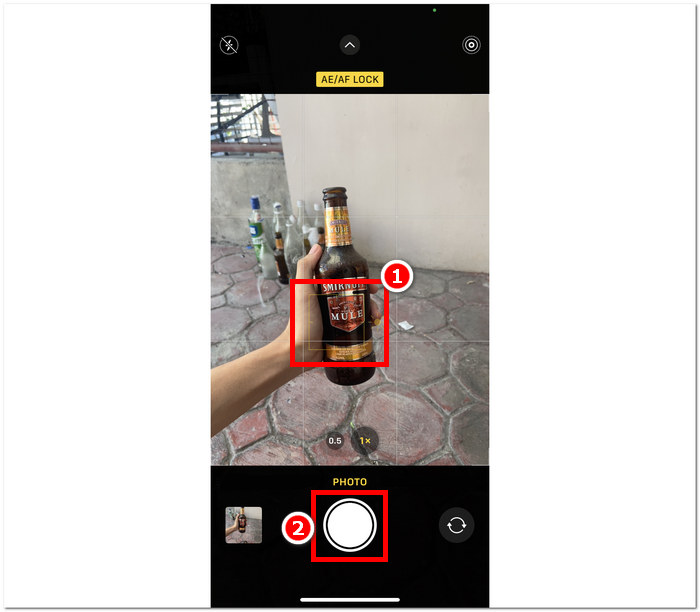
2단계. 기본 화면에서 배경과 피사체 사이의 거리를 늘리기 위해, 피사체와 함께 배경으로부터 충분히 떨어지도록 뒤로 이동합니다.
3단계. 피사체를 길게 누르고 있으면 화면 상단에 AE/AF LOCK 표시가 나타납니다. 이렇게 하면 피사체에 초점이 고정되어 배경이 자연스럽게 흐려집니다.
4단계. 피사체가 흐릿한 배경과 또렷하게 분리되어 보이면 촬영할 준비가 된 것입니다. 셔터 버튼을 눌러 사진을 촬영합니다.
카메라 설정의 인물 모드 기능 없이도 iPhone에서 피사체와 배경 사이의 거리를 수동으로 만들고 초점을 올바르게 맞추면 사진을 흐리게 할 수 있습니다. 이 단계는 iOS 사용자뿐만 아니라 카메라 설정에 인물 사진 모드가 없는 Android 사용자에게도 적용됩니다.
타사 앱: Snapseed
Snapseed는 Google에서 개발한 강력하고 전문적인 수준의 사진 편집 애플리케이션 중 하나입니다. 이 앱은 사용자가 모든 사진 편집 작업에 필요한 기능과 도구로 가득 차 있으며, 그중에는 iPhone만 사용하여 사진을 흐리게 처리하는 기능도 있습니다. 타사 응용 프로그램을 사용하면 iPhone 사진에서 사람의 얼굴을 흐리게 하는 방법에 대한 우려를 해결하는 데 도움이 될 수 있습니다. 이 응용 프로그램을 사용하면 흐리게 할 부분을 결정할 수 있기 때문입니다. 피사체를 탭하여 초점을 맞추세요.
1단계. 앱 스토어에서 Snapseed를 다운로드한 뒤, 아이폰에서 실행합니다.
2단계. 앱 화면에서 아무 곳이나 탭하여 블러 효과를 적용하고 싶은 사진을 불러옵니다.
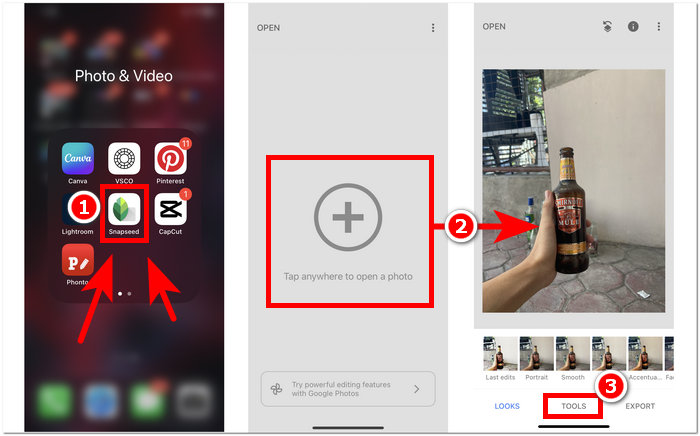
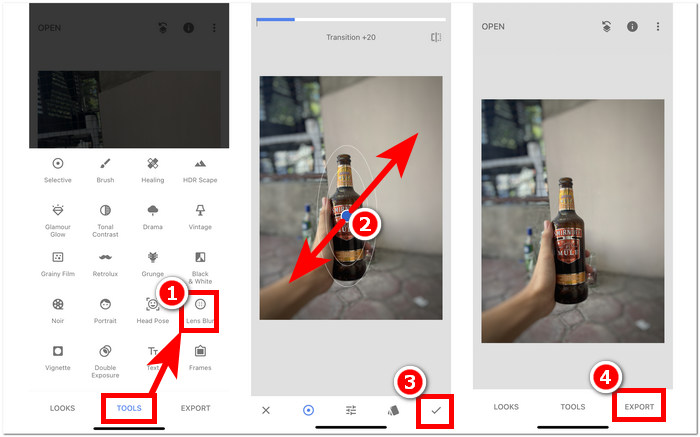
3단계. TOOLS(도구) 메뉴에서 Lens Blur 옵션을 찾아 탭합니다. 그러면 사진 위에 원형 프레임이 생기는데, 이 원 안이 초점 영역이며, 바깥 부분이 흐려질 영역입니다.
4단계. 손가락을 모으거나 벌려 원형 프레임의 크기를 조절합니다. 피사체 크기에 맞게 원의 크기를 설정한 뒤, 편집 결과가 마음에 들면 체크 버튼을 탭하고, 이어서 EXPORT를 눌러 변경 사항을 사진에 저장합니다.
Snapseed의 다용성은 이미지에 블러 기능을 원활하게 추가하는 등 다양한 사진 편집 작업으로 확장됩니다. 이 앱은 iPhone뿐만 아니라 다른 기기에서도 사용할 수 있으므로 포괄적인 편집 경험을 원하는 사용자에게 이상적이고 편리한 도구입니다. Snapseed의 사용자 친화적인 인터페이스와 기기 간 호환성을 통해 이보다 더 쉽게 사진에 원하는 흐림 효과를 적용할 수 없습니다.
2부. iPhone 사진에서 흐리게 하지 않고 개체를 제거하는 방법
아이폰 사진에서 완벽한 블러 효과를 구현하는 것은 전체가 지나치게 흐릿해지거나 일부 사물이 흐리게 보이는 등의 문제로 인해 쉽지 않을 수 있습니다. 이러한 흐림만으로는 해결할 수 없는 사물이 있다면, 과감히 제거하는 편이 더 나을 때도 있습니다. 다행히 FVC Free Watermark Remover는 iOS 사용자는 물론 비모바일 기기 사용자에게도 흐릿하고 원치 않는 사물이나 워터마크를 무료로 제거할 수 있는 도움을 제공합니다. FVC는 여러 기기에서 다양한 웹 브라우저로 접속 가능한 웹 기반 도구입니다. 설치나 구독 없이 누구나 무료로 이용할 수 있도록 설계되었습니다. 아래 단계만 따라 하면 흐리게 만들지 않고도 매끄럽게 보정된 결과를 얻을 수 있습니다.
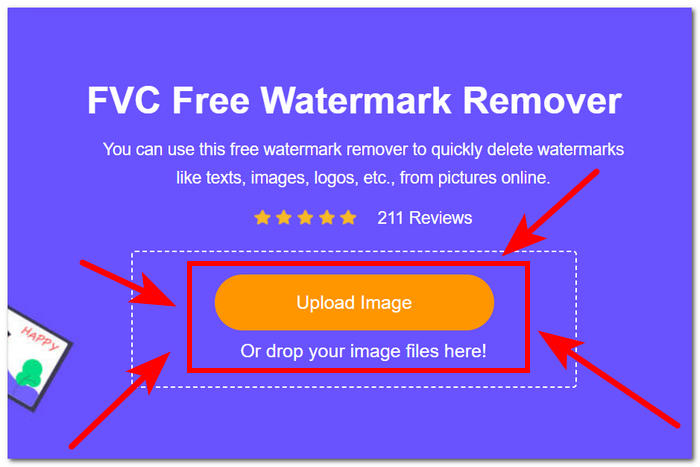
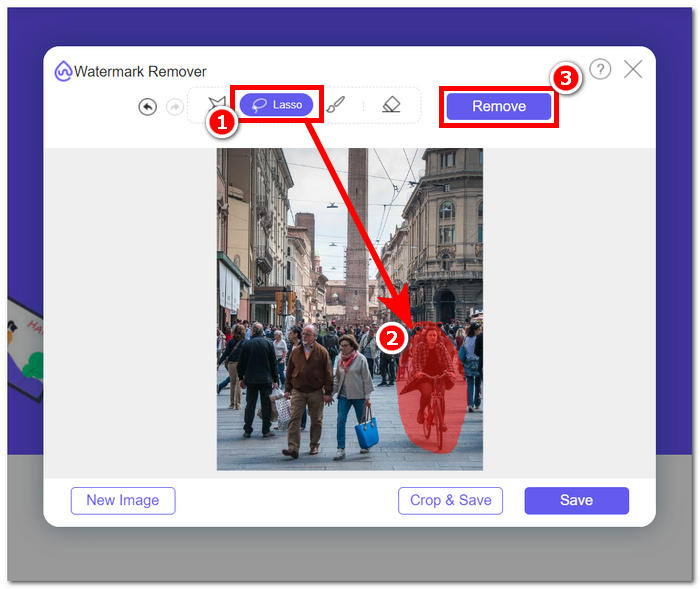
1단계. 모바일 또는 데스크톱 브라우저에서 FVC Free Watermark Remover 페이지에 접속한 뒤, Upload Image 버튼을 클릭하여 이미지를 업로드합니다.
2단계. 사진이 편집 화면에 올라오면 상단의 Lasso tool을 클릭한 뒤, 흐릿하게 지우고 싶은 사물이나 텍스트 부분을 따라 그려 선택하고, 마지막으로 Remove 버튼을 눌러 사진에서 제거합니다.
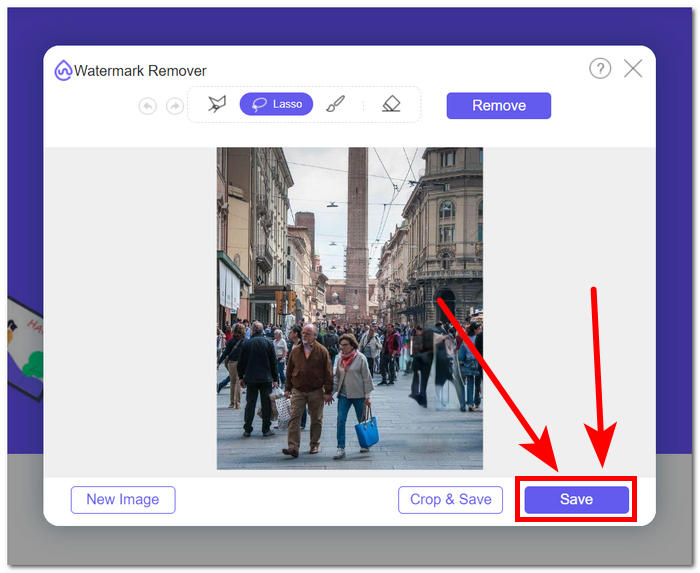
3단계. 사진 처리가 완료되면 새로 편집된 사진의 미리보기를 확인할 수 있습니다. 제거 결과가 만족스러우면 Save 버튼을 눌러 사진을 다운로드합니다.
FVC Free Watermark Remover는 사진의 선명도를 해치지 않고도 사물을 제거할 수 있는 능력을 보여 주었습니다. 따라서 인물 모드나 서드파티 앱으로 사진을 흐리게 처리하든, 이 도구는 그 과정에서 발생할 수 있는 다양한 문제를 해결해 줄 훌륭한 보조 도구라고 자신 있게 말할 수 있습니다. 또한 이 도구는 원래 JPG 이미지의 워터마크 제거를 비롯해 PNG 등 다양한 포맷을 위한 용도로 설계되었습니다.
3부. iPhone에서 사진을 흐리게 하는 방법에 대한 FAQ
앱 없이 iPhone에서 사진을 어떻게 흐리게 처리하나요?
앱을 사용하지 않고 iPhone에서 사진을 흐리게 하려면 내장된 편집 기능을 활용할 수 있습니다. 사진 앱을 열고 편집하려는 사진을 선택한 후 편집을 탭하고 점 3개 아이콘을 선택한 다음 마크업을 선택합니다. 그런 다음 펜 도구를 사용하여 흐리게 처리하려는 영역을 그릴 수 있습니다.
iPhone 사진 앱에 흐림 도구가 있나요?
iPhone 사진 앱에는 전용 흐림 도구가 없습니다. 하지만 인물 사진 모드 사진에서 배경 흐림을 조정하기 위한 깊이 도구를 포함하여 다양한 편집 옵션을 제공합니다. 사진 앱을 열고 인물 사진 모드 사진을 선택한 다음 편집을 탭하고 깊이 슬라이더를 사용하여 배경 흐림을 제어합니다.
모든 iPhone에 인물 모드가 있고 배경이 흐려지나요?
모든 iPhone에 인물 사진 모드와 배경을 흐리게 하는 기능이 있는 것은 아닙니다. 인물 사진 모드는 iPhone 7 Plus 이상에서 사용할 수 있었습니다. iPhone에 인물 사진 모드가 있는지 확인하려면 카메라 앱을 열고 인물 사진이 옵션으로 나타나는지 확인하세요.
사진을 찍은 후 iPhone에서 배경을 흐리게 하는 방법은 무엇입니까?
사진을 촬영한 후 iPhone에서 배경을 흐리게 하려면 iPhone에서 인물 사진 모드 기능을 지원하는 경우 이를 사용할 수 있습니다. 사진 앱을 열고 사진을 선택하고 편집을 탭한 다음 심도 슬라이더를 사용하여 배경 흐림을 조정합니다. 이 기능은 특정 iPhone 모델에서만 사용할 수 있습니다.
iPhone에서 사진의 일부를 흐리게 만드는 방법은 무엇입니까?
iPhone에서 사진의 일부를 흐리게 처리하려면 사진 앱의 마크업 도구를 사용하면 됩니다. 사진 앱을 열고 사진을 선택한 후 편집을 누르고 점 3개 아이콘을 선택한 다음 마크업을 선택합니다. 펜 도구를 사용하여 흐리게 처리하려는 영역 위에 그림을 그리고 필요에 따라 강도를 조정합니다.
결론
결론적으로, 아이폰에서 사진을 흐리게 처리하는 기능은 이미지에 깊이감과 드라마, 그리고 전문적인 분위기를 더해 줄 수 있는 무궁무진한 가능성을 엽니다. 기본으로 제공되는 인물 모드 활용부터 Snapseed 같은 서드파티 앱 사용까지, 초보자와 숙련된 사진가 모두에게 유연한 선택지를 제공합니다. 여기에 FVC Free Watermark Remover와 같은 도구를 더하면, 원치 않는 사물을 선명도를 해치지 않고 제거할 수 있어 걱정을 덜 수 있습니다. 아이폰 사용자가 이러한 기법과 도구를 꾸준히 탐색할수록, 사진 블러 처리의 흥미로운 세계는 더욱 쉽고 즐거운 영역이 될 것입니다. 이제 아이폰을 손에 들고, 이 방법들을 하나씩 시도해 보며 사진을 전문가 수준으로 끌어올려 보세요!
-
 김프를 사용하여 이미지에서 배경을 제거하는 방법
 김프를 시작하고 이미지에서 배경을 제거하는 단계별 프로세스를 시작하세요. 오늘 김프를 사용하여 투명한 이미지를 만드는 효율적인 방법을 찾아보세요!
-
 온라인과 오프라인에서 이미지 크기를 늘리는 방법
 품질 저하 없이 이미지 크기를 늘리는 가장 쉬운 방법을 알아보세요. 최적의 사진 품질을 보장하려면 크기 조정 도구와 소프트웨어를 확인하세요.
-
 PPT는 배경 이미지를 어떻게 제거합니까? 종합 가이드
 프레젠테이션을 한 단계 더 발전시킬 준비가 되셨나요? 이 기사에서는 PPT가 배경 이미지를 제거하고 뛰어난 PowerPoint 프레젠테이션을 쉽게 만드는 방법을 알아보세요.