


3가지 효과적인 방법을 사용하여 iPhone에서 이미지 크기를 조정하는 방법 [무료]
웹에서 iPhone으로 저장한 이미지들 중에는 가로세로 비율과 크기 때문에 배경화면이나 홈 화면으로 딱 맞지 않는 경우가 있습니다. 잘못된 크기의 사진을 배경화면이나 홈 화면으로 설정하면 사진이 흐릿해지거나 화면에 맞게 채워지지 않고 양옆이 검게 보이기도 합니다. 꽤 번거롭죠? 다행히 App Store에서 사진 리사이저 앱을 내려받거나, 단축어(Shortcut)를 사용하거나, 내장된 사진 편집 기능을 활용해 이 문제를 해결할 수 있습니다. iPhone에서 사진 크기를 빠르게 조절하고 싶다면, 이 글을 몇 분만 읽어 보면서 기기에서 발생하는 크기 문제를 바로잡아 보세요.

1부. iPhone에서 이미지 크기를 조정하는 효과적인 방법 3가지 [다운로드 가능 및 내장]
바로 가기 사용하기 [내장]

단축어(Shortcut)는 iOS 사용자가 다양한 기능을 직접 만들어 쓸 수 있게 해 주는 앱으로, 로컬 파일에 있는 이미지를 리사이즈하는 기능도 만들 수 있습니다. iOS 13 이상 버전에는 이 앱이 기본으로 설치되어 있습니다. 도입된 지 얼마 되지 않은 앱이라 이전 iOS 버전에는 이런 고급 기능의 앱이 기본 제공되지 않지만, iPhone이나 iPad의 App Store에서 무료로 내려받아 사용할 수 있습니다. 이 앱을 이용해 iPhone 이미지 크기를 조절하는 방법을 알려 드리니, 아래 단계들을 따라 해 보세요.
1단계. iPhone에서 단축어 앱을 연 뒤, 상단의 플러스(+) 버튼을 눌러 이미지 크기 조절용 새 단축어를 추가합니다.
2단계. 세 줄 메뉴(점 세 개 아이콘)를 누른 뒤 단축어 이름을 입력합니다. 이 단축어에는 ‘Resizing Photo’와 같은 이름을 사용할 수 있습니다. ‘공유 시트에 표시(Show in Share Sheet)’를 켜 두면, 이미지를 공유할 때 이 단축어를 선택해 자동으로 크기를 조절할 수 있습니다.
3단계. 공유 시트의 ‘모든 항목(Anything)’ 선택을 해제하고, 타입을 ‘이미지(Images)’만 선택되도록 설정합니다. 그런 다음 ‘완료(Done)’를 눌러 설정을 저장합니다.
4단계. 이 기능을 사용하기 전에 플러스(+) 아이콘을 누르고, ‘미디어(Media)’를 선택한 다음 ‘이미지 크기 조절(Resize Image)’을 추가합니다. 필요에 따라 가로·세로 길이를 설정한 뒤 ‘완료(Done)’를 눌러 저장합니다. 이제 이미지를 공유할 때마다 이 단축어를 선택하면 자동으로 크기를 조절할 수 있습니다.
사진 앱 [내장] 사용하기
iPhone의 모든 버전에서 자유롭게 사용할 수 있는 또 다른 기본 앱은 ‘사진(Photos) 앱’입니다. 오랫동안 iPhone 사용자에게 믿을 만한 이미지 편집 및 보정 도구 역할을 해 온 만큼, 이 앱을 빼놓고는 이야기할 수 없습니다. 이 앱으로 크기 조절을 할 줄 아는 사용자도 있지만, 모르는 사용자도 있죠. iPhone에서 사진 크기를 조절하는 방법을 모르는 분들을 위해 아래 튜토리얼을 준비했습니다.
1단계. 사진(Photos) 앱을 열고 크기를 조절할 사진을 탭 합니다.
2단계. 크기를 변경할 사진을 선택한 뒤, ‘편집(Edit)’을 탭 합니다.
3단계. 오른쪽 상단의 자르기 아이콘을 누른 다음, ‘정사각형 모양의 버튼(비율 아이콘)’을 탭 합니다.
4단계. 여러 가지 화면 비율 프리셋이 표시되면 원하는 비율을 선택한 뒤, ‘완료(Done)’를 눌러 변경 사항을 저장합니다.
이미지 크기 사용 [다운로드 가능]
'Image Size’는 iOS에서 내려받아 iPhone 배경화면용 사진 크기를 쉽게 조절할 수 있는 서드파티 앱입니다. 앞에서 소개한 두 가지 방법과 달리, 이 앱은 사용하기 전에 App Store에서 따로 설치해야 합니다. iOS 기본 앱은 아니지만, 대부분의 iOS 버전에서 바로 다운로드해 사용할 수 있습니다. 무료 앱인 만큼 사용 중에 여러 개의 광고가 팝업으로 나타날 수 있습니다. 광고가 크게 신경 쓰이지 않는다면, 아래 단계에 따라 이 사진 리사이저 앱을 iPhone에서 사용해 보세요.
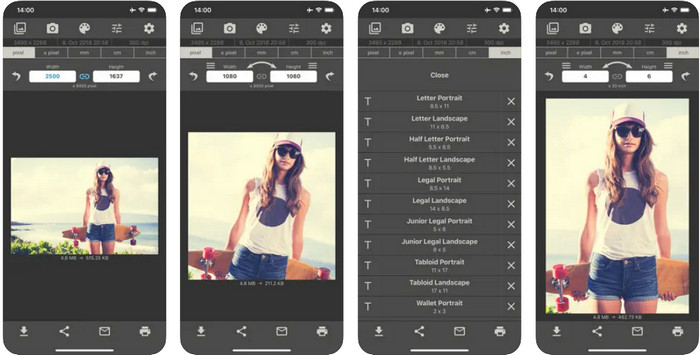
1단계. 이 사진 리사이저 앱을 iOS에 설치한 뒤 실행합니다.
2단계. ‘이미지(image)’ 아이콘을 눌러 이 앱에서 크기를 조절할 이미지를 불러옵니다.
3단계. 화면 상단에 현재 이미지에 설정된 치수가 표시되며, 여기서 원하는 가로·세로 크기로 값을 변경합니다.
4단계. ‘다운로드(download)’ 버튼을 눌러 크기를 조절한 이미지를 저장합니다.
2부. 광고나 설치 과정 없이 온라인에서 이미지 크기를 조정하는 가장 좋은 방법
'FVC Free Image Upscaler’를 사용하면, AI의 도움을 받아 모든 이미지의 크기를 자동으로 손쉽게 변경할 수 있습니다. 리사이즈 경험이 많지 않아도 이 도구만 있으면 충분합니다. 수백만 명의 사용자가 이 앱 하나로 이미지를 한 번에 리사이즈하고, 업스케일하며, 향상시키고, 이미지 품질을 개선하는 데 활용하고 있습니다. 게다가 이 모든 기능을 무료로 사용할 수 있다는 점이 큰 장점입니다. 놀랍지 않나요? 이 도구는 말 그대로 올인원 편집기를 제공한다고 볼 수 있습니다. 아래 단계를 따라 사진 크기를 조절하는 데 활용해 보세요.
1단계. 이 웹 도구를 사용하려면 이 링크를 클릭해 새 탭에서 페이지를 엽니다.
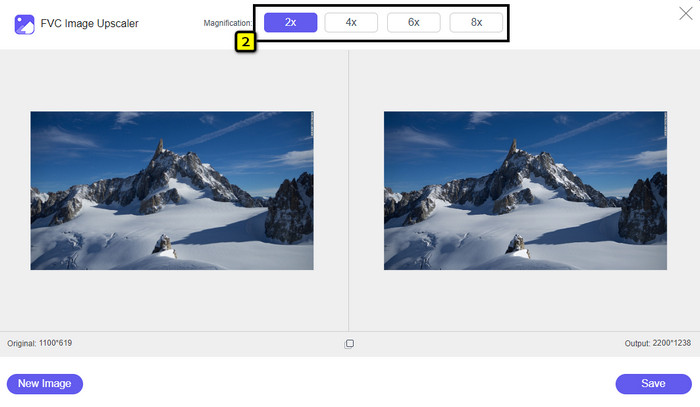
2단계. 크기를 조절할 이미지를 추가하려면 ‘이미지 추가(Add Image)’를 클릭합니다. 화면에 표시되는 파일 탐색기에서 원하는 이미지를 찾은 뒤 ‘열기(Open)’를 눌러 업로드합니다.

3단계. 앱이 업로드한 이미지를 불러온 뒤, 이미지에 적용할 배율을 선택합니다. 그러면 선택한 배율에 맞춰 사진이 자동으로 새 크기로 리사이즈됩니다.
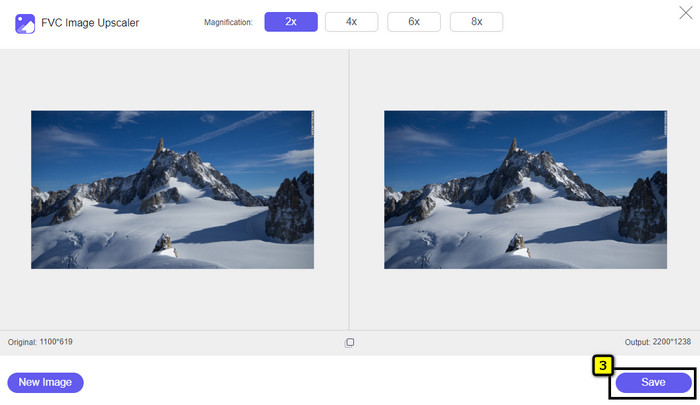
4단계. 이미지 수정을 마쳤다면 ‘저장(Save)’ 버튼을 눌러 크기가 조절된 이미지를 로컬 저장소에 내려받습니다.
3 부분. iPhone에서 이미지 크기를 조정하는 방법에 대한 FAQ
iPhone에서 배경 화면으로 사용하기에 완벽한 치수는 무엇입니까?
iPhone SE, 6, 6 plus, 7, 7 plus, 8, 8 plus 사용자의 경우 배경 화면으로 사용할 이미지의 표준 크기는 1136 x 640 ~ 1920 x 1080픽셀 사이여야 합니다. iPhone 장치에서 배경 화면으로 사용하려는 이미지의 표준 길이 및 높이입니다. 그러나 iPhone XR, 11 및 13을 사용하는 사용자는 이제 828 x 1792 또는 최대 3073 x 1420픽셀을 디스플레이 크기로 사용할 수 있습니다.
iPhone에서 이미지 크기를 조정하는 대신 자르기의 단점은 무엇입니까?
이미지를 자르면 크기가 잘리는 것을 볼 수 있습니다. 예, 이미지 크기가 변경되지만 전체 모양은 크기 조정과 동일하지 않습니다. 크기를 조정하는 동안 가장자리나 어떤 종류를 자르지 않고 이미지의 높이와 길이를 자유롭게 변경할 수 있습니다. 따라서 사진을 배경 화면으로 사용하고 맞게 만들고 싶다면 iPhone에서 자르는 것보다 크기를 조정하는 것이 좋습니다.
iPhone에서 크기를 조정한 후 이미지를 더 크게 만들면 왜 흐릿해집니까?
이 기사에 포함된 이러한 응용 프로그램과 방법은 PPI를 생성하지 않기 때문에 iPhone에서 크기가 조정된 이미지를 늘립니다. 따라서 이러한 유형의 문제가 발생하고 싶지 않다면 여기에 포함된 온라인 도구를 사용하여 iPhone에서 이미지 크기를 조정할 때 PPI를 생성해야 합니다.
결론
iPhone에서 사진 크기를 손쉽게 조절할 수 있는 다양한 도구를 소개했습니다. 별도의 앱을 설치하지 않아도, 기기에 기본으로 포함된 앱을 활용할 수 있습니다. 더 세밀한 설정이 필요하다면 여기서 소개한 전용 앱을 내려받아 사용하는 것도 좋은 방법입니다. 다만, 이미지 품질 저하 없이 크기만 조절하고 싶다면, 위에서 소개한 온라인 도구를 활용해 보세요. 사용 방법 튜토리얼은 2부에 정리해 두었으니 함께 참고하면 도움이 됩니다.
-
 모든 플랫폼에서 사용할 수 있는 최고의 GIF 리사이저 5가지 [2022]
 사용할 수 있는 GIF 크기 조정기를 알고 싶으십니까? 이 경우 아래에 제공된 정보는 모든 플랫폼에서 GIF에 사용할 수 있는 크기 조정기에 대해 설명합니다.
-
 이미지 크기 조정 방법 – Adobe 이미지 크기 조정 [온라인 및 오프라인]
 Adobe 크기 조정 이미지를 검색하는 경우 솔루션이 있습니다. 이 게시물을 자세히 보고 PC에서 Adobe를 사용하여 이미지 크기를 조정하는 방법을 배우십시오.
-
 Facebook용 사진 크기 조정 방법 [빠르고 쉬운 단계]
 Facebook에 대용량 이미지를 업로드하는 데 문제가 있는 경우 해결 방법이 있습니다. 이 문서를 완료하여 Facebook용 사진 크기를 조정하는 방법을 알아보세요.