


Photoshop에서 이미지를 빠르게 선명하게 하는 방법 - 알아야 할 완전한 안내서
최고 수준의 전문가용 이미지 편집기를 사용하면 가지고 있는 모든 이미지를 한 단계 더 업그레이드할 수 있습니다. Adobe Photoshop은 Windows, Mac, iOS, Android에서 다운로드해 사용할 수 있는 가장 오래되고 신뢰할 만한 소프트웨어입니다. 개발사인 Adobe 덕분에 이미 편집 기능을 최대한도로 도입하고 혁신해 왔습니다. 고급 기능 때문에, 새로 편집을 시작하는 사용자들은 UI와 전체적인 기능 때문에 이 프로그램을 어렵게 느끼기도 합니다. 겉보기에는 사용하기 어려워 보일 수 있지만, 특히 이미지를 선명하게 만드는 작업이라면 그렇지 않습니다. 여기에서는 Photoshop에서 이미지를 빠르게 선명하게 만드는 방법 전체 튜토리얼을 다룹니다.

1부. Photoshop에서 이미지를 선명하게 하는 방법에 대한 전체 자습서 [3가지 효과적인 선명하게 하는 방법]
Photoshop 이미지를 선명하게 하는 것은 이 프로그램을 사용하지 않은 사람들을 압도할 수 있습니다. 그러나 튜토리얼을 진행하기 전에 Adobe에서 공식 소프트웨어를 다운로드해야 합니다. 데스크탑에 설치하려면 올바른 다운로드 버튼을 선택하십시오. 데스크톱에 이 프로그램을 다운로드하지 않은 경우 무료 평가판을 사용할 수 있지만 평가판을 완료한 경우 월간 또는 연간 요금제를 구입해야 합니다. 다음을 모두 수행한 후 아래에 포함된 원하는 방법의 단계로 진행하십시오.
1번 방법. 하이 패스를 사용하여 Photoshop에서 이미지를 선명하게 만드는 방법:
Highpass를 사용하면 이미지를 강조 표시하고 Photoshop에 업로드하는 사진의 가장자리를 선명하게 만드는 데 도움이 되는 필터를 이미지에 적용할 수 있습니다. 아래에 추가한 튜토리얼을 따라 이미지에 하이패스를 적용하고 사용하는 방법을 배울 수 있습니다.
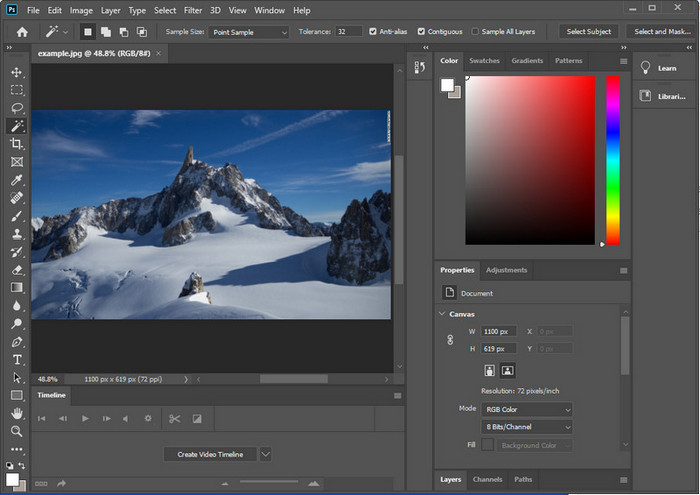
1단계. 소프트웨어를 실행한 뒤 파일(File)을 클릭하고 열기(Open)를 눌러 이미지를 불러온 다음, 선명하게 만들기 작업을 시작합니다.
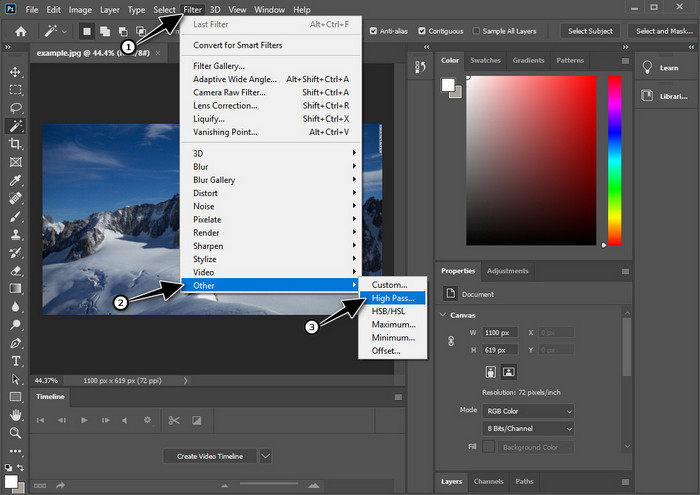
2단계. Photoshop에 불러온 이미지의 레이어를 하나 복제합니다.
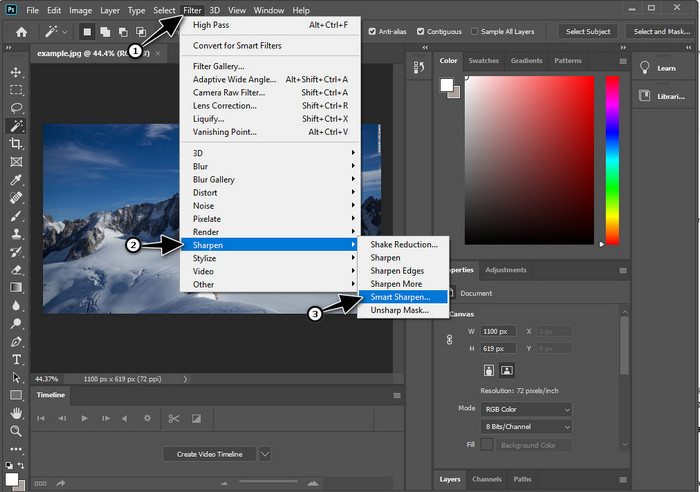
3단계. 상단 메뉴에서 필터(Filter)를 클릭한 뒤 기타(Other)를 선택하고 하이 패스(High Pass)를 누릅니다. 하이 패스를 적용하면 이미지가 회색으로 보이더라도 걱정할 필요가 없습니다. 원래 그런 효과입니다.
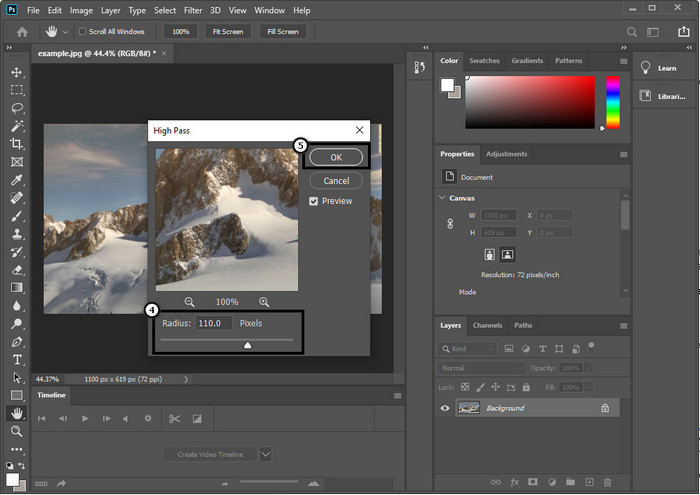
4단계. 화면에 팝업 창이 나타나면, 여기서 슬라이더(slider)를 드래그해 반경(Radius)을 조절해 이미지의 디테일을 더 살릴 수 있습니다. 설정이 끝나면 확인(OK)을 눌러 저장합니다.
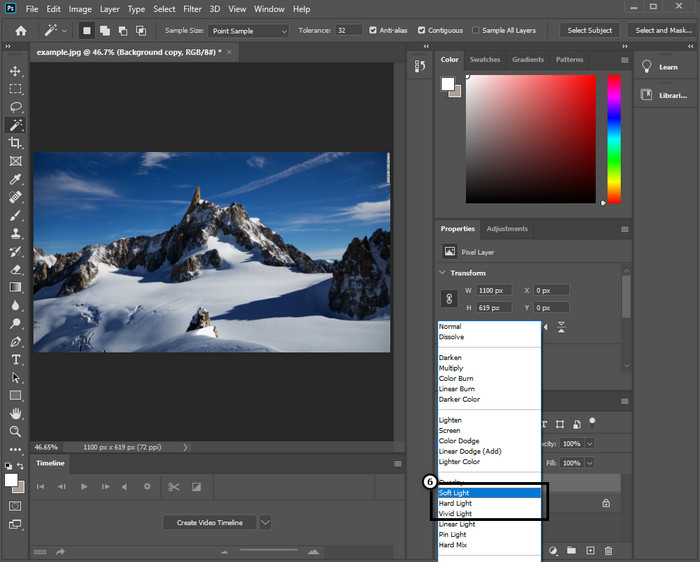
5단계. 다시 레이어 패널로 돌아가서, 드롭다운(drop-down) 버튼을 클릭하고 이미지에 적용할 빛의 종류를 선택합니다. 소프트 라이트(Soft Light), 하드 라이트(Hard Light), 비비드 라이트(Vivid Light) 등에서 골라 선명도를 높일 수 있습니다. 이미지를 더 선명하게 만들고 싶다면 3단계부터 이 단계까지의 과정을 반복합니다.
두 번째 방법. Smart Sharper를 사용하여 Photoshop에서 이미지를 더 선명하게 만드는 방법:
스마트 샤프(Smart Sharpen)는 Adobe Photoshop에서 이미지를 전체적으로 선명하게 만들 수 있는 효과적인 기능입니다. 이 기능은 자동으로 모든 것을 해결해 주는 도구가 아니므로, 전체 이미지를 또렷하게 보이도록 하려면 몇 가지 파라미터를 직접 조정해야 합니다. Adobe에서 이 기능을 사용해 보고 싶다면, 아래에 정리한 단계를 따라 하면 됩니다.
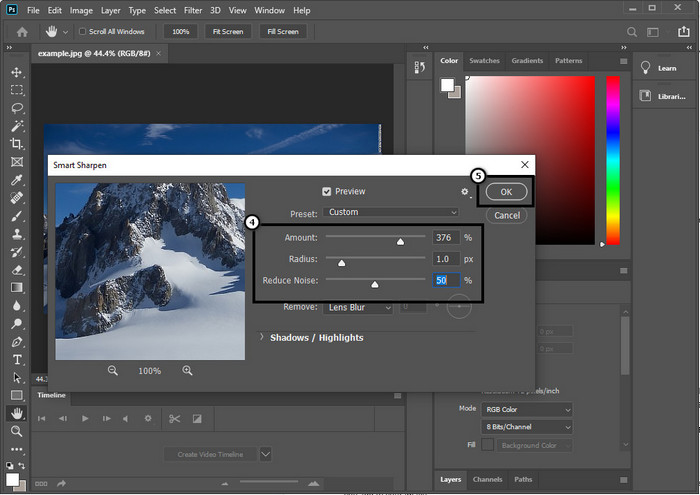
1단계. 선명하게 만들고 싶은 이미지를 불러온 뒤, 상단 메뉴에서 필터(Filter)를 클릭합니다.
2단계. 나타나는 옵션에서 샤픈(Sharpen)을 선택한 뒤 스마트 샤픈(Smart Sharpen)을 누릅니다.
3단계. 원하는 정도에 맞게 양(Amount)과 반경(Radius)을 조절하고, 확인(OK)을 눌러 변경 사항을 저장합니다. 이렇게 간단한 단계만으로도, 이 소프트웨어의 샤프닝 도구를 사용해 사진을 선명하게 만들 수 있습니다.
제3의 길. 밝기 및 대비를 조정하여 사진의 이미지를 선명하게 하는 방법:
우리가 소개한 두 가지 방법과 달리 밝기와 대비는 업로드한 이미지를 강조 표시하여 선명하게 하는 도구와 같이 더 자세히 보이게 하는 데 중점을 둡니다. 이 옵션을 아는 사용자는 거의 없으므로 이 옵션을 사용하여 가지고 있는 이미지를 선명하게 하려면 아래 단계를 따르십시오.
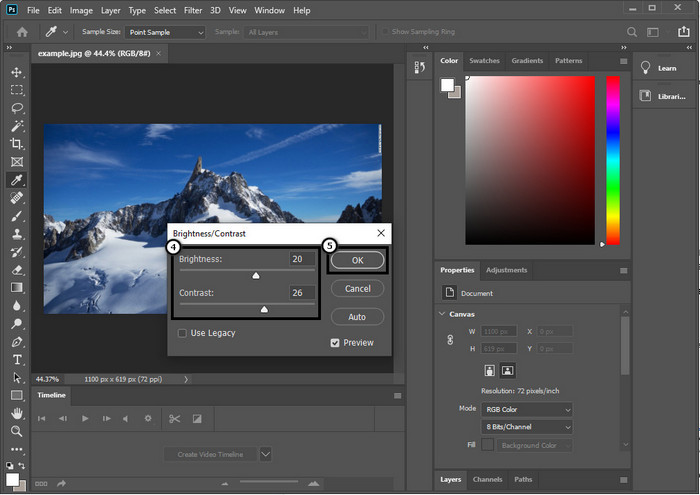
1단계. 이미지를 Photoshop에 업로드한 뒤, 상단 메뉴에서 이미지(Image)를 클릭합니다.
2단계. 여러 옵션이 표시되면, 조정(Adjustments)을 선택한 다음 밝기/대비(Brightness and Contrast)를 클릭합니다.

3단계. 슬라이더(slider)를 드래그해 밝기와 대비를 조절한 뒤, 확인(OK)을 눌러 이미지에 적용한 변경 사항을 저장합니다.
관련 항목:
Photoshop으로 동영상에 워터마크를 빠르게 넣는 간단 가이드
2부. 온라인에서 이미지를 선명하게 하기 위한 Photoshop의 최상의 대안 [무료 서비스]
앱 없이 Photoshop으로 흐릿한 이미지를 선명하게 만들 수 있을까요? 그럴 때는 FVC Free Image Upscaler를 사용할 수 있습니다. 이 온라인 도구는 여기서 설명한 복잡한 과정을 거치지 않아도 되게 도와줍니다. 이미지를 업로드하고, 이 소프트웨어에 내장된 AI 기술이 작업을 진행하도록 맡기기만 하면 됩니다. 또한 소프트웨어의 라이선스 키나 유료 버전을 구매할 필요도 없습니다. 즉시 사진을 편집해야 하는 모든 사용자가 무료로 이용할 수 있습니다. 편집 전문가가 아니더라도, 아래에 안내된 단계만 따르면 이미지를 충분히 선명하게 만들 수 있습니다.
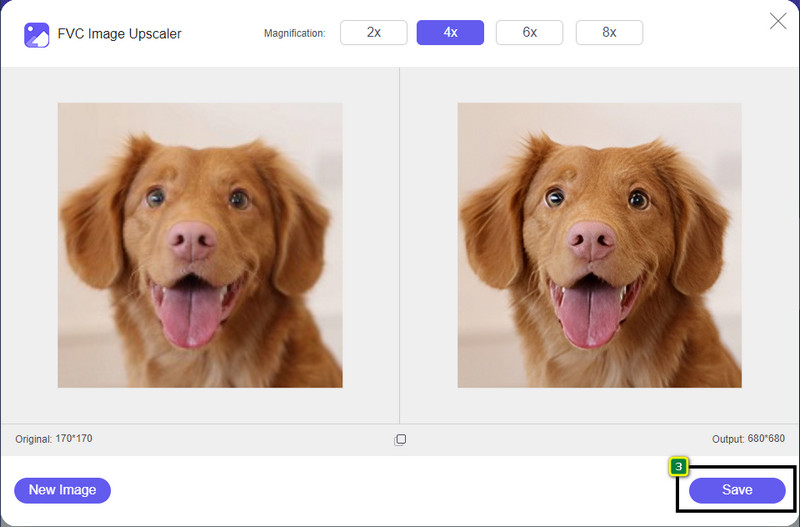
1단계. 이 링크를 클릭해 웹 도구를 열고 사진을 선명하게 만듭니다.
2단계. 웹사이트에서 Upload Image를 눌러 선명하게 만들 사진을 불러옵니다. 화면에 폴더 창이 나타나면, 이미지를 선택한 다음 열기(Open)를 눌러 업로드합니다.
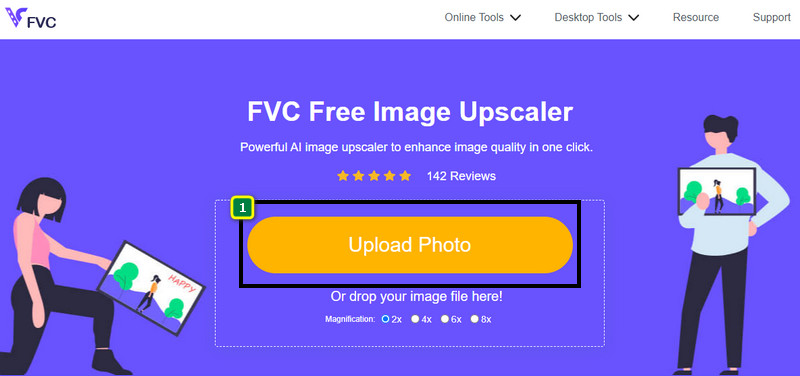
3단계. 다양한 배율 옵션이 제공되므로, AI 기술의 도움을 받아 이미지를 쉽게 확대하고 선명하게 만들 수 있습니다.
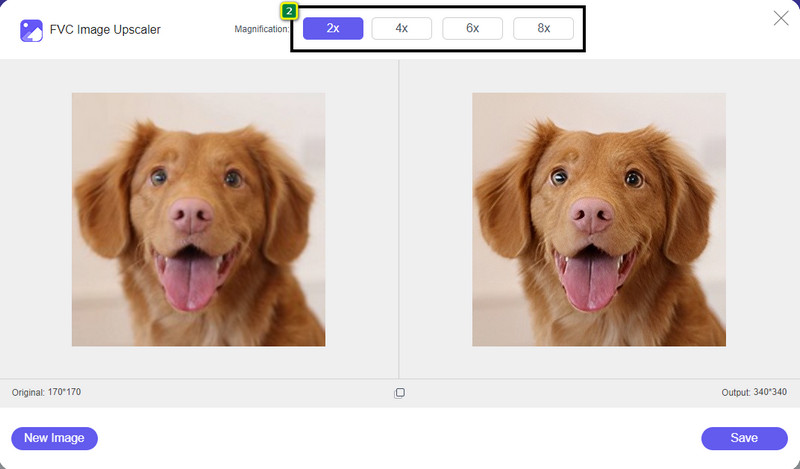
4단계. 화면 하단에서 Save 버튼을 눌러 선명해진 이미지를 로컬 드라이브에 다운로드합니다.
3부. Photoshop에서 이미지를 선명하게 하는 방법에 대한 FAQ
Photoshop 무료 평가판이 종료되면 어떻게 해야 합니까?
Adobe가 개발한 이 전문 이미지 편집기를 계속 사용하고 싶다면, 플랜을 구매해 사용을 이어 가야 합니다. 하지만 Photoshop과 유사한 편집 기능을 무료로 경험해 보고 싶다면, FVC Free Image Upscaler를 사용해 보세요.
Photoshop으로 무엇을 할 수 있습니까?
여기에서 다른 편집기에서는 제공하지 않는 다양한 이미지 및 비디오 편집을 수행할 수 있습니다. 2D 이미지를 3D로 바꾸는 등의 놀라운 작업을 수행하는 데 필요한 완벽한 이미지 편집기입니다. 그러나 이 소프트웨어는 약간 복잡하며 전체 사용 방법을 숙달하는 데 시간이 걸립니다.
포토샵은 어디서 다운받을 수 있나요?
Adobe Photoshop은 Windows 10 64비트 이상 및 Mac 10.15 Catalina 이상을 지원합니다. 또한 모바일 버전인 Photoshop Express Photo Editor를 지원합니다.
결론
Photoshop에서 이미지를 선명하게 만드는 방법 튜토리얼을 통해, 이제 최고의 편집기를 활용해 다양한 방식으로 이미지를 손쉽게 선명하게 할 수 있습니다. 그렇다면 무료 체험 기간이 끝난 뒤에도 이미지를 선명하게 만들고 싶다면 어떻게 해야 할까요? 걱정할 필요는 없습니다. 인터넷만 연결되어 있다면 더 쉽게, 그리고 무료로 이미지를 선명하게 만들 수 있는 온라인 대안을 소개했기 때문입니다. 바로 FVC Free Image Upscaler입니다.
-
 시장에서 찾을 수 있는 최고의 방법으로 Photo HD 만들기
 사진을 HD로 만들고 싶거나 궁금하십니까? 사용할 수 있는 다양한 솔루션으로 아래에 추가한 자습서를 따를 수 있습니다.
-
 온라인 및 오프라인에서 사용할 수 있는 상위 4가지 이미지 품질 감소기
 이러한 이미지 품질 감소기는 몇 가지 이유로 이미지 품질을 줄이는 데 도움이 될 수 있습니다. 필요한 경우 이 기사를 읽으십시오!
-
 실습 튜토리얼을 통해 이미지를 4k로 업그레이드하는 공식 방법
 이미지를 4k로 업스케일하려면 장치에 소프트웨어가 필요합니다. 아직 없는 경우 여기에 포함된 도구를 선택해야 합니다.