

포괄적인 단계로 비디오 해상도를 변경하는 가장 쉬운 방법 4가지
동영상 해상도를 변경해야 하는 이유는 매우 다양합니다. 그중 하나는 동영상 파일 용량을 줄이기 위한 것일 수 있습니다. 이유가 무엇이든, 이 가이드는 동영상의 화질을 낮추거나 높이는 네 가지 방법을 알려 줍니다. 더 이상 지체하지 않고, 동영상 해상도를 변경하는 데 사용할 수 있는 해상도 변환 도구들을 살펴보겠습니다.

1부. 첫 번째 방법: Windows 및 macOS에서 비디오 해상도를 변경하는 궁극적인 데스크탑 도구
Video Converter Ultimate는 이 작업에 가장 적합한 도구로, 몇 번의 클릭만으로 동영상 포맷뿐 아니라 동영상 화질까지 함께 변환할 수 있습니다. 이 툴은 초고속 변환을 지원하므로, 동영상 화질을 가장 높은 해상도나 일반적인 해상도로 손쉽게 바꿀 수 있습니다. 이런 소프트웨어를 쓸 수 있다니 정말 매력적이지 않나요? 더 알고 싶나요? 그렇다면 이 툴은 데스크톱 양 플랫폼을 모두 지원합니다. Windows와 Mac을 모두 지원하며, Windows에서 볼 수 있는 기능은 Mac에서도, Mac에서 볼 수 있는 기능은 Windows에서도 거의 동일하게 사용할 수 있습니다. 이 툴에는 특별한 점이 있다고 판단해 이 목록에 포함했습니다. 이제 단계별 가이드를 원한다면, 아래에 작성된 튜토리얼을 따라 동영상 해상도를 성공적으로 변경하는 방법을 배워 보세요.
1단계. 알맞은 버튼을 클릭해 프로그램을 드라이브에 다운로드합니다. 다운로드가 완료되면 파일을 열고 화면에 표시되는 설치 과정을 따라 진행합니다. 설치를 마친 뒤 동영상 해상도 변환기를 실행하고 다음 단계로 진행합니다.
Free DownloadFor Windows 7 or laterSecure Download
Free DownloadFor MacOS 10.7 or laterSecure Download
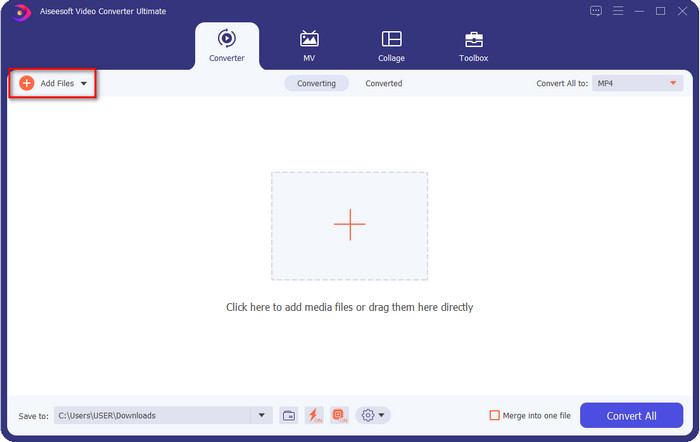
2단계. 해상도를 변경하려는 동영상 파일을 추가하려면 Add File 버튼을 클릭합니다. 나타나는 컴퓨터 폴더에서 파일을 찾아 선택한 후 Open을 클릭합니다.
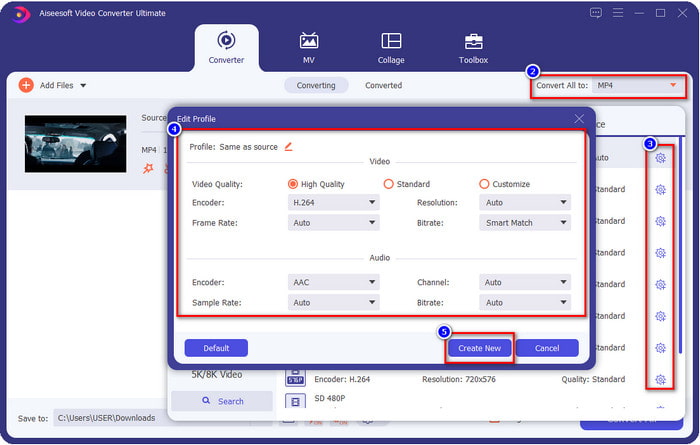
3단계. 오른쪽 상단을 확인하고, 메인 인터페이스에서 드롭다운 버튼을 클릭합니다. MP4, MOV, AVI, MKV, FLV 등 200개가 넘는 포맷 중 원하는 동영상 포맷을 선택합니다. 포맷을 선택한 뒤, 해당 포맷 프로필을 편집하려면 톱니바퀴(위젯) 버튼을 클릭합니다. 여기에서 해상도를 더 높이거나 낮추고, 인코더, 품질, 비트레이트 등을 조절해 동영상 해상도를 올리거나 유지할 수 있습니다. 수정 내용을 저장하려면 Create New를 클릭합니다.
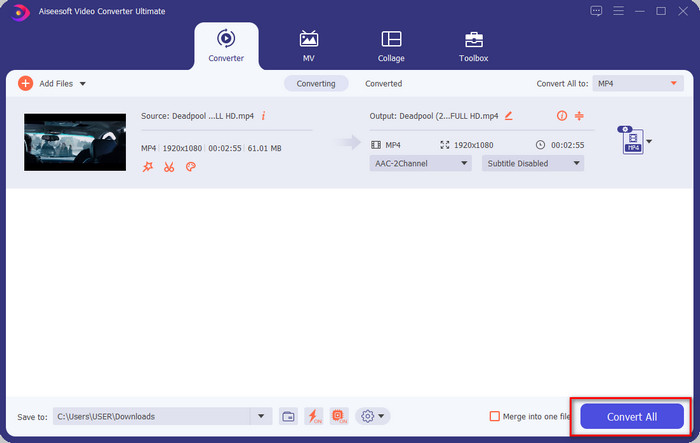
4단계. 마지막으로 Convert All을 클릭하면 해상도 변환이 시작됩니다. 이렇게 하면 Video Converter Ultimate의 도움으로 동영상 해상도를 변환할 수 있습니다.
2부. 두 번째 방법: 온라인에서 비디오 해상도를 변경하는 간단하고 자유로운 방법
온라인에서 동영상 해상도를 변경하고 싶으신가요? 그렇다면 이 강력한 도구의 무료 온라인 버전인 FVC Free Video Converter Online을 사용하면 됩니다. 이 툴을 이용하면 동영상의 해상도를 무료로 변환할 수 있습니다. 온라인 도구이므로, 사용하려면 인터넷 연결이 필요합니다. 또한 이 툴은 모든 동영상 포맷을 지원하는 것은 아니어서, 업로드할 수 있는 포맷에 제한이 있습니다. 이제 아래 단계들을 따라 해상도를 변경하는 방법을 직접 사용해 봅시다.
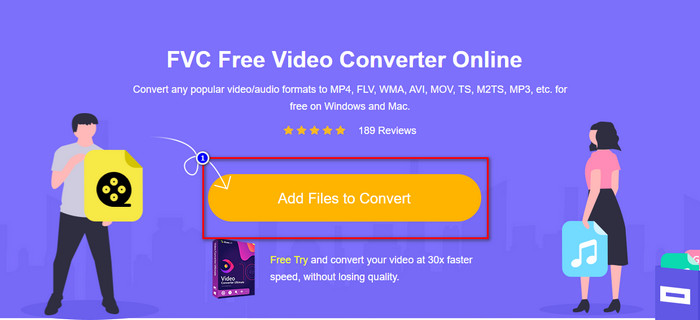
1단계. 온라인 동영상 해상도 변환기를 열려면 이 링크를 클릭해 도구를 바로 실행합니다.
2단계. 처음 사용하는 경우 Add Files to Convert를 눌러 런처를 다운로드합니다. 설치 파일을 다운로드한 후, 다시 한 번 클릭합니다. 클릭하면 폴더 창이 뜨는데, 여기에서 동영상 파일을 찾은 뒤 Open을 클릭합니다.
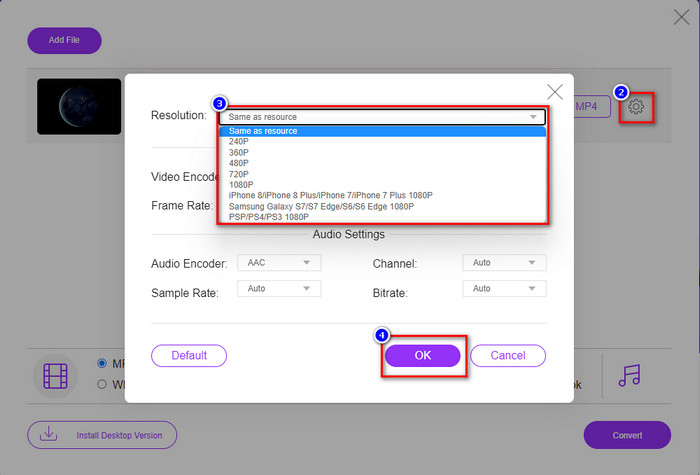
3단계. 톱니바퀴 버튼을 클릭해 새 창을 열고, 그 창에서 동영상 해상도를 변경합니다. 새 창 상단의 Resolution을 클릭한 다음 원하는 동영상 해상도를 선택하고, OK를 눌러 저장합니다.
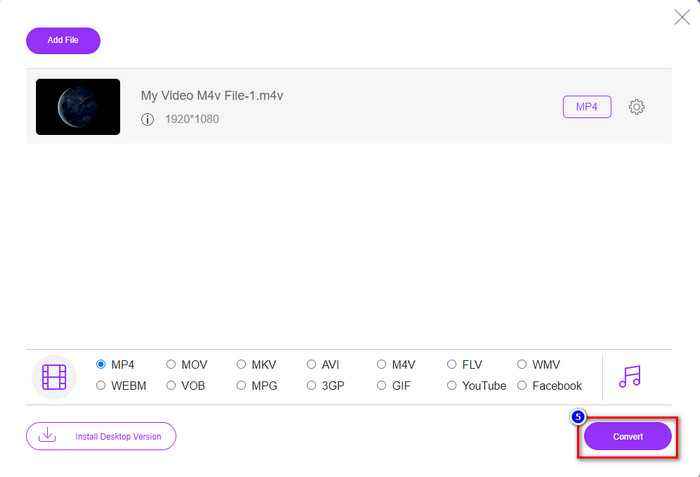
4단계. 설정 목록에서 포맷을 선택한 뒤 Convert를 클릭해 해상도 변환을 시작합니다.
관련 항목:
동영상에 자막 추가
동영상에 워터마크 추가
3부. 세 번째 방법: iPhone 및 Android에서 비디오 해상도를 변경하는 모바일 기반 방법
이러한 방법은 비디오 해상도를 변환할 수 없지만 더 낮거나 더 높은 해상도의 비디오를 찍을 수 있습니다. 또한 동영상을 촬영하면서 동영상 해상도를 변경하는 방법을 알아보겠습니다.
1. 아이폰 내장 비디오 해상도
iOS 사용자인 경우 원하는 경우 촬영한 비디오 해상도를 변경할 수 있습니다. 그러나 카메라에서 찾을 수 없으므로 찾을 수 없는 경우 아래 단계에 따라 동영상을 촬영하기 전에 iPhone에서 동영상 해상도를 변경하는 방법을 알 수 있습니다.
이 단계는 iPhone X 모델에서 가져온 것이므로 단계는 iPhone과 유사한 이름 또는 기능의 다른 버전과 약간 다를 수 있습니다.
1단계. iPhone에서 설정(Settings)을 엽니다.
2단계. 설정에서 카메라(Camera) 항목을 찾아 눌러 들어갑니다.
3단계. 비디오 녹화(Record Video)를 선택하고, 동영상을 촬영할 때 사용할 해상도를 고릅니다. 다시 홈 화면으로 돌아가 카메라를 열고, 방금 설정에서 지정한 해상도로 동영상을 촬영합니다.
2. 내장 안드로이드 비디오 해상도
Android 사용자의 경우 카메라에서 비디오 해상도에 직접 액세스할 수 있습니다. 우리가 제공하는 단계는 설정을 구성할 필요가 없기 때문에 iPhone만큼 복잡하지 않습니다. 이제 Android에서 비디오 해상도를 변경하려면 아래 지침을 따르십시오.
이 단계는 Redmi 10에서 가져온 것이므로 이름이나 기능과 같은 일부 다른 Android 기기에서는 단계가 약간 다를 수 있습니다.
1단계. 휴대폰에서 카메라 앱을 실행합니다.
2단계. 카메라가 열리면 비디오 모드로 전환하고, 세 줄 메뉴(가로줄 세 개 아이콘)를 눌러 원하는 동영상 해상도를 선택합니다.
3단계. 빨간 버튼을 눌러 설정한 해상도로 동영상을 녹화합니다.
4부. 비디오 해상도 변경에 대한 FAQ
비디오 해상도는 무엇입니까?
프레임당 포함된 픽셀 수를 비디오 해상도라고 합니다. 또한 사진이 얼마나 더 선명한지와 같이 단일 비디오에서 볼 수 있는 세부 사항을 제어합니다. 또한 다양한 비디오 해상도가 있습니다. 초당 더 많은 품질의 프레임을 사용하는 HD 이상부터 더 높은 해상도를 호출합니다. 저해상도는 SD 이하에서 시작하지만 이 비디오 해상도는 고해상도보다 대역폭이 적지만 초당 프레임 품질이 더 낮습니다.
1080이 최고의 비디오 해상도입니까?
Youtube 및 기타 비디오 스트리밍 앱에서 가장 일반적으로 선택되는 가장 많이 선택된 비디오 해상도 사용자 중 하나를 생성합니다. 그러나 720보다 비디오를 버퍼링하는 데 더 많은 시간이 걸릴 수 있기 때문에 고품질 비디오를 보는 것이 항상 최선의 선택은 아닙니다. 따라서 다음에 온라인으로 비디오를 볼 때 1080보다 720을 사용하여 로드하는 것을 선호합니다. 비디오를 훨씬 더 빠르게 만들고 변경해도 두 품질 모두에 큰 변화가 없습니다.
해상도를 낮추면 품질에 영향을 줍니까?
예, 비디오 품질을 낮추면 변경 사항이 있습니다. 예를 들어 비디오가 HD인 경우 SD로 변경하면 품질이 크게 바뀝니다. 따라서 동영상 해상도를 변경하면 갑자기 변경되는 것을 볼 수 있지만 그 후에도 여전히 시청할 수 있습니다.
결론
마지막으로 이제 원하는 대로 비디오 해상도를 변경할 수 있습니다. 다양한 도구를 사용하여 비디오 품질을 변경할 수 있지만 여전히 가장 안전하고 최고의 온라인, 오프라인 및 기본 제공 도구를 제공합니다. 이 문서가 해상도를 변경하는 데 도움이 되기를 바랍니다. 더 궁금한 사항이 있으시면 아래에 댓글을 남겨주시면 답변해 드리겠습니다.
-
 상위 10 개 HD 비디오 컨버터 소프트웨어 (무료 및 상업용) 검토
 10가지 권장 사항에서 최고의 HD 비디오 변환기 소프트웨어를 얻으려면 읽고 비교하십시오. 다음은 멀티플랫폼용 각 HD 비디오 컨버터에 대한 자세한 리뷰입니다.
-
 M4A를 WAV로 변환하는 방법에 대한 지침 [PC 및 Mac]
 자세한 단계와 선택할 수 있는 다양한 도구를 사용하여 M4A를 WAV로 변환하는 방법에 대해 자세히 알아보십시오.
-
 MKV를 AVI 형식으로 변환하는 탁월한 선택
 독점적으로 제공되는 쉬운 단계로 MKV 비디오를 변환하는 방법을 마스터하십시오. 방법을 알고 싶습니까? 그런 다음 이 링크를 클릭하여 자세히 알아보세요.