


Hoe u de helderheid van foto's in minder dan een minuut kunt bewerken met tips en trucs
Elke fotografie-enthousiasteling wil dat de foto die hij of zij vastlegt er het beste uitziet tussen alle andere foto’s die door andere fotografen zijn gemaakt. Met verschillende technieken kun je dit eenvoudig doen: verscherpen en intense kleuren toevoegen zodat het beeld simpelweg gedetailleerder wordt. Maar wat als je een vleugje extra scherpte wilt toevoegen? Of juist alles gladder wilt maken? Daar komt helderheid (clarity) om de hoek kijken. Daarmee kun je de middentonen en het contrast in je foto aanpassen om die extra punch te geven die het beeld verbluffend maakt. Ben je benieuwd hoe je dat doet? Lees dan de informatie die we hier toevoegen en ontdek hoe je de helderheid van foto’s kunt bewerken.

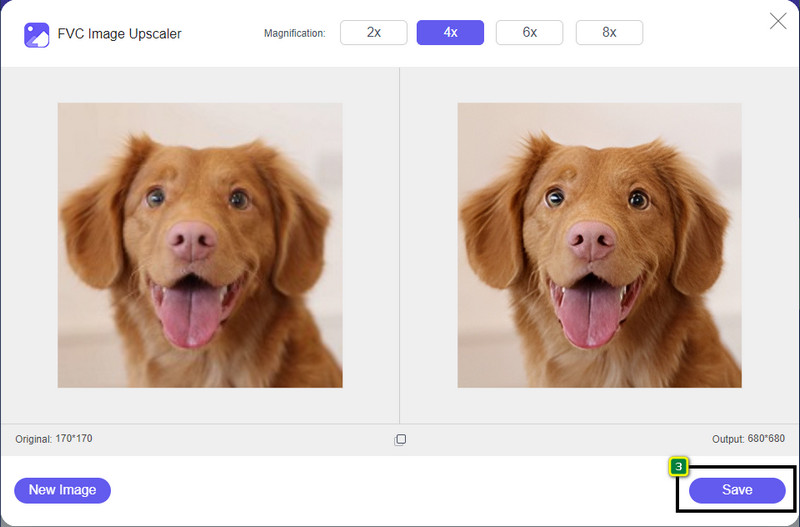
Deel 1. Hoe u de fotohelderheid gratis online kunt verbeteren door afbeeldingen op te schalen
FVC Free Image Upscaler is de beste app voor fotoclarity die je in je browser kunt gebruiken zonder bestanden op je desktop te hoeven downloaden. Deze app kan de fotokwaliteit herstellen en verbetert de kwaliteit van je foto’s op een prachtige manier, zoals je nog niet eerder hebt gezien. Ook als je niet technisch bent, kun je in minder dan een minuut leren hoe je deze software gebruikt. Als je deze software wilt uitproberen, volg dan de tutorial die we hieronder hebben toegevoegd.
Stap 1. Ga naar de officiële website van deze upscaler door op deze link te klikken.
Stap 2. Importeer de foto waarvan je de helderheid wilt verbeteren door op Upload Image te klikken. Er wordt vervolgens een map geopend waarin je het bestand kunt opzoeken en op Open kunt drukken.

Stap 3. Nu de foto is geüpload, kies je de optie die je wilt gebruiken om de helderheid van je afbeelding te verbeteren.

Stap 4. Nadat je de helderheid hebt verbeterd, klik je op de knop Save om de foto te downloaden die je hier hebt verbeterd.
Deel 2. Hoe u snel de helderheid van foto's in Photoshop kunt vergroten
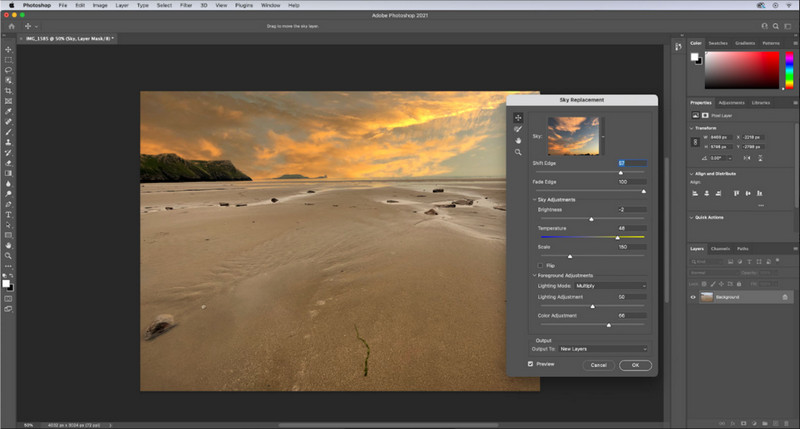
Adobe Photoshop is de fotoclarity-app die je moet downloaden als je een professionele tool op je apparaat wilt. Deze tool biedt uitgebreide functies voor beeldbewerking om je foto er beter uit te laten zien door de verschillende opties aan te passen, zodat je indruk maakt op iedereen die de foto ziet. Er is nauwelijks andere software die je dezelfde prestaties kan bieden als deze. Om de helderheid van je foto te verbeteren, moet je het contrast en de middentonen aanpassen. Wil je weten hoe je dat doet? Volg de onderstaande handleiding.
Stap 1. Download Adobe Photoshop en open de software. Begin met het uploaden van de foto door op File en vervolgens op Open te klikken.
Stap 2. Klik bovenin op Image, klik daaronder op Adjustment en kies Brightness/Contrast.
Stap 3. Er verschijnt een dialoogvenster op je scherm; verander het contrast van de foto door de schuifregelaar te verslepen. Je kunt deze vrij bewegen om het contrast te verhogen of te verlagen, wat de helderheid zal beïnvloeden.
Stap 4. Klik op OK om je wijzigingen in de foto op te slaan; deze worden automatisch toegepast.
Deel 3. Hoe u de helderheid van een foto in Adobe Lightroom in minder dan een minuut kunt verbeteren
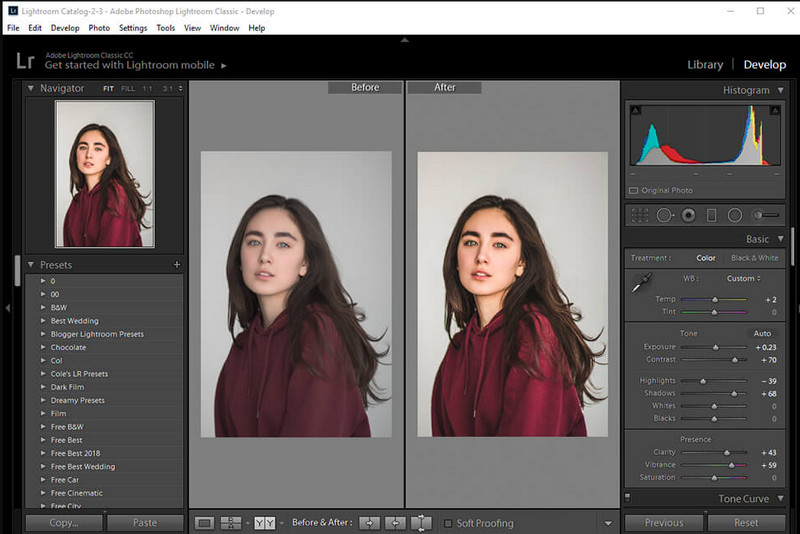
In tegenstelling tot Photoshop heeft Adobe Lightroom een betrouwbare helderheidsoptie (clarity) die je kunt gebruiken om de beeldkwaliteit te verhogen en je foto meer detail in de kleuren te geven wanneer je deze verhoogt, of juist zachter te maken wanneer je deze verlaagt. Photoshop en Lightroom worden beide door Adobe ontwikkeld, dus een professioneel resultaat is 100% gegarandeerd. Je kunt de onderstaande stappen volgen om helderheid toe te voegen aan foto’s en de kleuren van een ruwe afbeelding te verbeteren.
Stap 1. Download en installeer de officiële software van Adobe, start het programma en upload de foto die je wilt bewerken.
Stap 2. Open de module Develop om de opties te openen waarmee je helderheid aan je foto kunt toevoegen.
Stap 3. Verplaats onder het gedeelte ‘Presence’ de slider voor helderheid naar het door jou gewenste percentage. Je kunt ook andere opties aanpassen om je foto gedetailleerder en beter te maken dan het originele beeld.
Deel 4. Tips voor het bewerken van foto's Duidelijkheid die u moet kennen
Nu je de beste app voor fotohelderheid hebt die je op internet en offline kunt gebruiken, geeft de volgende informatie je tips over het aanpassen van de helderheid van een afbeelding.
Tip 1. GA NIET TE OVERBOD OP DUIDELIJKHEID!
Wat bedoelen we hiermee? Deze middelen voegen niet teveel duidelijkheid toe aan je afbeelding, want het zal een korrelig beeld worden. Iedereen houdt niet van een korrelig beeld, dus maak het niet te veel groter. Verlaag de helderheid ook niet tot het maximale potentieel om te voorkomen dat het beeld er wazig uitziet.
Tip 2. Contrast en helderheid zijn niet hetzelfde
Contrast en helderheid staan vaak hetzelfde bekend, maar zijn dat niet. Als u de helderheid van een afbeelding aanpast, past u de middentoon ervan aan en vervolgens een bepaald gebied. Terwijl als u contrast gebruikt, u het algehele beeld wijzigt, markeert en schaduwt.
Tip 3. Ken het doel van duidelijkheid op afbeeldingen voordat u deze toevoegt
Veel beeldbewerkers hebben deze opties bestudeerd die ze kunnen aanpassen om de afbeelding te verbeteren, zoals helderheid, belichting, gamma en nog veel meer. Dus als u een nieuwe gebruiker bent, is het beter om het doel van de helderheid te kennen voordat u deze op de afbeelding toepast. Als u informatie over helderheid leest, weet u ook of dit de juiste optie is om te tweaken om de afbeelding er beter uit te laten zien. Zo niet, voeg dan geen duidelijkheid toe.
Tip 4. Gebruik duidelijkheid op grote schaal
Als je te maken hebt met een afbeelding op kleine schaal, is het beter om ze te verscherpen in plaats van de helderheid ervan te veranderen. Hiermee kunt u de randen van uw foto gemakkelijker en beter verscherpen. Maar als je het beeld dat je hebt als een grote schaal beschouwt, dan kun je beter de helderheid gebruiken.
Deel 5. Veelgestelde vragen over het bewerken van foto's Duidelijkheid
Waarom wordt mijn afbeelding korrelig nadat ik helderheid heb toegevoegd?
Als je de helderheid hebt ingesteld op 100%, dan is de kans op een korrelig beeld ongetwijfeld aanwezig. We raden u aan het percentage in te stellen op 40% tot 70%; je kunt hoger gaan, afhankelijk van je voorkeur.
Heb ik een editor nodig om duidelijkheid aan foto's toe te voegen?
U zult inderdaad software moeten downloaden of gebruiken om uw afbeelding duidelijker te maken. Veel software zegt dat het de helderheid kan aanpassen, maar laat je er niet door misleiden. U kunt de software gebruiken die we in dit artikel toevoegen, omdat we bewijzen dat ze de helderheid van uw afbeelding kunnen veranderen om deze gedetailleerder te maken dan voorheen.
Kan ik contrast aan de afbeelding toevoegen om het duidelijk te maken?
Ja, u kunt contrast toevoegen aan de afbeelding om deze duidelijker en presentabeler te maken. Maar als u nauwkeuriger wilt zijn in plaats van het hele beeld te beïnvloeden, is het beter om de helderheid ervan aan te passen.
Gevolgtrekking
We hopen dat dit artikel je heeft geleerd hoe je de helderheid van foto's kunt bewerken met verschillende toegevoegde tools en stappen. Als je denkt dat we het geweldig hebben gedaan, zouden we het geweldig vinden als je ons hieronder 5 sterren geeft. Bedankt voor het lezen van dit artikel!
-
 De resolutie van de afbeelding verhogen [5 manieren om te verbeteren]
 Heeft u problemen omdat de resolutie van uw afbeelding laag is? Maak je geen zorgen meer! Hier leren we u hoe u de resolutie van de afbeelding kunt verhogen.
-
 Maak iPhone-fotoresolutie beter met de beste versterkers
 Wilt u de iPhone-fotoresolutie verbeteren? Welnu, in dit artikel behandelen we de beste tools die je kunt gebruiken en andere trucs die je moet kennen!
-
 Oude fotorestauratie online en offline [eenvoudige stappen]
 Wilt u een oude foto herstellen? Met deze tools ken je het oude fotoherstelproces. Lees dit bericht om de meest eenvoudige methoden te leren.