


Hoe u audio in iMovie kunt trimmen: tutorial voor iPhone en Mac
iMovie is een gratis video- en audiobewerkingsprogramma voor iPhone en Mac, ontwikkeld door Apple, waarmee gebruikers naadloos mediaprojecten kunnen monteren en produceren. Wanneer Apple-gebruikers op zoek zijn naar manieren om specifieke audiobestanden te bewerken, bij te snijden of delen eruit te knippen, is het precies goed om daar speciale software voor te gebruiken. Wat velen echter niet weten, is dat iMovie ook gebruikt kan worden voor het knippen en trimmen van audio. Door deze handleiding te volgen, kun je als gebruiker het proces van het knippen van audio in iMovie effectief en probleemloos doorlopen.

Deel 1. Hoe u audio in iMovie kunt trimmen
iPhone
Muziek trimmen in iMovie met een iPhone is makkelijker dan met een Mac. De mobiele versie van iMovie is lichtgewicht en eenvoudig, wat zorgt voor een naadloos proces waarmee gebruikers hun audiobestanden kunnen trimmen met een paar tikken in de mobiele app. Hoe eenvoudig het ook is in vergelijking met de Mac-versie, het heeft beperkte functies in video- en audiobewerking.
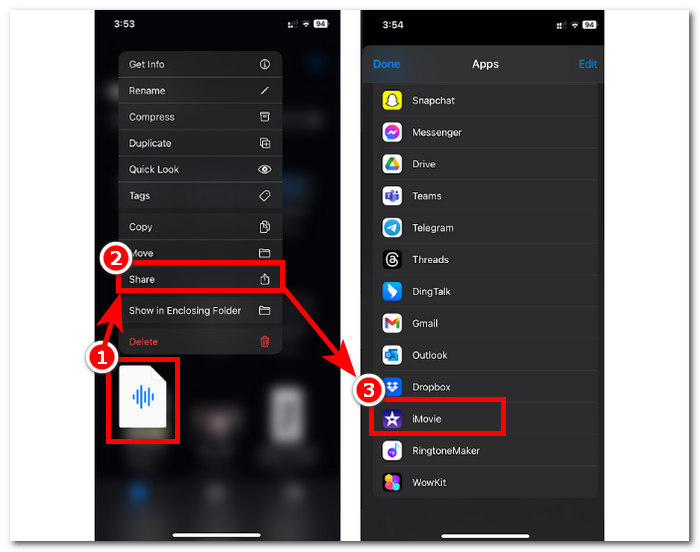
Stap 1. Ga naar je Bestanden-app, houd het audiobestand dat je wilt trimmen lang ingedrukt, tik op 'Deel' en open het in de iMovie-app. Als je een opname wilt knippen, neem het audiobestand dan eerst in iMovie op.

Stap 2. Om je audiobestand te trimmen, ga je naar het begin- en eindgedeelte van je audiobestand in de tijdlijn. Je ziet dan de trim-balken aan beide uiteinden. Sleep de trim-balken eenvoudig van links en rechts tot je tevreden bent met de manier waarop je audio is getrimd. Klik daarna op de knop Gereed bovenaan om verder te gaan.
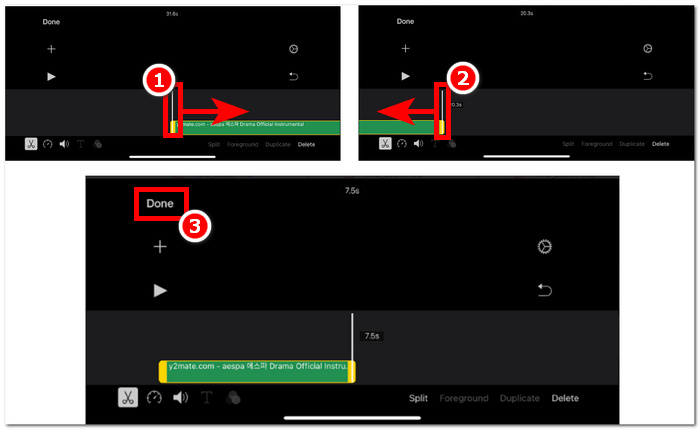
Stap 3. Klik ten slotte op het Delen-pictogram in het midden onderaan de app en sla het bestand op.

Mac
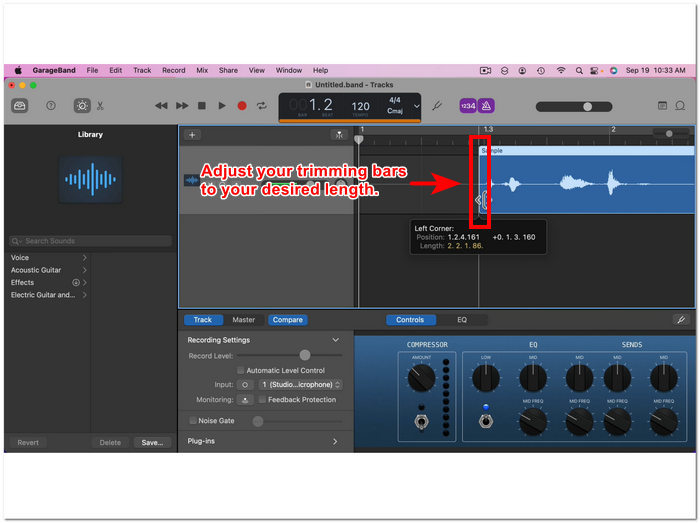
Hoe trim je muziek iMovie? Gebruikers hebben de mogelijkheid om audioclips te trimmen met iMovie op hun Mac-apparaat. Door de Mac-versie van iMovie te gebruiken om een audiobestand te trimmen, hebben gebruikers toegang tot verschillende audiobewerkingsfuncties, in dit geval het gebruik van een cliptrimmer, die niet beschikbaar is op de mobiele versie. Deze cliptrimmer maakt het mogelijk om de trimbalken naadloos van links en rechts te slepen om direct een trim te creëren. Om dit effectief te doen, moet u de onderstaande stappen volgen.
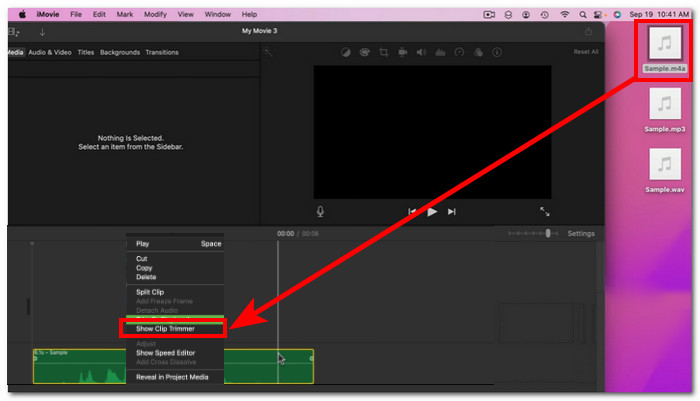
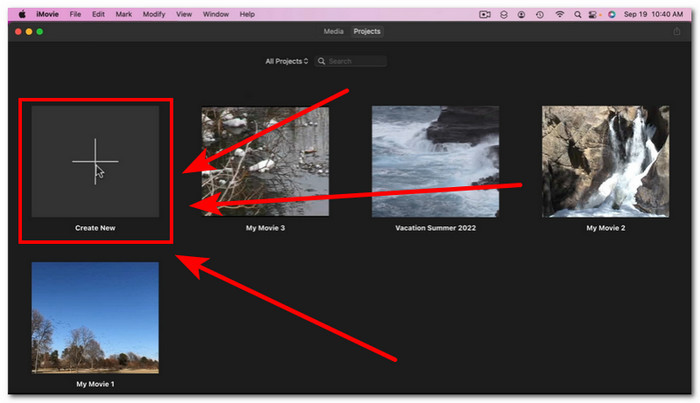
Stap 1. Open de iMovie-software op je Mac en voeg je audiobestand toe of sleep het naar de tijdlijn van de software.

Stap 2. Zodra het bestand in de software is geladen, klik je met de rechtermuisknop op je audiobestand en kies je de optie Toon fragmenttrimmer.
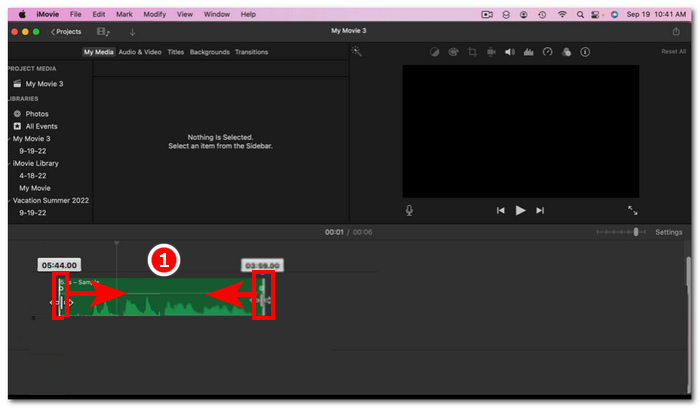
Stap 3. Nadat je hierop hebt geklikt, sleep je de trim-balken aan beide uiteinden van je audiobestand om je audio te trimmen.
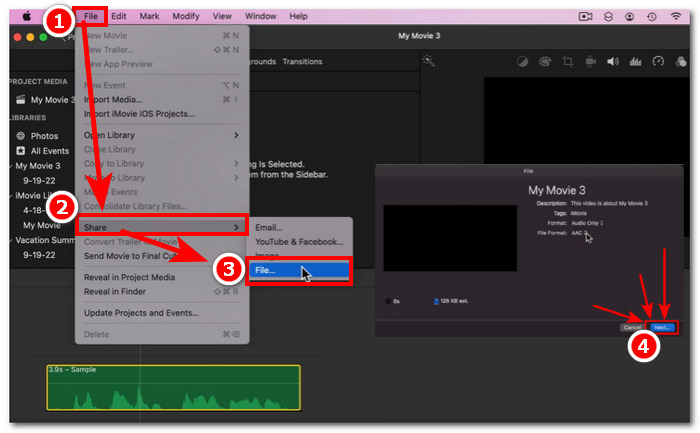
Stap 4. Als je klaar bent met trimmen, kun je het bestand opslaan door bovenaan links in de software op het menu Archief te klikken en deze route te volgen: Archief > Deel > Bestand > Volgende om het op je Mac op te slaan. iMovie is alleen beschikbaar voor Mac-computers.
Als je iMovie voor Windows nodig hebt met een dergelijke trimfunctie, bekijk het dan hier.
Deel 2. Hoe u delen van audio in iMovie kunt verwijderen
iPhone
Hoe knip je muziek in een iMovie? Om bepaalde delen in muziek of audio te knippen met behulp van iMovie op iPhone, ga je naar specifieke delen in je tijdlijn die je wilt verwijderen of knippen. Verwijder het vervolgens met de speciale verwijderknop voor het eenvoudig verwijderen van delen in de tijdlijn.
Stap 1. Om een audiobestand te trimmen, houd je het lang ingedrukt in de Bestanden-app. Tik vervolgens op de Deel-knop en selecteer de iMovie-app om het bestand daarin te openen.
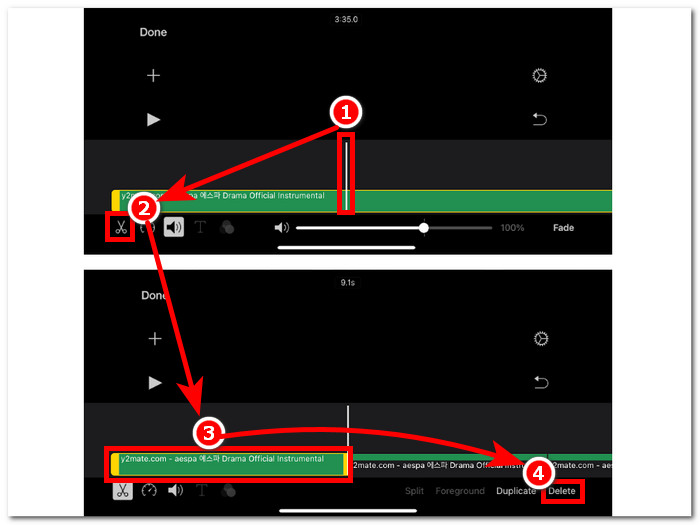
Stap 2. Ga naar het gedeelte van je audiobestand dat je wilt knippen en tik op het schaarpictogram linksonder in je scherm om het in twee delen te splitsen. Er staan nu twee delen in je tijdlijn. Selecteer het deel dat je niet nodig hebt en klik op de knop Verwijder om het eruit te knippen.
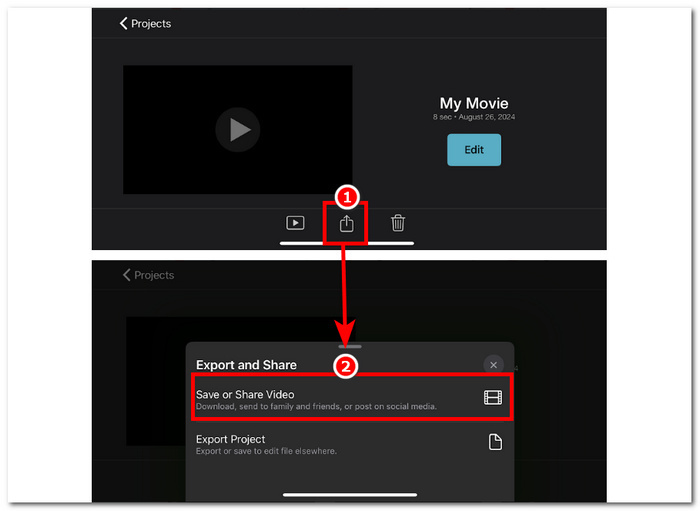
Stap 3. Nadat je alle onnodige delen uit je audiobestand hebt verwijderd, klik je op de knop Gereed in de linkerbovenhoek van je scherm.
Stap 4. Sla je bestand op door op het Deel-pictogram te klikken en tik vervolgens op Video bewaren of delen.
Mac
Het knippen van bepaalde delen van uw audiobestand met iMovie is eenvoudig, omdat het afhankelijk is van de basisfuncties van de tool: het combineren van de Split Clip-functie en verwijderen. Hieronder staan de eenvoudigste manieren om dit te doen.
Stap 1. Open iMovie op je Mac en klik op de +‑knop om het audiobestand te openen waarvan je delen wilt knippen.
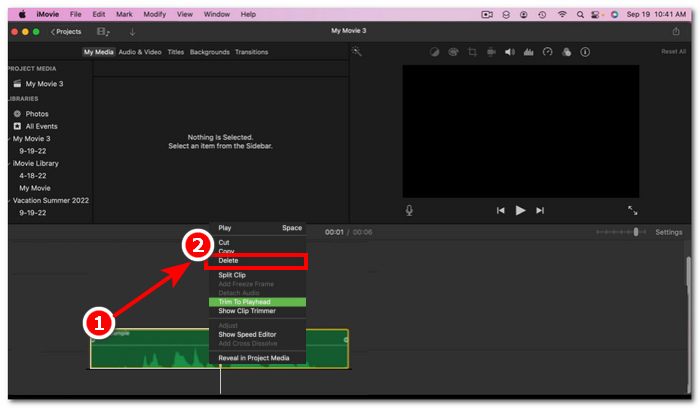
Stap 2. Zodra je audiobestand in de software staat, ga je naar het deel van je audio dat je wilt knippen, klik je met de rechtermuisknop en kies je Splits fragment.
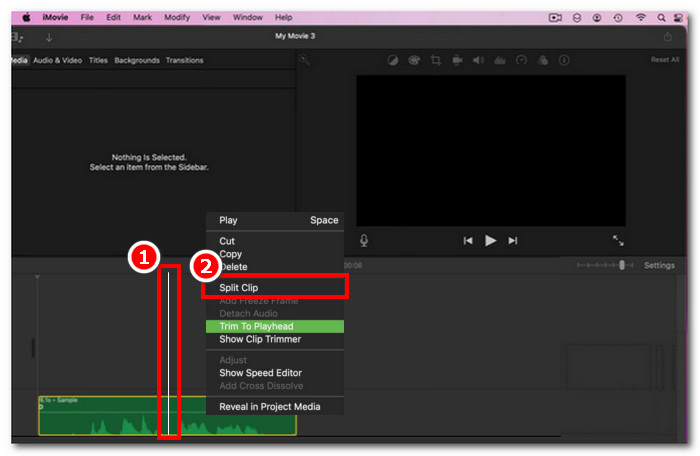
Stap 3. Zodra het audiobestand is gesplitst, verwijder of knip je de delen die je niet meer nodig hebt door er met de rechtermuisknop op te klikken en vervolgens Verwijder te kiezen.
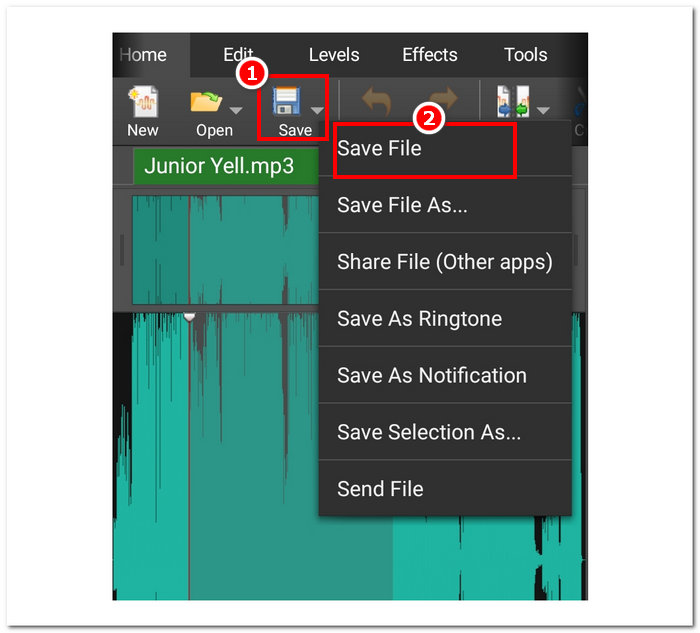
Stap 4. Nadat je het deel dat je niet in je audio wilt hebben hebt weggeknipt, sla je je bestand op door te klikken op Archief > Deel > Bestand en daarna op Volgende te klikken om het op je Mac op te slaan.
Deel 3. Beste iMovie-alternatief om audio te knippen
Hoewel iMovie prima werkt voor het knippen of trimmen van audiobestanden, hebben we de beste alternatieve softwaretool gevonden voor het geval je bugs tegenkomt of iMovie om de een of andere reden niet meer werkt. De door FVC geselecteerde Video Converter Ultimate is het perfecte hulpmiddel dat niet alleen als audioknipper of -trimmer kan worden gebruikt, maar ook voor video, vergelijkbaar met iMovie. Bovendien beschikt het over een bewerkingsfunctie, knipt het audio en maakt het het mogelijk om het uitvoerformaat aan te passen. Het gaat dus verder dan alleen basistrimmen of -knippen van audio zoals andere softwaretools, omdat het een ongeëvenaarde verwerkingssnelheid biedt en tegelijk verliesvrije audiokwaliteit garandeert.
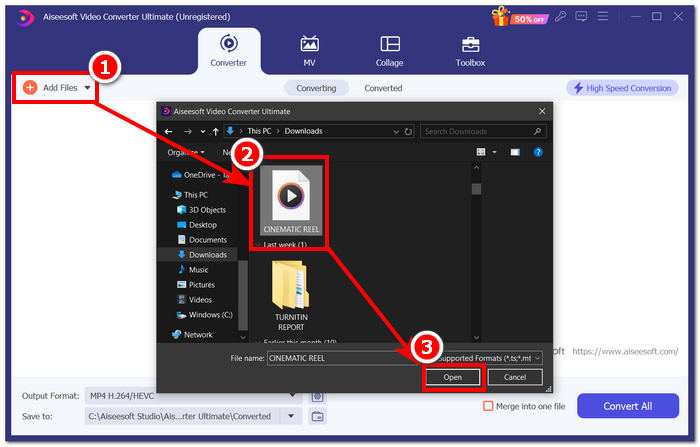
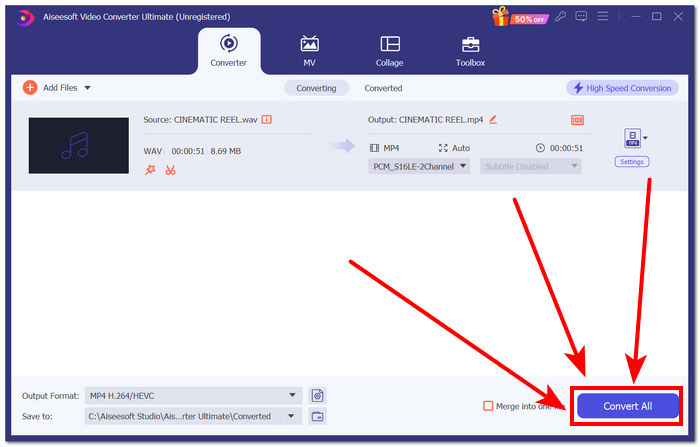
Stap 1. Download en open op je computer de door FVC geselecteerde software Video Converter Ultimate. Klik in de interface van de software op Bestanden toevoegen om het audiobestand te laden waarvan je bepaalde delen wilt trimmen of knippen.
Gratis downloadVoor Windows 7 of nieuwerVeilige download
Gratis downloadVoor MacOS 10.7 of nieuwerVeilige download
Stap 2. Klik op het schaar-pictogram om toegang te krijgen tot de knip- en trimfuncties van de software.
Stap 3. Om het audiobestand te knippen of te trimmen met behulp van de functies van de software, hoef je alleen maar de trim‑balken te verplaatsen naar de delen die je wilt behouden.
De delen buiten de trimbalken zijn de delen die u moet verwijderen om uw audiobestand korter te maken.
Stap 4. Klik ten slotte op de knop Alles converteren om je nieuwe, kortere audiobestand op te slaan, de wijzigingen toe te passen en het in de daarvoor bestemde map op je computer te bewaren.
Deel 4. Veelgestelde vragen over het knippen van audio in iMovie
Hoe selecteer je een deel van de audio in iMovie?
Zodra u uw audiobestand in meerdere delen hebt gesplitst, kunt u een deel selecteren door simpelweg op de specifieke delen van de audio in uw tijdlijn te tikken of te klikken. Zodra het geselecteerde deel een gele rand eromheen heeft, betekent dit dat u dat deel hebt geselecteerd.
Waarom onderbreekt iMovie mijn audio?
Als iMovie abrupt een deel van uw video afsnijdt, kan dat betekenen dat de lengte van uw audio de maximale audiolengte van iMovie overschrijdt. Op het moment dat deze handleiding werd geschreven, was de maximale lengte van audio die een gebruiker in de iMovie-software kon importeren één uur en tien minuten.
Kun je audio in Quicktime bijsnijden?
Ja, gebruikers kunnen audiobestanden bijsnijden met QuickTime door hun audiobestand in de speler te laden, op het menu Bewerken in het bovenste gedeelte van de spelerinterface te klikken en verder te gaan naar het gedeelte Bijsnijden.
Gevolgtrekking
Het maken van trim en het wegknippen van bepaalde delen in een audiobestand is eenvoudig en gemakkelijk, dankzij Apple's eigen iMovie-software. Hoewel het bekend staat als videobewerkingssoftware, kan het op de een of andere manier audiobewerkingstaken zoals trimmen en knippen zonder problemen uitvoeren. iOS- en macOS-gebruikers weten vast wel hoe ze de functies van iMovie kunnen maximaliseren bij audiobewerkingstaken; het is echter de moeite waard om op te merken dat wanneer de software in de toekomst een probleem lijkt te hebben, u zeker de alles-in-één FVC-gekozen Video Converter Ultimate moet gebruiken.
-
 Hoe MPEG-4-bestanden online te comprimeren - Geen download, geen watermerk
 Heeft u niet genoeg bestandsopslag om al uw MPEG-4-bestanden te bewaren? Hier zijn enkele oplossingen die u kunnen helpen uw videobestanden kleiner te maken.
-
 Hoe VOB-bestanden online en gratis te comprimeren [Geen download]
 Bent u op zoek naar methoden om VOB-bestanden te comprimeren? Lees in dit artikel hoe u VOB-bestanden het beste kleiner kunt maken.
-
 Hoe een OGV-bestand te comprimeren zonder kwaliteitsverlies
 Kunt u geen grote OGV-bestanden naar anderen verzenden? Welnu, dit artikel introduceert 2 eenvoudige manieren om u te helpen OGV-bestanden eenvoudig te comprimeren.