


Volledig proces voor het gebruik van GIMP om het formaat van afbeeldingen te wijzigen
Het formaat van een afbeelding wijzigen is essentieel als het gaat om het bewerken van een afbeelding. Soms moet u de hoogte en breedte van uw afbeelding wijzigen, zodat u de gewenste maat krijgt. Het vergroten of verkleinen van een afbeelding wordt ook gedaan door andere foto-editors om de grootte van hun afbeelding te verkleinen of om de kwaliteit op te schalen. Gelukkig hebben we een applicatie gevonden waarmee je het formaat van een afbeelding kunt wijzigen.
GIMP is een online softwaretool voor beeldbewerking waarmee je je afbeelding kunt bewerken. Daarnaast maakt GIMP het mogelijk de hoogte en breedte van je afbeelding aan te passen, waardoor de kwaliteit van je afbeelding wordt verhoogd. Als je dus GIMP wilt gebruiken om een afbeelding te vergroten of verkleinen, lees dan nu dit artikel.
Deel 1. Hoe GIMP te gebruiken om het formaat van afbeeldingen te wijzigen
GIMP is een applicatieplatform voor grafische manipulatie waarmee grafisch ontwerpers uitstekende output kunnen creëren. Hiermee kunnen gebruikers ontwerpelementen, gescripte afbeeldingen, pictogrammen en meer maken. Bovendien is het een gratis, open-sourcetoepassing die u op bijna alle mediaplatforms kunt gebruiken, zoals Windows, Mac en Linux. Veel mensen raden deze applicatie aan bij het zoeken naar een alternatief voor Adobe Photoshop.
En ondanks dat het een eenvoudigere interface heeft dan Photoshop, hebben sommige mensen het nog steeds moeilijk om GIMP te gebruiken. Wat nog interessanter is aan GIMP, is dat je hiermee de pixels van je afbeelding kunt bewerken. En als u op zoek bent naar de beste resizer voor afbeeldingen, wilt u misschien GIMP als uw voorkeur beschouwen.
In dit deel zullen we u twee methoden presenteren om GIMP te gebruiken voor het wijzigen van het formaat van afbeeldingen (afmetingen en grootte).
GIMP gebruiken om de afmetingen van afbeeldingen te wijzigen
Stap 1. Download eerst de GIMP-applicatie op je apparaat en installeer deze. Open na de installatie de app op je apparaat. Open vervolgens de afbeelding in GIMP.
Houd er rekening mee dat wanneer u uw afbeelding op GIMP opent, de afbeelding wordt ingezoomd zodat de hele afbeelding in uw afbeeldingscanvas past. U ziet de huidige grootte van uw afbeelding in de rechterbovenhoek van uw venster.
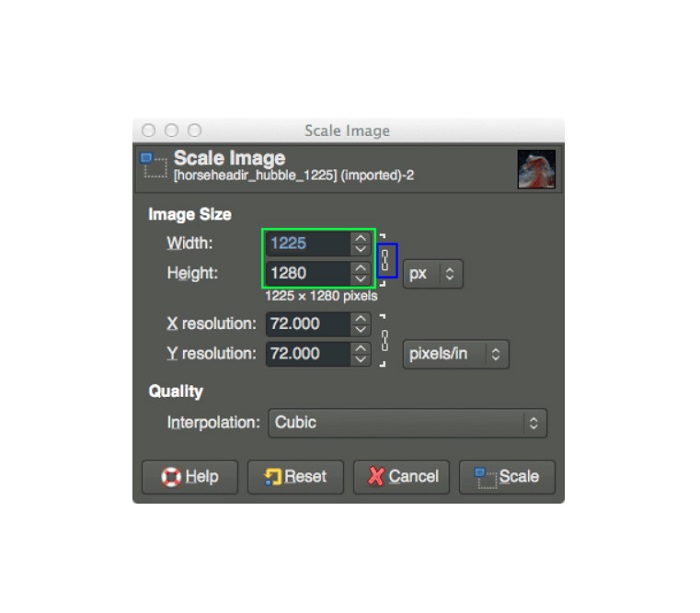
Stap 2. Om de afmetingen van je afbeelding te wijzigen, ga je naar Afbeelding en selecteer je het venster Afbeelding schalen. In het venster Afbeelding schalen kun je de Breedte en Hoogte van je afbeelding aanpassen. Typ je gewenste afmetingen en ga door naar de volgende stap. Naast de hoogte en breedte van je afbeelding zie je een ketting die aangeeft dat hoogte en breedte aan elkaar gekoppeld zijn; dit betekent dat wanneer je de hoogte wijzigt, de breedte zich automatisch aanpast.
Stap 3. Zodra je klaar bent met het aanpassen van de afmetingen van je foto, kun je de afbeelding exporteren. Om je afbeelding te exporteren, ga je naar Bestand > Exporteren. En om je resultaat met een nieuwe bestandsnaam te exporteren, ga je naar Bestand > Overschrijven en geef je je bestand een naam.
Hoe GIMP te gebruiken om het formaat van afbeeldingen te wijzigen zonder kwaliteitsverlies (bestandsgrootte):
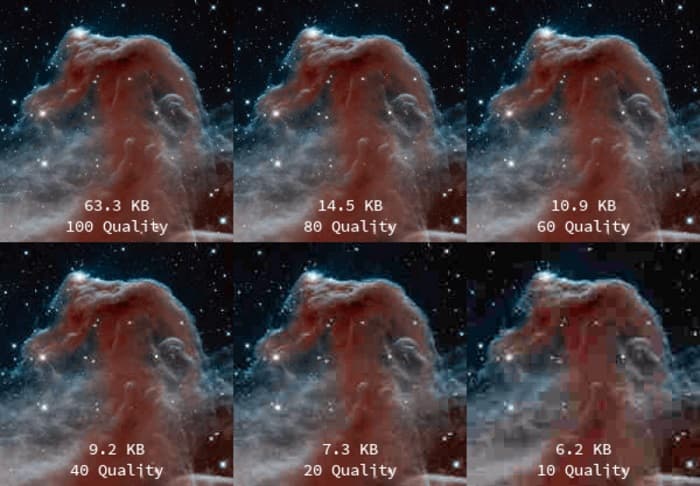
In deze zelfstudie zullen we een JPEG-afbeelding gebruiken, omdat dit type indeling een compressie met verlies is, wat betekent dat we bij het comprimeren van de grootte van deze afbeelding een deel van de kwaliteit ervan opofferen. Maar door GIMP te gebruiken, is het mogelijk om het formaat van uw afbeelding te wijzigen zonder de kwaliteit ervan aan te tasten.
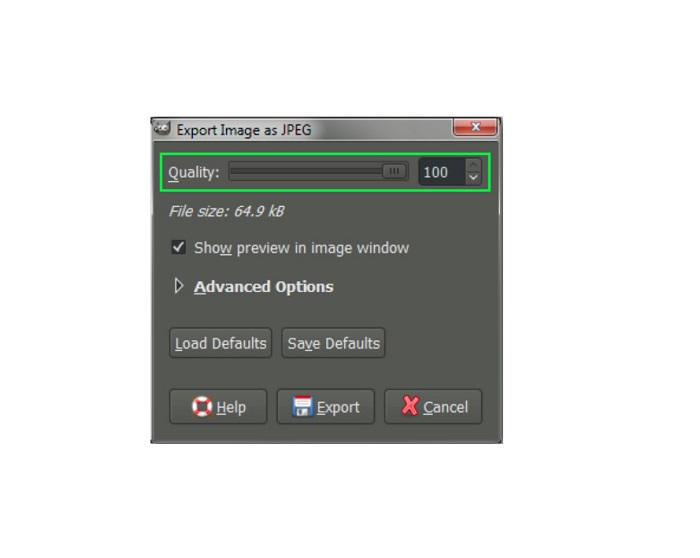
Stap 1. Met gebruik van dezelfde afbeelding als hierboven zullen we de afbeelding verkleinen naar 200 px breed en het bestand exporteren met verschillende JPEG-compressieniveaus. In het onderstaande voorbeeld zie je dat bij een kwaliteitsinstelling van 80 de bestandsgrootte van je afbeelding kleiner is dan bij 100, terwijl de kwaliteit vrijwel hetzelfde blijft.
Stap 2. Wanneer je klaar bent met het aanpassen van de grootte van je afbeelding, gaan we je resultaat exporteren. Klik op de knop Bestand en selecteer Exporteren.
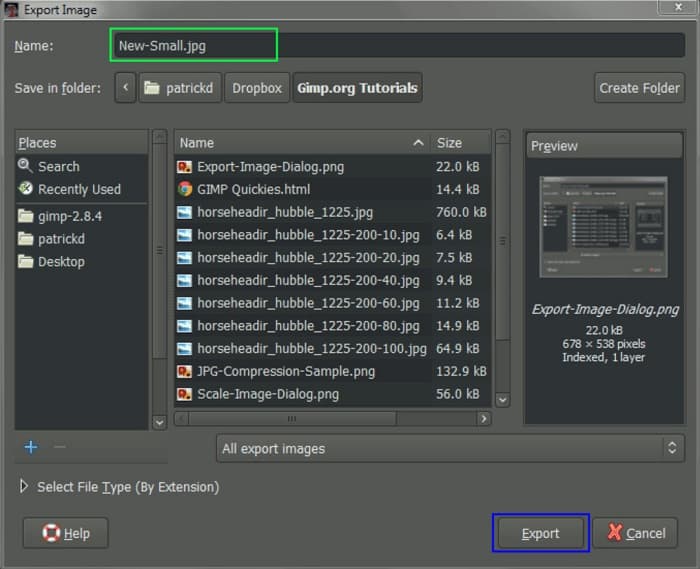
Stap 3. Voer in het tabblad Afbeelding exporteren de nieuwe naam van je afbeelding in. Als je je afvraagt in welk formaat je resultaat wordt opgeslagen: GIMP exporteert standaard in het oorspronkelijke bestandsformaat. In ons voorbeeld zie je dat het uitvoerformaat nog steeds .jpg is.
Stap 4. Nadat je op de knop Exporteren hebt geklikt, verschijnt het tabblad Afbeelding exporteren als JPEG, waar je de kwaliteit van de afbeelding die je exporteert kunt wijzigen. Als je ook de optie Voorbeeld in afbeeldingsvenster weergeven hebt, kun je het vakje aanvinken en een voorbeeld van je afbeelding zien. Je ziet ook de informatie over de Bestandsgrootte, zodat je weet hoe groot het uiteindelijke bestand van je afbeelding zal zijn.
Stap 5. Vink tenslotte de knop Exporteren aan om je afbeelding te exporteren en op je apparaat op te slaan.
En zo kunt u GIMP gebruiken om de afmetingen en bestandsgrootte van uw afbeelding te wijzigen. U kunt uw afbeelding meer bewerken, zoals een afbeelding draaien, een foto omdraaien en uw afbeelding bijsnijden. Lees het volgende deel als je nog steeds een optie wilt om het formaat van je afbeelding te wijzigen of de kwaliteit van je foto's te verbeteren.
Deel 2. Alternatief voor GIMP
GIMP is een van de meest standaard fotobewerkingsprogramma's die veel professionals gebruiken. Sommige gebruikers hebben echter moeite om deze software te gebruiken om foto's te bewerken, zoals het formaat van afbeeldingen wijzigen. En als u een van de gebruikers bent die een eenvoudigere applicatie willen gebruiken, dan hebben wij de oplossing voor u.
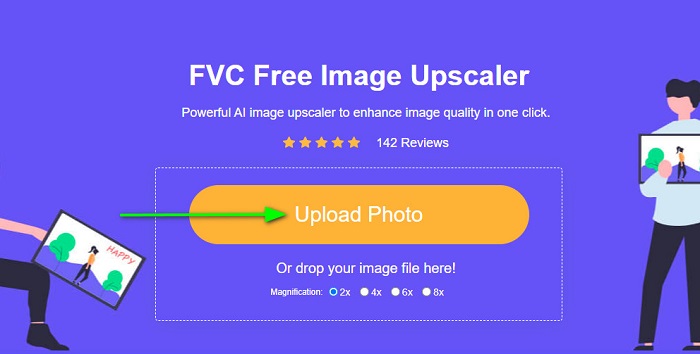
FVC Free Image Upscaler is een gratis online toepassing met een eenvoudige gebruikersinterface, waardoor het een gebruiksvriendelijke tool is voor beginners die op zoek zijn naar de beste tool om afbeeldingen op te schalen en de kwaliteit van hun beeldmateriaal te verbeteren. Het gebruikt een AI-upsamplingproces dat automatisch de wazige delen van je afbeelding detecteert en verbetert. Bovendien kun je je foto tot wel 8x vergroten. Het ondersteunt ook de meest gangbare bestandsformaten, zoals JPEG, JPG, PNG en BMP. En in tegenstelling tot andere bewerkingstoepassingen kan FVC Free Image Upscaler je afbeelding vergroten zonder kwaliteitsverlies. Als je deze tool wilt gebruiken om je afbeelding te vergroten en te verbeteren, volg dan de eenvoudige stappen hieronder.
Hoe het formaat van een afbeelding te wijzigen zonder kwaliteitsverlies GIMP-alternatief:
Stap 1. Open je webbrowser en zoek op FVC Free Image Upscaler in de zoekbalk. Je kunt ook direct op de link naar de hoofdpagina klikken. Klik vervolgens in de hoofdinterface van de software op de knop Foto uploaden om de app op je apparaat te starten.
Stap 2. Klik daarna op de knop Foto uploaden in de hoofdinterface om de foto toe te voegen die je wilt verkleinen/op schalen.
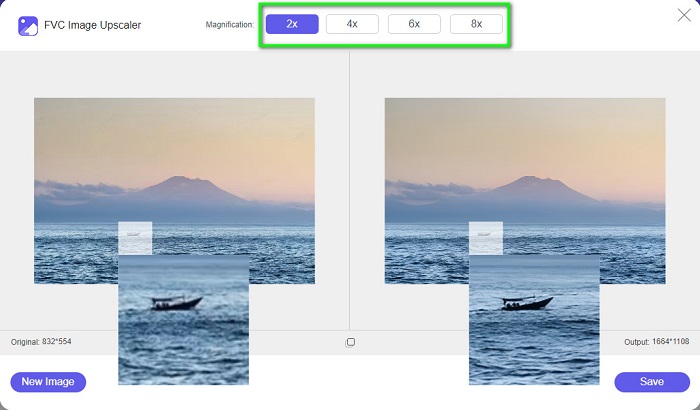
Stap 3. Selecteer na het uploaden van je bestand een van de vergrotingspresets. Je kunt kiezen tussen 2x, 4x, 6x en 8x. Vervolgens kun je het voorbeeld van je resultaat bekijken door met de cursor over de afbeelding te schuiven.
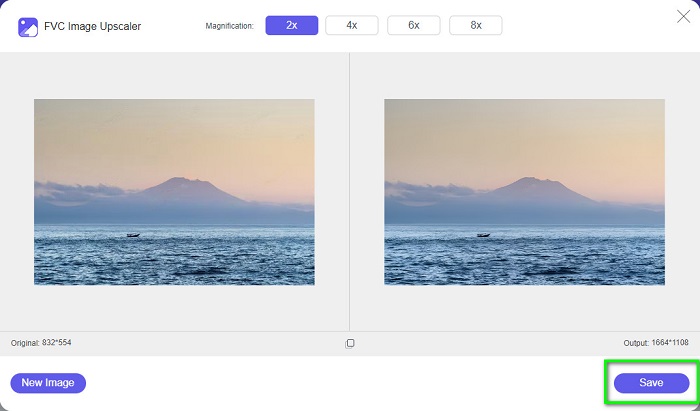
Stap 4. Klik tot slot op de knop Opslaan rechtsonder in de interface om je resultaat op je apparaat op te slaan.
Gerelateerd aan:
Hoe een afbeelding optimaliseren voor het web met de beste oplossingen [Snel]
3 manieren om een afbeelding voor Twitter te verkleinen zonder kwaliteitsverlies
Deel 3. Veelgestelde vragen over het gebruik van GIMP om het formaat van afbeeldingen te wijzigen
Heeft GIMP een online versie?
Ja dat doet het. GIMP is niet alleen een offline toepassing voor het bewerken van foto's; het heeft ook een online versie. GIMP online bevat echter niet alle functies zoals de desktopversie van GIMP.
Is GIMP de beste gratis Photoshop?
GIMP is niet te vergelijken met Photoshop. Photoshop is nog steeds de meest uitstekende fotobewerkingssoftware voor desktops. Toch is GIMP een van de beste alternatieven voor Adobe Photoshop.
Ondersteunt GIMP PNG-bestanden?
Ja. Met GIMP kunt u uw uitvoer opslaan in JPEG, JPG, PNG en andere formaten.
Gevolgtrekking
En dat is het proces voor het gebruik van GIMP om afbeeldingen te vergroten of verkleinen. Hoewel GIMP een complexe interface heeft, kun je met de bovenstaande stappen de afmetingen en de bestandsgrootte van je afbeelding aanpassen. Maar als je liever een gratis online afbeeldingsresizer gebruikt die de kwaliteit van je afbeelding kan verbeteren, gebruik dan FVC Free Image Upscaler.
-
 6 manieren om een afbeelding op het web en offline te wijzigen [100% werkt]
 Met de zelfstudie die we hier toevoegen, kunt u nu eenvoudig het formaat van een afbeelding wijzigen op basis van uw gewenste grootte. Leer hier hoe je het doet!
-
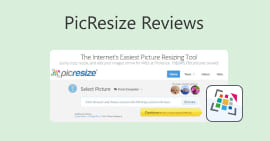 Feitelijke PicResize-recensie die u in 2022 moet weten
 Wil je weten of PicResize de beste optie is voor het bewerken van afbeeldingen? Lees dit artikel terwijl we de algemene tool bekijken.
-
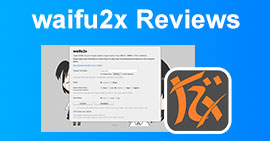 Alles wat u moet weten over de Waifu2x en het alternatief
 Meer weten over de Waifu2x? Dit artikel biedt de informatie die moet worden gemarkeerd in deze app en het alternatief.