

Hoe je een video in QuickTime kunt bijsnijden om een fragment te knippen op een Mac
Heb je ooit een supercoole gameplay-clip, een Zoom-college of een hartverwarmende verjaardagsboodschap opgenomen op je Mac, om er vervolgens achter te komen dat je de eerste dertig seconden alleen maar ongemakkelijk staat te hoesten of naar de camera staart? Geen zorgen, QuickTime biedt de oplossing.
QuickTime Player is niet alleen om films te bekijken; het is een verrassend krachtige (en gratis!) tool voor eenvoudige bewerkingen. In deze gids leer je hoe je video’s bijsnijdt in QuickTime en vind je oplossingen om vervelende foutjes op te lossen. Laten we erin duiken!

Deel 1. Video's inkorten in QuickTime
Toen ik voor het eerst leerde hoe je video's kunt inkorten met QuickTime, was ik verrast hoe eenvoudig het was. Je hoeft geen techneut te zijn om dit onder de knie te krijgen. Of je nu een QuickTime-video wilt inkorten voor een e-mail of gewoon video's wilt knippen op je Mac om opslagruimte te besparen, hier leg ik precies uit hoe ik het doe.
Stap 1. Zoek de functie Bijsnijden
Om te beginnen zoek je de video die je wilt bewerken. Klik met de rechtermuisknop op het bestand, kies vervolgens Open met en selecteer QuickTime Player.

Zodra je video is geopend, kijk je naar de menubalk bovenaan. Ga naar Wijzig en klik vervolgens op Bijsnijden.

Ik ben een enorme fan van sneltoetsen, omdat ze me het gevoel geven dat ik een hacker ben. Je kunt simpelweg op Command + T op je toetsenbord drukken en de bijsnijdinterface verschijnt direct.
Stap 2. Pas de gele handgrepen aan
Hier gebeurt de magie. Zodra je de "Trim-modus" ingaat, verschijnt er een geel kader (de bijsnijd balk) over de videotijdlijn onderaan het venster.
Om een video in QuickTime Player bij te snijden, klikt u op de linker gele greep en sleept u deze naar het gewenste beginpunt. Sleep vervolgens de rechter gele greep naar het gewenste eindpunt van de video.

Voor extra precisie klikt u op de gele hendel en houdt u deze ingedrukt. QuickTime zoomt dan in op de frames, zodat u precies kunt zien waar een scène begint of eindigt. Dit is een redder in nood als u bijvoorbeeld een onhandige oogknipper wilt verwijderen!
Stap 3. Begin met videoknippen
Zodra je het perfecte gedeelte van je clip hebt geïsoleerd, klik je op de knop Bijsnijden aan de rechterkant van de tijdlijn. Alles buiten die gele balken verdwijnt. Maak je geen zorgen: je bent het originele bestand nog niet kwijt!

Stap 4. Je bijgeknipte video exporteren
Nadat je de video in QuickTime voor Mac hebt bijgesneden, moet je hem opslaan. Ga naar Archief > Bewaar. Geef je nieuwe, kortere clip een naam. Ik voeg meestal "-trimmed" toe aan het einde van de bestandsnaam zodat ik hem niet verwar met de oorspronkelijke lange versie.

Als je de kwaliteit wilt wijzigen (bijvoorbeeld verlagen van 4K naar 1080p om ruimte te besparen), kun je in plaats daarvan naar Archief > Exporteer als gaan. Dit is hoe je een QuickTime‑video effectief verkort terwijl je de bestandsgrootte klein houdt.
Deel 2. Waarom is mijn Trim-knop grijs? (Redenen en oplossingen)
Niets is frustrerender dan een bestand openen en erachter komen dat je een video niet kunt inkorten in QuickTime omdat de knop grijs is. Ik heb menig late avond doorgebracht met staren naar een grijs scherm, me afvragend wat ik verkeerd had gedaan. Na wat experimenteren heb ik de oorzaak gevonden.
Als je je afvraagt: "Waarom kan ik een video niet inkorten in QuickTime?", dan zijn dit de meest voorkomende redenen en hoe ik ze heb opgelost:
Niet-ondersteunde bestandsindelingen
QuickTime is nogal veeleisend. Het ondersteunt .mov- en .mp4-bestanden, maar als je een .mkv- of een oud .avi-bestand probeert af te spelen, kun je de video misschien wel bekijken, maar niet bewerken.
De oplossing: Je moet eerst MKV naar MP4 converteren, een Mac‑vriendelijk formaat (we hebben het zo over een tool daarvoor!).
Alleen-lezen bestanden
Soms, als je een bestand van internet of een cloudopslag hebt gedownload, kan het 'vergrendeld' zijn of ingesteld op 'alleen-lezen'.
De oplossing: Klik met de rechtermuisknop op het bestand, selecteer Toon info en zorg dat het selectievakje "Vergrendeld" is uitgevinkt, en dat je bevoegdheden zijn ingesteld op "Lezen en schrijven"."
Het bestand is al in gebruik.
Als een andere app probeert toegang te krijgen tot die video of deze te uploaden, kan QuickTime het bewerken blokkeren om beschadiging van het bestand te voorkomen.
De oplossing: Sluit andere apps, zoals iMovie of je webbrowser, en probeer het opnieuw.
macOS-problemen
Soms heeft je Mac gewoon even een dutje nodig.
De oplossing: Herstart QuickTime Player of, als niets helpt, herstart je Mac. Het klinkt cliché, maar "uit- en weer aanzetten" lost 90% van mijn technische problemen op. Deze oplossing werkt ook wanneer QuickTime Player niet werkt.
Deel 3. Het beste alternatief voor QuickTime voor het inkorten van video's
Hoewel leren hoe je video’s bijsnijdt in QuickTime Player ideaal is voor snelle edits, heeft het programma zeker zijn grenzen. Zo kan QuickTime niet goed overweg met meerdere clips tegelijk en is de ondersteuning voor bestandsformaten relatief beperkt. Dat is het moment waarop ik ben overgestapt op FVC Video Converter Ultimate. Deze software is een echte krachtpatser voor Mac‑gebruikers die meer controle willen over hun videobewerking. Het is niet alleen een converter; het is een complete videotoolkit waarmee je je video’s met een paar klikken kunt bijsnijden, bijsnijden/kaderen, samenvoegen en verbeteren. Of je nu werkt met 4K‑beelden of vreemde bestandstypen die QuickTime afwijst, FVC kan het allemaal zonder moeite aan.
Ben je klaar om verder te gaan dan de basisprincipes van het bewerken van video's op een Mac? Zo gebruik ik FVC om dat voor elkaar te krijgen:
Gratis downloadVoor Windows 7 of nieuwerVeilige download
Gratis downloadVoor MacOS 10.7 of nieuwerVeilige download
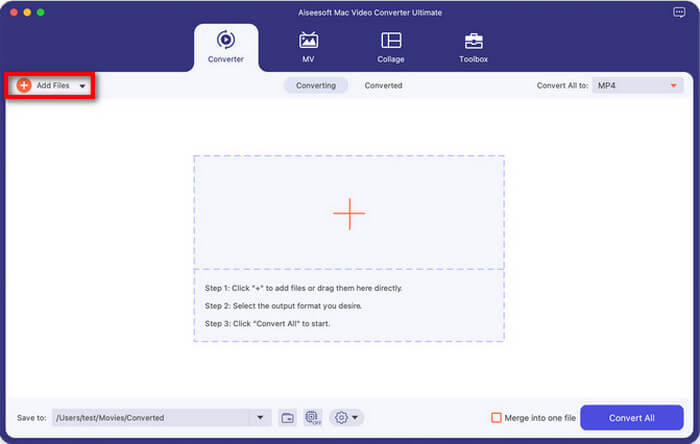
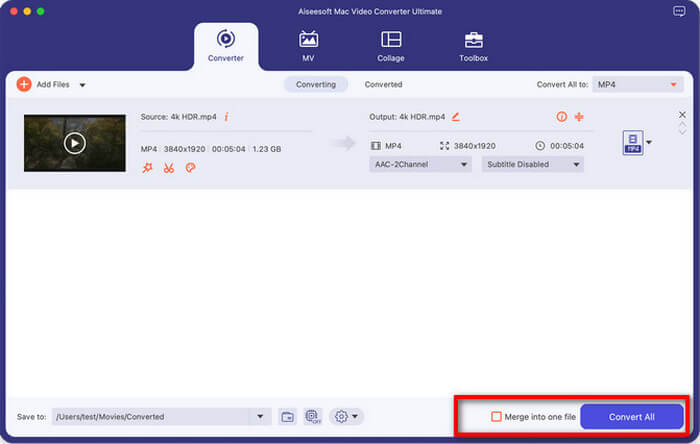
Stap 1. Voeg je video toe
Open het programma en klik op de grote +-knop of op Bestanden toevoegen om je video te importeren. Je kunt zelfs meerdere video’s tegelijk slepen en neerzetten als je haast hebt.
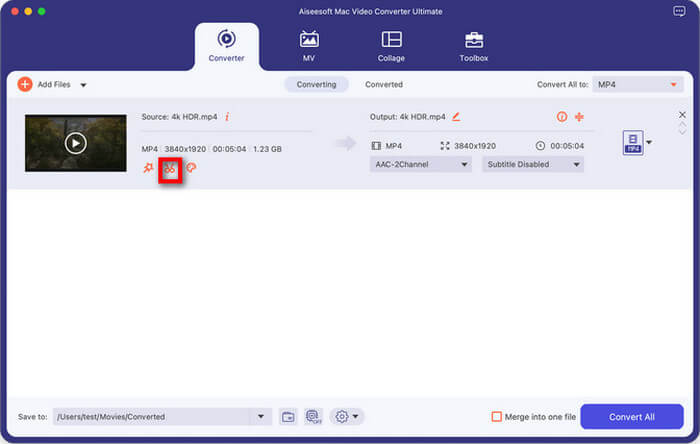
Stap 2. Ga naar de Knip‑tool
Zoek het pictogram Knippen (weergegeven door een schaar) naast de videominiatuur. Klik erop om het bijsnijdvenster te openen.
Stap 3. Een video bijsnijden
Net als in QuickTime kun je de schuifregelaars verplaatsen om te kiezen waar de clip begint en eindigt. FVC laat je echter op Segment toevoegen klikken, wat betekent dat je meerdere verschillende delen uit één enkele video kunt knippen, iets wat in QuickTime niet eenvoudig kan.
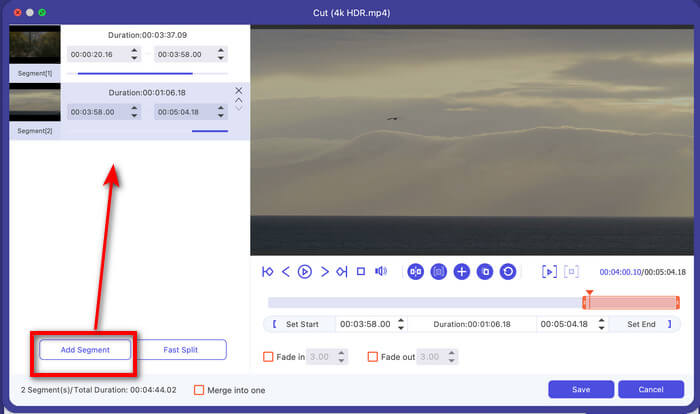
Deze tool biedt ook een snelle splitsfunctie, waarmee je een lange video in meerdere fragmenten kunt knippen op basis van gemiddelde tijdsduur of een bepaald deel.
Stap 4. Opslaan en converteren
Zodra je tevreden bent met je clips, klik je op Opslaan. Kies vervolgens in het hoofdvenster je uitvoerformaat (zoals MP4 of MOV) en klik op Alles converteren.
Als je je geknipte clips wilt samenvoegen tot één bestand, zet je ze in de gewenste volgorde en vink je het selectievakje Samenvoegen tot één bestand aan.
FVC Video Converter Ultimate is aanzienlijk sneller dan QuickTime bij het verwerken van bestanden met een hoge resolutie. Ik vind het geweldig dat het niet vastloopt wanneer ik grote bestanden probeer te bewerken, en de mogelijkheid om een lange video snel in gelijke delen te splitsen is echt een gamechanger voor mijn berichten op sociale media. Het enige nadeel is dat het een app van een derde partij is, dus je moet hem downloaden, terwijl QuickTime al op je Mac is geïnstalleerd. Maar voor iedereen die meer doet dan af en toe bewerken, zijn de extra functies het absoluut waard.
Deel 4. Veelgestelde vragen
Welke videoformaten ondersteunt QuickTime voor het bijsnijden van video's?
QuickTime Player werkt het best met native Apple-formaten. Het programma ondersteunt het beste MOV-, MP4-, M4V- en sommige AVI-bestanden (afhankelijk van de codec). Als je merkt dat het bijsnijden van een video in QuickTime op een Mac kwaliteitsverlies oplevert, komt dat mogelijk doordat het oorspronkelijke formaat niet volledig werd ondersteund. Voor MKV- of FLV-bestanden is het waarschijnlijk nodig om een converter zoals de hierboven genoemde FVC te gebruiken voordat je ze kunt bewerken.
Hoe kan ik meerdere delen van een video inkorten in QuickTime?
Dit is een "geheime" functie! Om een middendeel uit een video te knippen:
1. Ga naar Wijzig > Clip splitsen (of druk op Command + Y) op het punt waar je met knippen wilt beginnen.
2. Verplaats de afspeelkop naar het einde van het deel dat je wilt verwijderen en druk opnieuw op Command + Y.
3. Je video bestaat nu uit drie stukken. Klik op het middelste stuk (het wordt geel omlijnd) en druk op de Delete-toets op je toetsenbord.
4. Voilà! Je hebt zojuist het middenstuk uit een video verwijderd.
Waar slaat QuickTime de bijgesneden video's op?
Standaard bewaart QuickTime de bewerkte versie in zijn tijdelijke geheugen wanneer je op "Bijsnijden" klikt. Het wordt pas een permanent bestand nadat je naar Archief > Bewaar gaat. Op dat moment verschijnt er een venster waarin je wordt gevraagd waar je het bestand precies wilt opslaan. Ik sla de mijne meestal op in de map Bureaublad of Downloads, zodat ik ze niet kwijtraak in mijn rommelige bestandssysteem.
Gevolgtrekking
Leren hoe je video’s bijsnijdt in QuickTime is een eenvoudige Mac‑vaardigheid die je veel tijd en gedoe kan besparen. Of je nu student, maker of gewoon iemand bent die familievideo’s van vakanties wil opruimen, QuickTime is een betrouwbare, gebruiksvriendelijke tool voor deze klus. Maar als je jezelf ooit afvraagt: "Waarom kan ik geen video bijsnijden in QuickTime?" of wanneer je geavanceerdere bewerkingen moet uitvoeren, zoals clips samenvoegen of formaten converteren, wees dan niet bang om een alternatief zoals FVC Video Converter Ultimate te proberen.
-
 Tips en trucs over VLC Metadata Editor die u in 2025 moet kennen
 Wil je de VLC gebruiken als metadata-editor? In dit geval kunt u dit artikel lezen omdat we een onbevooroordeelde beoordeling van de VLC-metadata-editor geven.
-
 VLC-afspeelsnelheid: geheime technieken om de videosnelheid te regelen
 Wil je een video bekijken maar de VLC-afspeelsnelheid wijzigen? We zullen u leren hoe u dit eenvoudig kunt doen in beide besturingssystemen.
-
 Hoe VLC te gebruiken om video's te repareren | Uw ultieme gids
 Heeft u kapotte video's in uw bestanden? Ontdek de ultieme gids voor VLC-videoreparatie om uw video's te repareren en ze gemakkelijk weer te laten afspelen.