


Jak zoptymalizować obraz na potrzeby Internetu za pomocą 4 rozwiązań [Szybko]
Optymalizacja obrazu odgrywa kluczową rolę w internecie, ponieważ skraca czas ładowania strony. Na podstawie ostatnich badań, gdy obrazy nie są dobrze zoptymalizowane, niemal połowa odwiedzających natychmiast opuszcza witrynę, co oznacza mniejszy ruch i niższe przychody. Jeśli chcesz ograniczyć buforowanie i zbudować niezawodną stronę internetową, aby zwiększyć ruch i zarabiać więcej, musisz nauczyć się, jak to robić. To proste – z pomocą samouczka, który dodaliśmy na temat jak zoptymalizować obraz na potrzeby internetu w możliwie najłatwiejszy sposób.

Część 1. Najlepsze i bezpłatne sposoby optymalizacji obrazu online bez utraty jakości obrazu
1. Skalowanie obrazu swobodnego FVC
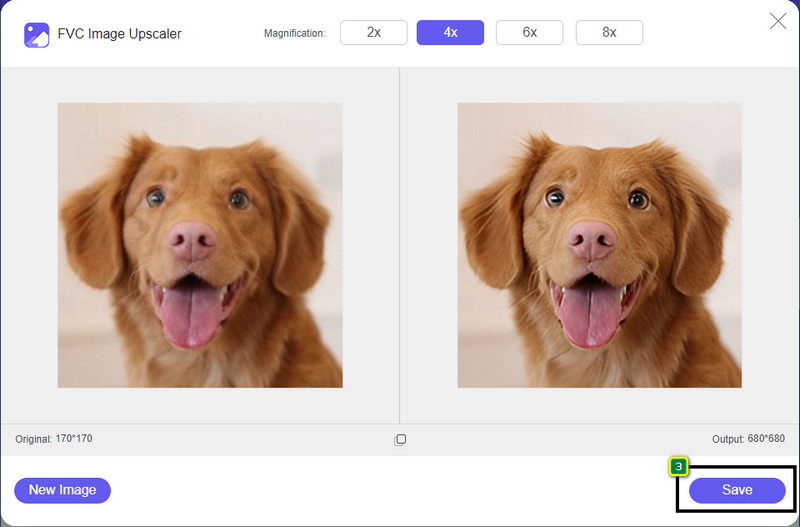
Szukasz sposobu na optymalizację wymiarów i proporcji obrazu, którego chcesz użyć w sieci? FVC Free Image Upscaler to narzędzie zdolne do optymalizowania obrazów dzięki zaawansowanej technologii SI. Ten upscaler może zmienić rozmiar obrazu bez naruszania jego szczegółowego PPI, dzięki czemu nie doświadczysz utraty jakości. Ponadto to narzędzie online potrafi naprawiać rozmazane lub rozpikselowane obrazy, śledząc niedoskonałości na nich. Zanim wyeksportujesz obraz, dostępne jest okno podglądu, w którym porównasz stan przed i po. Jeśli więc musisz zmienić rozmiar obrazu na potrzeby internetu, możesz postępować według kroków, które podajemy poniżej.
Krok 1. Otwórz stronę internetową, klikając ten link.
Krok 2. Naciśnij Upload Image, aby wstawić tutaj obraz, którego rozmiar chcesz zmienić.
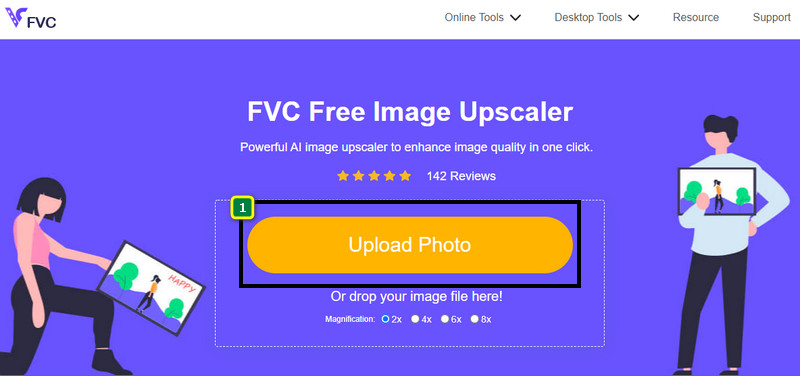
Krok 3. Wybierz opcję, którą chcesz zastosować do obrazu, aby go przeskalować.
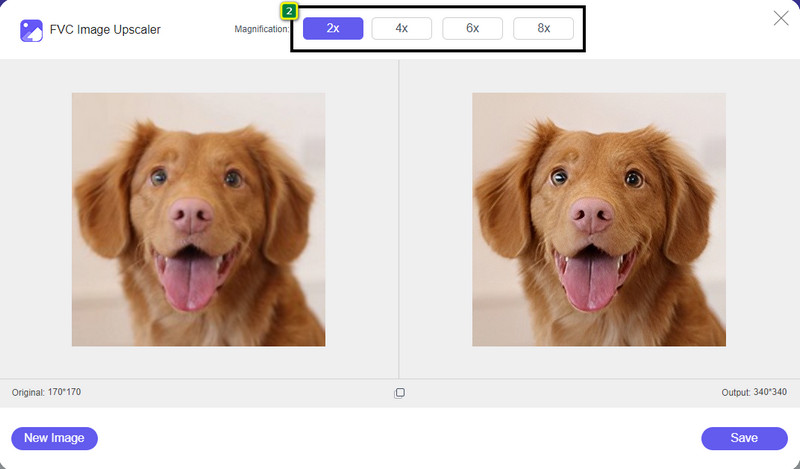
Krok 4. Naciśnij Save, aby pobrać przeskalowany obraz na dysk lokalny.
2. Bezpłatna kompresor obrazu FVC
FVC Free Image Compressor pozwala każdemu zoptymalizować obraz na potrzeby internetu poprzez zmniejszenie jego rozmiaru pliku. Umożliwia kompresję popularnych formatów używanych na różnych stronach, takich jak PNG, JPG, SVG, BMP itd., o wielkości poniżej 5 MB każdy. Dzięki niemu możesz wrzucić wiele obrazów i przekształcić je w zoptymalizowany rozmiar, aby lepiej ładowały się w sieci. To narzędzie oparte na sztucznej inteligencji zapewnia najlepszy współczynnik kompresji, jakiego nie osiągniesz w innych kompresorach online.
Krok 1. Odwiedź oficjalną stronę narzędzia, wyszukując jego nazwę, albo kliknij ten link, aby otworzyć je w przeglądarce.
Krok 2. Przeciągnij i upuść plik obrazu, który chcesz tutaj przesłać, albo kliknij Upload Images; na ekranie pojawi się okno folderu, kliknij plik, który chcesz skompresować, i naciśnij Open. Ten kompresor może zmniejszyć rozmiar ponad 40 obrazów jednocześnie.
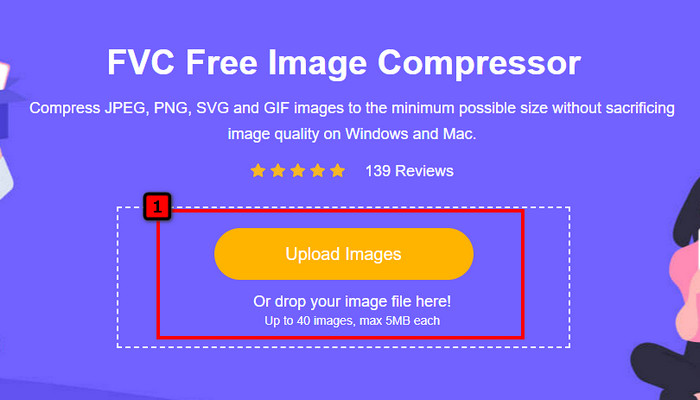
Krok 3. Narzędzie automatycznie zmniejszy rozmiar pliku obrazu na podstawie algorytmu SI. Następnie kliknij Download, aby wyeksportować skompresowaną wersję obrazu.

3. TinyPNG
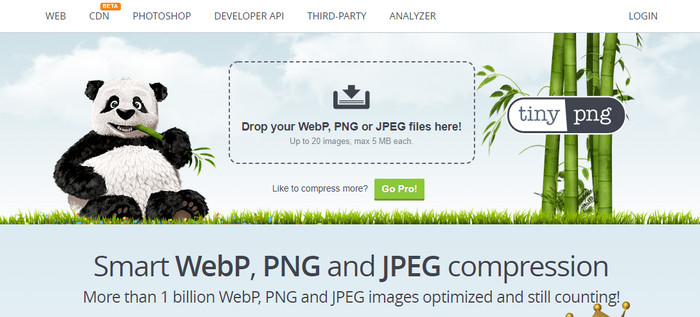
TinyPNG to popularne i niezawodne oprogramowanie, którego możesz użyć do optymalizowania obrazów online. To kompresor, który automatycznie zmniejsza obraz nawet do 75% oryginalnego rozmiaru. Możesz przesłać obrazy na Dropbox, jeśli nie znajdują się na dysku lokalnym. Nie będziesz mieć problemu z nauką obsługi tego kompresora, ponieważ jego twórcy zaprojektowali go bardzo prosto.
Chociaż jest łatwy w użyciu, obsługiwane formaty to tylko PNG i JPG i nie ma nic więcej. Tak więc, jeśli chcesz skompresować posiadane pliki BMP, GIF, SVG i inne, nie możesz tego zrobić tutaj, ponieważ nie obsługuje on wspomnianego formatu. Niemniej jednak jest to łatwe w użyciu; możesz wykonać kroki, które dodamy.
Krok 1. Otwórz wyszukiwarkę i znajdź oficjalną stronę TinyPNG.
Krok 2. Kliknij ikonę importu, aby wczytać obraz, który chcesz skompresować; to narzędzie może przetwarzać 20 obrazów jednocześnie.
Krok 3. Poczekaj na zakończenie procesu kompresji, a następnie kliknij przycisk Download, aby zapisać skompresowaną wersję obrazu, który tu przesłałeś.
Część 2. Optymalizacja obrazu w trybie offline za pomocą profesjonalnego oprogramowania w systemach Windows i Mac
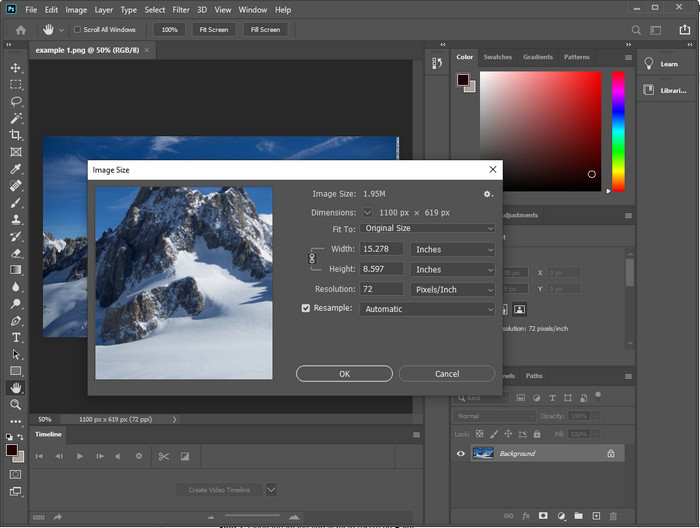
Photoshop potrafi wykonać oba zadania, o których wspomnieliśmy na początku: zmianę rozmiaru i zmniejszenie wagi zdjęcia. Choć to narzędzie nie zostało stworzone wyłącznie do tego celu, nadal może to robić jako część dodatkowych, zaawansowanych funkcji. Dzięki niemu możesz zacząć dodawać filtry lub edytować obraz zgodnie ze swoim pomysłem. Jedynym ograniczeniem jest twoja wyobraźnia oraz to, jak trudne jest w obsłudze to oprogramowanie.
W przeciwieństwie do narzędzia online, o którym wspominaliśmy, nie potrzebujesz połączenia z Internetem, aby korzystać z tego oprogramowania po pobraniu go na swoje urządzenie. Jednak aby z niego korzystać, musisz kupić oprogramowanie, więc jeśli chcesz zobaczyć, jak zoptymalizować obraz do Internetu w Photoshopie, poniżej dodajemy instrukcję, która pozwala zmniejszać i zmieniać rozmiar obrazu.
Krok 1. Pobierz i uruchom oprogramowanie na komputerze, aby zacząć z niego korzystać.
Krok 2. Prześlij obraz, który chcesz edytować, następnie przejdź do menu Image i kliknij Image Size. Zmieniaj wymiary zgodnie ze swoją specyfikacją, a następnie kliknij OK, aby zapisać zmiany. Jeśli nie chcesz zmieniać proporcji ani wymiarów obrazu, lepiej pomiń krok 2.
Krok 3. Przejdź do menu File i wybierz Save as. Na ekranie pojawi się okno dialogowe. Wybierz rozmiar pliku, który chcesz uzyskać, a następnie naciśnij OK, aby rozpocząć eksport obrazu.
Część 3. Często zadawane pytania dotyczące optymalizacji obrazu w Internecie
Jaki jest najlepszy format obrazu do internetu?
Lepiej użyj obrazu z rozszerzeniem PNG i JPG, ponieważ wiadomo, że te formaty są dobrze zoptymalizowane na różnych stronach internetowych. Jednak czasami trzeba będzie go zoptymalizować, zmniejszając lub zmieniając rozmiar obrazu, w czym z pomocą przyszło narzędzie, które dodaliśmy tutaj.
Co przynosi więcej szczegółów w sieci; PNG czy JPG?
Oba obrazy rastrowe dobrze prezentują się na stronie internetowej; ładują się szybciej i optymalizują strony internetowe. Jednak nadal istnieją różnice między tymi dwoma formatami, na przykład gdy chcesz użyć czystej fotografii bez przezroczystości w Internecie, Twoim głównym formatem musi być JPG lub JPEG. Ale jeśli chcesz mieć 1-bitową przezroczystość w swojej sieci z dużą szczegółowością, PNG jest tutaj, aby ci pomóc.
Czy zmiana rozmiaru obrazu powoduje pogorszenie jakości?
Jeśli nadmiernie skompresujesz obraz, może on mieć słabą jakość, ale można tego uniknąć, po prostu nie przesadzając z kompresją. Po skompresowaniu obrazu najlepiej zmniejszyć go o co najmniej 45% do 70%, aby uniknąć utraty jakości. Możesz też skorzystać z narzędzia do poprawy jakości obrazu, aby zwiększyć jakość obrazu.
Wniosek
Teraz, gdy wiesz, jak zoptymalizować swój wizerunek, lepiej zrób to, aby zyskać więcej odwiedzin i przyciągnąć dużo uwagi. Dzięki samouczkowi, który dodaliśmy powyżej, jesteśmy pewni, że możesz to zrobić łatwo i szybko bez wpływu na jakość. Jeśli potrzebujesz zmienić rozmiar lub skompresować, zalecamy skorzystanie z produktu FVC, który tutaj zamieściliśmy, aby rozwiązać problem bez pobierania instalatora.
-
 Twórz zdjęcia HD za pomocą najlepszych sposobów, jakie możesz znaleźć na rynku
 Zastanawiasz się lub chcesz zrobić zdjęcie HD? Możesz postępować zgodnie z samouczkiem, który dodamy poniżej, z różnymi rozwiązaniami, z których możesz skorzystać.
-
 4 najlepsze reduktory jakości obrazu, których możesz używać online i offline
 Te reduktory jakości obrazu mogą z pewnych powodów pomóc w obniżeniu jakości obrazu. Jeśli potrzebujesz, przeczytaj ten artykuł!
-
 Oficjalne sposoby na przeskalowanie obrazu do 4k za pomocą praktycznego samouczka
 Aby przeskalować obraz do 4k, potrzebujesz oprogramowania na swoim urządzeniu. Jeśli go nie masz, musisz wybrać narzędzie, które tutaj zawieramy.