


Jak edytować pliki WAV, aby uzyskać szybką edycję dźwięku wysokiej jakości
Pliki WAV są najpopularniejszym formatem plików audio i uważa się je za idealny sposób przechowywania muzyki lub nagrań o różnych przepływnościach bitów. Lepsze formaty plików oznaczają lepszą jakość, a edycja plików WAV może dodatkowo ją poprawić. Jak jednak upewnić się, że nie psujesz nieświadomie jakości swojego pliku WAV? Bez obaw – ten poradnik odpowie na pytania, jakiego oprogramowania lub narzędzi najlepiej używać do edycji plików WAV. Przedstawiamy cztery metody wybrane na podstawie naszego własnego doświadczenia. Co więcej, w tym przewodniku, niezależnie od tego, czy jesteś początkującym, czy zaawansowanym użytkownikiem, krok po kroku nauczysz się, jak skutecznie edytować pliki WAV, nie niszcząc ich jakości.

Część 1. Najlepszy sposób edycji plików WAV za pomocą pełnofunkcyjnego edytora plików WAV
FVC przeszukał internet, aby znaleźć idealny sposób edycji plików WAV, warty opisania w tym artykule, tak abyś sam nie musiał tego robić. Ku naszemu zaskoczeniu trafiliśmy na wybrane przez FVC narzędzie Video Converter Ultimate, które jest łatwe w obsłudze, ma prosty interfejs i oferuje w pełni funkcjonalne narzędzia, takie jak możliwość cięcia, dzielenia, łączenia, wzmocnienia głośności itd. Edytowanie plików WAV za pomocą tego wyjątkowego oprogramowania na Windows i macOS, z ponad pięcioma milionami pobrań, budzi zaufanie nie tylko jako edytor WAV, lecz także jako konwerter i narzędzie do edycji wideo.
Kluczowe funkcje:
• Wszechstronny i łatwy w użyciu edytor plików WAV.
• Dostępne narzędzia: przycinanie, łączenie, kompresor, usuwanie szumów, zwiększanie głośności itp.
• Obsługiwane jest ponad 1000 formatów audio/wideo, takich jak MP3, AAC, WMA, WAV i inne.
• Brak ograniczeń co do rozmiaru pliku przy przesyłaniu go w formacie WAV.
Krok 1. Pobierz i zainstaluj wybrane przez FVC narzędzie Video Converter Ultimate tutaj.
Bezpłatne pobieranieDla Windows 7 lub nowszegoBezpieczne pobieranie
Bezpłatne pobieranieDla MacOS 10.7 lub nowszegoBezpieczne pobieranie
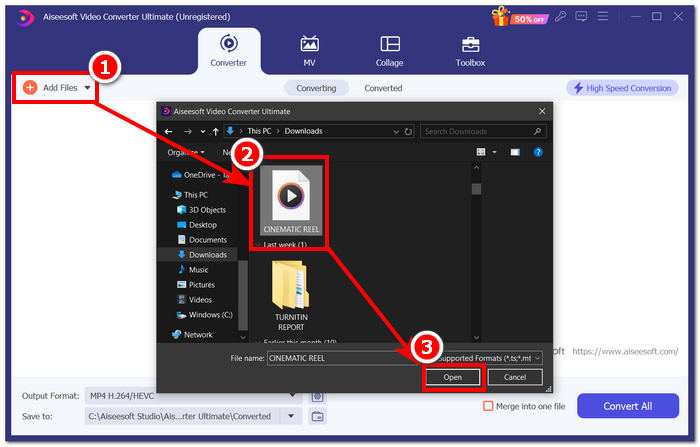
Krok 2. W interfejsie narzędzia kliknij przycisk Add Files, aby dodać plik WAV do programu.
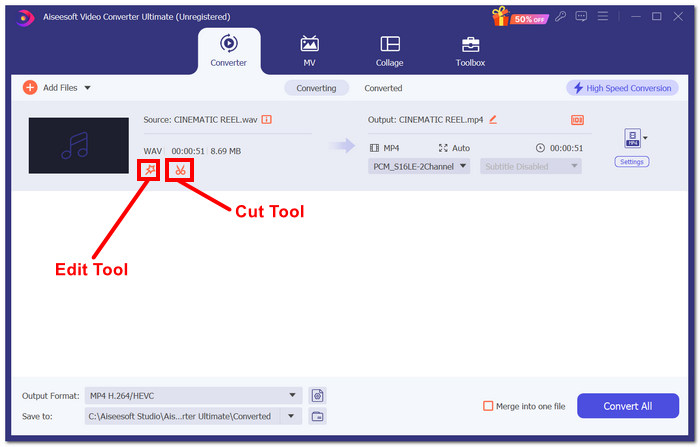
Krok 3. Gdy plik WAV znajdzie się w narzędziu, możesz go edytować, klikając przyciski Edit oraz Cut, znajdujące się tuż obok wgranego pliku WAV.
Uwaga:
Narzędzie edycji ma ikonę przypominającą różdżkę. W tym narzędziu znajdują się funkcje wzmocnienia głośności i opóźnienia dźwięku.
Narzędzie Cięcie ma postać ikony nożyczek i zawiera efekty Cięcie, Dzielenie, Scalanie i Dodaj zanikanie.
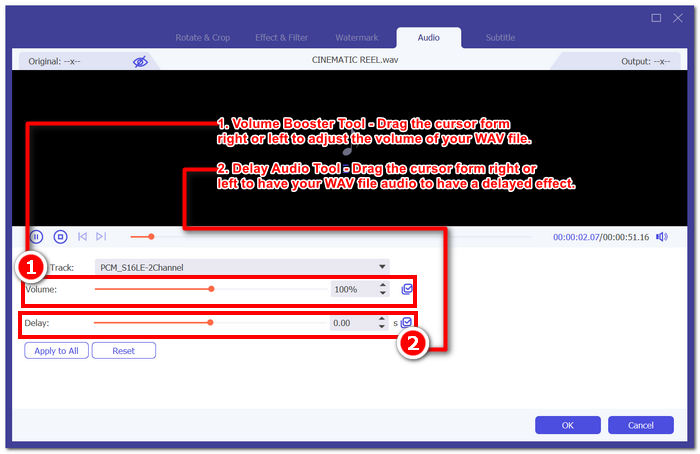
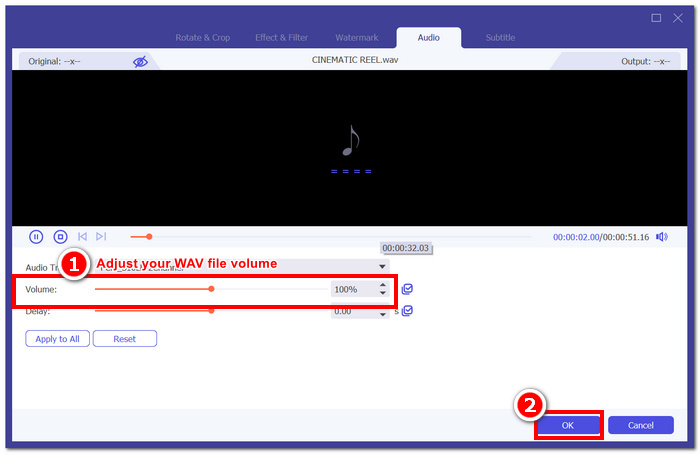
Krok 4. Aby edytować plik WAV, kliknij ikonę przypominającą różdżkę, aby skorzystać z funkcji wzmacniacza głośności, i przeciągnij suwak głośności w lewo lub w prawo, aby ją dostosować, albo bezpośrednio wpisz żądaną wartość. Jeśli chcesz skorygować opóźnienie dźwięku, przeciągnij suwak opóźnienia, aby je wyregulować. Gdy skończysz, kliknij przycisk OK.
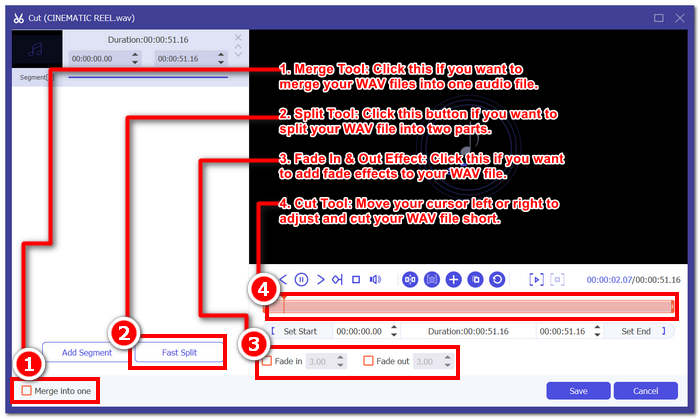
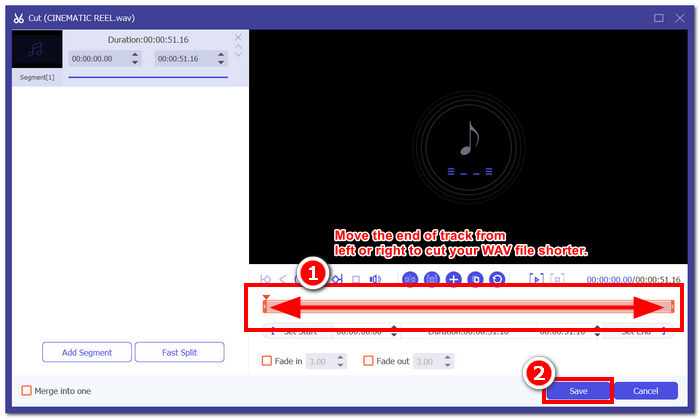
Z drugiej strony, aby przyciąć plik WAV, kliknij przycisk nożyczek i po prostu przeciągnij kursor do ścieżki z lewej do prawej, aby skrócić plik WAV. Po zakończeniu cięcia pliku WAV kliknij przycisk Zapisz.
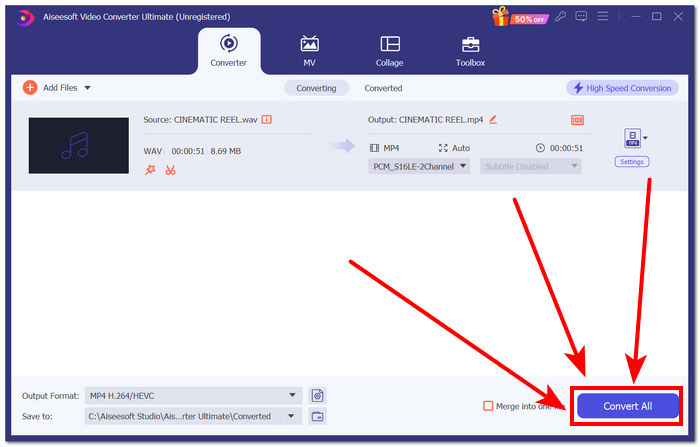
Krok 5. Gdy pomyślnie zedytujesz i przytniesz plik WAV zgodnie z upodobaniami, kliknij przycisk Convert All, aby pobrać go do domyślnego folderu pobierania na komputerze.
Nasze doświadczenie w edytowaniu pliku WAV przy użyciu wybranego przez FVC oprogramowania oszczędza nam czasu i opiera się na jego reputacji, ponieważ wykonywanie powyższych kroków pomaga nam płynnie wykonywać zadanie. Ponadto podczas korzystania z oprogramowania zauważyliśmy, że jest ono wypełnione innymi funkcjami do edycji wideo i audio. Ogólnie rzecz biorąc, daje nam to wiele opcji wyboru tego, co możemy zrobić więcej, aby edytować nasze pliki WAV.
Część 2. Edycja pliku WAV w systemie Windows 7/8/10/11 za pomocą wbudowanego narzędzia
Metoda 1. Edytuj pliki WAV w programie Windows Media Player za pomocą wtyczki
Windows Media Player, wbudowany odtwarzacz multimedialny w urządzeniach Windows, może być również używany jako edytor plików WAV za pomocą wtyczki. Aby to zrobić, wtyczka SolveigMM WMP Trimmer jest dostępna do pobrania bezpłatnie w sklepie Microsoft Store, aby móc wycinać i edytować pliki WAV.
Krok 1. Przejdź do sklepu Microsoft Store w systemie Windows i pobierz wtyczkę SolveigMM WMP Trimmer Plugin.
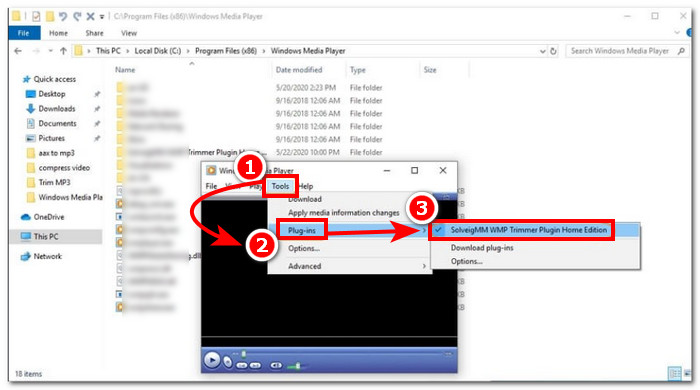
Krok 2. Po zainstalowaniu wtyczki otwórz Windows Media Player, kliknij sekcję Tools znajdującą się w górnej części odtwarzacza, a następnie wybierz Plug-ins, aby włączyć SolveigMM WMP Trimmer Plugin.
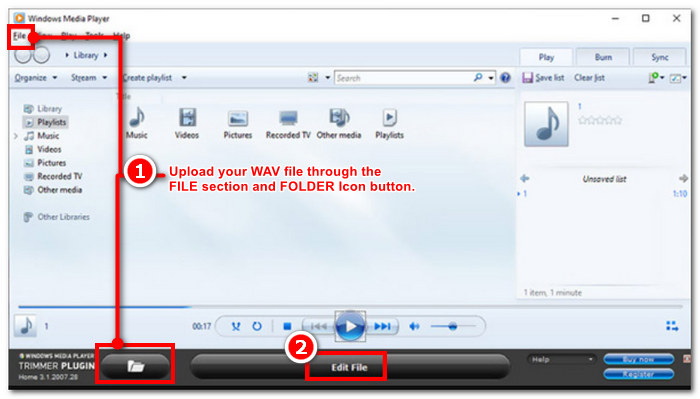
Krok 3. Po włączeniu wtyczki przejdź do wgrywania pliku WAV, klikając menu File w lewym górnym rogu odtwarzacza lub ikonę folderu w lewym dolnym rogu, aby załadować plik WAV. Gdy plik WAV zostanie wczytany do odtwarzacza, kliknij przycisk Edit File, aby przejść do właściwej edycji WAV.
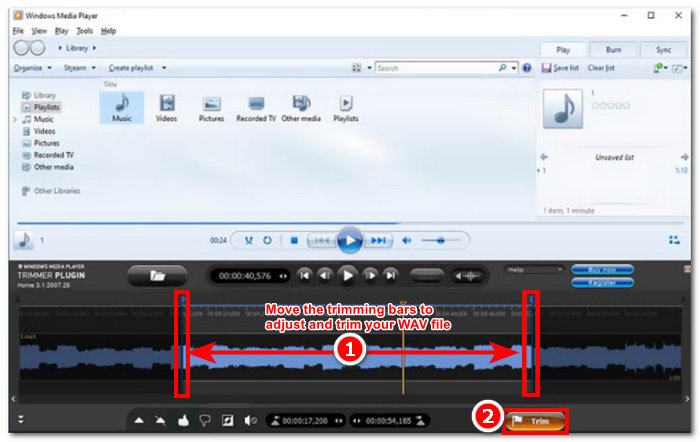
Krok 4. Możesz teraz wykonywać operacje edycyjne, na przykład przycinać plik WAV, przesuwając suwaki przycinania w lewo lub w prawo. Gdy będziesz zadowolony z długości pliku WAV, kliknij przycisk Trim, aby zapisać go domyślnie w tym samym folderze co oryginalny plik WAV.
Teraz, gdy edytowałeś plik WAV, w tym przypadku wykonaj przycinanie za pomocą Windows Media Player za pomocą wtyczek. Teraz możesz edytować plik WAV za pomocą wbudowanego odtwarzacza. Wtyczki mogą być przydatne dla wygody użytkownika, ale nie są całkowicie darmowe, ponieważ oferują jedynie ograniczone funkcje edycji w porównaniu do wersji płatnej.
Metoda 2. Edycja właściwości plików WAV za pomocą Eksploratora plików
Jeśli zazwyczaj trudno jest Ci poruszać się po oprogramowaniu, mamy też coś dla Ciebie: możliwość edycji plików WAV za pomocą wbudowanego narzędzia w systemach Windows 7/8/10/11. Choć trudno w to uwierzyć, Windows nie ma wbudowanego programu ani funkcji, która pozwalałaby swobodnie edytować plik WAV, jednak nadal możliwe jest edytowanie informacji o pliku WAV poprzez zmianę jego właściwości. Krótko mówiąc, korzystanie z domyślnej metody to sposób na edycję informacji o pliku WAV poprzez modyfikację jego właściwości w widoku pliku. Dlatego poniżej przedstawimy metody edycji właściwości informacyjnych pliku WAV.
Krok 1. Otwórz Eksplorator plików i zlokalizuj plik WAV, który chcesz edytować.
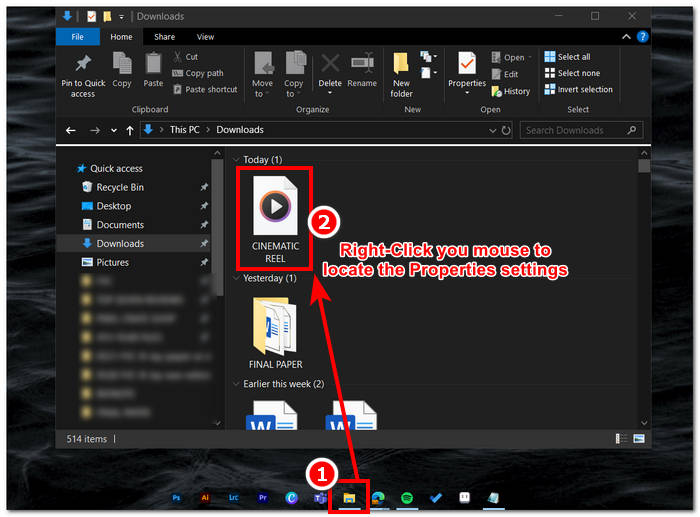
Krok 2. Gdy znajdziesz Właściwości, kliknij je – pojawi się okno z informacjami o Twoim pliku WAV.
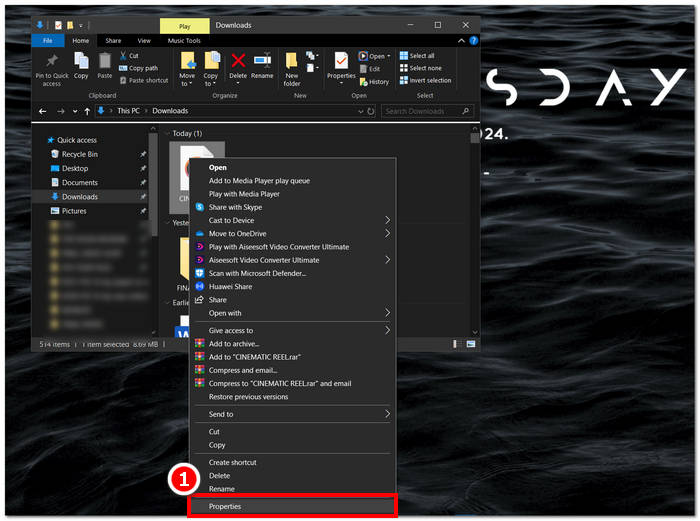
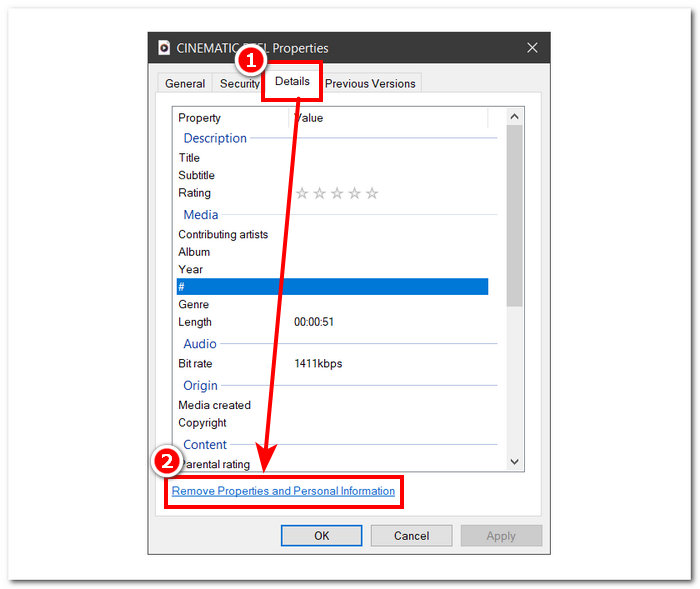
Krok 3. W nowo otwartym oknie kliknij kartę Szczegóły, a następnie wybierz opcję Remove Properties and Personal Information w dolnej części okna.
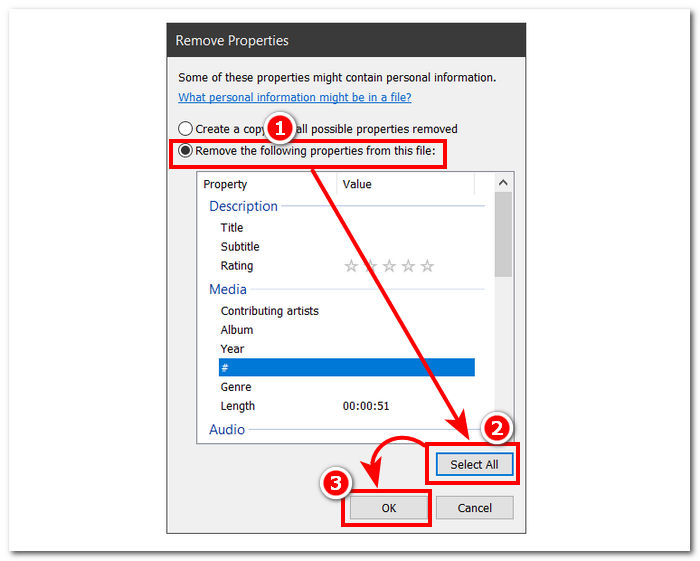
Krok 4. Wybierz drugą opcję – Remove the following properties from this file, następnie kliknij przycisk Select All. Na końcu kliknij OK, aby zresetować informacje o pliku WAV do ustawień domyślnych.
Pamiętaj, że ta metoda jest przeznaczona wyłącznie dla użytkowników systemu Windows i nie pozwala użytkownikom na dostosowanie pliku audio, ale raczej właściwości informacji. Ogólnie rzecz biorąc, użycie domyślnej metody resetowania informacji pliku WAV jest wygodne. Mimo to, gdy chcesz wypełnić szczegóły informacji pliku WAV, nie ma innego sposobu niż użycie oprogramowania do tego celu, w tym przypadku oprogramowania wybranego przez FVC.
Część 3. Edycja plików WAV na komputerze Mac za pomocą GarageBand
Natknęliśmy się na oprogramowanie, które ma również wersję aplikacji mobilnej. GarageBand to popularne narzędzie dla urządzeń macOS i iOS, które oferuje w pełni funkcjonalny edytor audio. Narzędzie oferuje gotowe ustawienia i integruje się z inteligentnymi elementami sterującymi. Ponadto poniżej wymieniliśmy prostą metodę korzystania z GarageBand; w tym przypadku użyjemy wersji macOS.
Krok 1. Pobierz GarageBand na urządzenie z systemem macOS, a po zakończeniu instalacji uruchom program.
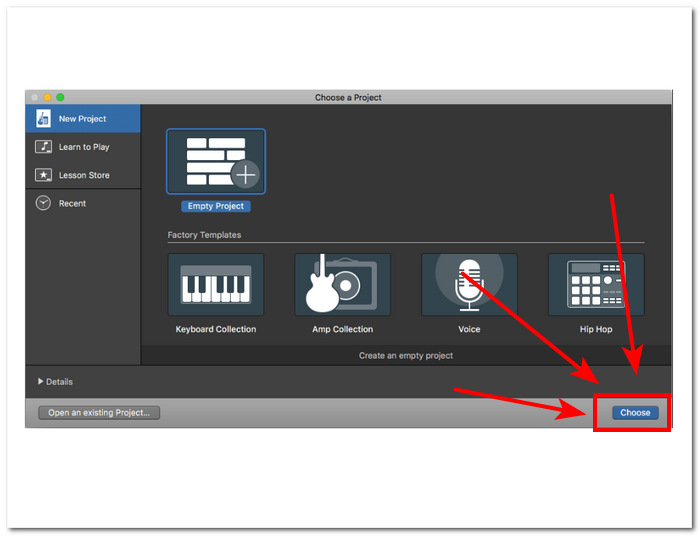
Krok 2. Załaduj plik WAV do programu, klikając przycisk Choose. Gdy plik WAV zostanie wczytany do narzędzia, kliknij dwukrotnie ścieżkę, aby w dolnej części interfejsu pojawiło się okno Audio Editor.
Krok 3. Edytuj plik WAV, korzystając z sekcji Track i Region, znajdujących się w dolnej części programu.
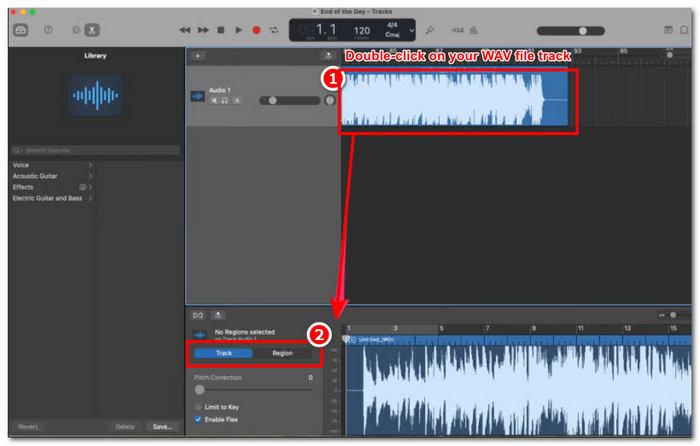
Sekcja Track odpowiada za edycję wysokości dźwięku pliku WAV i pełni funkcję korektora.
Sekcja Region zawiera ustawienia transpozycji, co umożliwia użytkownikowi odtwarzanie pliku WAV w odwrotnej kolejności.
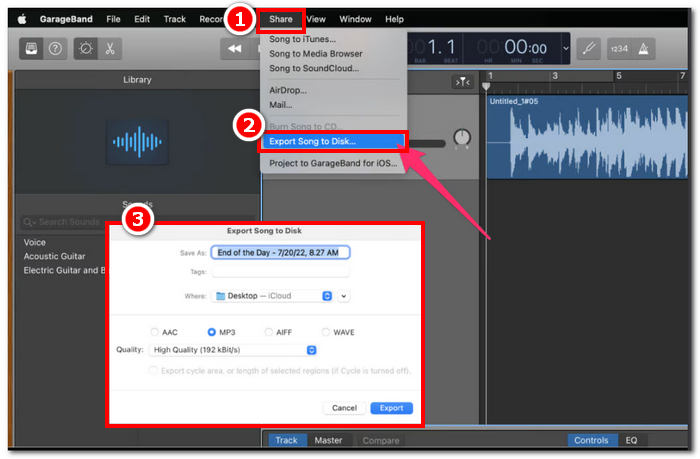
Krok 4. Gdy będziesz zadowolony ze zmian wprowadzonych w pliku WAV, wyeksportuj go, klikając Share > Export Songs to Disk i wybierz lokalizację, w której ma zostać zapisany edytowany plik WAV.
GarageBand to niezawodne oprogramowanie do edycji plików WAV na macOS i iOS. Dlatego jeśli szukasz bardziej zaawansowanych funkcji, zalecamy korzystanie z wersji GarageBand na macOS. Ogólnie rzecz biorąc, obie wersje są doskonałe w podstawowej i średniozaawansowanej edycji audio, ale pamiętaj, że musisz mieć pewną wiedzę na temat interfejsu narzędzia, aby uniknąć nieporozumień.
Część 4. Edycja plików WAV za pomocą edytora online
Inną metodą edycji pliku WAV jest użycie narzędzia online, które poradzi sobie z podstawową edycją. TwistedWave wyłonił się jako internetowy edytor audio, który nie tylko działa jako internetowy edytor, ale także pozwala użytkownikom edytować dźwięk WAV. Co więcej, pomimo przestarzałego interfejsu, jest to zaufane narzędzie WAV i ma jeden z najprostszych projektów wśród internetowych narzędzi do edycji WAV, jakie znaleźliśmy.
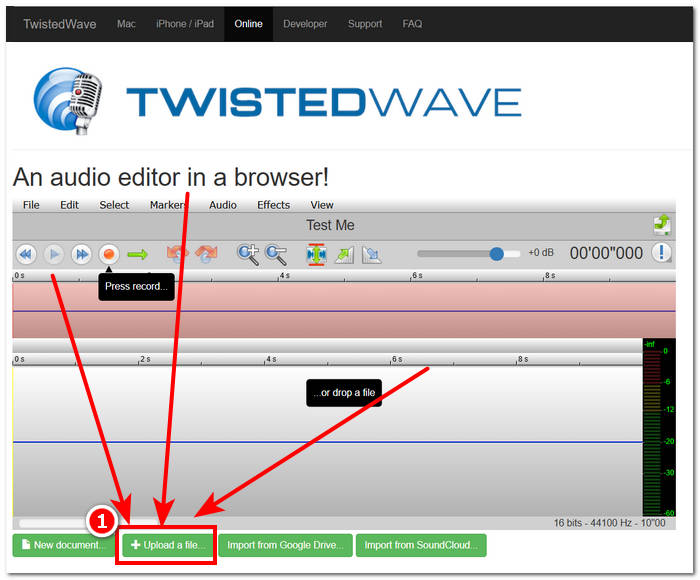
Krok 1. Przejdź na oficjalną stronę TwistedWave i kliknij przycisk Upload a file, aby wybrać plik WAV z komputera do edycji w narzędziu.
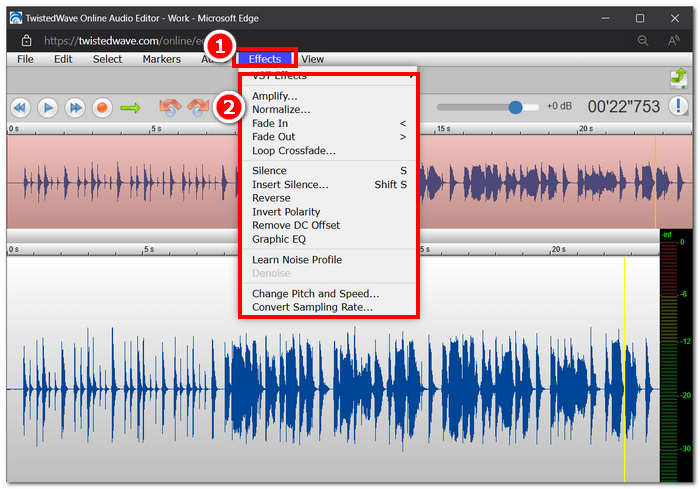
Krok 2. Gdy plik WAV znajdzie się w narzędziu, kliknij sekcję Effect u góry interfejsu. Wybierz pożądane działania z dostępnych efektów, które chcesz zastosować do pliku WAV.
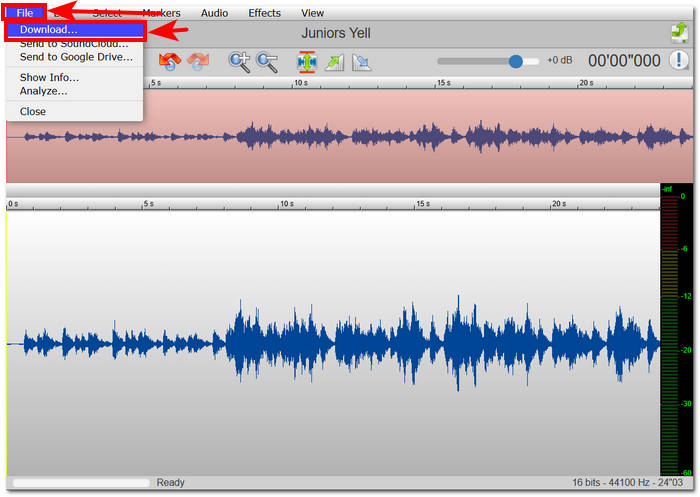
Krok 3. Po wybraniu efektów, które chcesz zastosować w swoim pliku, przejdź do pobierania edytowanego pliku WAV. Aby to zrobić, kliknij sekcję File w lewym górnym rogu narzędzia i wybierz Download, aby wyeksportować plik WAV do folderu pobierania.
Aby edytować pliki WAV online, TwistedWave jest najłatwiejszym sposobem przetwarzania pliku WAV na serwerze, więc potrzeba pobierania oprogramowania byłaby zbędna. Pomimo wygody użytkowania, pozwala użytkownikowi edytować tylko jeden plik na darmowym koncie przez maksymalnie pięć minut.
Część 5. Często zadawane pytania dotyczące edycji plików WAV
Czy Microsoft ma oprogramowanie do edycji dźwięku?
Microsoft nie ma dedykowanego oprogramowania do edycji audio w momencie tworzenia tego przewodnika, tak samo jak w przypadku edytora plików WAV. Do zadań takich jak zmiana audio i stosowanie efektów zaleca się korzystanie z oprogramowania wybranego przez FVC i Audacity.
Czy można przyciąć plik WAV w programie Windows Media Player?
Nie, Windows Media Player nie ma możliwości wykonywania takiego zadania. Przycinanie pliku WAV na komputerze odbywa się za pomocą zewnętrznego oprogramowania, takiego jak GarageBand na macOS oraz wybranego przez FVC oprogramowania na Windows.
Jaka jest najłatwiejsza aplikacja do edycji dźwięku na komputerze Mac?
GarageBand jest zdecydowanie najłatwiejszy, z prostym interfejsem. Jest szeroko znany wśród użytkowników macOS, nie mówiąc już o entuzjastach muzyki i początkujących producentach. To narzędzie oferuje solidne zaawansowane funkcje i jest już wstępnie zainstalowane na macOS, aby zapewnić natychmiastowy dostęp do usługi.
Do czego najczęściej wykorzystuje się pliki WAV?
Pliki WAV są powszechnie kojarzone z profesjonalnym wykorzystaniem w procesach audio, nagrywania i edycji. Znany ze swojej bezstratnej jakości i nieskompresowanej natury, WAV jest idealnym formatem do eksportowania WAV i innych projektów audio.
Czy plik WAV jest cyfrowy czy analogowy?
Plik WAV to cyfrowy format do przechowywania danych dźwiękowych, które można udostępniać za pośrednictwem komputerów i innych urządzeń. Zawiera zatem analogowe fale dźwiękowe, ale w formie cyfrowej.
Wniosek
Edycja plików WAV przy użyciu odpowiedniego oprogramowania i narzędzi zapewnia wyższą jakość dźwięku. Dlatego warto zastosować opisane tu różne metody edycji plików WAV, w tym rekomendowane, w pełni funkcjonalne oprogramowanie, metody wbudowane w system Windows, GarageBand dla użytkowników macOS i iOS oraz wreszcie narzędzia działające w przeglądarce.
-
 Odtwarzacz WAV - 5 najlepszych aplikacji odtwarzacza WAV na Androida, iPhone'a, PC i Mac
 Jak odtwarzać pliki WAV na telefonie z systemem Android? Jaki odtwarzacz może odtwarzać WAV? Ten post przedstawia 5 najlepszych darmowych odtwarzaczy WAV na Androida, iPhone'a, Maca i PC.
-
 Top 6 darmowych rejestratorów WAV dostępnych dla systemów Windows i Mac
 Najlepsze oprogramowanie do nagrywania WAV, które udostępniamy w tym artykule, ma wiele przydatnych funkcji, które pomagają rejestrować dźwięk i głos jak profesjonaliści.
-
 Top 5 najlepszych rejestratorów myszy i klawiatury dla systemów Windows i Mac
 Oto pięć najlepszych programów do nagrywania myszy i klawiatury, które mogą zapisywać ruchy myszy i kliknięcia klawiatury oraz powtarzać zdarzenia.