


วิธีลบลายน้ำออกจากกราฟต้นทางอย่างมีประสิทธิภาพบนกราฟ
คุณอาจจำเป็นต้องใช้ Origin Graph เพื่อสร้างเทมเพลตสำหรับข้อมูลทางคณิตศาสตร์หรือวิทยาศาสตร์ที่ซับซ้อนเกินกว่าจะสื่อออกมาเป็นคำพูดได้ ซอฟต์แวร์นี้ได้ช่วยเหลือนักเรียน นักวิจัย ศาสตราจารย์ นักธุรกิจ และผู้ใช้อื่น ๆ ที่จำเป็นต้องสร้างกราฟของตนเองมาแล้ว ด้วยชุดเทมเพลตให้เลือกใช้ คุณสามารถสร้างกราฟที่ดึงดูดสายตาและสะดุดความสนใจของผู้ชมได้ ปัญหาที่คุณอาจพบเจอเมื่อใช้เวอร์ชันฟรีก็คือ โปรแกรมจะใส่ลายน้ำข้อความลงบนผลลัพธ์สุดท้าย แล้วคุณกำลังลำบากกับการจัดการลายน้ำอยู่หรือไม่? ไม่ต้องกังวลไป! เพราะเรามีวิธีแก้ให้คุณ ที่นี่ เราจะนำเสนอเคล็ดลับที่เป็นประโยชน์เกี่ยวกับการลบลายน้ำออกจาก Origin Graph แล้วนำไปใช้ในงานนำเสนอ Word หรือ PowerPoint ของคุณได้ต่อไป.

ส่วนที่ 1 วิธีลบลายน้ำออกจากกราฟต้นฉบับด้วยเครื่องมือลบลายน้ำรูปภาพออนไลน์
FVC Free Watermark Remover Online เป็นเครื่องมือลบลายน้ำข้อความระดับแนวหน้าที่คุณสามารถใช้เพื่อลบลายน้ำ Origin Graph ได้ เครื่องมือนี้มีประสิทธิภาพสูงมากในการลบวัตถุใด ๆ บนรูปภาพของคุณ เพื่อให้ภาพดูเป็นมืออาชีพยิ่งขึ้นหลังจากลบลายน้ำออก ด้วยเครื่องมือนี้ เรามั่นใจได้ว่านี่คือโปรแกรมลบลายน้ำโดยเฉพาะที่คุณสามารถใช้และไว้วางใจได้เมื่อต้องเจอปัญหาแบบนี้ คุณสงสัยหรือไม่ว่าเครื่องมือนี้ใช้งานง่ายหรือเปล่า? ไม่ต้องสงสัยอีกต่อไป! เพราะขั้นตอนที่เราเพิ่มไว้ด้านล่างคือขั้นตอนที่คุณสามารถทำตามเพื่อกำจัดลายน้ำข้อความบนรูปภาพที่ Origin Graph ใส่เข้ามา.
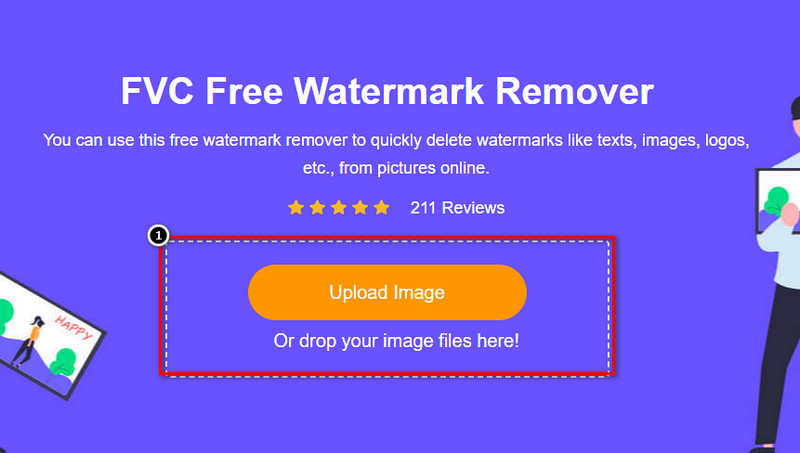
ขั้นตอนที่ 1. คลิกลิงก์นี้ link เพื่อเปิดเครื่องมือลบลายน้ำรูปภาพออนไลน์ ระบบจะเปิดแท็บใหม่ให้คุณเข้าถึงเครื่องมือนี้ได้ทันที.
ขั้นตอนที่ 2. กด Upload Image เพื่อเพิ่มรูปภาพที่มีลายน้ำ จากนั้นค้นหาไฟล์รูปในโฟลเดอร์และคลิก Open เพื่ออัปโหลดให้สำเร็จ.
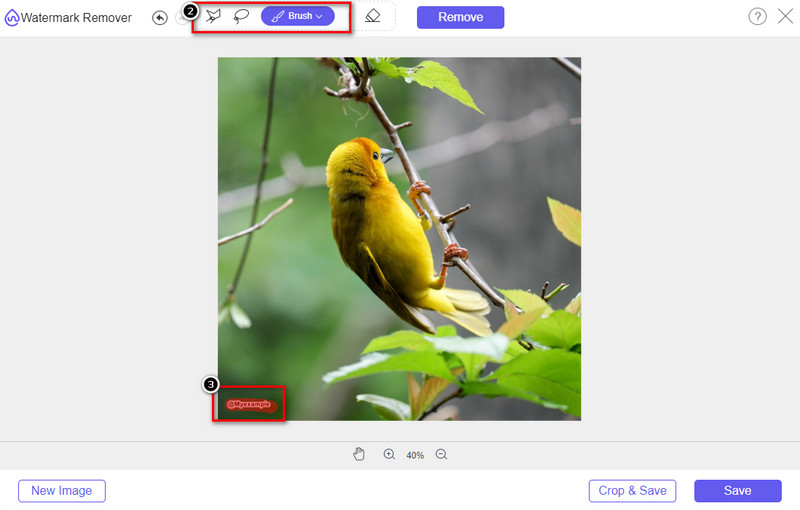
ขั้นตอนที่ 3. คุณสามารถใช้เครื่องมือได้ 3 แบบเพื่อไฮไลต์บริเวณลายน้ำ แม้การทำงานจะแตกต่างกัน แต่ประสิทธิภาพใกล้เคียงกัน เลือกเครื่องมือหนึ่งอย่าง แล้วไฮไลต์บริเวณบนรูปภาพที่มีลายน้ำ.
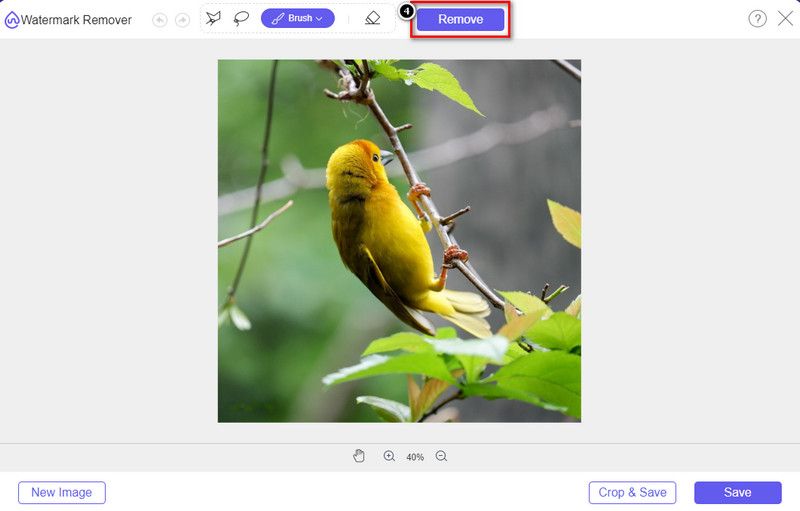
ขั้นตอนที่ 4. อย่าลืมคลิกไอคอน Remove หลังจากไฮไลต์ลายน้ำด้วยเครื่องมือแล้ว ขั้นตอนนี้สำคัญมากเพื่อให้เมื่อคุณส่งออกภาพออกมา จะได้รูปที่ไม่มีลายน้ำ.
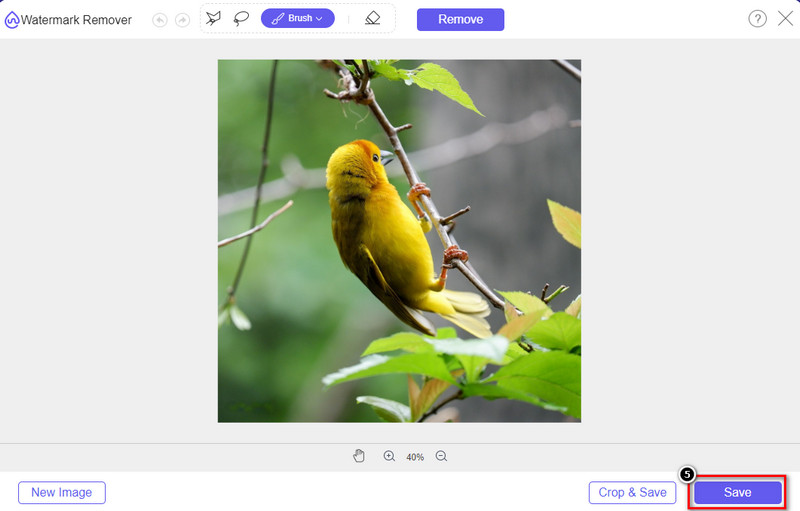
ขั้นตอนที่ 5. เพื่อเริ่มกระบวนการส่งออก คุณสามารถคลิกปุ่ม Save ได้เลย รอให้ระบบประมวลผล จากนั้นคุณก็ตรวจสอบรูปภาพที่ไม่มีลายน้ำ Origin Graph ปรากฏอยู่ในบริเวณนั้นได้.
ข้อดี
- โปรแกรมลบลายน้ำรูปภาพบนเว็บฟรีที่คุณสามารถเข้าถึงได้
- มันทำงานอย่างมีประสิทธิภาพในการลบลายน้ำด้วยการสนับสนุน AI-Technology
- รองรับรูปแบบรูปภาพหลากหลายรูปแบบที่คุณอาจมีในไดรฟ์ในเครื่องของคุณ
- ไม่มีการเพิ่มลายน้ำบนภาพที่ส่งออก
จุดด้อย
- ต้องการการเชื่อมต่ออินเทอร์เน็ตเพื่อใช้งาน
- เน้นที่การลบลายน้ำและไม่มีอะไรอื่น
ส่วนที่ 2 วิธีการคัดลอกกราฟจากแหล่งกำเนิดไปยัง Word หรือ PowerPoint โดยไม่มีลายน้ำ
ในส่วนนี้ของบทความ เราจะให้ขั้นตอนที่คุณจำเป็นต้องรู้เพื่อเพิ่มกราฟที่คุณสร้างขึ้นบนกราฟต้นฉบับโดยไม่มีลายน้ำ ทำตามนั้นเพื่อเพิ่มกราฟที่คุณสร้างบน Microsoft Word และ PowerPoint ได้สำเร็จโดยไม่มีลายน้ำ
คุณจะต้องเพิ่มพื้นที่ว่างอย่างน้อย 1.9GB เนื่องจากขนาดไฟล์ที่ใหญ่โต ในไฟล์ 1.9GB คุณสามารถขอความช่วยเหลือได้ แต่ถ้าคุณไม่ต้องการความช่วยเหลือ คุณสามารถดาวน์โหลดเวอร์ชัน 652 MB ผ่าน .zip หรือ .exe
ขั้นตอนในการสร้างกราฟบนกราฟต้นทางโดยไม่มีลายน้ำ:
ขั้นตอนที่ 1. ก่อนอื่น ให้ดาวน์โหลด Origin Graph ลงบนระบบปฏิบัติการของคุณโดยไปที่เว็บไซต์ทางการ จากนั้นเปิดโปรแกรมเพื่อเริ่มสร้างกราฟที่คุณต้องการ.
ขั้นตอนที่ 2. หลังจากเปิดซอฟต์แวร์แล้ว ให้ใส่ค่าตารางที่คุณต้องการ คุณสามารถเพิ่มตัวแปรและจำนวนกราฟได้มากขึ้นที่นี่.
เพิ่มเติม: คุณสามารถคลิก Plot เพื่อดูกราฟอื่น ๆ ที่มีให้ใช้ เช่น Basic 2D, Bar, Statistical และอื่น ๆ.
ขั้นตอนที่ 3. คลิก File แล้วกด Save เพื่อส่งออกกราฟที่คุณสร้าง.
ขั้นตอนที่ 4. คุณสามารถทำตามขั้นตอนที่เราให้ไว้ในส่วนที่ 1 และดูบทแนะนำวิธีลบลายน้ำออกจาก Origin Graph ด้วยความช่วยเหลือของ FVC Free Watermark Remover Online.
วิธีใช้กราฟบน Word โดยไม่มีลายน้ำ:
ขั้นตอนที่ 1. เปิดแอป Word บนเดสก์ท็อปของคุณ จากนั้นคลิกหน้าเปล่า (Blank Page) หากคุณมีไฟล์เอกสาร Word อยู่แล้ว ให้เปิดไฟล์นั้น.
ขั้นตอนที่ 2. ไปที่เมนู Insert จากนั้นคลิก Pictures ค้นหาไฟล์กราฟบนไดรฟ์ในเครื่องของคุณ คลิกไฟล์หนึ่งครั้งแล้วกด Open เพื่ออัปโหลดลงใน Word.
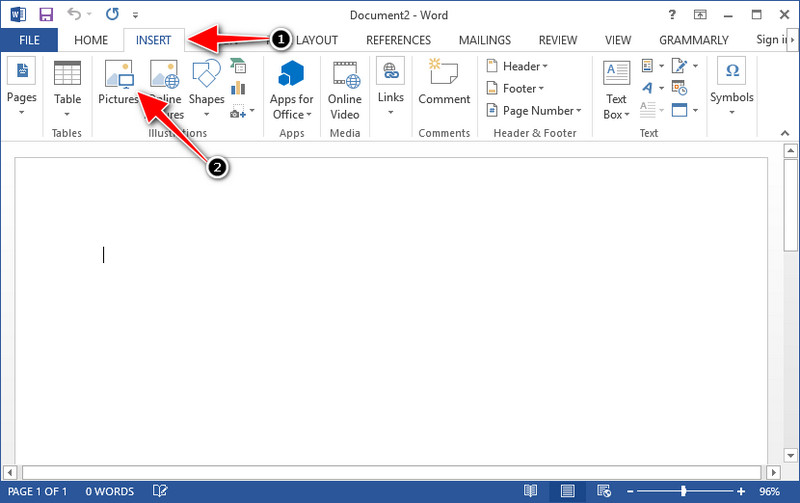
ขั้นตอนที่ 3. รูปจะโหลดเข้ามาในเอกสาร Word ที่คุณเปิดหรือตั้งใหม่โดยอัตโนมัติ จากนั้นคุณสามารถจัดวางกราฟได้โดยคลิกค้างแล้วลากไปยังตำแหน่งที่ต้องการใน Word.
วิธีใช้กราฟบน Powerpoint โดยไม่มีลายน้ำ:
ขั้นตอนที่ 1. เปิด PowerPoint บนคอมพิวเตอร์ของคุณ แล้วคลิก Blank Presentation คุณยังสามารถตรวจดูงานนำเสนอที่สร้างล่าสุดทางด้านซ้าย หากมีไฟล์ที่คุณต้องการเพิ่มกราฟ ให้คลิกเพื่อเปิด.
ขั้นตอนที่ 2. กด Insert แล้วคลิก Picture เพื่อแทรกรูปกราฟที่คุณสร้างด้วย Origin Graph.

ขั้นตอนที่ 3. ปรับขนาดและตำแหน่งรูปกราฟแล้วจัดวางลงบนสไลด์.
อ่านเพิ่มเติม:
วิธีลบลายน้ำ B612 ออกจากรูปภาพของคุณ
วิธีลบลายน้ำ WOW Slider ได้ฟรี
ส่วนที่ 3 คำถามที่พบบ่อยเกี่ยวกับวิธีการลบลายน้ำออกจากกราฟต้นกำเนิด
Origin Pro ราคาเท่าไหร่คะ?
สำหรับผู้ใช้แต่ละราย คุณสามารถรับ Origin Graph เวอร์ชันพรีเมียมสำหรับการเริ่มต้น $435 คุณสามารถเยี่ยมชมร้านค้าอย่างเป็นทางการได้ที่ Origin Lab
ฉันจะดาวน์โหลด Origin Graph อย่างเป็นทางการได้ที่ไหน
ไปที่ Origin Lab เพื่อดาวน์โหลด Origin Graph ก่อนที่คุณจะสามารถดาวน์โหลดซอฟต์แวร์บนเดสก์ท็อปได้ ซอฟต์แวร์จะถามคำถาม หลังจากนั้นจะมีสองตัวเลือกในการดาวน์โหลดไฟล์ หากคุณต้องการดาวน์โหลดไฟล์ด้วยความช่วยเหลือหรือไม่ ในรูปแบบ .exe หรือ zip
Excel และ Origin เหมือนกันหรือไม่
Excel และ Origin มี GUI ที่เหมือนสเปรดชีตสำหรับการจัดเรียงข้อมูล การคำนวณ และการกำหนดป้ายกำกับ อย่างไรก็ตาม Excel จะเน้นที่การมีหลายคอลัมน์และแถวที่คุณสามารถใช้ได้ แต่สำหรับ Origin จะใช้สำหรับการจัดเรียงแอตทริบิวต์ที่ใช้สูตรคอลัมน์แทนที่จะเป็นสูตรของเซลล์อย่างที่ Excel รองรับ
สรุป
เมื่อคุณได้เรียนรู้วิธีลบลายน้ำออกจากกราฟต้นฉบับแล้ว ถึงเวลาที่คุณจะใช้กราฟที่คุณสร้างขึ้นและนำเสนออย่างมืออาชีพ หากจุดประสงค์ของคุณคือใช้งานบน Word หรือ Powerpoint คุณสามารถอ่านส่วนที่ 2 เพื่อเรียนรู้วิธีการใช้งาน การลบลายน้ำด้วยเครื่องมือนี้เป็นที่ต้องการมากที่สุดโดยทุกคนที่ต้องการลบลายน้ำบนรูปภาพ ปัญหาได้รับการแก้ไขด้วยเครื่องมือนี้ หากบทความนี้ช่วยคุณได้ กรุณาให้ 5 ดาวด้านล่าง
-
 วิธีลบลายน้ำด้วย Pixlr ในขั้นตอนโดยละเอียด [มีประสิทธิภาพ]
 ต้องการทราบวิธีลบลายน้ำด้วย Pixlr หรือไม่? ถ้าใช่ อ่านต่อด้านล่างเพื่อทราบวิธีการดำเนินการและทางเลือกอื่นที่คุณสามารถใช้ได้
-
 ลบลายน้ำแอนิโมติกาบนวิดีโอที่ส่งออกด้วย 3 วิธีที่ได้รับการพิสูจน์แล้ว
 คุณเคยสงสัยหรือไม่ว่าจะสามารถลบลายน้ำ Animatica บนวิดีโอที่คุณส่งออกได้หรือไม่? บทความนี้มีวิธีการ
-
 วิธีฟรีในการลบลายน้ำ VideoShop บนวิดีโอ [ได้อย่างง่ายดาย]
 ในการลบลายน้ำ VideoShop อุปกรณ์ของคุณจะต้องมีตัวลบลายน้ำ หากต้องการทราบว่าสิ่งเหล่านี้คืออะไร อ่านบทความนี้