


4 วิธีง่ายๆ ในการบันทึกภาพหน้าจอเป็น JPG [คู่มือปี 2025]
โดยปกติแล้วภาพสกรีนช็อตมักจะถูกบันทึกเป็นไฟล์ PNG ดังนั้นการเปลี่ยนไฟล์เหล่านี้ให้เป็นรูปแบบที่คุณต้องการจึงอาจใช้เวลาสักหน่อย โดยเฉพาะเมื่อไฟล์ถูกบันทึกไปแล้ว หากคุณเคยเจอปัญหาแบบนี้และต้องการบันทึก สกรีนช็อตเป็น JPG บทความนี้เหมาะสำหรับคุณ ในบทความนี้ เราจะพูดถึงวิธีการและเครื่องมือต่าง ๆ ที่คุณสามารถใช้ได้ ตั้งแต่ซอฟต์แวร์ของบุคคลที่สามไปจนถึงตัวเลือกที่มีมาให้ในอุปกรณ์ของคุณเอง เพื่อให้คุณสามารถเลือกวิธีที่เหมาะกับคุณที่สุดได้ มาเริ่มกันเลย!

ส่วนที่ 1: วิธีที่ง่ายที่สุดในการบันทึกภาพหน้าจอเป็น JPG บน Windows และ Mac
หากคุณกำลังมองหาวิธีง่าย ๆ ในการบันทึกสกรีนช็อตเป็น JPG ทั้งบน Windows และ Mac FVC Screen Recorder ถือเป็นตัวเลือกที่เหมาะสำหรับคุณ เครื่องมือบันทึกหน้าจอนี้ถูกออกแบบมาเพื่อทำให้ขั้นตอนการจับภาพหน้าจอและบันทึกเป็นรูปแบบไฟล์ที่คุณต้องการเป็นเรื่องง่าย ด้วยหน้าตาการใช้งานที่เข้าใจได้ไม่ยาก คุณสามารถจับภาพหน้าจอทั้งหน้าจอของ Mac หรือ Windows หน้าต่างใดหน้าต่างหนึ่ง หรือเลือกเฉพาะพื้นที่ที่ต้องการ และบันทึกเป็น JPG หรือรูปแบบอื่นที่คุณต้องการได้ในไม่กี่คลิก นอกจากนี้ หากคุณต้องการปรับแต่งหรือเพิ่มลูกเล่นให้สกรีนช็อตของคุณ เครื่องมือนี้ยังมีฟีเจอร์ขั้นสูงมากมายที่ช่วยให้คุณแก้ไขภาพก่อนบันทึกเป็น JPG ได้อีกด้วย.
ขั้นตอนที่ 1 ก่อนอื่น ให้ดาวน์โหลดและติดตั้ง FVC Screen Recorder บนคอมพิวเตอร์ Windows หรือ Mac ของคุณ.
ดาวน์โหลดฟรีสำหรับ Windows 7 ขึ้นไปดาวน์โหลดอย่างปลอดภัย
ดาวน์โหลดฟรีสำหรับ MacOS 10.7 ขึ้นไปดาวน์โหลดอย่างปลอดภัย
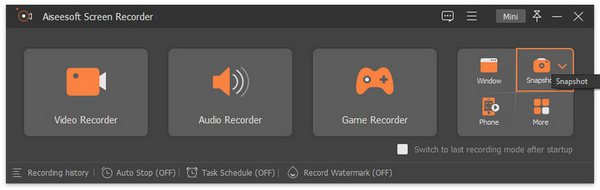
ขั้นตอนที่ 2 หลังจากเปิดโปรแกรมแล้ว ให้คลิกที่ไอคอน Snapshot ที่มุมขวา.
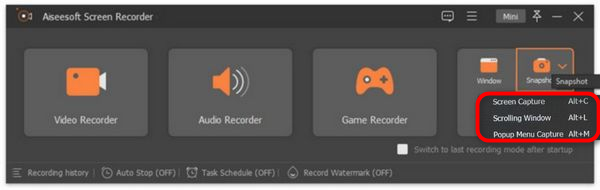
ขั้นตอนที่ 3 หลังจากคลิกไอคอน Snapshot แล้ว คุณจะมีตัวเลือก 3 แบบในการถ่ายสกรีนช็อต คุณสามารถเลือกได้จาก Screen Capture, Scrolling Window หรือ Pop-up Menu Capture.
ขั้นตอนที่ 4 จากนั้นลากเคอร์เซอร์ไปยังบริเวณหน้าจอบนเครื่อง Windows ของคุณ เพื่อเลือกส่วนที่ต้องการจับภาพหน้าจอ.
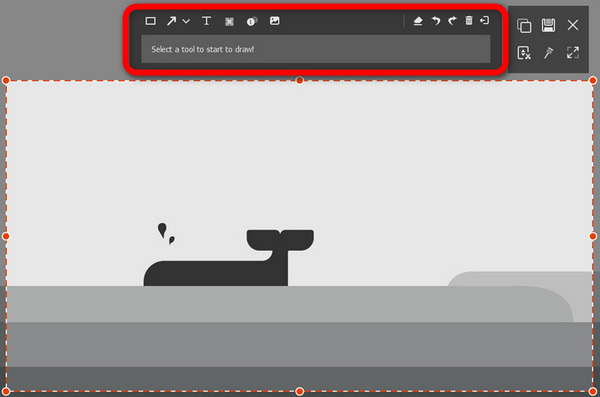
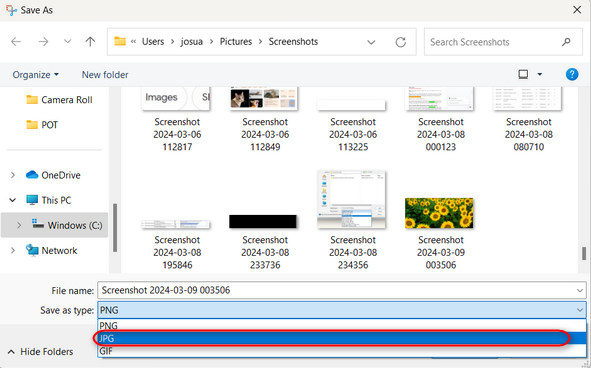
ขั้นตอนที่ 5 จากนั้นคลิกปุ่ม Save ไปที่ตัวเลือก Save as Type แล้วเลือก JPG จากเมนูดรอปดาวน์.

ด้วยอินเทอร์เฟซที่ใช้งานง่ายสำหรับการถ่ายภาพหน้าจอและบันทึกเป็น JPG หรือไฟล์รูปแบบใดๆ ที่คุณต้องการ FVC Screen Recorder เป็นตัวเลือกที่ดีที่สุดสำหรับใครก็ตามที่กำลังมองหาวิธีที่ไม่ยุ่งยากในการจับภาพและบันทึกภาพหน้าจอเป็นรูปแบบ JPG ทั้งบน Windows และ แพลตฟอร์ม Mac
ส่วนที่ 2: บันทึกภาพหน้าจอเป็น JPG บน Windows ด้วยเครื่องมือ Snipping
Snipping Tool เป็นหนึ่งในแอพพลิเคชั่นในตัวที่ใช้กันทั่วไปในระบบปฏิบัติการ Windows ในปัจจุบัน ซึ่งออกแบบมาเพื่อจับภาพหน้าจอ ด้วยการใช้เครื่องมือ Snipping Tool ผู้ใช้สามารถบันทึกภาพหน้าจอเป็น JPG หลังจากจับภาพได้
ขั้นตอนที่ 1 อันดับแรก ให้ไปที่เมนู Start บน Windows ของคุณ.
ขั้นตอนที่ 2 จากนั้น ไปที่แถบค้นหาและพิมพ์หา Snipping Tool .
ขั้นตอนที่ 3 ตอนนี้คุณจะเห็นปุ่ม New ให้คลิกเพื่อเริ่มจับภาพหน้าจอ.
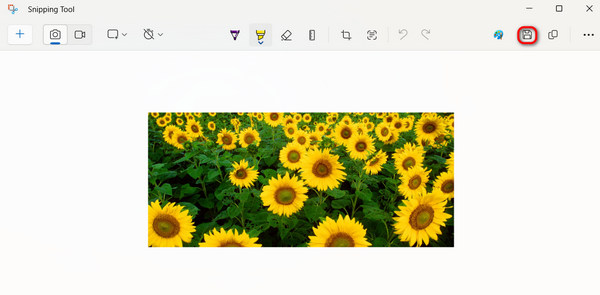
ขั้นตอนที่ 4 สุดท้าย หากต้องการบันทึกภาพสกรีนช็อตและแปลงเป็น JPG ให้คลิกปุ่ม Save แล้วเลือก JPG ในเมนูดรอปดาวน์ Save as Type.
ดังนั้น หากคุณเป็นผู้ใช้ Windows และต้องการบันทึกภาพหน้าจอเป็น JPG การใช้ Snipping Tool ถือเป็นตัวเลือกที่สะดวกอย่างแน่นอน อย่างไรก็ตาม โปรดทราบว่าไม่มีคุณสมบัติขั้นสูงที่พบในเครื่องมือของบุคคลที่สาม และอาจรู้สึกว่าล้าสมัยสำหรับผู้ใช้บางคน
ส่วนที่ 3: บันทึกภาพหน้าจอเป็น JPG บน Mac โดยใช้การแสดงตัวอย่าง
ในขณะเดียวกัน หากคุณใช้ Mac คุณสามารถใช้เครื่องมือ Preview เพื่อบันทึกและถ่ายสกรีนช็อตบน Mac เป็นไฟล์ JPG ได้ เครื่องมือนี้มีมาให้ใน Mac อยู่แล้ว จึงไม่จำเป็นต้องติดตั้งเพิ่มเติม คุณเพียงแค่เปิดไฟล์สกรีนช็อตด้วยแอปนี้แล้วบันทึกเป็น JPG.
ขั้นตอนที่ 1 ก่อนอื่น คุณต้องถ่ายสกรีนช็อตโดยใช้คีย์ลัดสกรีนช็อตที่มีมาให้ใน Mac
จับภาพหน้าจอทั้งหน้าจอ: กด Command + Shift + 3.
จับภาพเฉพาะส่วนของหน้าจอ: กด Command + Shift + 4.
จับภาพหน้าต่างใดหน้าต่างหนึ่ง: กด Command + Shift + 4 แล้วกด Spacebar.
ขั้นตอนที่ 2 เมื่อคุณถ่ายสกรีนช็อตแล้ว ให้คลิกที่ภาพตัวอย่างเล็ก ๆ (thumbnail) ที่มุมล่างขวาของหน้าจอเพื่อเปิดในแอป Preview.
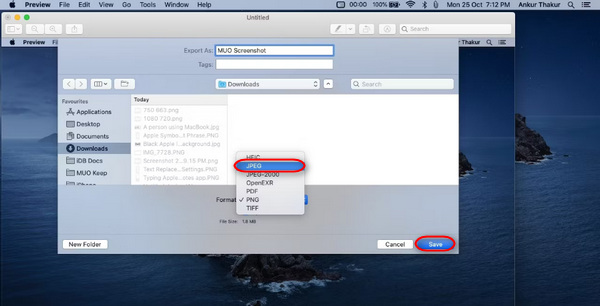
ขั้นตอนที่ 3 จากนั้น ในแอป Preview ให้ไปที่เมนู File.
ขั้นตอนที่ 4 จากเมนู File ให้เลือก Export หรือกด Command + Shift + S.
ขั้นตอนที่ 5 สุดท้าย เลือก JPG เป็นรูปแบบไฟล์จากเมนูดรอปดาวน์ แล้วคลิก Save.
แม้ว่าขั้นตอนนี้อาจฟังดูง่ายและรวดเร็ว แต่การจับภาพหน้าจอและเปลี่ยนรูปแบบเป็น JPG ใน Preview ด้วยตนเองนั้นยังคงไม่สะดวกและต้องใช้เวลาพอสมควร อย่างไรก็ตาม หากไม่เป็นปัญหาสำหรับคุณ คุณสามารถใช้วิธีนี้เพื่อบันทึกภาพหน้าจอเป็น JPG ใน Mac ของคุณได้
ส่วนที่ 4: เคล็ดลับ: วิธีแปลงภาพหน้าจอเป็น JPG ออนไลน์
หากคุณกำลังมองหาเครื่องมือแปลงไฟล์ออนไลน์เพื่อแปลงสกรีนช็อตเป็น JPG FVC Free Image Converter ถือเป็นตัวเลือกที่ดีที่สุด เครื่องมือนี้ช่วยให้คุณแปลงรูปภาพต่าง ๆ เช่น JPG, JPEG, PNG, GIF, BMP, TIFF, WEBP, ICO และ SVG ให้เป็น JPG, PNG และ GIF ได้ อีกทั้งยังทำได้อย่างรวดเร็วและง่ายดาย ด้วยหน้าตาการใช้งานที่เป็นมิตรต่อผู้ใช้ ทำให้เหมาะกับผู้ใช้ทุกระดับ.
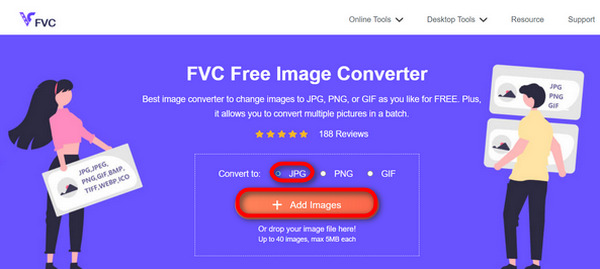
ขั้นตอนที่ 1 เข้าไปที่เว็บไซต์อย่างเป็นทางการของ FVC Free Image Converter.
ขั้นตอนที่ 2 คลิก Add Images และในตัวเลือก Convert To ให้เลือก JPG.
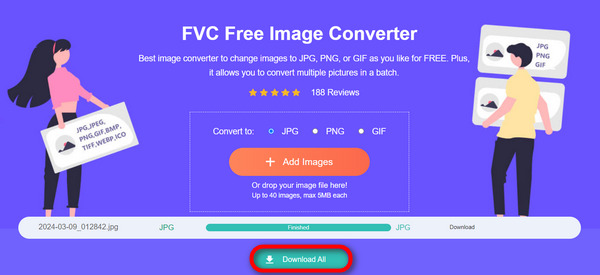
ขั้นตอนที่ 3 เมื่อกระบวนการแปลงเสร็จสิ้น เพียงคลิกปุ่ม Download All เพื่อบันทึกสกรีนช็อตที่ถูกแปลงเป็น JPG แล้ว.
ด้วย FVC Free Image Converter การแปลงภาพหน้าจอเป็น JPG ทำได้รวดเร็วและง่ายดาย เป็นทางเลือกที่ดีที่สุดเมื่อคุณประสบปัญหากับวิธีการอื่นๆ ที่กล่าวมาข้างต้น
ส่วนที่ 5: คำถามที่พบบ่อยเกี่ยวกับการแปลงภาพหน้าจอเป็น JPG
ฉันสามารถแปลงภาพหน้าจอหลายภาพเป็นรูปแบบ JPG พร้อมกันได้หรือไม่
ใช่. คุณสามารถแปลงภาพหน้าจอหลายภาพเป็นรูปแบบ JPG ได้พร้อมกันโดยใช้เครื่องมือแปลงไฟล์ที่มีคุณสมบัติการแปลงเป็นชุด เช่น FVC Free Image Converter เครื่องมือนี้ช่วยให้คุณเลือกภาพหน้าจอหลายภาพและแปลงเป็นรูปแบบ JPG ได้ในคราวเดียว ซึ่งช่วยประหยัดเวลาและความพยายาม
การแปลงภาพหน้าจอเป็น JPG ส่งผลต่อคุณภาพหรือไม่
ใช่แต่ไม่มากขนาดนั้น การแปลงภาพหน้าจอเป็น JPG จะมีการปรับลดคุณภาพเพียงเล็กน้อยเท่านั้น แต่ก็เป็นสิ่งที่ยอมรับได้ เมื่อเลือกการบีบอัด JPG ตรวจสอบให้แน่ใจว่าขนาดไฟล์และการตั้งค่าคุณภาพของภาพสมดุลเพื่อให้ได้ผลลัพธ์ที่น่าพอใจ
ฉันสามารถปรับคุณภาพของภาพเมื่อบันทึกภาพหน้าจอเป็น JPG ได้หรือไม่
ใช่. มีซอฟต์แวร์แก้ไขรูปภาพและตัวแปลงออนไลน์มากมายที่มีคุณสมบัติในการปรับการตั้งค่าคุณภาพของภาพเมื่อบันทึกภาพหน้าจอเป็น JPG ซึ่งช่วยให้สามารถควบคุมระดับการบีบอัดที่ใช้กับรูปภาพได้
สรุป
ทั้งหมดก็มีเพียงเท่านี้ ไม่ว่าคุณจะใช้ Windows หรือ Mac ก็มีหลายวิธีง่าย ๆ ในการแปลงสกรีนช็อตให้เป็นไฟล์ JPG ด้วยวิธีเหล่านี้ คุณสามารถจัดการและบันทึกสกรีนช็อตเป็นรูปแบบ JPG ได้อย่างสะดวกมากขึ้น ครั้งต่อไปที่คุณต้องบันทึกสกรีนช็อต อย่าลืมวิธีเหล่านี้ โดยเฉพาะเมื่อคุณต้องการบันทึกสกรีนช็อตเป็น JPG.
-
 บทช่วยสอนชั้นนำ 5 อันดับแรกในการแปลง PNG เป็น JPG อย่างรวดเร็ว
 หากคุณต้องการแปลงไฟล์ PNG เป็นรูปแบบ JPG คุณสามารถเรียนรู้วิธีที่ดีที่สุดได้ที่นี่ คุณจะได้เรียนรู้ความแตกต่างระหว่างรูปแบบไฟล์ PNG และ JPG
-
 วิธีแก้ปัญหาการจับภาพหน้าจอไม่ทำงานบน iPhone [2025]
 มีปัญหาในการจับภาพหน้าจอบน iPhone ของคุณหรือไม่? เราเข้าใจคุณแล้ว! เรียนรู้คำแนะนำที่ครอบคลุมของเราเพื่อช่วยคุณแก้ไขภาพหน้าจอที่ไม่ทำงานบน iPhone อย่างรวดเร็วและง่ายดาย
-
 วิธีการง่ายๆ ในการแปลงรูปแบบ SVG เป็น JPG
 กำลังหาวิธีที่ดีที่สุดในการแปลง SVG เป็น JPG? โพสต์นี้จะให้คำแนะนำบางอย่างที่คุณสามารถลองได้ คุณจะพบตัวแปลง SVG เป็น JPG สำหรับคุณ