


วิธีที่ง่ายที่สุดในการรวมแทร็กใน Audacity [คู่มือปี 2025]
การรวมองค์ประกอบต่างๆ เช่น เสียง ดนตรี หรือแทร็กอื่นๆ เข้าด้วยกันถือเป็นสิ่งสำคัญในการสร้างโปรเจ็กต์เสียงที่สร้างสรรค์และไม่เหมือนใคร โดยทั่วไปแล้วกระบวนการนี้จะทำโดยใช้แอปแก้ไขเสียงเฉพาะที่มีฟีเจอร์ในการรวมแทร็กต่างๆ ให้เป็นหนึ่งเดียว ปัจจุบัน เครื่องมือหนึ่งมักใช้ในการรวมแทร็กหลายๆ แทร็กเข้าด้วยกัน นั่นก็คือ Audacity
เครื่องมือนี้เป็นที่รู้จักของหลายคนเพราะเป็นซอฟต์แวร์ฟรีและโอเพ่นซอร์ส แต่ก็มีชุดฟีเจอร์การตัดต่อเสียงที่ดีมากซึ่งดึงดูดผู้ใช้ ดังนั้นหากคุณกำลังมองหาคู่มือเกี่ยวกับวิธีการรวมแทร็กใน Audacity หรือวิธีอื่นที่ทำได้ง่าย ๆ ให้อ่านบทความนี้ต่อไป.

ส่วนที่ 1 วิธีการรวมแทร็กใน Audacity
Audacity เป็นซอฟต์แวร์แก้ไขเสียงฟรีที่ได้รับความนิยมอย่างกว้างขวาง ซึ่งมีฟีเจอร์การแก้ไขมากมาย รวมถึงแทร็กผสาน Audacity ที่โด่งดัง
ด้วยฟีเจอร์นี้ ผู้ใช้สามารถนำเข้าองค์ประกอบเสียงต่างๆ เข้าสู่ไทม์ไลน์การแก้ไขได้อย่างง่ายดาย จากนั้น ผู้ใช้สามารถจัดเรียงแทร็กให้เป็นแทร็กเดียวจากไทม์ไลน์การแก้ไขได้โดยการเลื่อนแทร็กเหล่านี้ไปตามลำดับที่ต้องการด้วยตนเอง นอกจากนั้น เครื่องมือนี้ยังมีฟีเจอร์การแก้ไขที่ยอดเยี่ยมซึ่งจำเป็นสำหรับการขัดเกลาแทร็กที่รวมกัน ฟีเจอร์เฟดอินและเฟดเอาต์สามารถสร้างการเปลี่ยนผ่านระหว่างแทร็กได้อย่างราบรื่น ในขณะเดียวกัน ฟีเจอร์การปรับระดับเสียงจะทำให้แทร็กทั้งหมดฟังดูสมดุลเมื่อรวมเข้าด้วยกัน
แล้วทำไมโปรแกรมแก้ไขเสียงจึงรวมแทร็กเข้าด้วยกัน?
เพื่อสร้างการเปลี่ยนผ่านที่ราบรื่น การรวมหลายแทร็กเข้าด้วยกันช่วยให้สร้างจังหวะเปลี่ยนช่วงเสียงที่ลื่นไหล โดยไม่มีรอยต่อหรือช่องว่างที่สังเกตเห็นได้ระหว่างแทร็กเสียงต่าง ๆ.
เพื่อลดความซับซ้อนของเวิร์กโฟลว์ การผสานหลายแทร็กช่วยรวบรวมเลเยอร์เสียงหลายชั้นให้กลายเป็นหนึ่งเดียว ทำให้จัดการและตัดต่อได้ง่ายขึ้นโดยไม่ต้องคอยจัดการไฟล์แยกหลายไฟล์.
เพื่อสร้างเสียงที่สมดุล การรวมองค์ประกอบเสียงต่าง ๆ เข้าด้วยกันจะช่วยให้นักตัดต่อเสียงสามารถปรับระดับความดัง ซิงก์จังหวะเวลา และผสมผสานแทร็กต่าง ๆ เข้าด้วยกันได้.
วิธีการรวมแทร็กบน Audacity มีดังนี้:
ขั้นตอนที่ 1: ก่อนอื่นให้ดาวน์โหลดและติดตั้ง Audacity บนอุปกรณ์คอมพิวเตอร์ของคุณ.
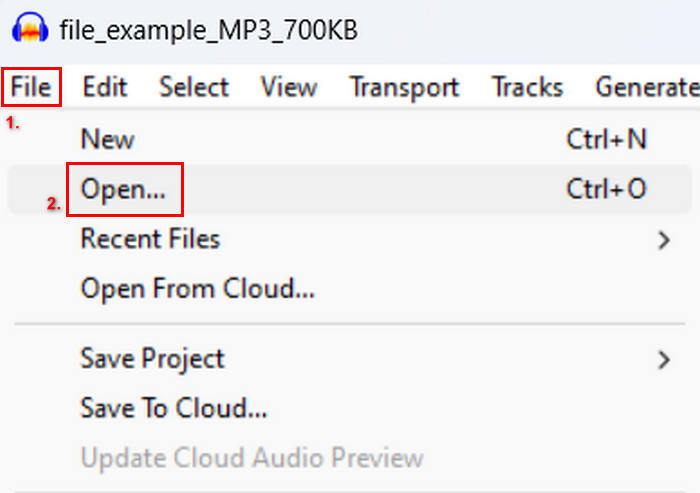
ขั้นตอนที่ 2: เปิดโปรแกรม ไปที่แท็บ File คลิก Open แล้วนำเข้าแทร็กที่คุณต้องการจะรวม.
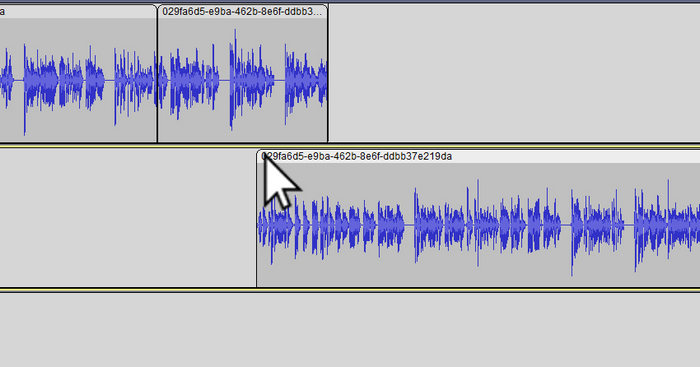
ขั้นตอนที่ 3: ตอนนี้แทร็กทั้งหมดของคุณถูกนำเข้ามาในไทม์ไลน์แล้ว ขั้นต่อไปที่ต้องทำคือคลิกที่หัวคลิปของแทร็กเพื่อย้ายและจัดเรียงให้เป็นลำดับตามที่คุณต้องการ.
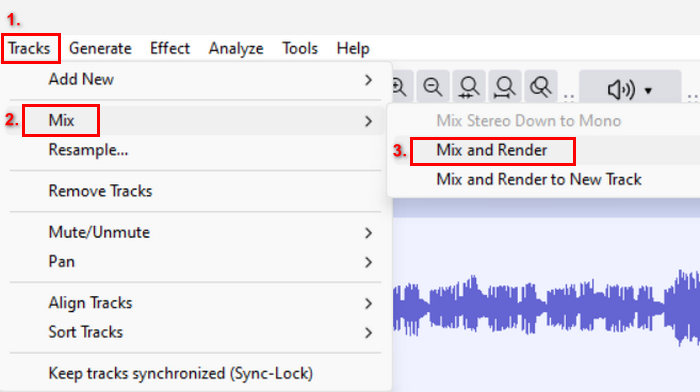
ขั้นตอนที่ 4: เมื่อคุณจัดแทร็กให้อยู่ในแนวเดียวกันแล้ว ให้ผสมให้กลายเป็นหนึ่งผลงานเสียงเดียว หากต้องการเลือกแทร็กที่ต้องการรวม ให้กดค้างปุ่ม Ctrl พร้อมกับคลิกเลือกแทร็กเหล่านั้น จากนั้นหากต้องการรวมแทร็กที่เลือกให้เป็นแทร็กเดียว ให้ไปที่เมนู Tracks คลิก Mix แล้วเลือก Mix and Render.
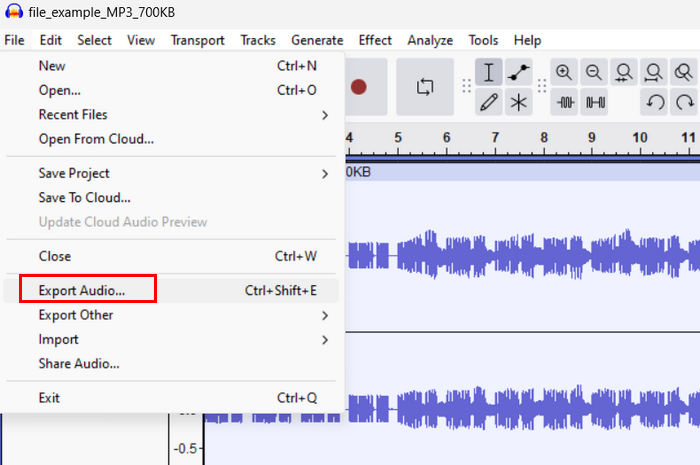
ขั้นตอนที่ 5: หากต้องการส่งออกไฟล์ ให้ไปที่แท็บ File แล้วเลือก Export Audio.
เพื่อให้การเปลี่ยนผ่านลื่นไหลและได้เสียงที่สมดุลสำหรับแทร็กรวม ให้ใช้เอฟเฟกต์ Amplify หรือ Normalize ภายในโปรแกรม นอกจากนี้ให้ใช้เฟดเข้า (fade-in) และเฟดออก (fade-out) เพื่อสร้างการเปลี่ยนช่วงเสียงที่เนียนระหว่างแทร็ก ช่วยให้ได้เสียงที่มืออาชีพและกลมกล่อมมากขึ้น คลิกที่นี่เพื่อเรียนรู้วิธีเฟดเสียงใน Audacity.
ส่วนที่ 2. การรวมแทร็กด้วยทางเลือก Audacity
หากคุณกำลังมองหาทางเลือกที่ยอดเยี่ยมเพราะรู้สึกว่าวิธีใช้ฟีเจอร์รวมแทร็กของ Audacity นั้นเข้าใจยาก คุณสามารถใช้ Video Converter Ultimate ที่ FVC คัดสรรมาให้ นี่คือเครื่องมือแบบครบฟังก์ชันที่มีชุดเครื่องมือสำหรับงานเสียงและวิดีโอ เช่นเดียวกับตัวรวมเสียง โดยหลักการทำงานคือหลังจากนำเข้าไฟล์เสียงที่ต้องการรวมแล้ว คุณสามารถเปลี่ยนลำดับแทร็กได้อย่างง่ายดายตามต้องการ และแก้ไขได้ทันที ก่อนจะรวมทั้งหมดด้วยการคลิกเพียงครั้งเดียว.
คุณสมบัติหลัก:
• สามารถรวมไฟล์เสียงหลายไฟล์ในรูปแบบต่างๆ มากกว่า 1,000 รูปแบบ เช่น MP3, AAC, WAV, FLAC, OGG และอื่นๆ
• ประกอบด้วยฟีเจอร์การแก้ไขพื้นฐาน เช่น การตัดแต่ง การแยกอย่างรวดเร็ว การเฟดอิน และเอฟเฟ็กต์เฟดเอาต์
• ช่วยให้สามารถแก้ไขเอาท์พุตเสียงเช่น ตัวเข้ารหัส อัตราตัวอย่าง อัตราบิต ช่องสัญญาณ ฯลฯ
• กระบวนการผสานรวมรวดเร็ว
• ใช้งานได้ทั้ง Windows และ MacOS
นี่คือวิธีการรวมแทร็กโดยใช้ FVC ที่เลือก Video Converter Ultimate:
ขั้นตอนที่ 1: ขั้นแรก คุณต้องดาวน์โหลดและติดตั้งโปรแกรมบนอุปกรณ์ของคุณ.
ดาวน์โหลดฟรีสำหรับ Windows 7 หรือใหม่กว่าดาวน์โหลดอย่างปลอดภัย
ดาวน์โหลดฟรีสำหรับ MacOS 10.7 หรือใหม่กว่าดาวน์โหลดอย่างปลอดภัย
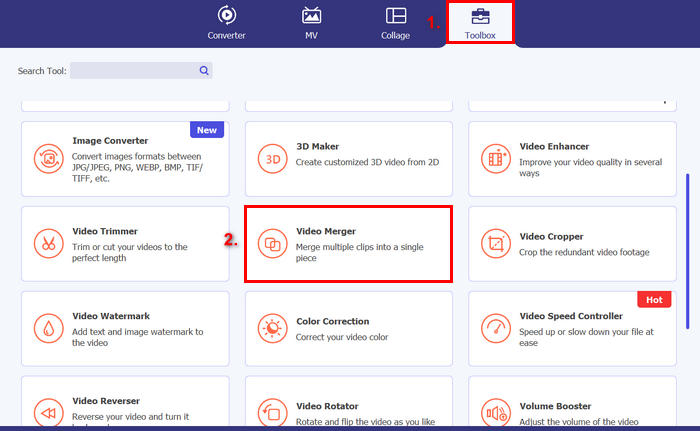
ขั้นตอนที่ 2: เปิดโปรแกรม ไปที่แท็บ Toolbox แล้วเลือก Video Merger จากนั้นคลิกไอคอนเครื่องหมายบวกเพื่อทำการนำเข้าไฟล์เสียงที่คุณต้องการจะรวมได้อย่างง่ายดาย.
ขั้นตอนที่ 3: ตอนนี้แทร็กเสียงทั้งหมดที่คุณนำเข้ามาจะแสดงอยู่ด้านล่าง หากต้องการปรับลำดับของแทร็ก ให้ลากคลิปเสียงไปยังตำแหน่งที่ถูกต้อง หรือเลือกคลิปแล้วคลิกปุ่ม Forward หรือ Backward หลังจากนั้นคลิกปุ่ม Export เพื่อบันทึกโปรเจกต์ของคุณ.
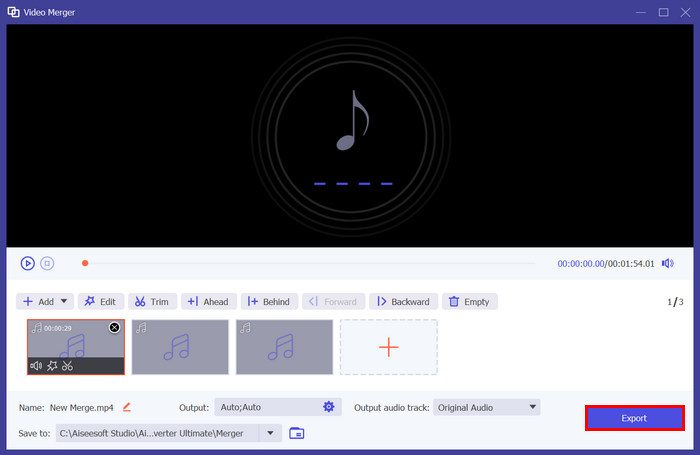
หมายเหตุ: หากคุณต้องการเปลี่ยนรูปแบบไฟล์เสียงหรือปรับแต่งการตั้งค่าเสียงบางอย่าง ให้ไปที่การตั้งค่า Output จากตรงนั้นคุณสามารถเปลี่ยนฟอร์แมต ตัวเข้ารหัส (encoder) อัตราการสุ่มตัวอย่าง (sample rate) ช่องสัญญาณ (channel) และบิตเรตของแทร็กเสียงได้ เมื่อเสร็จแล้วให้คลิกปุ่ม Export.
นั่นแหละ FVC เลือก Video Converter Ultimate เป็นทางเลือกที่ดีเยี่ยมสำหรับ Audacity ด้วยอินเทอร์เฟซที่ใช้งานง่ายและใช้งานง่าย แม้แต่ผู้เริ่มต้นก็สามารถใช้เครื่องมือนี้ได้อย่างง่ายดายเมื่อรวมแทร็กต่างๆ เข้าด้วยกัน
ส่วนที่ 3 คำถามที่พบบ่อยเกี่ยวกับการรวมแทร็กใน Audacity
ฉันจะนำเข้าไฟล์เสียงหลายไฟล์ลงในแทร็กเดียวใน Audacity ได้อย่างไร
หากต้องการนำเข้าไฟล์เสียงหลายไฟล์ใน Audacity ให้ไปที่แท็บ File คลิก Open แล้วเลือกไฟล์เสียงที่คุณต้องการจะรวม แต่ละไฟล์จะแสดงเป็นแทร็กแยกกันบนไทม์ไลน์ จากนั้นคุณสามารถจัดแนวและรวมแทร็กด้วยตนเองโดยใช้ตัวเลือก Mix and Render ในเมนู Tracks.
ฉันจะย้ายเสียงจากแทร็กหนึ่งไปยังอีกแทร็กหนึ่งใน Audacity ได้อย่างไร
มีสองวิธีในการย้ายแทร็กเมื่อรวมแทร็กหลายแทร็กใน Audacity หากต้องการย้ายแทร็กเดียว ให้คลิกและลากที่จับคลิปของแทร็กแล้วจัดตำแหน่งในลำดับที่คุณต้องการ ในขณะเดียวกัน หากต้องการย้ายแทร็กหลายแทร็ก ให้เลือกแทร็กทั้งหมดที่คุณต้องการย้ายโดยใช้เครื่องมือการเลือก จากนั้นลากที่จับคลิปใดๆ ภายในพื้นที่ที่เลือกเพื่อย้ายคลิปที่เลือกทั้งหมดพร้อมกัน
Audacity มีกี่แทร็ค?
Audacity ไม่มีข้อจำกัดที่แน่นอนเกี่ยวกับจำนวนแทร็กที่คุณสามารถแก้ไขได้ ด้วยเหตุนี้ คุณสามารถสร้างและนำเข้าแทร็กได้มากเท่าที่คุณต้องการ อย่างไรก็ตาม เมื่อทำงานกับแทร็กจำนวนมาก คุณต้องพิจารณาความจุของคอมพิวเตอร์ของคุณ เนื่องจากประสิทธิภาพอาจขึ้นอยู่กับพลังการประมวลผลและหน่วยความจำของระบบของคุณ
สรุป
ตอนนี้คุณรู้แล้ววิธีการรวมแทร็กใน Audacity คุณจึงสามารถสร้างการเปลี่ยนผ่านที่ลื่นไหลและเสียงที่สมดุลสำหรับโปรเจกต์ของคุณได้อย่างง่ายดาย นอกจากนี้ คุณยังสามารถสำรวจฟีเจอร์อื่น ๆ ได้ เช่น เฟดเข้า เฟดออก และการปรับระดับเสียง เพื่อให้ได้เสียงที่ดีขึ้น ในขณะเดียวกัน หากคุณต้องการตัวเลือกที่ใช้ง่ายกว่าหรือมีความสามารถขั้นสูงกว่า ลองใช้ Video Converter Ultimate ที่ FVC คัดสรรมาให้ ใช้งานง่ายและมีตัวเลือกการปรับแต่งสำหรับไฟล์เสียงของคุณมากกว่าเดิม.
-
 วิธีใช้ Audacity เพื่อย้อนกลับเสียงบน Windows 10/11
 หากคุณกำลังแก้ไขไฟล์เสียงใน Audacity และสงสัยว่าจะย้อนกลับไฟล์ทั้งหมดหรือบางส่วนได้อย่างไร โปรดอ่านที่นี่เพื่อเรียนรู้วิธีย้อนกลับเสียงใน Audacity ได้อย่างง่ายดาย
-
 วิธีการเฟดเสียงใน Audacity: 4 วิธีที่แตกต่างกัน [2025]
 ค้นพบขั้นตอนในการเฟดเสียงใน Audacity อย่างมีประสิทธิภาพ รวมถึงความรู้เพิ่มเติมเกี่ยวกับเอฟเฟกต์เฟดอิน/เอาต์ของ Audacity เตรียมตัวให้พร้อมแล้วมาเริ่มกันเลย
-
 วิธีแยกเสียงใน Audacity ด้วยความแม่นยำสูง [คู่มือ]
 กำลังพยายามเรียนรู้วิธีแยกแทร็กใน Audacity อยู่ใช่หรือไม่ คุณมาถูกหน้าแล้ว! ในบทความนี้ คุณจะได้เรียนรู้วิธีแยกแทร็กหนึ่งเป็นสองแทร็กได้อย่างง่ายดาย