


เรียนรู้ 2 วิธีในการแยกเสียงใน Audacity [2024]
คุณกำลังทำโปรเจ็กต์เสียงและพบว่าแทร็กยาวเป็นพิเศษใช่หรือไม่? นั่นคือที่มาของการแบ่งแทร็กเสียง การแบ่งแทร็กเสียงเป็นกระบวนการที่แทร็กเสียงหนึ่งแทร็กถูกแบ่งออกเป็นสองส่วน วิธีนี้ช่วยให้ผู้ใช้สามารถย้ายส่วนใดส่วนหนึ่งหรือทั้งสองส่วนของเสียง เพิ่มเอฟเฟกต์ต่างๆ ให้กับแทร็ก หรือทำอย่างอื่นเพื่อให้กระบวนการแก้ไขง่ายขึ้น นอกจากนี้ การแบ่งแทร็กยังเป็นสิ่งที่นักตัดต่อเสียงมักจะทำกัน ดังนั้นจึงสามารถปรับเปลี่ยนแทร็กได้อย่างง่ายดายตามต้องการ
หากคุณวางแผนจะใช้ Audacity เพื่อแก้ไขโปรเจกต์เสียงของคุณ แต่ยังไม่รู้วิธีใช้งาน โดยเฉพาะการแยกแทร็ก ไม่ต้องกังวล! บทความนี้จะสอนวิธีการต่าง ๆ ในการแยกแทร็กใน Audacityอย่างง่ายดายและแม่นยำ มาเริ่มกันเลย!

ส่วนที่ 1. วิธีการแยกแทร็กใน Audacity
Audacity เป็นเครื่องมือตัดต่อและบันทึกเสียงที่ใช้งานได้บนระบบปฏิบัติการต่างๆ เช่น Windows, Linux และ macOS ด้วยเครื่องมือนี้ ผู้ใช้สามารถทำงานตัดต่อเสียงตั้งแต่ขั้นพื้นฐานไปจนถึงระดับมืออาชีพ เช่น การแบ่งแทร็กเสียงออกเป็นส่วนๆ หรือส่วนที่ต้องการ นอกจากนี้ เครื่องมือนี้ยังรองรับรูปแบบไฟล์ยอดนิยม เช่น MP3, M4A, AIFF, FLAC และ WAV ซึ่งเข้ากันได้ดี
ตอนนี้เรามาดูวิธีแยกแทร็กใน Audacity กัน
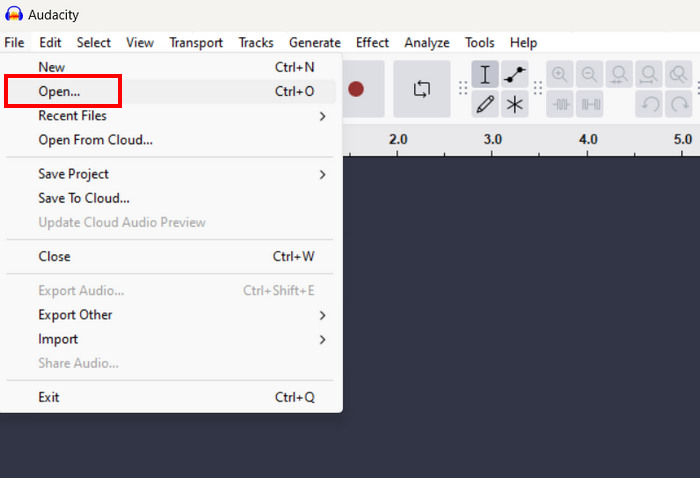
ขั้นตอนที่ 1 ก่อนอื่น ดาวน์โหลดเครื่องมือลงในคอมพิวเตอร์ของคุณแล้วเปิดใช้งาน.
ขั้นตอนที่ 2 จากนั้น โหลดแทร็กที่คุณต้องการจะแยก โดยไปที่แท็บ File แล้วคลิกเมนู Open.
ขั้นตอนที่ 3 ตอนนี้ บนคลื่นเสียง ให้เลือกส่วนที่คุณต้องการแยกเสียงของคุณ จากนั้นไปที่แท็บ Edit เลือก Audio Clips จากเมนู แล้วคลิก Split.

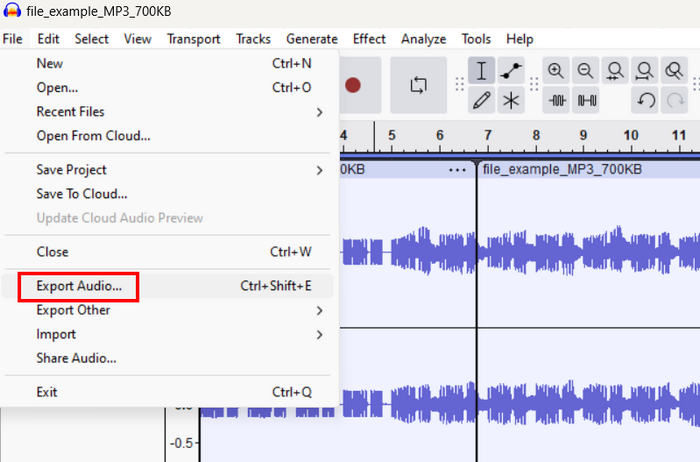
ขั้นตอนที่ 4 ขั้นสุดท้าย เพื่อบันทึกแทร็กที่แก้ไขแล้ว ให้ไปที่แท็บ File แล้วเลือกตัวเลือก Export Audio จากเมนู.
แม้ว่า Audacity จะมีอินเทอร์เฟซผู้ใช้ที่ซับซ้อน แต่คุณลักษณะการแยกเสียงสามารถใช้งานได้ง่ายหากมีการแนะนำอย่างถูกต้อง ผู้ใช้จะต้องทราบว่าการแยกเสียงใน Audacity ต้องใช้การเลือกจุดที่แน่นอนบนเวฟฟอร์มอย่างระมัดระวัง หากการเลือกไม่ถูกต้องแม้เพียงเล็กน้อย อาจทำให้เสียงถูกตัดอย่างกะทันหันหรือไม่ได้ตั้งใจ
ส่วนที่ 2. แยกแทร็กโดยอัตโนมัติใน Audacity พร้อมป้ายกำกับ
ในขณะเดียวกัน หากคุณกำลังทำงานกับแทร็กยาวๆ ที่ต้องแยกไฟล์มากกว่า 2 ไฟล์ การเพิ่มป้ายกำกับให้กับแทร็กที่เกี่ยวข้องถือเป็นสิ่งสำคัญ โชคดีที่ Audacity สามารถแยกไฟล์เสียงด้วยป้ายกำกับได้ ด้วยฟีเจอร์นี้ ผู้ใช้จะได้รับคำแนะนำเกี่ยวกับแทร็กที่พวกเขาจะจัดการเมื่อแก้ไขโปรเจ็กต์เสียงของตน
นี่คือคู่มือทีละขั้นตอนเกี่ยวกับวิธีแยกแทร็กใน Audacity ด้วยป้ายกำกับ:
ขั้นตอนที่ 1 ขั้นตอนเหมือนเดิม ก่อนอื่น โหลดแทร็กที่คุณต้องการจะแยก โดยไปที่แท็บ File แล้วคลิกเมนู Open.
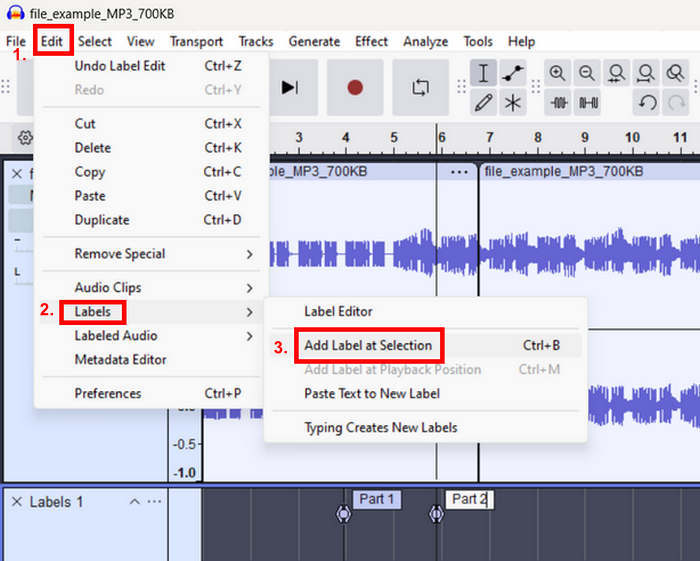
ขั้นตอนที่ 2 ต่อไป บนคลื่นเสียง ให้เลือกส่วนที่คุณต้องการแยกเสียงพร้อมกำหนดฉลาก (Label) จากนั้นไปที่แท็บ Edit เลือก Labels จากเมนู แล้วคลิก Add Label at Selection ระบบจะแยกแทร็กเสียงของคุณโดยอัตโนมัติ และให้คุณเปลี่ยนชื่อฉลากได้ตามต้องการ.
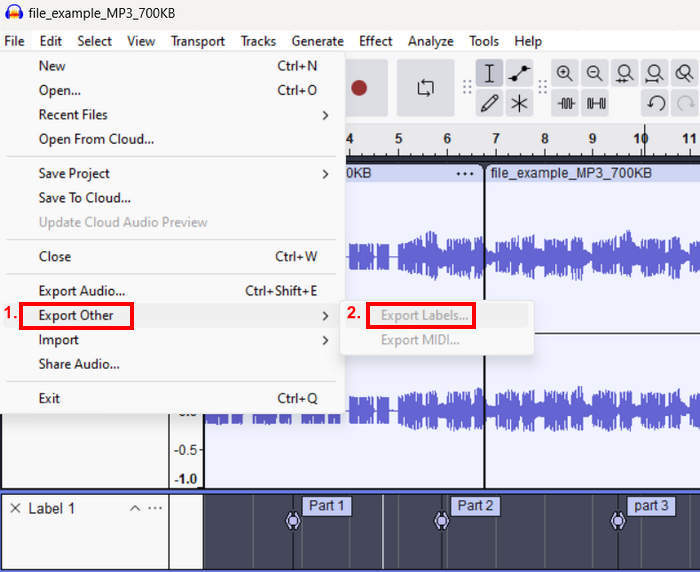
ขั้นตอนที่ 3 หลังจากนั้น ส่งออกแทร็กโดยไปที่แท็บ File คลิกตัวเลือก Export แล้วเลือก Export Labels.
ด้วยฟีเจอร์นี้ ผู้ใช้สามารถนำทางไปยังส่วนต่างๆ ที่แยกออกจากแทร็กได้อย่างง่ายดาย ซึ่งถือเป็นเรื่องดีสำหรับการจัดการและการจัดระเบียบ อย่างไรก็ตาม ผู้ใช้ยังคงต้องส่งออกแต่ละส่วนที่ติดป้ายกำกับทีละส่วนหากต้องการให้เป็นไฟล์เสียงแยกกัน
ส่วนที่ 3. การแยกแทร็กด้วยทางเลือกของ Audacity
Audacity มีหน้าตาอินเทอร์เฟซที่ค่อนข้างซับซ้อน ซึ่งอาจทำให้ผู้ใช้ โดยเฉพาะมือใหม่ สับสนได้ ดังนั้นหากคุณกำลังมองหาเครื่องมือทางเลือกที่ง่ายและตรงไปตรงมาสำหรับแยกแทร็กเสียงที่ยาว FVC แนะนำ Video Converter Ultimate ให้เป็นตัวเลือกสำหรับคุณ เครื่องมือนี้มีจุดเด่นที่ชุดเครื่องมือและฟีเจอร์ที่ครบครัน แต่เข้าถึงได้ง่ายเพราะมีอินเทอร์เฟซที่ใช้งานง่ายและเข้าใจไม่ยาก นอกจากนี้ เมื่อเทียบกับ Audacity แล้ว เครื่องมือนี้รองรับรูปแบบไฟล์เสียงได้หลากหลายกว่ามาก สูงสุดถึงประมาณ 20 รูปแบบ เพื่อให้มั่นใจได้ว่าสามารถใช้งานร่วมกับไฟล์เสียงส่วนใหญ่ที่ต้องการแก้ไขได้.
ขั้นตอนที่ 1 ก่อนอื่น บนคอมพิวเตอร์ Mac หรือ Windows ของคุณ ให้ดาวน์โหลดและติดตั้ง Video Converter Ultimate ที่ FVC แนะนำ.
ดาวน์โหลดฟรีสำหรับ Windows 7 ขึ้นไปดาวน์โหลดอย่างปลอดภัย
ดาวน์โหลดฟรีสำหรับ MacOS 10.7 ขึ้นไปดาวน์โหลดอย่างปลอดภัย
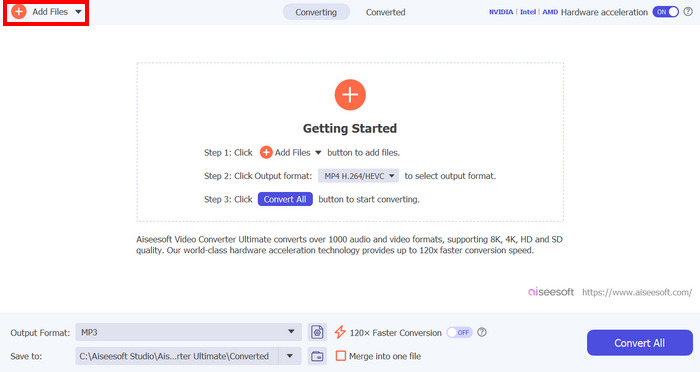
ขั้นตอนที่ 2 จากนั้น เพิ่มแทร็กที่คุณต้องการจะแยกโดยคลิกปุ่ม Add Files.
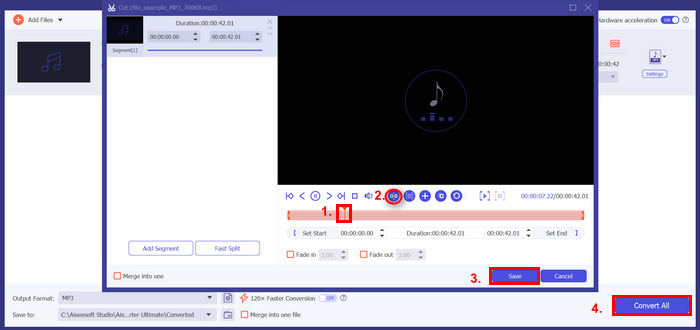
ขั้นตอนที่ 3 หลังจากนั้น คลิกปุ่ม Cut แล้วระบบจะพาคุณไปยังหน้าต่างอีกหน้าหนึ่ง จากตรงนั้น คลิกที่แทร็ก เลื่อนเส้นสีแดงไปยังตำแหน่งที่คุณต้องการแยกแทร็ก เมื่อเสร็จแล้วให้คลิกปุ่ม Split จากนั้นคลิก Save และสุดท้ายเพื่อบันทึกแทร็กเสียงที่คุณแก้ไขแล้ว ให้คลิกปุ่ม Convert All.
ดังนั้น หากการแยกแทร็กใน Audacity ไม่เหมาะกับคุณ FVC Video Converter Ultimate ที่เลือกมานี้สามารถเป็นทางเลือกที่ดีสำหรับไฟล์เสียงยาวๆ ของคุณได้ ฟังก์ชันนี้ให้ผลเหมือนกัน แต่เมื่อเทียบกับ Audacity แล้ว โปรแกรมนี้มีวิธีแยกแทร็กที่ง่ายกว่า ซึ่งถือเป็นข้อดีสำหรับผู้ใช้ทุกระดับ
ส่วนที่ 4 คำถามที่พบบ่อยเกี่ยวกับ Audacity Split Track
ทางลัดสำหรับการแยกใน Audacity คืออะไร?
คุณสามารถแบ่งแทร็กได้อย่างรวดเร็วโดยใช้วิธีลัดต่างๆ ตัวอย่างเช่น หากคุณเป็นผู้ใช้ Windows คุณสามารถใช้ Ctrl + I และสำหรับผู้ใช้ macOS คุณสามารถใช้ Command + I คำสั่งนี้ช่วยให้คุณแบ่งแทร็กเสียงที่เลือกไว้ได้ทันที
ทำไมฉันถึงไม่สามารถแยกแทร็กใน Audacity ได้?
หากคุณไม่สามารถแยกแทร็กใน Audacity ได้ อาจเป็นเพราะสาเหตุหลายประการ ปัญหาทั่วไปประการหนึ่งคืออาจเลือกแทร็กไม่ถูกต้องก่อนพยายามแยก ตรวจสอบให้แน่ใจว่าคุณได้เน้นส่วนที่แน่นอนของคลื่นเสียงที่คุณต้องการแยก
จะตัดและรวมเสียงใน Audacity ได้อย่างไร?
ในการตัดและรวมเสียงใน Audacity ขั้นแรก ให้เลือกส่วนของเสียงที่คุณต้องการตัดโดยใช้เครื่องมือการเลือก เมื่อเลือกแล้ว คุณสามารถกด Ctrl + X สำหรับผู้ใช้ Windows และ Command + X สำหรับผู้ใช้ macOS เพื่อตัดเสียง นอกจากนี้ คุณสามารถไปที่แท็บแก้ไขและเลือกตัวเลือกตัดจากเมนู ในขณะเดียวกัน หากต้องการรวมหรือรวมเสียง เพียงวางเคอร์เซอร์ในตำแหน่งที่คุณต้องการวางส่วนที่ตัด แล้วกด Ctrl + V หากคุณเป็นผู้ใช้ Windows และกด Command + V สำหรับผู้ใช้ macOS เพื่อวาง
สรุป
สุดท้าย ตอนนี้คุณก็รู้แล้วว่าจะแยกแทร็กใน Audacity อย่างไร ง่ายใช่ไหม? ยกเว้นเรื่องอินเทอร์เฟซที่ซับซ้อน แต่อย่ากังวล! ยังมีทางเลือกที่ง่ายและเรียบง่ายกว่าซึ่งคุณสามารถลองใช้ได้ นั่นคือ Video Converter Ultimate ที่ FVC แนะนำ ดังนั้น หากคุณต้องการปรับแต่งขั้นตอนการตัดต่อเสียงของคุณให้มีประสิทธิภาพมากขึ้นด้วยเครื่องมือแยกไฟล์ MP3 ที่ใช้งานง่ายและเป็นมิตรต่อผู้ใช้ ให้ลองใช้เครื่องมือนี้ได้เลย!
-
 บทช่วยสอนที่เป็นรูปธรรม – วิธีผสานสองแทร็กเสียงใน Audacity
 Audacity ได้รับความนิยมในการแก้ไขเสียง แต่จะใช้มันเพื่อรวมแทร็กเสียงได้อย่างไร โพสต์นี้จะบอกวิธีรวมแทร็กใน Audacity
-
 วิธีใช้ Audacity เพื่อย้อนกลับเสียงบน Windows 10/11
 หากคุณกำลังแก้ไขไฟล์เสียงใน Audacity และสงสัยว่าจะย้อนกลับไฟล์ทั้งหมดหรือบางส่วนได้อย่างไร โปรดอ่านที่นี่เพื่อเรียนรู้วิธีย้อนกลับเสียงใน Audacity ได้อย่างง่ายดาย
-
 วิธีการเฟดเสียงใน Audacity: 4 วิธีที่แตกต่างกัน [2024]
 ค้นพบขั้นตอนในการเฟดเสียงใน Audacity อย่างมีประสิทธิภาพ รวมถึงความรู้เพิ่มเติมเกี่ยวกับเอฟเฟกต์เฟดอิน/เอาต์ของ Audacity เตรียมตัวให้พร้อมแล้วมาเริ่มกันเลย