


วิธีแปลงไฟล์ TS เป็น MP4 ด้วย VLC: คู่มือฉบับสมบูรณ์ ฟรี และใช้งานง่าย
คุณเคยเจอปัญหาไฟล์วิดีโอที่มีนามสกุล .ts แปลกๆ แล้วรู้สึกเหมือนเจอกำแพงดิจิทัลตันหรือเปล่า? ผมเคยเจอมาแล้วครับ เมื่อฤดูร้อนที่ผ่านมา ผมพยายามกู้คืนงานนำเสนอเก่าๆ และบันทึกครอบครัวจากเครื่องรับสัญญาณทีวีดิจิทัลรุ่นเก่า พอผมย้ายไฟล์เหล่านั้นไปยังแล็ปท็อป ปรากฏว่าไฟล์ทั้งหมดอยู่ในรูปแบบ TS โทรศัพท์ของผมเล่นไม่ได้ iPad ก็ขึ้นข้อความว่าไม่รองรับรูปแบบไฟล์ และแม้แต่โปรแกรมตัดต่อวิดีโอพื้นฐานของผมก็ยังใช้งานไม่ได้เลย ถ้าคุณกำลังเจอปัญหาแบบเดียวกัน ไม่ต้องกังวลไปครับ คุณไม่จำเป็นต้องซื้อซอฟต์แวร์ราคาแพงหรือเสี่ยงกับความเป็นส่วนตัวของคุณบนเว็บไซต์ฟรีที่ไม่น่าเชื่อถือซึ่งเต็มไปด้วยป๊อปอัพ คุณอาจมีวิธีแก้ปัญหาอยู่แล้วบนเดสก์ท็อปของคุณ: VLC Media Player
ในคู่มือนี้ ฉันจะพาคุณทำตามทีละขั้นตอนแบบละเอียดว่าจะแปลงไฟล์ TS เป็น MP4 ด้วย VLCอย่างไร เราจะครอบคลุมทั้งขั้นตอนพื้นฐาน เคล็ดลับระดับโปรที่ไม่สูญเสียคุณภาพ และวิธีจัดการเมื่อเกิดปัญหา.

ส่วนที่ 1. VLC สามารถแปลงไฟล์ TS เป็น MP4 ได้หรือไม่
ตอบแบบสั้นๆ ก็คือ: ได้แน่นอน 100%
แม้คนส่วนใหญ่จะรู้จัก VLC แค่ในฐานะโปรแกรมที่เล่นไฟล์อะไรๆ ก็ได้ แต่จริงๆ แล้วมันคือเครื่องมือแปลงไฟล์ทรงพลังที่แอบซ่อนอยู่ มันเหมือนมีดอเนกประสงค์สวิสในโลกมีเดีย มันสามารถเอาไฟล์ Transport Stream (.ts) ที่เทอะทะและบิตเรตสูง มาแพ็กใหม่ให้กลายเป็นไฟล์ .mp4 ที่ลื่นไหลและเป็นมิตรกับมือถือได้.
ก่อนที่เราจะไปดูวิธีการกัน เรามาพูดถึงเหตุผลที่คุณควรทำแบบนี้ก่อน และทำไม VLC ถึงควรเป็นตัวเลือกแรกของคุณ
ส่วนที่ 2 เหตุใดจึงต้องแปลงไฟล์ TS เป็น MP4 ด้วย VLC
ตอนที่ผมเริ่มแปลงไฟล์วิดีโอในคลังของผมครั้งแรก ผมลองใช้โปรแกรมแปลงไฟล์ MP4 ออนไลน์ที่หาได้ใน Google ซึ่งเป็นความผิดพลาดครั้งใหญ่ โปรแกรมเหล่านั้นครึ่งหนึ่งจำกัดขนาดไฟล์ไว้ที่ 100MB ส่วนอีกครึ่งหนึ่งก็ใส่ลายน้ำขนาดใหญ่ไว้ตรงกลางวิดีโอของผม
นี่คือเหตุผลว่าทำไมการแปลงไฟล์ TS เป็น MP4 โดยใช้ VLC จึงเป็นวิธีที่ดีที่สุด:
- ไม่มีค่าใช้จ่าย: VLC เป็นซอฟต์แวร์โอเพนซอร์สและใช้งานได้ฟรี 100% ไม่มีการอัปเกรดแบบพรีเมียม ไม่มีการสมัครสมาชิก
- ไม่มีลายน้ำ: ต่างจากโปรแกรมทดลองใช้ฟรีของโปรแกรมระดับมืออาชีพ VLC จะไม่ทำให้วิดีโอของคุณเสียคุณภาพด้วยโลโก้ต่างๆ
- ความเป็นส่วนตัวและความปลอดภัย: เมื่อคุณใช้โปรแกรมแปลงไฟล์ออนไลน์ คุณกำลังอัปโหลดวิดีโอส่วนตัวของคุณไปยังเซิร์ฟเวอร์ของคนอื่น แต่ด้วย VLC ทุกอย่างจะอยู่บนคอมพิวเตอร์ของคุณ ข้อมูลของคุณ ธุรกิจของคุณ
- การแปลงแบบกลุ่ม: จริงๆ แล้วคุณสามารถป้อนไฟล์จำนวนมากเข้าไปพร้อมกันได้เลย
- ไม่ต้องติดตั้งซอฟต์แวร์เพิ่มเติม: หากคุณเป็นนักเรียนหรือคนที่ไม่อยากให้ฮาร์ดไดรฟ์รก โปรแกรม VLC น่าจะติดตั้งอยู่แล้ว ทำไมต้องติดตั้งโปรแกรมอื่นเพิ่มล่ะ?
หากคุณกำลังแปลงวิดีโอเหตุการณ์สำคัญในครอบครัวหรือโปรเจกต์งานโรงเรียนที่คุณทุ่มเททำมาอย่างหนัก อย่าใช้โปรแกรมแปลงไฟล์ออนไลน์เด็ดขาด ไม่ใช่แค่เรื่องความเป็นส่วนตัวเท่านั้น แต่เป็นเพราะเครื่องมือออนไลน์เหล่านั้นมักจะบีบอัดวิดีโอของคุณมากเกินไป จนภาพที่ได้ดูเหมือนถ่ายด้วยกล้องคุณภาพต่ำมาก
ส่วนที่ 3 วิธีการแปลงไฟล์ TS เป็น MP4 ด้วย VLC
เอาล่ะ มาเริ่มกันเลยดีกว่า ผมจะอธิบายในสองวิธี คือ วิธีมาตรฐาน (ซึ่งง่าย) และวิธีแบบมืออาชีพ (ซึ่งรักษาคุณภาพได้อย่างสมบูรณ์แบบ)
ขั้นตอนการแปลงข้อมูลพื้นฐาน
ขั้นตอนที่ 1 เปิดโปรแกรม VLC Media Player
หากคุณยังไม่มี โปรดดาวน์โหลดได้จากเว็บไซต์อย่างเป็นทางการของ VideoLAN
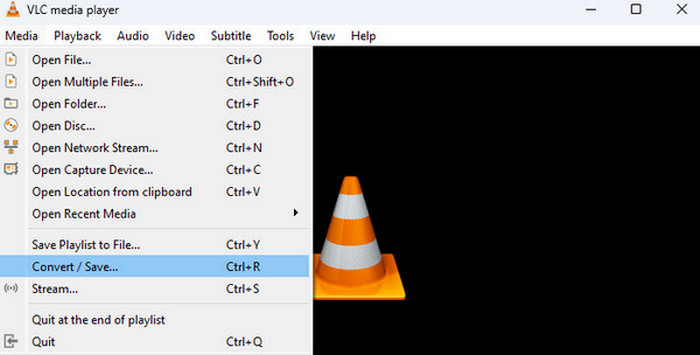
ขั้นตอนที่ 2 ไปที่เมนู Media
ที่แถบเมนูด้านบน คลิกที่ Media จากนั้นเลือก Convert / Save... (หรือกด Ctrl + R บนคีย์บอร์ดถ้าอยากรู้สึกเหมือนแฮกเกอร์).
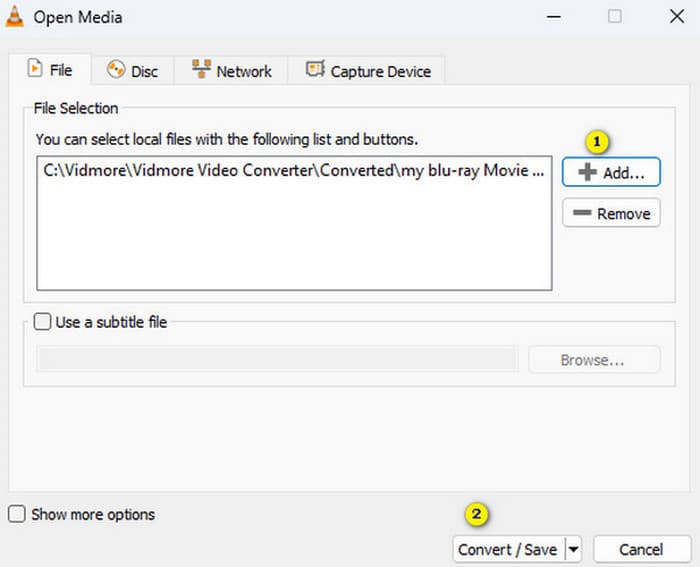
ขั้นตอนที่ 3 เพิ่มไฟล์ของคุณ
จะมีหน้าต่างเด้งขึ้นมา คลิกปุ่ม + Add... แล้วหาไฟล์ .ts จอมดื้อที่เก็บอยู่ในคอมพิวเตอร์ของคุณ.
ขั้นตอนที่ 4 กด Convert/Save
เมื่อเพิ่มไฟล์เรียบร้อยแล้ว ให้คลิกปุ่ม Convert / Save ด้านล่าง.
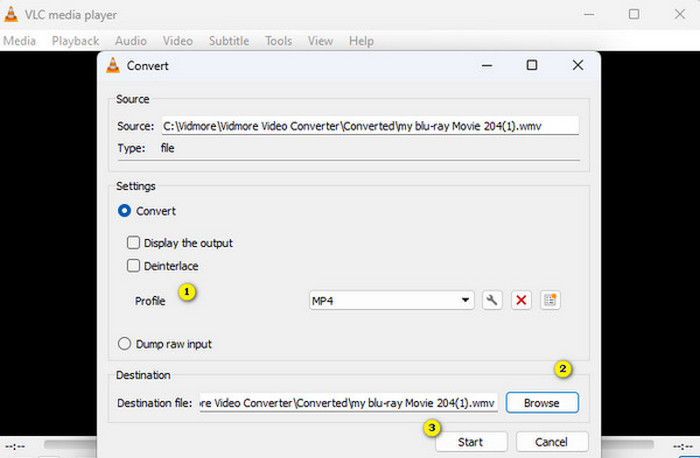
ขั้นตอนที่ 5 เลือกโปรไฟล์
ในส่วน Settings คุณจะเห็นเมนูดรอปดาวน์ถัดจาก Profile ให้มองหา Video - H.264 + MP3 (MP4) โปรไฟล์นี้คือมาตรฐานทองคำด้านความเข้ากันได้กับอุปกรณ์ต่างๆ.
ขั้นตอนที่ 6 กำหนดตำแหน่งปลายทาง
คลิก "Browse" ด้านล่างเพื่อเลือกว่าจะบันทึกไฟล์ใหม่ไว้ที่ไหน และตรวจสอบให้แน่ใจว่าชื่อไฟล์ลงท้ายด้วย .mp4.
ขั้นตอนที่ 7 เริ่มแปลงไฟล์
คลิก Start แล้วดูแถบความคืบหน้า (ตัวเดียวกับที่คุณใช้เลื่อนหาช่วงวิดีโอ) เคลื่อนไปจนสุดหน้าจอ เมื่อถึงปลายแถบก็เสร็จเรียบร้อย!
เคล็ดลับมือโปร: รักษาคุณภาพเสียงต้นฉบับ (แบบไม่สูญเสียข้อมูล)
การแปลงไฟล์แบบมาตรฐานมักจะเข้ารหัสวิดีโอใหม่ ซึ่งหมายความว่า VLC จะแยกวิดีโอออกเป็นส่วนๆ แล้วประกอบใหม่ กระบวนการนี้ใช้เวลาและอาจทำให้คุณภาพลดลงเล็กน้อย แต่เคล็ดลับก็คือ .ts และ .mp4 มักเป็นเพียงคอนเทนเนอร์สำหรับข้อมูลวิดีโอประเภทเดียวกัน (H.264)
หากคุณต้องการให้การแปลงไฟล์รวดเร็วทันใจและคงคุณภาพเดิมไว้ที่ 100% ให้ทำตามขั้นตอนนี้:
ขั้นตอนที่ 1 ทำตามขั้นตอนที่ 1–4 ด้านบน.
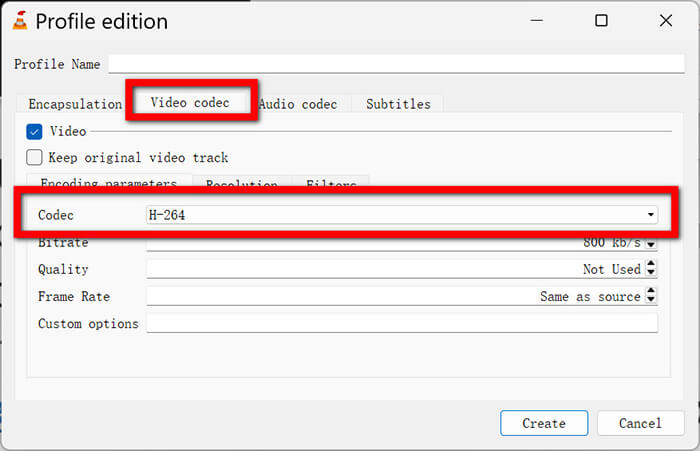
ขั้นตอนที่ 2 ถัดจากเมนูดรอปดาวน์ Profile ให้คลิกที่ ไอคอนประแจ (Edit selected profile).
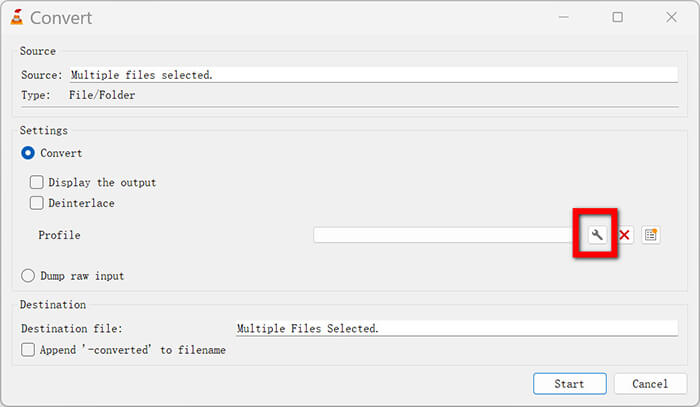
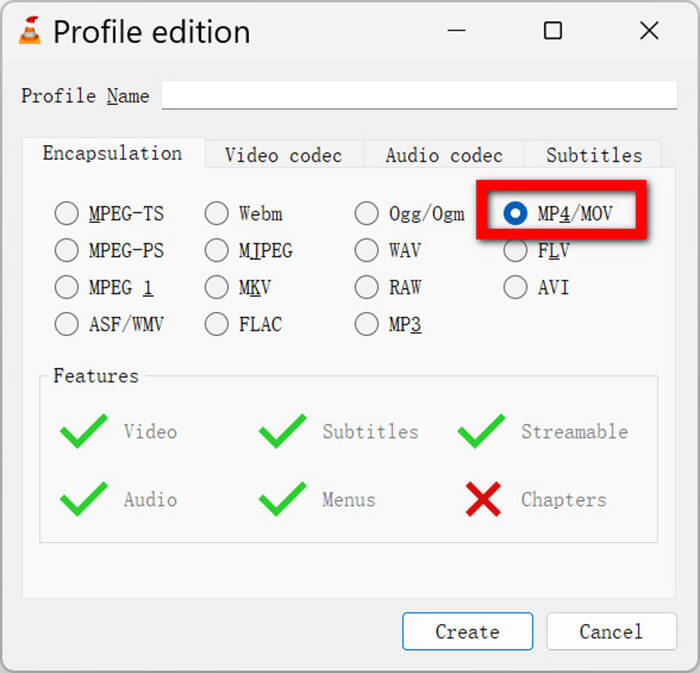
ขั้นตอนที่ 3 ไปที่แท็บ Encapsulation และตรวจสอบให้แน่ใจว่าเลือก MP4/MOV อยู่.
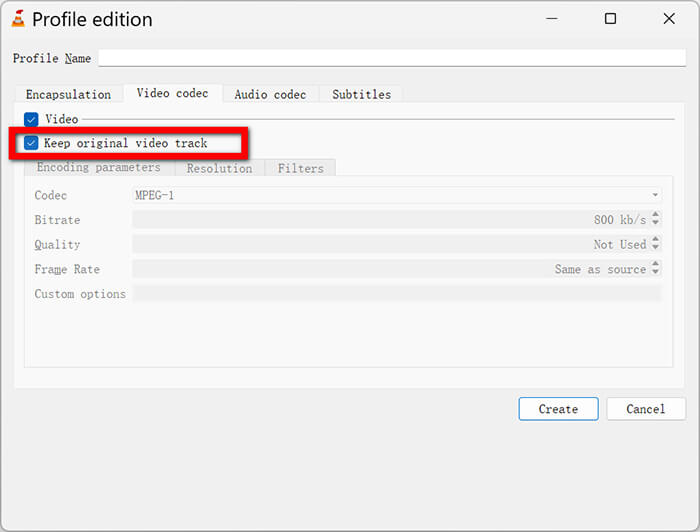
ขั้นตอนที่ 4 ไปที่แท็บ Video codec แล้วติ๊กถูกช่อง 'Keep original video track'.
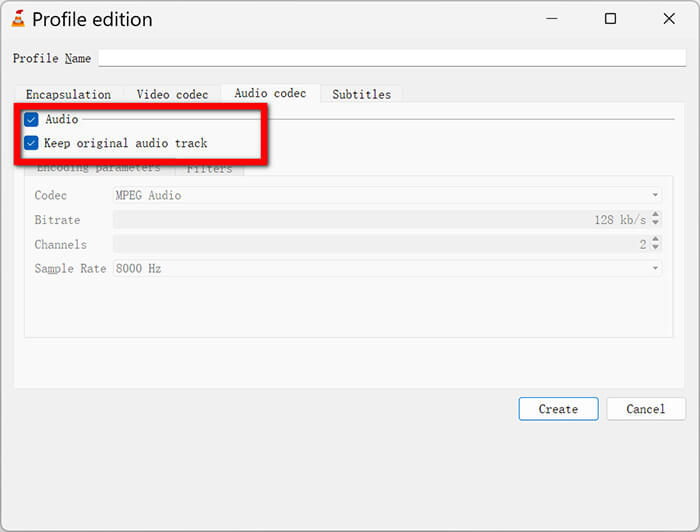
ขั้นตอนที่ 5 ไปที่แท็บ Audio codec แล้วติ๊กถูกช่อง Keep original audio track.
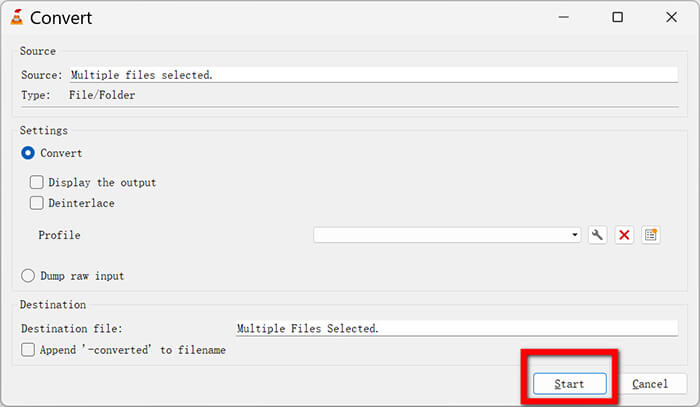
ขั้นตอนที่ 6 คลิก Save.
ขั้นตอนที่ 7 ตอนนี้เมื่อคุณกด Start VLC จะไม่ประมวลผลวิดีโอใหม่ แต่เพียงย้ายมันจากกล่อง TS ไปใส่ในกล่อง MP4 แทน ใช้เวลาแทบจะทันที!
ตอนที่ 4. โปรแกรม VLC ของฉันใช้ไม่ได้สำหรับการแปลงไฟล์ TS เป็น MP4! (การแก้ไขปัญหา)
ฉันเองก็เคยเจอปัญหา "ทำไมมันถึงใช้ไม่ได้?" มาหลายครั้งแล้ว เทคโนโลยีมันดีจนกระทั่งมันใช้งานไม่ได้นั่นแหละ นี่คือปัญหาที่พบบ่อยที่สุดที่เกิดขึ้นเมื่อพยายามแปลงไฟล์ TS เป็น MP4 ใน VLC พร้อมกับวิธีแก้ไขที่ฉันค้นพบ
ไม่มีวิดีโอ / มีแต่เสียง
บางครั้งคุณแปลงไฟล์เสร็จแล้ว เปิดไฟล์ขึ้นมา แต่... ไม่มีอะไรเกิดขึ้นเลย มีแค่หน้าจอสีดำพร้อมเสียง นี่มันน่าหงุดหงิดมาก
วิธีแก้: ปัญหานี้มักเกิดขึ้นเมื่อคุณพยายามใช้ทริก Keep original video track แต่ฟอร์แมตวิดีโอต้นฉบับไม่รองรับกับ MP4 ให้กลับไปที่ไอคอนประแจในหน้าต่างตั้งค่าการแปลง เอาเครื่องหมายถูกออกจาก 'Keep original video track' และตรวจสอบให้แน่ใจว่าใช้โค้เดก H.264 วิธีนี้จะบังคับให้ VLC เข้ารหัสใหม่เป็นฟอร์แมตที่ใช้งานได้แน่นอน.
ถ้าเสียงใน VLC ของคุณดีเลย์ ให้ลองดูวิธีแก้ไขได้ที่นี่.
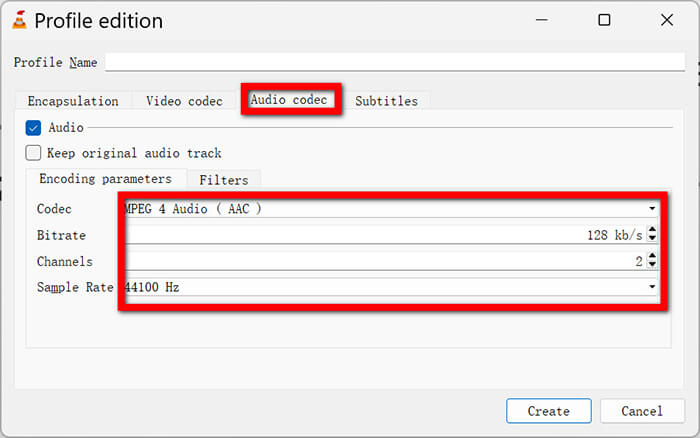
VLC แปลง TS เป็น MP4 ไม่มีเสียง
ถ้าพบว่าไม่มีเสียงขณะแปลงไฟล์ด้วย VLC ส่วนใหญ่มักเป็นเพราะบิตเรตเสียงหรืออัตราการสุ่มตัวอย่างเสียงผิดปกติ
วิธีแก้: ในหน้าต่างแก้ไขโปรไฟล์ (ไอคอนรูปประแจ) ไปที่ Audio codec จากเดิมที่เลือก Keep original ให้เปลี่ยนเป็น MPEG 4 Audio (AAC) แล้วตั้งค่า Bitrate เป็น 128 kb/s และ Sample Rate เป็น 44100 Hz ค่านี้ถือเป็นมาตรฐานที่ปลอดภัยสำหรับเสียง.
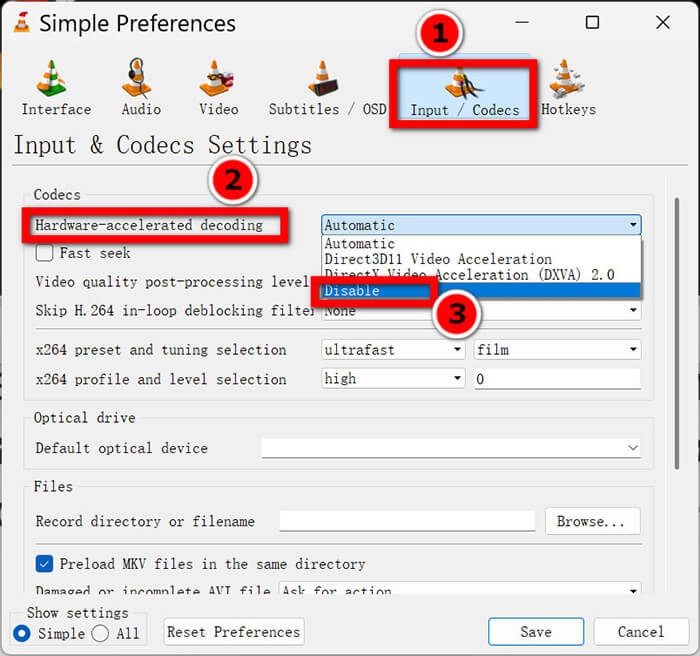
VLC ขัดข้องระหว่างการแปลงไฟล์
เหตุการณ์นี้เคยเกิดขึ้นกับแล็ปท็อปเครื่องเก่าของฉัน ฉันกดปุ่มเริ่ม แล้วโปรแกรมทั้งหมดก็หายไปเลย
วิธีแก้: ปกติแล้วเกิดจากการเร่งความเร็วด้วยฮาร์ดแวร์ (Hardware Acceleration) VLC จะพยายามใช้การ์ดจอของคอมคุณช่วยประมวลผลเพื่อเพิ่มประสิทธิภาพ แต่บางครั้งสองอย่างนี้ทำงานร่วมกันไม่ดี ให้ไปที่ Tools > Preferences > Input / Codecs มองหาตัวเลือก Hardware-accelerated decoding แล้วตั้งค่าเป็น Disable จากนั้นลองแปลงไฟล์อีกครั้ง อาจจะช้าลงเล็กน้อย แต่จะไม่ค้างหรือเด้งออก
ฉันมีโฟลเดอร์ ไม่ใช่ไฟล์!
หากคุณพยายามแปลงไฟล์ video_ts เป็น MP4 ใน VLC Media Player ขั้นตอนจะแตกต่างออกไปเล็กน้อย โฟลเดอร์ VIDEO_TS คือสิ่งที่คุณพบได้ในแผ่น DVD
วิธีแก้: แทนที่จะใช้ Add File ให้ไปที่ Media > Open Disc คลิกแท็บ DVD ชี้ไปที่โฟลเดอร์ VIDEO_TS ของคุณ แล้วกดลูกศรเล็กๆ ข้างปุ่ม Play เพื่อเลือก Convert.
วิธีนี้ยังใช้ได้ในกรณีที่VLC เล่นแผ่น DVD ไม่ได้ด้วย.
ส่วนที่ 5. ทางเลือกที่ดีที่สุดแทน VLC: FVC Video Converter Ultimate
เอาตรงๆ นะ ฉันชอบ VLC มาก มันเป็นโปรแกรมที่ฉันใช้มาตั้งแต่สมัยมัธยมต้นแล้ว แต่ฉันต้องยอมรับว่าบางครั้งมันก็จุกจิกไปหน่อย ถ้าคุณมีไฟล์ต้องแปลง 50 ไฟล์ หรือถ้า VLC ยังคงแสดงข้อผิดพลาดว่าไม่มีเสียงอยู่เรื่อยๆ ทั้งๆ ที่คุณพยายามอย่างเต็มที่แล้ว คุณอาจจะต้องการโปรแกรมที่แข็งแกร่งกว่านี้
FVC Video Converter Ultimate เป็นทางเลือกที่ยอดเยี่ยมที่ฉันใช้เวลาต้องรีบหรือต้องจัดการกับไฟล์ 4K ขนาดใหญ่ มันเป็นโปรแกรมแปลงไฟล์โดยเฉพาะ หมายความว่าถูกออกแบบมาทำงานนี้โดยตรง ในขณะที่การแปลงไฟล์เป็นแค่ฟังก์ชันเสริมของ VLC เท่านั้น โปรแกรมนี้รองรับฟอร์แมตกว่า 1,000 แบบ และใช้การเร่งความเร็วด้วยฮาร์ดแวร์ความเร็วสูงที่ทำงานได้เสถียรโดยไม่ทำให้ระบบล่ม ส่วนตัวฉันรู้สึกว่าหน้าตาโปรแกรมทันสมัยกว่าและไม่น่ากลัวเท่าเมนูซ้อนกันหลายชั้นของ VLC เหมาะมากสำหรับคนที่อยากได้ประสบการณ์แบบคลิกเดียวจบ ไม่ต้องกังวลเรื่องโค้เดกหรือบิตเรต.
วิธีใช้ FVC Video Converter Ultimate:
ขั้นตอนที่ 1 เพิ่มไฟล์ TS
ดาวน์โหลดซอฟต์แวร์จากปุ่มด้านล่าง แล้วเปิดใช้งาน
ดาวน์โหลดฟรีสำหรับ Windows 7 หรือใหม่กว่าดาวน์โหลดอย่างปลอดภัย
ดาวน์โหลดฟรีสำหรับ MacOS 10.7 หรือใหม่กว่าดาวน์โหลดอย่างปลอดภัย
คุณสามารถลากและวางไฟล์ .ts ลงในหน้าต่างได้โดยตรง ใช้งานได้อย่างราบรื่นมาก
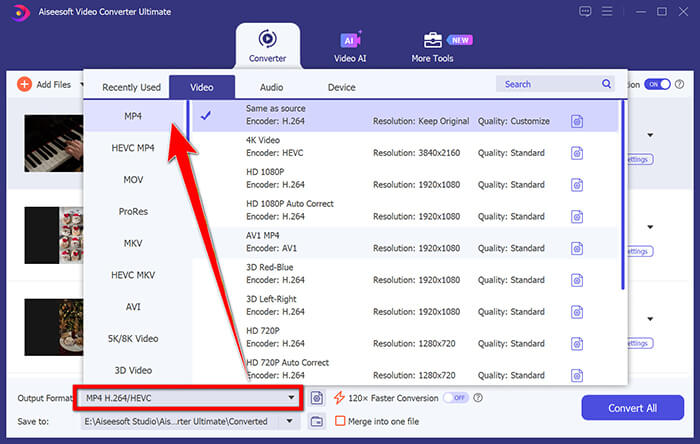
ขั้นตอนที่ 2 เลือกฟอร์แมตเอาต์พุต
คลิกที่รูปแบบเอาต์พุต เลือกเมนูแบบเลื่อนลงที่มุมบนขวา เลือก MP4 และเลือก เช่นเดียวกับแหล่งที่มา เพื่อรักษาคุณภาพให้อยู่ในระดับสูง
ขั้นตอนที่ 3 แก้ไขไฟล์ (ไม่บังคับ)
สิ่งหนึ่งที่ฉันชอบคือไอคอนรูปกรรไกรเล็กๆ คุณสามารถใช้มันตัดแต่งวิดีโอหรือตัดแถบสีดำออกก่อนแปลงไฟล์ได้

ขั้นตอนที่ 4 Convert All
คลิกปุ่มใหญ่ Convert All ด้านขวาล่าง โปรแกรมจะใช้โหมด Lightning ที่เร็วกว่า VLC อย่างเห็นได้ชัดจากประสบการณ์ของฉัน.
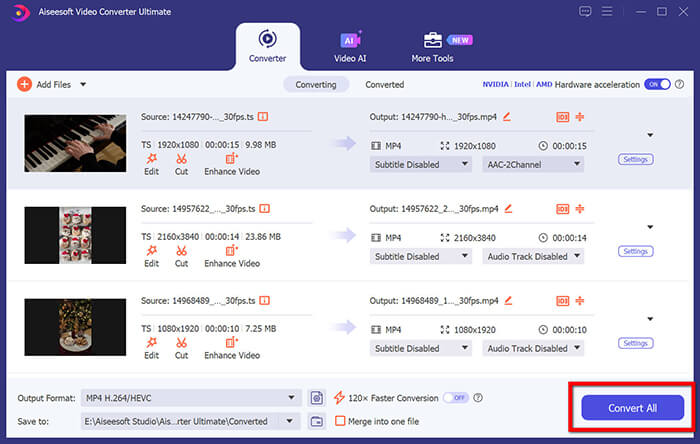
ซอฟต์แวร์นี้เสถียรมาก ผมไม่เคยเจอปัญหาโปรแกรมล่มเลย แม้แต่กับไฟล์ขนาดใหญ่ จุดเด่นที่แท้จริงคือการประมวลผลแบบกลุ่ม คุณสามารถตั้งคิวประมวลผลซีซั่นทั้งหมดของรายการทีวีแล้วปล่อยให้มันทำงานไปเองได้ นอกจากนี้ โปรแกรมตัดต่อในตัวก็ช่วยให้ตัดแต่งส่วนต้นและส่วนท้ายของวิดีโอได้อย่างรวดเร็ว
ต่างจาก VLC ตรงที่เวอร์ชัน Ultimate เป็นผลิตภัณฑ์ระดับพรีเมียม แม้จะมีเวอร์ชันฟรีให้ใช้งาน แต่เวอร์ชันเต็มจะใช้งานได้ก็ต่อเมื่อมีใบอนุญาตเท่านั้น หากคุณมีไฟล์ที่จะแปลงเพียงไฟล์เดียว ให้ใช้ VLC ต่อไป แต่หากคุณกำลังสร้างคลังสื่อ FVC คุ้มค่ากับการลงทุน
ส่วนที่ 6. คำถามที่พบบ่อย
ถาม: การแปลงไฟล์ TS เป็น MP4 จะทำให้คุณภาพลดลงหรือไม่?
A: ถ้าคุณใช้วิธี "เก็บแทร็กต้นฉบับ (คัดลอกสตรีม)" คุณภาพจะไม่ลดลงเลย แต่ถ้าคุณเข้ารหัสใหม่ (วิธีมาตรฐาน) คุณภาพจะลดลงเล็กน้อย แต่โดยปกติแล้วจะไม่สังเกตเห็นได้ด้วยตาเปล่า เว้นแต่คุณจะปรับการตั้งค่าลงอย่างมาก
ถาม: การแปลงไฟล์ .ts ใช้เวลานานเท่าไหร่?
A: ขึ้นอยู่กับคอมพิวเตอร์ของคุณและขนาดไฟล์ ไฟล์ขนาด 1GB อาจใช้เวลา 5 นาทีในการแปลงแบบมาตรฐาน หรือ 30 วินาทีด้วยวิธีการแปลงแบบไม่สูญเสียคุณภาพ (lossless) ของ Pro-Tip
ถาม: ฉันสามารถแปลงไฟล์ TS เป็น MP4 บน Mac โดยใช้ VLC ได้หรือไม่?
A: ใช่! ขั้นตอนแทบจะเหมือนกันเลย ปุ่มอาจจะดูคล้ายของ Mac เล็กน้อย แต่หลักการทำงานยังคงเหมือนเดิม
ถาม: ทำไมไฟล์ TS ถึงมีขนาดใหญ่มาก?
A: ไฟล์ TS ถูกออกแบบมาสำหรับการออกอากาศ (เช่น โทรทัศน์ดาวเทียมหรือเคเบิลทีวี) ไฟล์เหล่านี้มีข้อมูลแก้ไขข้อผิดพลาดเพิ่มเติมจำนวนมากเพื่อให้แน่ใจว่าภาพยังคงเสถียรแม้ว่าสัญญาณจะกระพริบก็ตาม ส่วนไฟล์ MP4 นั้นมีประสิทธิภาพมากกว่าสำหรับการจัดเก็บในฮาร์ดไดรฟ์
ถาม: ถ้าไฟล์ที่แปลงแล้วไม่มีเสียงบนทีวี จะทำอย่างไร?
A: ทีวีรุ่นเก่าบางรุ่นไม่รองรับไฟล์เสียง AAC ลองแปลงไฟล์อีกครั้ง แต่ตั้งค่าตัวแปลงสัญญาณเสียงเป็น MP3 หรือ AC3 แทน
สรุป
การแปลงไฟล์.ts เป็น .mp4 ด้วย VLCเป็นหนึ่งในทักษะด้านไอทีเล็กๆ ที่ทำให้คุณรู้สึกเหมือนเป็นพ่อมดสายเทคโนโลยีเมื่อทำได้คล่อง มันช่วยคุณประหยัดเงิน รักษาความเป็นส่วนตัว และทำให้ความทรงจำกับโปรเจ็กต์ของคุณเล่นได้บนทุกอุปกรณ์ที่มี ฉันหวังว่าคู่มือนี้จะช่วยให้คุณเคลียร์ไฟล์ที่เล่นไม่ได้เหล่านั้นให้หมด! ถ้าคุณเจอข้อผิดพลาดเฉพาะที่ฉันยังไม่ได้พูดถึง หรือถ้าคุณค้นพบทริกที่ได้ผลดีกว่า ก็ขอให้ลองค้นคว้าและทดลองต่อไป.
-
 VLC ไม่สามารถแปลงเป็น MP4 ได้? นี่คือ 7 วิธีในการแก้ไข
 VLC ไม่สามารถแปลงเป็น MP4 ได้ใช่ไหม ค้นพบโซลูชันที่ได้รับการพิสูจน์แล้ว 7 ประการและทางเลือกที่ดีที่สุดของ VLC เพื่อแปลงวิดีโออย่างรวดเร็วโดยไม่มีข้อผิดพลาดหรือปัญหาความเข้ากันได้
-
 วิธีแก้ไข VLC Media Player ที่ไม่สามารถเล่นวิดีโอได้: 5 วิธี
 อย่าเพิ่งตกใจหากพบปัญหา VLC Media Player ไม่สามารถเล่นวิดีโอได้ เราได้เตรียมวิธีแก้ปัญหาทั้ง 5 วิธีไว้ในบทความนี้แล้ว อ่านและลองดู
-
 4 วิธีในการแปลง TS เป็น MP4 ฟรีและออนไลน์
 ไฟล์ TS คืออะไรและต้องการแปลง TS เป็น MP4 ในโพสต์นี้เราจะแบ่งปันวิธีการฟรีและออนไลน์ในการแปลง TS เป็น MP4