


วิธีย่อขนาดไฟล์ PNG ได้อย่างง่ายดายและฟรี [คู่มือ]
ในยุคดิจิทัลทุกวันนี้ PNG เป็นรูปแบบรูปภาพที่นิยมใช้กันมากที่สุดรูปแบบหนึ่ง เนื่องจากการบีบอัดข้อมูลแบบไม่สูญเสียข้อมูลและกราฟิกคุณภาพสูง อย่างไรก็ตาม สาเหตุเหล่านี้ยังเป็นสาเหตุที่ทำให้รูปแบบไฟล์นี้ใช้ขนาดใหญ่ ซึ่งทำให้การอัปโหลดและส่งไฟล์เหล่านี้ช้าลง
แต่อย่ากังวล! ในบทความนี้ คุณจะได้เรียนรู้วิธีการทั้งห้าในการบีบอัดไฟล์ PNG สำรวจข้อดีข้อเสียของแต่ละเทคนิค และทำความเข้าใจเชิงลึกเกี่ยวกับการบีบอัดไฟล์เหล่านี้ แล้วจะรออะไรอยู่? มาเริ่มกันเลยดีกว่า.

ส่วนที่ 1. วิธีที่ง่ายที่สุดในการบีบอัดไฟล์ PNG ออนไลน์ฟรี [ดีที่สุดสำหรับผู้เริ่มต้น]
หนึ่งในวิธีที่ดีที่สุดในการบีบอัดไฟล์ PNG ออนไลน์ โดยเฉพาะสำหรับผู้เริ่มต้น คือการใช้ FVC Free Image Compressor เครื่องมือบีบอัดรูปภาพออนไลน์นี้สามารถเข้าถึงได้อย่างง่ายดายทั้งบน Mac และ Windows ช่วยให้ผู้ใช้บีบอัดไฟล์ได้ด้วยการคลิกเพียงครั้งเดียว นอกจากนี้ อัลกอริทึมการเพิ่มประสิทธิภาพและการบีบอัดขั้นสูงยังช่วยให้มั่นใจได้ว่าคุณภาพของภาพไฟล์ PNG ยังคงเดิมหลังจากการบีบอัด.
วิธีบีบอัดไฟล์ PNG ด้วย FVC Free Image Compressor
ขั้นตอนที่ 1 อันดับแรก ให้เข้าไปที่เว็บไซต์ทางการของพวกเขา.
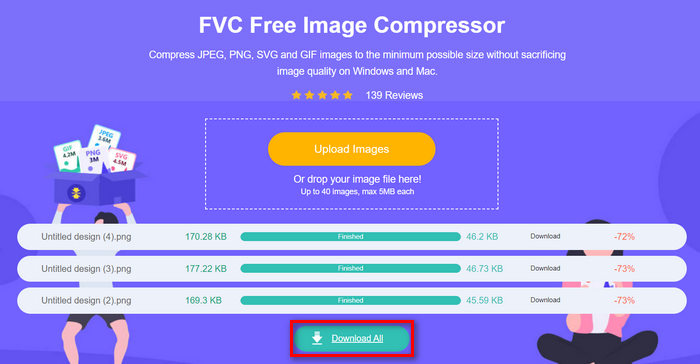
ขั้นตอนที่ 2 จากนั้นคลิก Upload Images เพื่ออัปโหลดไฟล์ PNG ที่คุณต้องการบีบอัด.

ขั้นตอนที่ 3 หลังจากบีบอัดไฟล์ PNGของคุณแล้ว คุณสามารถพรีวิวได้โดยตรวจสอบขนาดไฟล์ใหม่หลังการบีบอัด จากนั้นคลิก Download All เพื่อบันทึกรูปภาพของคุณ.
ความเป็นมิตรต่อผู้ใช้ของ FVC Free Image Compressor ทำให้เหมาะที่สุดสำหรับผู้เริ่มต้น โดยเฉพาะอย่างยิ่งเนื่องจากต้องใช้เพียงขั้นตอนเดียวในการบีบอัดไฟล์ PNG นอกจากนี้ ยังฟรีและเข้าถึงได้ง่าย และผลลัพธ์ที่ได้เมื่อบีบอัดแล้วนั้นก็มีคุณภาพดีเยี่ยม
ข้อดี
- 100% ฟรี
- รองรับรูปภาพขนาดสูงสุดถึง 5MB.
- บีบอัดรูปภาพโดยอัตโนมัติ
- ใช้อัลกอริธึมการเพิ่มประสิทธิภาพและการบีบอัดที่ดีที่สุด
- สามารถบีบอัดภาพได้สูงสุด 40 ภาพ
- รองรับรูปแบบภาพยอดนิยมอย่างกว้างขวาง รวมถึง JPEG, PNG, SVG และ GIF
จุดด้อย
- ไม่มีตัวเลือกการปรับแต่ง
ส่วนที่ 2. ลดขนาดไฟล์ PNG บน Mac
ผู้ใช้ Mac สามารถบีบอัดไฟล์ PNG โดยใช้แอป Preview เครื่องมือนี้ติดตั้งไว้ล่วงหน้าในคอมพิวเตอร์ Mac ทุกเครื่องและมีคุณสมบัติการแก้ไขพื้นฐาน เช่น การปรับขนาดรูปภาพ เมื่อต้องบีบอัดไฟล์ PNG เครื่องมือนี้มีวิธีการที่ตรงไปตรงมาและมีประสิทธิภาพ ผู้ใช้สามารถปรับคุณภาพของรูปภาพได้ผ่านฟังก์ชันการส่งออก ซึ่งช่วยลดขนาดไฟล์ในขณะที่ยังคงคุณภาพของรูปภาพที่ยอมรับได้
วิธีบีบอัดไฟล์ PNG โดยใช้ Preview สำหรับผู้ใช้ Mac
ขั้นตอนที่ 1 ขั้นแรก ให้เปิดแอป Preview บนเครื่อง Mac ของคุณ.
ขั้นตอนที่ 2 หลังจากนั้น ให้เปิดไฟล์ PNG ที่คุณต้องการบีบอัด โดยไปที่แท็บ File แล้วคลิกปุ่ม Open.
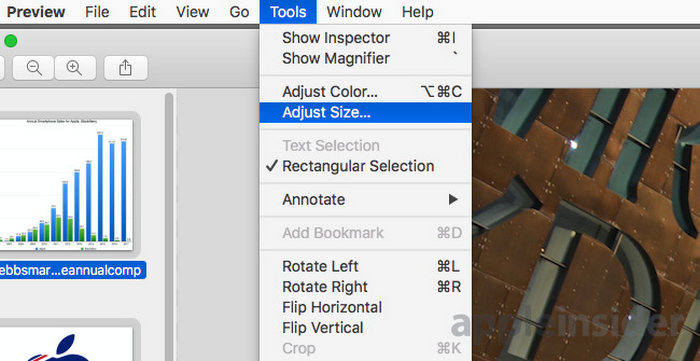
ขั้นตอนที่ 3 จากนั้น ไปที่แท็บ Tool ในแถบเมนู แล้วคลิก Adjust Size.
ขั้นตอนที่ 4 จากนั้น เพื่อบีบอัดไฟล์ PNG ของคุณ ให้เลือก Resample Image โดยทำเครื่องหมายในช่องสี่เหลี่ยมด้านข้าง.
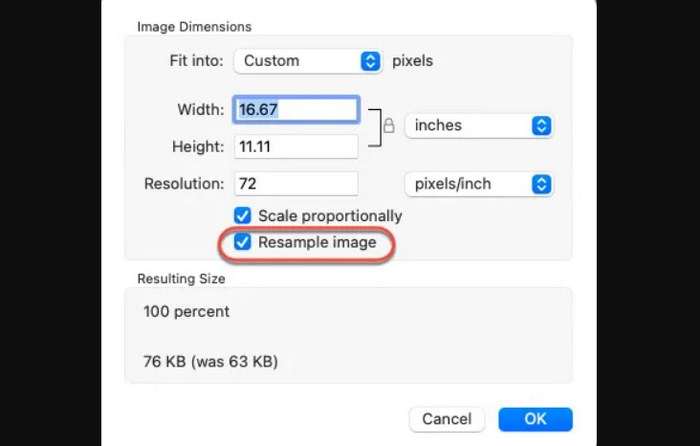
ขั้นตอนที่ 5 ตอนนี้ให้เปลี่ยนค่าของ Resolution ไฟล์ของคุณ เมื่อเปลี่ยนเรียบร้อยแล้ว ระบบจะแสดงขนาดไฟล์ใหม่ที่ด้านล่าง.
หมายเหตุ: หากคุณต้องการบีบอัดไฟล์ PNG จำนวนมากพร้อมกัน ให้คลิกที่ภาพตัวอย่างขนาดย่อในแถบด้านข้าง แล้วกด Command + A บนแป้นพิมพ์ก่อนดำเนินการไปยังขั้นตอนที่ 3 วิธีนี้จะเป็นการเลือกภาพทั้งหมด และให้ Preview ปรับขนาดกับรูปภาพทุกไฟล์ในครั้งเดียว.
ข้อดี
- ฟรี.
- อินเทอร์เฟซที่เรียบง่ายและใช้งานง่าย
- ช่วยให้ปรับคุณภาพของภาพได้อย่างรวดเร็ว
จุดด้อย
- ควบคุมการตั้งค่าการบีบอัดขั้นสูงน้อยลง
- พิเศษเฉพาะผู้ใช้ Mac เท่านั้น
ส่วนที่ 3. การบีบอัด PNG บน Windows
ผู้ใช้ Windows สามารถใช้แอป Photos เพื่อบีบอัดรูปภาพ PNG ให้บีบอัดได้อย่างราบรื่น ด้วยเครื่องมือบีบอัดรูปภาพนี้ ผู้ใช้สามารถปรับคุณภาพและความละเอียดของไฟล์ PNG ได้อย่างง่ายดาย ซึ่งจะช่วยลดขนาดไฟล์ นอกจากนี้ ผู้ใช้ยังสามารถเปิดรูปภาพ แก้ไขข้อมูลที่จำเป็น และบันทึกสำเนาด้วยขนาดไฟล์ที่เล็กลงได้อย่างรวดเร็ว
วิธีบีบอัดไฟล์ PNG โดยใช้ Preview สำหรับผู้ใช้ Windows
ขั้นตอนที่ 1 คลิกขวาที่ไฟล์ PNG ที่คุณต้องการบีบอัด เลือก Open With แล้วเลือก แอป Photos.
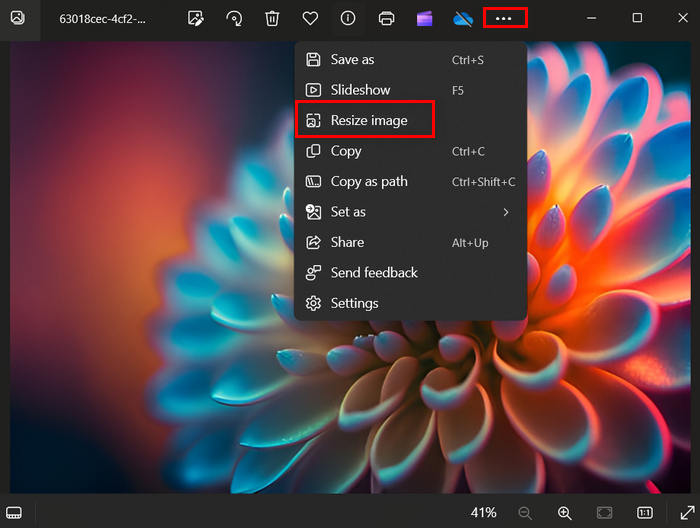
ขั้นตอนที่ 2 จากนั้น คลิกจุดสามจุดที่มุมขวาบน แล้วเลือก Resize image จากเมนู.
ขั้นตอนที่ 3 จากตรงนั้น คุณสามารถบีบอัดไฟล์ PNG ได้โดยการเปลี่ยนขนาด Pixel และ Percentage.
ขั้นตอนที่ 4 ขั้นตอนสุดท้ายให้คลิกปุ่ม Save.
ด้วยเครื่องมือนี้ ผู้ใช้ Windows สามารถบีบอัดไฟล์ PNG ลงในอุปกรณ์ได้โดยตรง อย่างไรก็ตาม วิธีนี้ขาดคุณสมบัติขั้นสูงบางประการที่สามารถเพิ่มคุณภาพของไฟล์ที่บีบอัดได้
ข้อดี
- ฟรี.
- การบีบอัดโดยตรงภายในแอปรูปภาพ
- ส่วนต่อประสานที่ใช้งานง่าย
- รองรับรูปแบบภาพยอดนิยมหลากหลาย
จุดด้อย
- การสูญเสียคุณภาพที่ชัดเจนในไฟล์ PNG ที่ถูกบีบอัด
- ไม่มีคุณสมบัติการบีบอัดขั้นสูง
ส่วนที่ 4. การบีบอัดไฟล์ PNG ด้วย Photoshop
Adobe Photoshop เป็นซอฟต์แวร์แก้ไขรูปภาพชื่อดังที่มืออาชีพทั่วโลกใช้กันอย่างแพร่หลาย ด้วยฟีเจอร์ที่หลากหลายและความสามารถในการแก้ไขอันทรงพลัง เครื่องมือนี้มาพร้อมเครื่องมือขั้นสูงสำหรับแก้ไขรูปภาพ รวมถึงการบีบอัดภาพ การครอป และการเปลี่ยนสีของรูปภาพ เป็นต้น ผู้ใช้สามารถปรับขนาดรูปภาพ รวมถึงตั้งค่าคุณภาพและฟอร์แมตของไฟล์ เพื่อให้ได้ขนาดไฟล์ที่เหมาะสมโดยไม่สูญเสียคุณภาพมากนัก.
วิธีที่ 1. การเปลี่ยนขนาดภาพเป็นพิกเซล
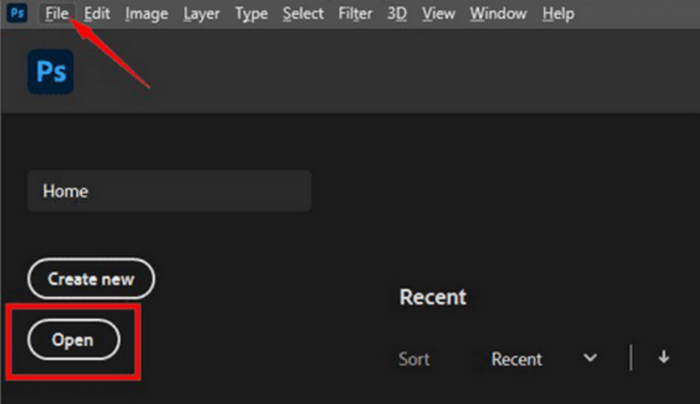
ขั้นตอนที่ 1 เปิดรูปภาพของคุณใน Photoshop โดยคลิก Open หรือไปที่ File แล้วเลือกไฟล์ PNG ที่คุณต้องการปรับขนาด.
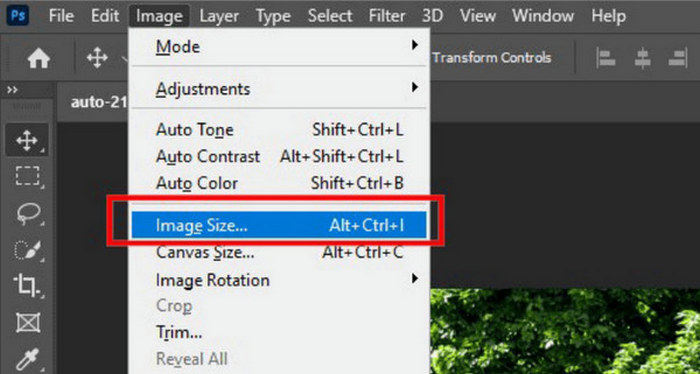
ขั้นตอนที่ 2 จากนั้นไปที่แท็บ Image แล้วเลือก Image Size.
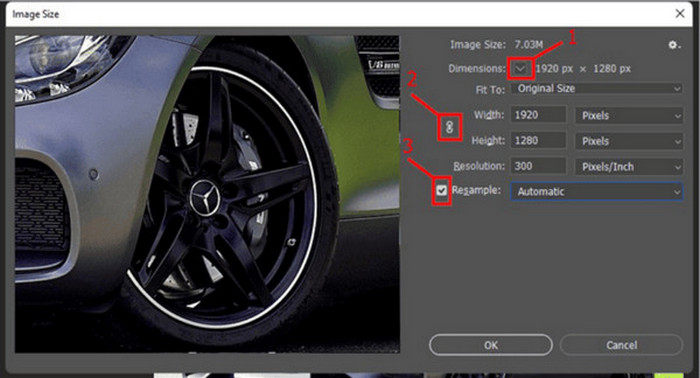
ขั้นตอนที่ 3 ในกล่องโต้ตอบ Image Size ให้เลือก Pixels จากเมนูแบบเลื่อนลง หากต้องการกำหนดขนาดเฉพาะเพื่อบีบอัดไฟล์ PNG ให้กรอกค่าในช่องความกว้างและความสูง แล้วคลิก OK เพื่อปรับขนาดรูปภาพ.
ขั้นตอนที่ 4 สุดท้าย บันทึกไฟล์ PNG ที่บีบอัดแล้วของคุณโดยคลิกปุ่ม Save As ใต้แท็บ File.
บันทึกไฟล์ PSD ในรูปแบบ PNG ก่อนที่จะบันทึก
วิธีที่ 2. การเปลี่ยนขนาดรูปภาพเป็นนิ้ว
ขั้นตอนที่ 1 เปิดรูปภาพของคุณใน Photoshop โดยคลิก Open หรือไปที่ File แล้วเลือกไฟล์ PNG ที่คุณต้องการบีบอัด.
ขั้นตอนที่ 2 จากนั้นไปที่แท็บ Image แล้วเลือก Image Size.
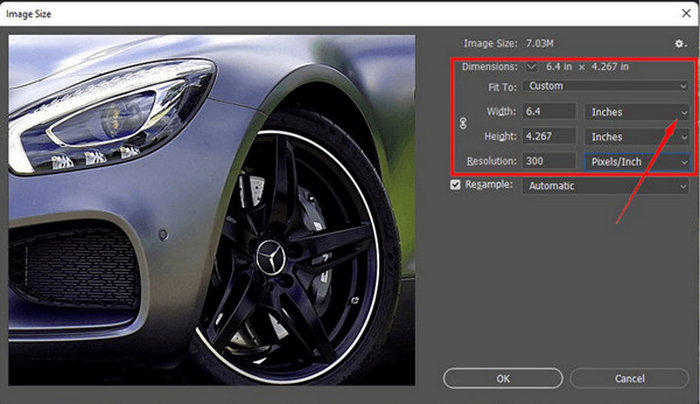
ขั้นตอนที่ 3 ในกล่องโต้ตอบ Image Size ให้เลือก Inches จากเมนูแบบเลื่อนลง หากต้องการกำหนดขนาดเฉพาะเพื่อบีบอัดไฟล์ PNG ให้กรอกค่าในช่องความกว้างและความสูง แล้วคลิก OK เพื่อปรับขนาดรูปภาพ.
ขั้นตอนที่ 4 สุดท้ายให้คลิกปุ่ม Save As ใต้แท็บ File เพื่อบันทึกรูปภาพฉบับสุดท้าย.
ทั้งสองวิธีนี้เหมาะอย่างยิ่งสำหรับนักออกแบบเว็บ ช่างภาพ และศิลปินดิจิทัลที่ต้องการควบคุมรูปภาพของตนอย่างแม่นยำ ชุดเครื่องมือที่ครอบคลุมของ Photoshop ทำให้เป็นโซลูชันที่มีความยืดหยุ่นในการบีบอัดไฟล์ PNG
ข้อดี
- การควบคุมที่ครอบคลุมเหนือการตั้งค่าการบีบอัดและคุณภาพ
- รองรับรูปแบบภาพต่างๆ
- เครื่องมือแก้ไขขั้นสูง
จุดด้อย
- ต้องสมัครสมาชิกเพื่อใช้คุณสมบัติครบถ้วน
- อินเทอร์เฟซที่ซับซ้อนสำหรับผู้เริ่มต้น
ส่วนที่ 5. บีบอัด PNG ด้วยส่วนขยายของ Google
เครื่องมือบีบอัดไฟล์ PNG ใน Google Chrome เป็นเครื่องมือที่ออกแบบมาเพื่อการบีบอัดรูปภาพอย่างรวดเร็วและง่ายดายโดยตรงภายในเบราว์เซอร์ ส่วนขยายนี้เหมาะสำหรับผู้ใช้ที่ต้องการบีบอัดไฟล์ PNG โดยไม่ต้องดาวน์โหลดหรือติดตั้งซอฟต์แวร์เพิ่มเติม
วิธีบีบอัดไฟล์ PNG ด้วยส่วนขยายของ Google
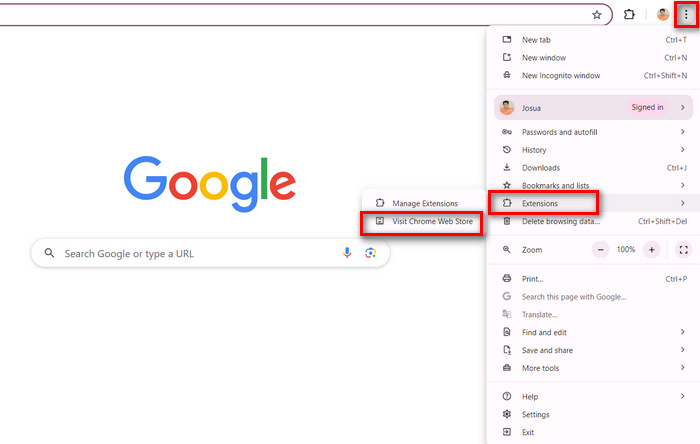
ขั้นตอนที่ 1 ที่มุมขวาบนของเบราว์เซอร์ Google คุณจะเห็นจุดสามจุด ให้คลิก จากนั้นเลือก Extensions และคลิก Visit Chrome Web Store.
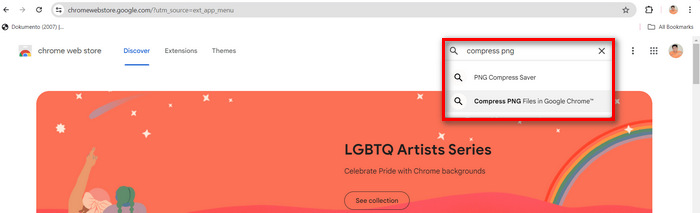
ขั้นตอนที่ 2 จากนั้น ให้ค้นหา Compress PNG Files ใน Google Chrome.
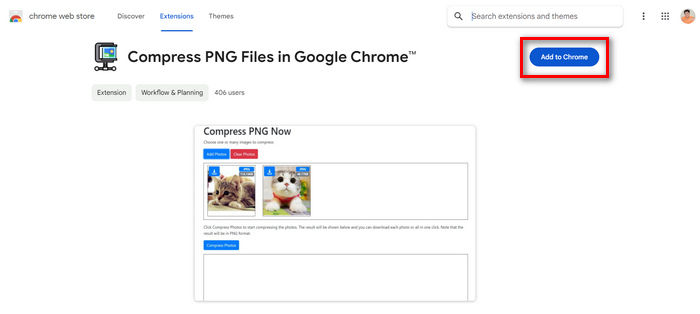
ขั้นตอนที่ 3 ต่อมา คลิก Add to Chrome.
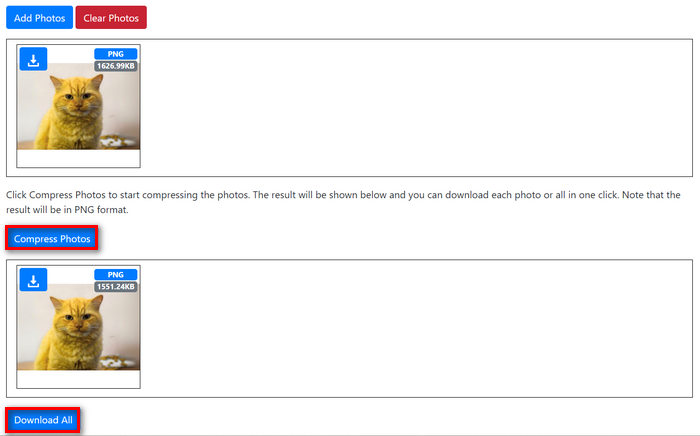
ขั้นตอนที่ 4 เมื่อติดตั้งเสร็จแล้ว คลิกปุ่ม Extension บน Google Chrome ของคุณ แล้วคลิก Add Photos เพื่ออิมพอร์ตไฟล์ PNG ที่คุณต้องการบีบอัด.
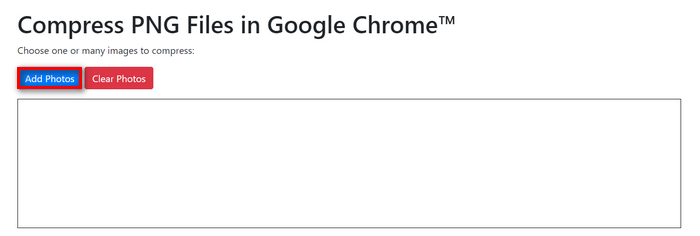
ขั้นตอนที่ 5 จากนั้น คลิกปุ่มบีบอัดเพื่อเริ่มบีบอัดไฟล์ PNG ของคุณ และเมื่อเสร็จแล้ว ให้คลิกปุ่ม Download All.
การใช้ส่วนขยายของ Google Chrome จะทำให้การบีบอัดไฟล์ PNG เร็วขึ้น อย่างไรก็ตาม ส่วนขยายนี้มีอัตราการบีบอัดที่ต่ำกว่า ซึ่งไม่สามารถช่วยแก้ปัญหาด้านการบีบอัดได้
ข้อดี
- เข้าถึงได้ง่ายและใช้งานง่าย
- สามารถบีบอัดไฟล์ PNG แบบเป็นชุดได้
- ฟรี.
จุดด้อย
- อัตราการบีบอัดต่ำกว่า
- ไม่มีคุณสมบัติขั้นสูงและการปรับแต่งสำหรับการบีบอัด
ส่วนที่ 6 คำถามที่พบบ่อยเกี่ยวกับการบีบอัดไฟล์ PNG
จะทราบขนาด PNG ได้อย่างไร?
การทราบขนาดไฟล์ PNG นั้นง่ายมาก คุณเพียงแค่คลิกขวาที่ไฟล์แล้วเลือก Properties เมื่อคุณทำสิ่งนี้บนอุปกรณ์ Windows หรือ Get Info บน Mac ด้วยวิธีนี้ คุณสามารถระบุขนาดไฟล์ PNG ได้อย่างง่ายดาย
PNG มีขนาดไฟล์ใหญ่หรือเปล่า?
ไฟล์ PNG มักจะมีขนาดใหญ่กว่าไฟล์รูปแบบอื่น เช่น JPEG เนื่องจากใช้การบีบอัดแบบไม่สูญเสียข้อมูล ซึ่งช่วยรักษาคุณภาพของภาพและรองรับความโปร่งใส ขนาดไฟล์ที่สูงนี้เกิดจากรูปภาพที่มีรายละเอียดและความละเอียดสูง รวมถึงมีการรวมข้อมูลพิกเซลทั้งหมด ทำให้ไฟล์เหล่านี้เหมาะสำหรับการออกแบบเว็บ งานศิลปะดิจิทัล และการถ่ายภาพ ซึ่งเน้นที่คุณภาพเป็นหลัก
JPEG หรือ PNG ดีกว่า?
การเลือกใช้ระหว่าง JPEG และ PNG ขึ้นอยู่กับกรณีการใช้งานเฉพาะ PNG เหมาะกับรูปภาพที่ต้องการความโปร่งใส เช่น โลโก้และไอคอน หรือเมื่อคุณต้องการกราฟิกคุณภาพสูงโดยไม่สูญเสียรายละเอียด ในทางกลับกัน JPEG เหมาะกับรูปถ่ายและรูปภาพที่ต้องการขนาดไฟล์ที่เล็กกว่า
สรุป
สรุปแล้ว ความจำเป็นในการบีบอัดไฟล์ PNG เกิดจากความต้องการในการเพิ่มประสิทธิภาพเว็บไซต์ ประหยัดพื้นที่จัดเก็บ และปรับปรุงประสบการณ์ของผู้ใช้ ด้วยการทำตามวิธีการในบทความนี้ คุณจะมั่นใจได้ว่ารูปภาพของคุณยังคงมีคุณภาพสูงแม้ผ่านการบีบอัดแล้ว.
-
 รีวิว PicWish Photo Enhancer และเครื่องมือทางเลือกที่ต้องลอง
 ค้นพบความมหัศจรรย์ที่โปรแกรมเพิ่มประสิทธิภาพรูปภาพ PicWish นำมาสู่โลกแห่งการแก้ไขภาพ การตรวจสอบเชิงลึกและการสำรวจทางเลือกที่เป็นไปได้เพื่อให้คุณลอง
-
 วิธีลบข้อความออกจากรูปภาพบน Windows/Mac/Online
 บอกลาข้อความที่กวนใจในภาพของคุณได้เลย! สำรวจวิธีการลบข้อความออกจากรูปภาพด้วยโซลูชันที่ราบรื่นเหล่านี้ซึ่งออกแบบมาเพื่อการลบข้อความได้อย่างราบรื่น
-
 รีวิว Fotor สำหรับการลบพื้นหลังและเครื่องมือเพิ่มประสิทธิภาพภาพถ่าย
 ทุกสิ่งที่คุณต้องรู้เกี่ยวกับ Fotor Background Remover และ Photo Enhancer ดูคุณสมบัติบางอย่างและดูทางเลือกที่แนะนำที่เหมาะกับความต้องการของคุณ