


วิธีแก้ไขความชัดเจนของภาพถ่ายภายในเวลาไม่ถึงนาทีด้วย Tips & Tricks
ทุกคนที่ชื่นชอบการถ่ายภาพย่อมอยากให้รูปที่ตัวเองถ่ายออกมาดูดีที่สุดเมื่อเทียบกับภาพถ่ายของคนอื่น ๆ ด้วยเทคนิคที่หลากหลาย คุณสามารถทำได้ง่าย ๆ ทั้งการเพิ่มความคมชัด และเติมสีสันจัดจ้านเพื่อให้ภาพดูมีรายละเอียดมากขึ้น แล้วถ้าคุณอยากเพิ่มความคมใสให้ภาพล่ะ? หรืออยากทำให้ทุกอย่างดูนุ่มนวลขึ้น? นั่นคือหน้าที่ของเครื่องมือ Clarity ด้วยเครื่องมือนี้ คุณสามารถปรับโทนกลาง (mid-tone) และคอนทราสต์ของภาพ เพื่อเพิ่มมิติและความโดดเด่นให้ภาพดูสวยสะดุดตามากขึ้น สนใจเรียนรู้วิธีทำไหม? ถ้าใช่ ลองอ่านข้อมูลที่เราอธิบายไว้ด้านล่างนี้แล้วมาศึกษาว่าวิธีปรับ Clarity ของรูปภาพต้องทำอย่างไร.

ส่วนที่ 1 วิธีการปรับปรุงความชัดเจนของภาพถ่ายออนไลน์ฟรีโดยการเพิ่มขนาดรูปภาพ
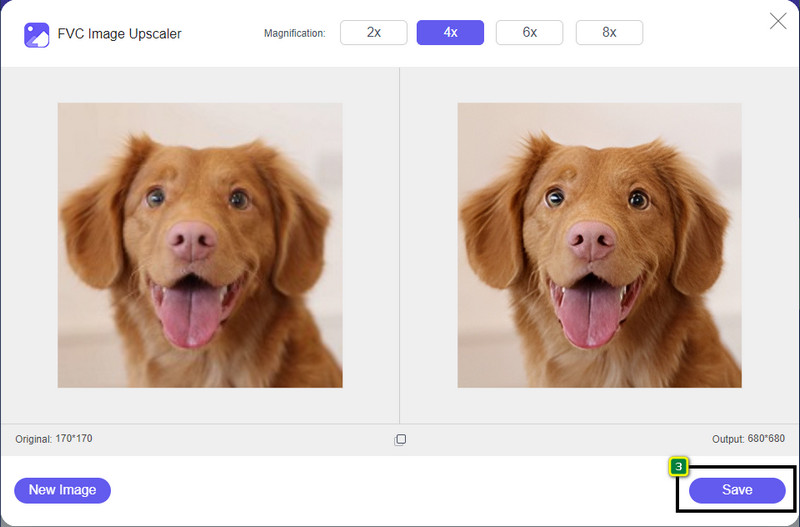
FVC Free Image Upscaler คือแอปปรับความคมชัดของรูปที่ดีที่สุดตัวหนึ่งซึ่งคุณสามารถใช้งานบนเบราว์เซอร์ได้เลย โดยไม่ต้องดาวน์โหลดไฟล์ใด ๆ ลงคอมพิวเตอร์ แอปนี้สามารถปรับแก้คุณภาพรูปภาพและยกระดับคุณภาพรูปให้สวยคมชัดกว่าที่คุณเคยเห็นมาก่อน แม้ว่าคุณจะไม่ถนัดด้านเทคโนโลยี ก็สามารถเรียนรู้วิธีใช้ซอฟต์แวร์นี้ได้ภายในไม่ถึงหนึ่งนาที หากคุณอยากลองใช้ซอฟต์แวร์ตัวนี้ สามารถทำตามคู่มือที่เราให้ไว้ด้านล่างได้เลย.
ขั้นตอนที่ 1. ไปที่เว็บไซต์ทางการของเครื่องมืออัปสเกลตัวนี้โดยคลิกที่ลิงก์นี้.
ขั้นตอนที่ 2. นำเข้ารูปภาพที่คุณต้องการปรับความคมชัดด้วยการคลิกที่ Upload Image จากนั้นจะมีหน้าต่างโฟลเดอร์เปิดขึ้นมา ให้ค้นหาไฟล์ที่ต้องการแล้วกด Open.

ขั้นตอนที่ 3. เมื่ออัปโหลดภาพเสร็จแล้ว ให้เลือกตัวเลือกที่คุณต้องการใช้เพื่อปรับปรุงความคมชัดของภาพ.

ขั้นตอนที่ 4. หลังจากปรับความคมชัดเรียบร้อยแล้ว ให้คลิกปุ่ม Save เพื่อดาวน์โหลดรูปภาพที่คุณปรับแต่งไว้.
ส่วนที่ 2 วิธีเพิ่มความชัดเจนของภาพถ่ายใน Photoshop อย่างรวดเร็ว
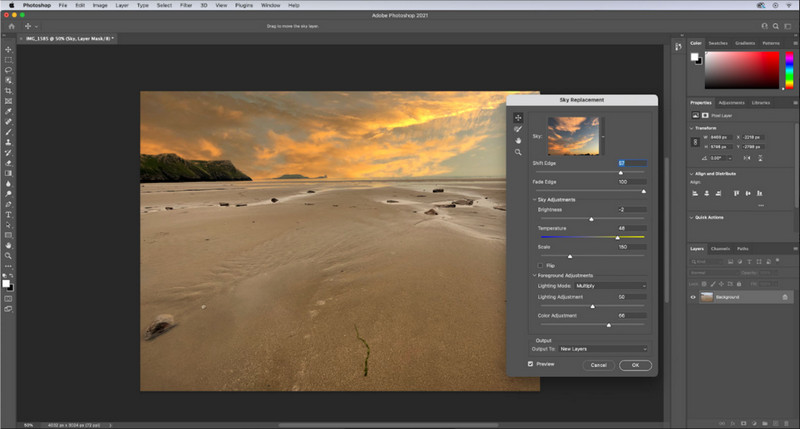
Adobe Photoshop คือแอปปรับความคมชัดของรูปที่ควรดาวน์โหลดหากคุณต้องการเครื่องมือระดับมืออาชีพติดตั้งไว้ในอุปกรณ์ของคุณ เครื่องมือนี้มีฟีเจอร์ปรับแต่งภาพอย่างครบครันเพื่อให้รูปของคุณดูดีขึ้น ด้วยการปรับค่าต่าง ๆ ให้เหมาะสมเพื่อให้คนที่ได้เห็นรู้สึกประทับใจ แทบไม่มีซอฟต์แวร์ตัวไหนให้ประสิทธิภาพได้เทียบเท่ากับโปรแกรมนี้ หากต้องการเพิ่มความคมชัดของภาพ คุณจำเป็นต้องปรับคอนทราสต์และโทนกลาง (mid-tone) แล้วจะทำอย่างไรดี? คัดลอกวิธีการที่เราให้ไว้ด้านล่างไปทำตามได้เลย.
ขั้นตอนที่ 1. ดาวน์โหลด Adobe Photoshop แล้วเปิดโปรแกรม จากนั้นเริ่มอัปโหลดรูปภาพโดยคลิกที่ File แล้วเลือก Open.
ขั้นตอนที่ 2. ที่แถบด้านบนให้คลิก Image จากนั้นไปที่ Adjustment แล้วเลือก Brightness/Contrast.
ขั้นตอนที่ 3. จะมีกล่องโต้ตอบแสดงขึ้นมาบนหน้าจอ ให้ปรับคอนทราสต์ของภาพโดยการเลื่อนแถบสไลเดอร์ คุณสามารถเลื่อนไปมาเพื่อเพิ่มหรือลดค่า ซึ่งจะส่งผลต่อความคมชัดของภาพ.
ขั้นตอนที่ 4. กด OK เพื่อบันทึกการเปลี่ยนแปลงในภาพ ระบบจะใช้ค่าที่คุณปรับโดยอัตโนมัติ.
ส่วนที่ 3 วิธีเพิ่มความชัดเจนของภาพถ่ายใน Adobe Lightroom ในเวลาน้อยกว่าหนึ่งนาที
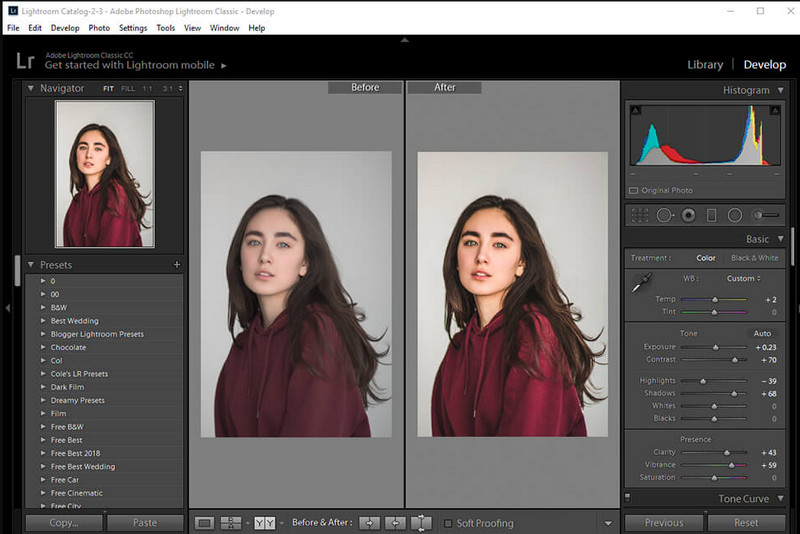
ต่างจาก Photoshop ตรงที่ Adobe Lightroom มีตัวเลือก Clarity ที่ใช้งานได้ดีมาก ซึ่งช่วยให้คุณเพิ่มคุณภาพรูปภาพ และทำให้รายละเอียดสีในภาพชัดขึ้นเมื่อเพิ่มค่า และทำให้ภาพนุ่มนวลขึ้นเมื่อคุณลดค่า Clarity ทั้ง Photoshop และ Lightroom ต่างก็พัฒนาโดย Adobe ดังนั้นคุณจึงมั่นใจได้ว่าผลลัพธ์ที่ได้จะเป็นงานระดับมืออาชีพอย่างแน่นอน คุณสามารถทำตามขั้นตอนต่อไปนี้เพื่อเพิ่ม Clarity ให้ภาพถ่ายและปรับสีของไฟล์ RAW ให้สวยขึ้น.
ขั้นตอนที่ 1. ดาวน์โหลดและติดตั้งซอฟต์แวร์เวอร์ชันทางการจาก Adobe จากนั้นเปิดโปรแกรมแล้วอัปโหลดรูปภาพที่คุณต้องการ.
ขั้นตอนที่ 2. เปิดโมดูล Develop เพื่อเข้าถึงตัวเลือกต่าง ๆ ที่คุณสามารถเริ่มปรับ Clarity ให้กับภาพได้.
ขั้นตอนที่ 3. ใต้หมวด Presence ให้เลื่อน slider ของ Clarity ไปยังเปอร์เซ็นต์ที่คุณต้องการ คุณสามารถปรับตัวเลือกอื่น ๆ เพิ่มเติมได้เพื่อให้ภาพดูมีรายละเอียดและสวยกว่ารูปต้นฉบับ.
ส่วนที่ 4 เคล็ดลับในการแก้ไขความชัดเจนของรูปภาพที่คุณต้องรู้
ตอนนี้คุณมีแอปความคมชัดของรูปภาพที่ดีที่สุดแล้วที่คุณสามารถใช้บนเว็บ และข้อมูลต่อไปนี้จะให้คำแนะนำเกี่ยวกับการปรับความคมชัดของภาพแบบออฟไลน์
เคล็ดลับ 1. อย่าใช้ความชัดเจนมากเกินไป!
เราหมายถึงอะไรโดยนี้? วิธีเหล่านี้จะไม่เพิ่มความชัดเจนให้กับภาพของคุณมากเกินไป เพราะจะทำให้ภาพกลายเป็นภาพหยาบ ทุกคนไม่ชอบมีภาพเหมือนเม็ดเกรน ดังนั้นอย่าเพิ่มมันมากเกินไป นอกจากนี้ อย่าลดความชัดเจนจนเต็มศักยภาพเพื่อหลีกเลี่ยงการทำให้ภาพดูพร่ามัว
เคล็ดลับ 2. ความเปรียบต่างและความชัดเจนไม่เหมือนกัน
คอนทราสต์และความชัดเจนมักรู้จักกันเหมือนกัน แต่ก็ไม่เป็นเช่นนั้น หากคุณปรับความชัดเจนของภาพ แสดงว่าคุณกำลังปรับโทนสีกลางของภาพแล้วปรับเป็นบางพื้นที่ แม้ว่าคุณจะใช้คอนทราสต์ คุณกำลังเปลี่ยนแปลง ไฮไลท์ และแรเงารูปภาพโดยรวม
เคล็ดลับ 3. รู้จุดประสงค์ของความชัดเจนของรูปภาพก่อนเพิ่ม
โปรแกรมแก้ไขรูปภาพหลายรายศึกษาตัวเลือกเหล่านี้เพื่อปรับแต่งเพื่อปรับปรุงภาพ เช่น ความชัดเจน การเปิดรับแสง แกมมา และอื่นๆ อีกมากมาย ดังนั้น หากคุณเป็นผู้ใช้ใหม่ ควรทราบจุดประสงค์ของความชัดเจนก่อนที่จะนำไปใช้กับรูปภาพจะดีกว่า นอกจากนี้ หากคุณอ่านข้อมูลเกี่ยวกับความชัดเจน คุณจะรู้ว่าเป็นตัวเลือกที่เหมาะสมในการปรับแต่งเพื่อทำให้ภาพดูดีขึ้นหรือไม่ ถ้าไม่เช่นนั้นอย่าเพิ่มความชัดเจน
เคล็ดลับ 4. ใช้ความชัดเจนในขนาดใหญ่
หากคุณกำลังจัดการกับภาพขนาดเล็ก การปรับให้คมภาพนั้นดีกว่าการเปลี่ยนความคมชัด มันจะช่วยให้คุณปรับขอบของรูปภาพของคุณให้คมชัดขึ้นอย่างง่ายดายและดีขึ้น แต่ถ้าภาพที่คุณมีคุณคิดว่าเป็นสเกลใหญ่ คุณก็ควรใช้ความคมชัดจะดีกว่า
ส่วนที่ 5. คำถามที่พบบ่อยเกี่ยวกับวิธีการแก้ไขความชัดเจนของรูปภาพ
ทำไมภาพของฉันจึงกลายเป็นเม็ดเล็กหลังจากเพิ่มความชัดเจน
หากคุณตั้งค่าความคมชัดเป็น 100% ความเป็นไปได้ที่จะมีภาพที่เป็นเม็ดเล็กจะเกิดขึ้นอย่างแน่นอน เราขอแนะนำให้คุณตั้งค่าเปอร์เซ็นต์เป็น 40% เป็น 70% คุณสามารถไปที่สูงขึ้นได้ขึ้นอยู่กับความชอบของคุณ
ฉันจำเป็นต้องมีโปรแกรมแก้ไขเพื่อเพิ่มความชัดเจนให้กับภาพถ่ายหรือไม่?
คุณจะต้องดาวน์โหลดหรือใช้ซอฟต์แวร์เพื่อเพิ่มความคมชัดให้กับภาพของคุณ ซอฟต์แวร์จำนวนมากบอกว่าสามารถปรับความคมชัดได้ แต่อย่าหลงกล คุณสามารถใช้ซอฟต์แวร์ที่เราเพิ่มในบทความนี้ได้ในขณะที่เราพิสูจน์ว่าพวกเขาสามารถเปลี่ยนความคมชัดของภาพเพื่อให้มีรายละเอียดมากขึ้นกว่าเดิม
ฉันสามารถเพิ่มคอนทราสต์ให้กับภาพเพื่อให้ชัดเจนได้หรือไม่?
ได้ คุณสามารถเพิ่มคอนทราสต์ให้กับภาพเพื่อให้ชัดเจนและเรียบร้อยยิ่งขึ้น แต่ถ้าคุณต้องการให้แม่นยำมากขึ้นแทนที่จะส่งผลกระทบทั้งภาพ การปรับความคมชัดของภาพนั้นดีกว่า
สรุป
เราหวังว่าบทความนี้จะสอนวิธีแก้ไขความชัดเจนของรูปภาพด้วยเครื่องมือและขั้นตอนต่างๆ ที่เพิ่มเข้ามา ถ้าคุณคิดว่าเราทำได้ดีมาก เราจะรักมันถ้าคุณให้ 5 ดาวด้านล่างนี้ ขอบคุณสำหรับการอ่านบทความนี้!
-
 วิธีเพิ่มความละเอียดของภาพ [5 วิธีในการปรับปรุง]
 มีปัญหาเพราะความละเอียดของภาพต่ำใช่หรือไม่? ไม่ต้องกังวลอีกต่อไป! ที่นี่ เราจะสอนวิธีเพิ่มความละเอียดของภาพให้คุณ
-
 ทำให้ความละเอียดภาพถ่ายของ iPhone ดีขึ้นด้วยเครื่องมือเพิ่มประสิทธิภาพสูงสุด
 คุณต้องการปรับปรุงความละเอียดภาพถ่ายของ iPhone หรือไม่? ในบทความนี้เราจะพูดถึงเครื่องมือที่ดีที่สุดที่คุณสามารถใช้ได้และลูกเล่นอื่นๆ ที่คุณต้องรู้!
-
 การฟื้นฟูรูปภาพแบบเก่าทั้งแบบออนไลน์และออฟไลน์ [ขั้นตอนง่าย ๆ ]
 ต้องการคืนค่ารูปภาพเก่าหรือไม่ ด้วยเครื่องมือเหล่านี้ คุณจะทราบขั้นตอนการกู้คืนภาพถ่ายแบบเก่า อ่านโพสต์นี้เพื่อเรียนรู้วิธีที่ตรงไปตรงมาที่สุด