


วิธีลดขนาดรูปภาพบน Mac ได้อย่างง่ายดาย [คู่มือฉบับสมบูรณ์]
ไม่ต้องกังวลเมื่อคุณต้องจัดการกับไฟล์ภาพขนาดใหญ่บน Mac ของคุณ เพราะมีวิธีแก้ปัญหานี้อยู่
เราเข้าใจดีว่าความจำเป็นในการบีบอัดรูปภาพนั้นช่วยให้จัดการและใช้งานได้สะดวกมากขึ้น บ่อยครั้งหากสังเกตดู คุณจะเห็นว่าบางระบบกำหนดให้เราต้องอัปโหลดไฟล์ภาพตามขนาดไฟล์ที่ระบุไว้ บางเว็บไซต์โหลดช้า และการส่งไฟล์ภาพทางอีเมลก็ใช้เวลานาน ปัญหาเหล่านี้ล้วนมีสาเหตุมาจากไฟล์รูปภาพที่มีขนาดใหญ่ ด้วยเหตุนี้ ในบทความนี้เราจะมาดู 3 วิธีที่ช่วยให้คุณลดขนาดรูปภาพบน Macได้อย่างง่ายดาย ซึ่งจะเป็นประโยชน์อย่างยิ่งเมื่อต้องการปรับปรุงประสิทธิภาพการทำงาน และทำให้มั่นใจได้ว่ารูปภาพของคุณเข้าถึงได้ง่ายและโหลดได้อย่างรวดเร็ว.

ส่วนที่ 1. ลดขนาดภาพบน Mac โดยการลดพิกเซล
อุปกรณ์ Mac มีวิธีที่ยอดเยี่ยมในการลดขนาดรูปภาพโดยใช้เครื่องมือในตัว ด้วยเครื่องมือเหล่านี้ ผู้ใช้ Mac สามารถบีบอัดรูปภาพบนอุปกรณ์ของตนได้อย่างง่ายดายและอิสระทันที
Preview คือเครื่องมือดูภาพและ PDF ในตัว ด้วยเครื่องมือนี้ ผู้ใช้ไม่เพียงแต่จะเพลิดเพลินกับฟีเจอร์ในการดูภาพและไฟล์ PDF เท่านั้น แต่ยังใช้ประโยชน์จากฟีเจอร์การแก้ไขที่ช่วยลดขนาดภาพบน Mac ได้อย่างง่ายดาย นอกจากนี้ ยังสะดวกและใช้งานได้ฟรี ทำให้ทุกคนเข้าถึงได้ หากต้องการทำเช่นนี้ ให้ทำตามขั้นตอนต่อไปนี้:
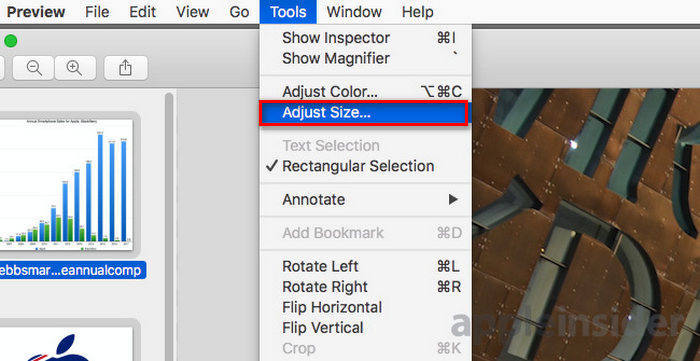
ขั้นตอนที่ 1 ขั้นแรก ให้เปิดแอป Preview บนเครื่อง Mac ของคุณ.
ขั้นตอนที่ 2 จากนั้น เปิดไฟล์รูปภาพที่คุณต้องการบีบอัดขนาด โดยไปที่แท็บ File แล้วคลิกปุ่ม Open.
ขั้นตอนที่ 3 จากนั้น ไปที่แท็บ Tool ในแถบเมนู แล้วคลิก Adjust Size.
ขั้นตอนที่ 4 เลือก Resample Image หากคุณต้องการลดขนาดไฟล์รูปภาพ.
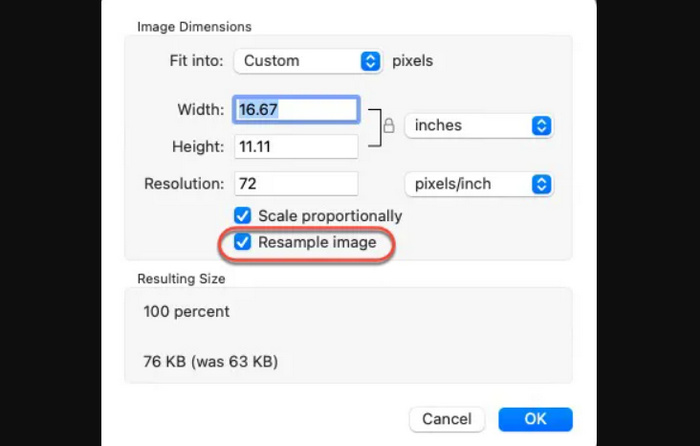
ขั้นตอนที่ 5 ตอนนี้ให้เปลี่ยนค่าของ Resolution ไฟล์ของคุณ เมื่อเปลี่ยนเรียบร้อยแล้ว ระบบจะแสดงขนาดไฟล์ใหม่ที่ด้านล่าง.
หากต้องการรักษาคุณภาพให้สูงที่สุดในขณะที่ลดขนาดรูปภาพบน Mac คุณสามารถลองปรับตั้งค่าความละเอียดแบบลองผิดลองถูกเพื่อดูว่าค่าความละเอียดใดเหมาะกับรูปภาพมากที่สุด ในการทำเช่นนี้ สิ่งสำคัญคือให้เริ่มจากการลดความละเอียดเพียงเล็กน้อย แล้วค่อย ๆ เพิ่มระดับการลดลงไปทีละนิด จนกว่าจะได้จุดสมดุลระหว่างคุณภาพของรูปภาพและขนาดไฟล์.
ส่วนที่ 2. บีบอัดขนาดภาพบน Mac ด้วยทางลัด
หากคุณต้องการวิธีง่ายๆ ในการบีบอัดขนาดรูปภาพบน Mac คุณสามารถใช้ Quick Actions เพื่อปรับปรุงกระบวนการบีบอัดรูปภาพ ด้วยวิธีนี้ คุณสามารถดำเนินการต่างๆ ได้โดยตรงจาก Finder โดยไม่จำเป็นต้องเปิดแอปพลิเคชัน ซึ่งรวมถึงความสามารถในการปรับขนาดรูปภาพอย่างรวดเร็วและมีประสิทธิภาพ นอกจากนี้ ยังมีกระบวนการที่สะดวกสำหรับจัดการงานแก้ไขรูปภาพพื้นฐาน เช่น การปรับขนาด ซึ่งมีประโยชน์สำหรับผู้ที่ต้องการประมวลผลรูปภาพหลายภาพอย่างรวดเร็ว
วิธีใช้ Quick Actions เพื่อลดขนาดไฟล์รูปภาพบน Mac มีดังนี้:
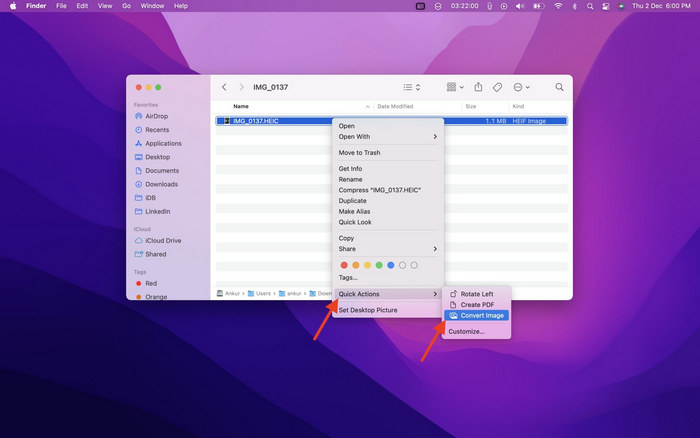
ขั้นตอนที่ 1 คลิกขวาที่รูปภาพที่คุณต้องการบีบอัด.
ขั้นตอนที่ 2 จากเมนูคลิกขวา เลือก Quick Actions แล้วเลือก Convert Image.
ขั้นตอนที่ 3 คลิกช่อง Image Size แล้วเลือก Small, Medium หรือ Large จากเมนูดรอปดาวน์ ซึ่งจะแสดงขนาดไฟล์ที่สอดคล้องกันด้วย.
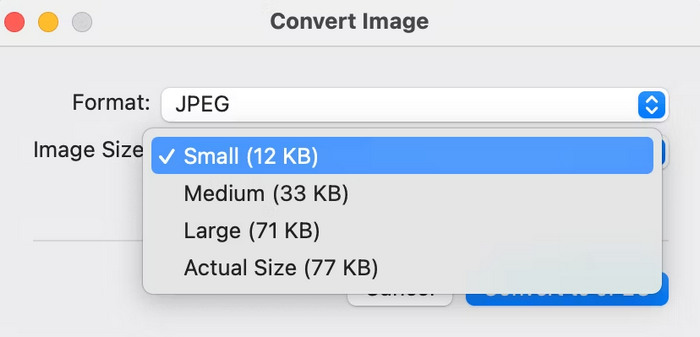
ขั้นตอนที่ 4 ทำเครื่องหมายที่ Preserve Metadata เพื่อเก็บข้อมูลทั้งหมดของรูปภาพนั้นไว้.
หากคุณต้องการปรับแต่งการดำเนินการด่วนและต้องการรวมการดำเนินการด่วนนี้ไว้ในตัวเลือกปรับขนาดที่ใช้บ่อยที่สุด คุณสามารถทำได้ผ่านการตั้งค่าระบบภายใต้ส่วนขยาย นอกจากนี้ หากคุณต้องการลดขนาดรูปภาพบน Mac เพื่อบีบอัดเป็นชุด เพียงเลือกรูปภาพหลายภาพก่อนใช้การดำเนินการด่วนเพื่อประหยัดเวลา
ส่วนที่ 3 วิธีที่เร็วที่สุดในการบีบอัดรูปภาพบน Mac [สูงสุด 40 ภาพในครั้งเดียว]
หากคุณกำลังมองหาเครื่องมือทางเลือกเพื่อใช้ลดขนาดรูปภาพบน Mac คุณสามารถลองใช้ FVC Free Image Compressor ได้ เครื่องมือนี้ให้ใช้งานได้ฟรีทั้งหมด และรองรับการบีบอัดแบบกลุ่ม ซึ่งผู้ใช้สามารถย่อไฟล์รูปภาพได้ครั้งละมากถึง 40 ไฟล์ นอกจากนี้ยังผสานอัลกอริทึมการเพิ่มประสิทธิภาพและการบีบอัดที่ยอดเยี่ยม เพื่อคงคุณภาพของรูปภาพที่บีบอัดแล้วเอาไว้ เมื่อพูดถึงความง่ายในการใช้งาน เครื่องมือนี้เหมาะอย่างยิ่งสำหรับผู้เริ่มต้น เพราะมีเพียงสองขั้นตอน และระบบจะดำเนินการบีบอัดให้อัตโนมัติ.
วิธีบีบอัด JPEG ด้วย FVC Free Image Compressor มีดังนี้
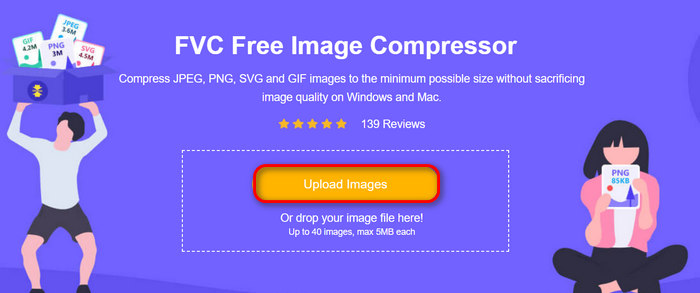
ขั้นตอนที่ 1 ก่อนเริ่มต้น คุณต้องเข้าเว็บไซต์ทางการของเขาก่อน โดยค้นหาคำว่า FVC Free Image Compressor บนเบราว์เซอร์ของคุณ.
ขั้นตอนที่ 2 จากนั้นคลิก Upload Images เพื่ออัปโหลดรูปภาพที่คุณต้องการบีบอัดบน Mac เครื่องมือจะบีบอัดให้โดยอัตโนมัติ.
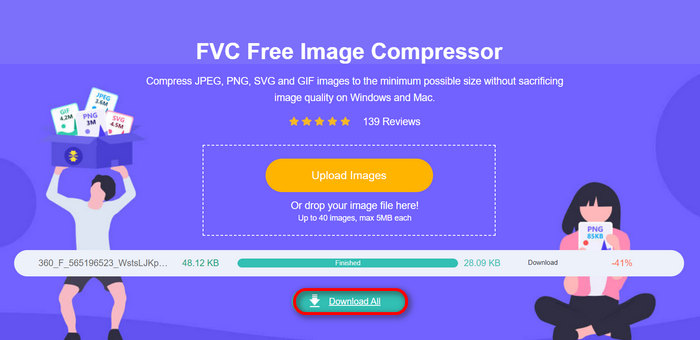
ขั้นตอนที่ 3 หลังการบีบอัด คุณสามารถดูตัวอย่างขนาดไฟล์ใหม่ของรูปภาพที่บีบอัดแล้วได้ สุดท้ายให้คลิก Download All เพื่อบันทึกรูปภาพของคุณ.
ด้วย FVC Free Image Compressor คุณสามารถลดขนาดรูปภาพบน Mac ได้อย่างง่ายดาย รับประกันคุณภาพผลลัพธ์ รองรับไฟล์ภาพหลากหลายรูปแบบ และมีคุณสมบัติสำคัญอื่นๆ เช่น การบีบอัดแบบแบตช์
คุณสามารถใช้ประโยชน์จากคุณสมบัติการบีบอัดแบบแบตช์ของเครื่องมือนี้เพื่อประหยัดเวลา โดยเฉพาะอย่างยิ่งหากคุณมีรูปภาพจำนวนมากที่ต้องบีบอัด สิ่งที่คุณต้องทำคือเพียงนำภาพเหล่านั้นเข้าไปในเครื่องมือพร้อมกัน แต่โปรดทราบว่าคุณสามารถบีบอัดรูปภาพได้มากถึง 40 ภาพในครั้งเดียว ทำให้กระบวนการรวดเร็วและมีประสิทธิภาพมากขึ้น
ส่วนที่ 4 คำถามที่พบบ่อยเกี่ยวกับการลดขนาดภาพบน Mac
คุณปรับขนาดรูปภาพใน Apple Photos ได้อย่างไร?
หากคุณต้องการปรับขนาดรูปภาพใน Apple Photos คุณสามารถใช้ฟีเจอร์แก้ไขในตัวซึ่งคุณสามารถครอบตัดรูปภาพได้ โดยเปิดรูปภาพในแอปแล้วแตะปุ่มแก้ไข จากนั้นแตะเครื่องมือครอบตัดและปรับพื้นที่ที่มองเห็นของรูปภาพ นอกจากนี้ คุณยังสามารถลากมุมของกล่องครอบตัดเพื่อปรับขนาดพื้นที่ที่มองเห็นของรูปภาพหรือเลือกอัตราส่วนภาพที่ตั้งไว้ล่วงหน้าเพื่อการควบคุมที่มากขึ้น
จะทำให้รูปภาพมีขนาดเล็กลงเป็น MB บน Mac ได้อย่างไร?
หากต้องการลดขนาดรูปภาพเป็น MB บน Mac ให้ใช้แอพ Preview เพื่อบีบอัดข้อมูล ซึ่งคุณสามารถลดความละเอียดและขนาดของรูปภาพเพื่อให้ขนาดไฟล์เล็กลงได้ แต่โปรดทราบว่าการลดคุณภาพจะทำให้ขนาดไฟล์เล็กลง แต่อาจส่งผลต่อรูปลักษณ์ของรูปภาพเล็กน้อย
แอพปรับขนาดภาพแบบเป็นชุดสำหรับ Mac คืออะไร?
Batch Photo Resizer เป็นแอป ปรับขนาดรูปภาพแบบแบตช์สำหรับ Mac ที่ยอดเยี่ยม มาพร้อมชุดฟีเจอร์ที่ครบถ้วน เหมาะอย่างยิ่งสำหรับการลดขนาดรูปภาพ ด้วยเครื่องมือนี้คุณสามารถปรับขนาดรูปภาพแบบหลายไฟล์พร้อมกัน ให้เป็นมิติที่ต้องการได้ โดยยังคงคุณภาพให้สูงที่สุดเท่าที่จะเป็นไปได้.
สรุป
โดยสรุปแล้ว การรู้ว่าควรใช้เครื่องมือใดในการลดขนาดรูปภาพบน Macนั้นเป็นสิ่งสำคัญ โดยเฉพาะเมื่อคุณต้องทำงานกับไฟล์ภาพ ดังนั้นไม่ว่าคุณจะใช้เครื่องมือหรือวิธีการใด ทั้งหมดนี้ล้วนช่วยให้คุณบีบอัดรูปภาพได้อย่างมีประสิทธิภาพ พร้อมที่จะใช้ประโยชน์จากเครื่องมือเหล่านี้ในการบีบอัดรูปภาพของคุณแล้วหรือยัง เริ่มเลยวันนี้!
-
 วิธีลดขนาดไฟล์รูปภาพบน iPhone: ขั้นตอนสำหรับ iOS ทั้งหมด
 คุณกำลังประสบปัญหาในการอัพโหลดไฟล์รูปภาพขนาดใหญ่บน iPhone อยู่ใช่หรือไม่ บทความนี้จะเป็นแนวทางในการลดขนาดไฟล์รูปภาพบน iPhone ของคุณ
-
 บีบอัดไฟล์ PNG: 5 วิธีที่ดีที่สุดที่คุณต้องรู้ [2024]
 สงสัยไหมว่าเครื่องมือใดดีที่สุดสำหรับการบีบอัดไฟล์ PNG? บทความนี้จะแนะนำเครื่องมือทั้ง 5 ชนิดให้คุณทราบ และรับคำแนะนำเกี่ยวกับวิธีย่อขนาดไฟล์โดยยังคงรักษาภาพไว้ได้
-
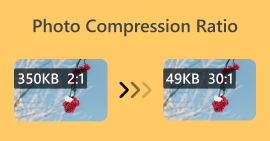 อัตราส่วนการบีบอัดภาพ: ฉันจำเป็นต้องรู้อะไรบ้าง? [รีวิว]
 เรียนรู้ว่าอัตราส่วนการบีบอัดภาพคืออะไรและส่งผลต่อคุณภาพของภาพอย่างไร รวมถึงรับคำแนะนำเกี่ยวกับวิธีเปลี่ยนอัตราส่วนการบีบอัดเมื่อทำไม่ถูกต้อง