


วิธีการบันทึกบน PS4 ผ่านค่าเริ่มต้นและทางเลือกที่ดีที่สุด
PS4 หรือ PlayStation 4 ได้สร้างความประทับใจให้กับเกมเมอร์จำนวนมากด้วยพลังการประมวลผลที่ยอดเยี่ยมและประสิทธิภาพที่สูงนับตั้งแต่เปิดตัวออกมา จนถึงตอนนี้มันก็ยังคงเป็นส่วนสำคัญในชีวิตของเกมเมอร์จำนวนมาก เพราะมีเกมให้เลือกเล่นหลากหลายและทำอะไรได้มากกว่าการเล่นเกมเพียงอย่างเดียว ทีนี้ เวลาเล่นเกมโปรดบน PS4 แน่นอนว่าคุณต้องอยากบันทึกโมเมนต์สุดมันส์เอาไว้แชร์ให้คนอื่นดูใช่ไหม ไม่ว่าคุณจะมีเหตุผลอะไร การรู้ว่าจะอัดหน้าจอ PS4 อย่างไรก็ถือว่าสำคัญมาก และนี่แหละคือเหตุผลที่เรามาช่วยคุณในบทความนี้!
ในโพสต์นี้ เราจะมาอธิบายขั้นตอนต่างๆ ที่คุณต้องปฏิบัติตามเพื่อบันทึกการเล่นเกมของคุณบนคอนโซลที่คุณชื่นชอบโดยใช้วิธีเริ่มต้น พร้อมด้วยทางเลือกที่ดีที่สุดที่คุณสามารถใช้ได้ ดังนั้น โปรดใส่ใจและทำตามอย่างใกล้ชิดเพื่อให้แน่ใจว่าคุณทำได้ถูกต้อง

ตอนที่ 1. วิธีบันทึกหน้าจอ PS4 ในคุณภาพเต็มรูปแบบโดยไม่มีข้อจำกัดนอกเหนือจากวิธีเริ่มต้น
เนื่องจาก PS4 มีข้อจำกัดด้านเวลาในการบันทึก เรามาดูตัวเลือกทางเลือกที่ดีกว่าก่อนเลย เมื่อต้องการบันทึกการเล่นเกมบนคอนโซลของคุณ FVC Screen Recorder ถือเป็นตัวเลือกที่ไว้ใจได้ นี่คือซอฟต์แวร์บนเดสก์ท็อปที่เน้นจับภาพการเล่นเกม รวมถึงหน้าจอ วิดีโอ เสียง โทรศัพท์ และอื่น ๆ อีกมากมาย ด้วยการรองรับการบันทึกแบบไม่เสียคุณภาพที่ 60 เฟรมต่อวินาที คุณจึงสามารถบันทึกเกมเพลย์ได้อย่างลื่นไหลและคมชัด นอกจากนี้ยังเหมาะมากสำหรับคนที่ต้องการบันทึกเกมแบบไม่จำกัดเวลา อีกทั้ง FVC Screen Recorder ยังมาพร้อมฟังก์ชันตัดต่อและแชร์คลิปที่บันทึกแล้วไปยังแพลตฟอร์มต่าง ๆ อย่าง YouTube, Twitter, Facebook, Instagram และอื่น ๆ ได้ด้วย.
สิ่งที่น่าสนใจยิ่งกว่าคือมีการตั้งค่าต่างๆ ให้คุณปรับแต่งการบันทึกให้เหมาะกับความต้องการของคุณได้ ไม่ว่าจะเป็นการปรับการตั้งค่าเอาต์พุต การทำความสะอาดเสียงพากย์ของคุณด้วยการตัดเสียงรบกวน หรือการรวมเว็บแคมของคุณในโหมดภาพซ้อนภาพ เครื่องมือนี้ช่วยคุณได้! นอกจากนี้ ด้วยคุณสมบัติต่างๆ เช่น การถ่ายสแน็ปช็อต การแชร์อย่างรวดเร็วไปยังเว็บไซต์ยอดนิยม และการปรับปรุงประสิทธิภาพ ทำให้เครื่องบันทึกหน้าจอนี้ยังคงเป็นเครื่องมืออเนกประสงค์สำหรับเกมเมอร์ ดังนั้น นี่คือวิธีบันทึกหน้าจอ PS4 โดยไม่มีข้อจำกัดด้านเวลา
ขั้นตอนที่ 1 ขั้นแรก ดาวน์โหลดเวอร์ชันที่ถูกต้องของโปรแกรมบันทึกเกมมาติดตั้งบนคอมพิวเตอร์ของคุณแล้วเปิดโปรแกรมขึ้นมา ก่อนเริ่มบันทึก ให้แน่ใจว่า PS4 ของคุณเชื่อมต่อกับคอมพิวเตอร์เครื่องเดียวกันผ่านการมองหน้าจอระยะไกล (screencast remote play) แล้ว.
ดาวน์โหลดฟรีสำหรับ Windows 7 ขึ้นไปดาวน์โหลดอย่างปลอดภัย
ดาวน์โหลดฟรีสำหรับ MacOS 10.7 ขึ้นไปดาวน์โหลดอย่างปลอดภัย
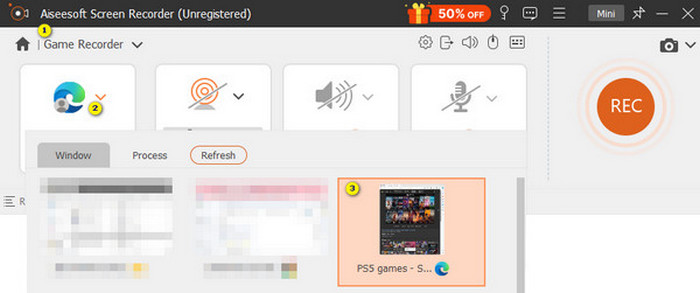
ขั้นตอนที่ 2 เมื่อโปรแกรมบันทึกหน้าจอเปิดขึ้นมา คุณจะมีตัวเลือกหลายอย่างให้ตั้งค่า แต่สำหรับงานนี้ ให้คลิกที่เครื่องมือ Game Recorder จากนั้น เลือกหน้าต่างที่แสดงภาพจาก PS4 โดยคลิกลูกศรในช่องเลือกอันแรก แล้วค่อยปรับการตั้งค่าอื่น ๆ ตามความต้องการของคุณ.
ขั้นตอนที่ 3 เมื่อตั้งค่าทุกอย่างเรียบร้อยแล้ว ให้คลิกปุ่ม REC เพื่อเริ่มบันทึก เมื่อบันทึกเสร็จให้กดปุ่ม Stop หลังจากนั้น ซอฟต์แวร์จะพาคุณไปยังหน้าต่างสำหรับปรับแต่งวิดีโอที่บันทึกไว้ คุณสามารถตัดต่อ (trim) จับภาพหน้าจอ (snapshot) และปรับระดับเสียงได้ตามต้องการ จากนั้นคลิกปุ่ม Done เพื่อดำเนินการบันทึกไฟล์ออกมา.

ขั้นตอนที่ 4 เมื่อวิดีโอถูกบันทึกแล้ว จะมีหน้าต่างใหม่เด้งขึ้นมา คุณสามารถคลิกขวาที่ไฟล์เกมที่บันทึกไว้ แล้วเลือกการตั้งค่าขั้นสูงต่าง ๆ ที่ต้องการ อีกทั้งคุณยังสามารถเลือกแชร์วิดีโอไปยังแพลตฟอร์มที่ต้องการได้ด้วย นี่คือวิธีอัดหน้าจอ PS4 แบบไม่ติดข้อจำกัดเรื่องเวลา.

ส่วนที่ 2 วิธีการบันทึกบน PS4 ด้วยวิธีเริ่มต้น
นอกจากการใช้โปรแกรมบันทึกเกมของบุคคลที่สามแล้ว PS4 เองก็มีตัวบันทึกภาพหน้าจอแบบติดเครื่องมาให้ด้วย ต่อไปมาดูขั้นตอนการใช้ตัวบันทึกในเครื่องของ PS4 กัน.
ขั้นตอนที่ 1 เริ่มจากเปิดเครื่อง PS4 แล้วเลือกเกมที่คุณต้องการบันทึก จากนั้นเข้าเกมและเริ่มเล่น เมื่อพร้อมจะเริ่มบันทึก ให้กดปุ่ม Share บนจอยคอนโทรลเลอร์แบบดับเบิลคลิก (กดเร็ว ๆ สองครั้งติดกัน)
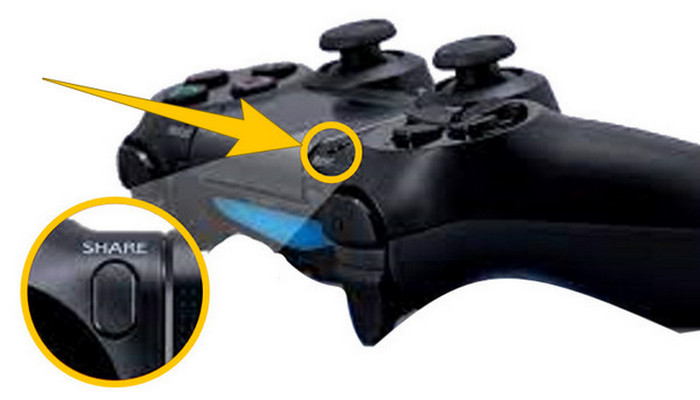
ขั้นตอนที่ 2 ระบบจะแจ้งเตือนว่าการบันทึกได้เริ่มขึ้นแล้ว แล้วจะหยุดบันทึกการเล่นเกมบน PS4 เมื่อไหร่และอย่างไรดี? วิธีหยุดก็คือ กดปุ่ม Share ค้างไว้สักครู่.
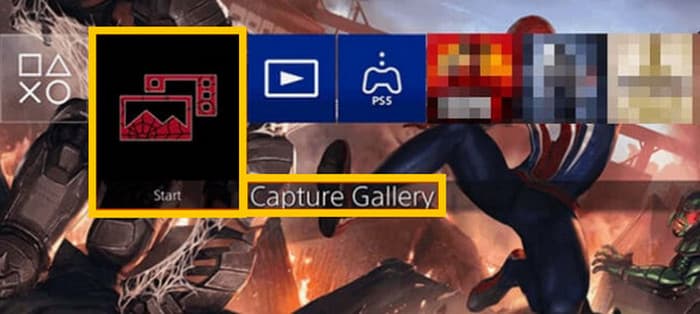
ขั้นตอนที่ 3 หลังจากนั้น ให้เข้าไปดูคลิปที่บันทึกไว้โดยเข้าเมนู Main Menu แล้วเลือก Capture Gallery จากตัวเลือกที่มีอยู่.
ส่วนที่ 3 วิธีการบันทึกการเล่นเกมบน PS4 โดยใช้การ์ดจับภาพ
ทางเลือกอื่นที่ได้รับความนิยมแทนเครื่องบันทึก PS4 แบบเริ่มต้นคือการใช้การ์ดจับภาพ แน่นอน! การ์ดจับภาพจะช่วยให้คุณเชื่อมต่อ PS4 ของคุณกับอุปกรณ์อื่นและให้คุณบันทึกทุกอย่างบน PS4 ของคุณได้ หากคุณไม่ทราบเกี่ยวกับเรื่องนี้ โปรดอ่านต่อไปและทำตามคำแนะนำด้านล่าง
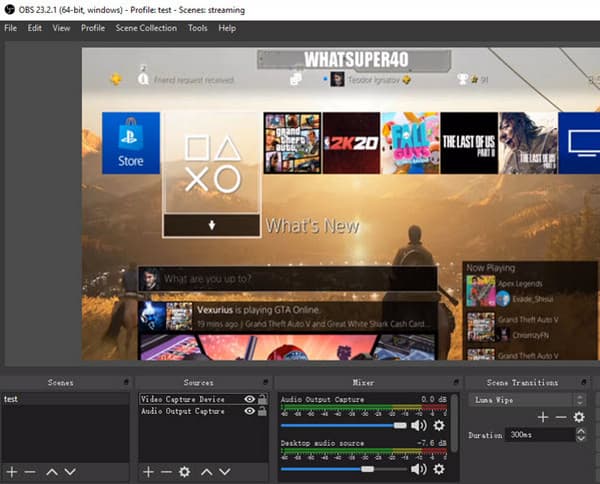
ขั้นตอนที่ 1 เชื่อมต่อการ์ดจับภาพ (capture card) เข้ากับ PS4 คอมพิวเตอร์ และจอมอนิเตอร์ทีวีของคุณผ่านสาย HDMI จากนั้นตรวจสอบให้แน่ใจว่าคอมพิวเตอร์ของคุณติดตั้งโปรแกรม OBS ไว้แล้ว เพื่อให้การบันทึกทำงานได้.

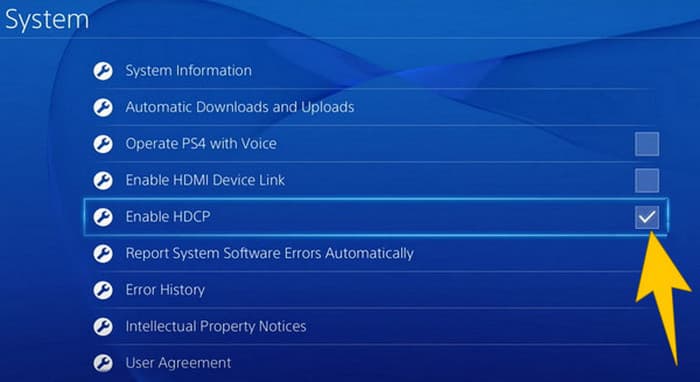
ขั้นตอนที่ 2 จากนั้น ตั้งค่า PS4 ของคุณโดยไปที่เมนู Settings เลือก System แล้วไปที่ System Information จากตรงนั้นให้ติ๊กเลือกตัวเลือก Enable HDCP.
ขั้นตอนที่ 3 เปิดโปรแกรม OBS แล้วไปที่ Source Section>Plus>Video Capture Device จากนั้นคลิกปุ่ม OK ตอนนี้คุณสามารถคลิกปุ่ม Start Recording แล้วเริ่มเล่นเกมเพื่อให้ OBS บันทึกเกมเพลย์ได้ เมื่อจะหยุดบันทึก ให้คลิกปุ่ม Stop Recording เมื่อใดก็ได้ตามต้องการ.
ส่วนที่ 4 คำถามที่พบบ่อยเกี่ยวกับการบันทึกบน PS4
จะหยุดการบันทึกการเล่นเกมบน PS4 ได้อย่างไร?
หากต้องการหยุดการบันทึกการเล่นเกมโดยใช้เครื่องบันทึกเริ่มต้นของ PS4 คุณเพียงแค่กดปุ่ม Share ค้างไว้ หลังจากกดปุ่มนี้ คุณจะเห็นตัวเลือก Stop Recording บนหน้าจอของคุณ คลิกเพื่อใช้งาน
ฉันต้องมีซอฟต์แวร์พิเศษเพื่อใช้การ์ดจับภาพบน PS4 ของฉันหรือไม่?
ได้ จำเป็นต้องมีซอฟต์แวร์เฉพาะอย่างเช่น OBS เพื่อให้การ์ดจับภาพทำงานร่วมกับ PS4 ได้ นอกจากนั้น คุณยังต้องมีอุปกรณ์แสดงผลและสายเชื่อมต่อ เช่น สาย HDMI และสาย USB เพื่อให้การบันทึกหน้าจอผ่านการ์ดจับภาพทำงานได้สำเร็จ.
ข้อจำกัดในการบันทึกบน PS4 บนเครื่องบันทึกในตัวคืออะไร
เป็นเรื่องจริงที่ฟีเจอร์บันทึกในตัวของ PS4 มีข้อจำกัดในการบันทึก ข้อจำกัดที่พบบ่อยที่สุดคือความยาวและคุณภาพของเกมเพลย์ที่บันทึกไว้
สรุป
ข้างต้นคือแนวทางเกี่ยวกับวิธีอัดหน้าจอ PS4 คุณสามารถบันทึกได้ด้วยวิธีมาตรฐานจากตัวเครื่อง PS4 เอง ใช้การ์ดจับภาพ หรือใช้ซอฟต์แวร์เฉพาะทางที่ออกแบบมาสำหรับบันทึกหน้าจอ อย่างไรก็ตาม อย่าลืมคำนึงถึงข้อจำกัดของตัวบันทึกในเครื่องของ PS4 ซึ่งอาจทำให้คุณไม่สามารถบันทึกได้นานและมีคุณภาพสูงตามต้องการ ในทำนองเดียวกัน การ์ดจับภาพก็อาจมีข้อจำกัดตามสเปกฮาร์ดแวร์และพื้นที่จัดเก็บในคอมพิวเตอร์ของคุณ ดังนั้น ถ้าคุณไม่อยากให้ข้อจำกัดเหล่านี้มาขวางทางการบันทึกเกมของคุณ ให้เลือกใช้ FVC Screen Recorder เป็นตัวเลือกหลักจะดีที่สุด.
-
 วิธีบันทึก Epic Stunts, Clutches หรือ Tutorials บน Minecraft
 คุณต้องการทราบวิธีการบันทึกการแสดงโลดโผนของคุณใน Minecraft หรือไม่? จากนั้นอ่านบทความนี้ตามที่เรามีให้
-
 วิธีการบันทึกบน PS5 ใน 2 วิธีแบบไร้ขีดจำกัด
 บทความนี้จะแนะนำวิธีบันทึกการเล่นเกมบน PS5 ที่ยอดเยี่ยมให้คุณทราบ มีวิธีเริ่มต้นและวิธีไม่จำกัดในคู่มือบทความนี้ อ่านเลยตอนนี้!
-
 คำแนะนำโดยละเอียดเกี่ยวกับวิธีการเล่นไฟล์ MKV บน PS4 [อัปเดต 2024]
 โดยการอ่านบทความนี้ คุณจะได้เรียนรู้วิธีเล่น MKV บน PS4 และวิธีแปลงไฟล์วิดีโอในกรณีที่วิดีโอไม่เล่น