


วิธีการใช้ Facebook Screenshot : 6 วิธีปฏิบัติที่สามารถทำได้
As an avid user of social media platforms like Facebook, I know that sharing information has become an integral part of the overall social media experience. As always, when looking for something interesting, you need to be able to share news from your mutual friends, and the best way to do it is by taking a Facebook screenshot. Regardless of the context of the screenshot, doing it is very easy. Through this guide, we will delve into different ways to take a screenshot on Facebook using different devices, varying from mobile to desktop devices. In the process of knowing how to do it, we also included the use of a reliable third-party software tool that can do all screenshot-type regardless of the device you are using. To find more information on the software tool, read this article until the end and take Facebook screenshots like a pro.

ส่วนที่ 1 วิธีการจับภาพหน้าจอ Facebook บนอุปกรณ์ต่างๆ
ก่อนจะลงลึกถึงวิธีการจับภาพหน้าจอโพสต์บน Facebook คุณต้องตัดสินใจก่อนว่าจะใช้เครื่องใด สำหรับบทความนี้ เราได้ตัดสินใจแยกอุปกรณ์แต่ละเครื่องออกจากกัน และจัดทำคู่มือทีละขั้นตอนโดยเริ่มจาก Windows, Mac, iPad/iPhone, Samsung Galaxy และ Android อุปกรณ์แต่ละชนิดอาจมีข้อแตกต่างกันเล็กน้อยในแง่ของการจับภาพหน้าจอ และยิ่งไปกว่านั้น การใช้เครื่องดังกล่าวบนแพลตฟอร์มโซเชียลมีเดียอย่าง Facebook อีกด้วย
Windows
สำหรับ Windows มีหลายวิธีในการจับภาพหน้าจอบน Facebook ไม่ว่าผู้ใช้จะใช้ Windows 7 หรือใหม่กว่าก็ตาม การปฏิบัติตามขั้นตอนด้านล่างจะช่วยให้คุณจับภาพหน้าจอได้อย่างมีประสิทธิภาพโดยใช้วิธีที่ง่ายที่สุด นอกจากนี้ ขั้นตอนด้านล่างยังใช้ฟีเจอร์ Snipping Tool ของ Windows ในการจับภาพหน้าจอ Facebook
Step 1. From your Windows Start Menu, search and open the Snipping Tool software.
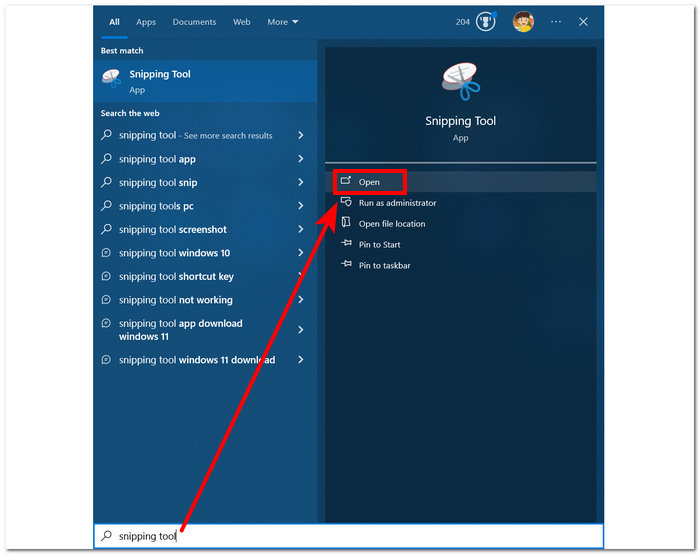
ซอฟต์แวร์ Snipping Tool ได้รับการติดตั้งไว้ล่วงหน้าใน Windows ของคุณแล้ว
Step 2. Once the Snipping Tool software is open, proceed to click on the Mode drop-down button to access the snipping features. For this case, you can select the Rectangular Snip.
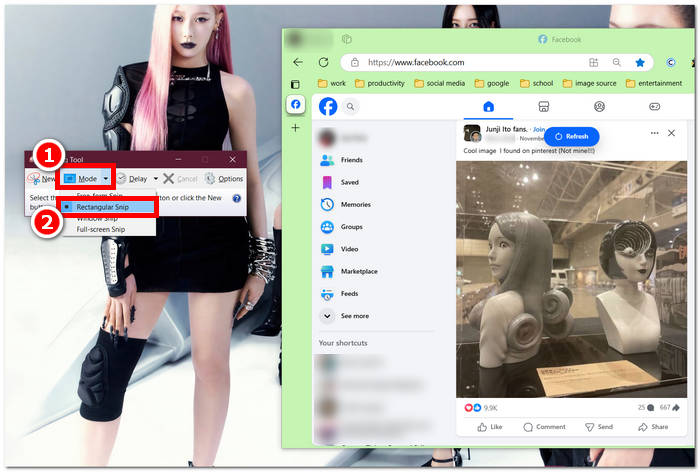
หากคุณต้องการพื้นที่รูปร่างที่กำหนดเองในสแนปช็อตของคุณ ให้เลือกการตัดแบบฟรีฟอร์ม หากคุณต้องการพื้นที่หน้าจอเป็นรูปสี่เหลี่ยมผืนผ้า ให้เลือกการตัดแบบสี่เหลี่ยมผืนผ้า หากคุณต้องการจับภาพหน้าจอของหน้าต่างหรือแท็บใดแท็บหนึ่ง ให้เลือกการตัดแบบหน้าต่าง หากต้องการจับภาพหน้าจอ Windows ทั้งหมด ให้เลือกการตัดแบบเต็มหน้าจอ
Step 3. Once you click on the Rectangular Snip, you can select the area on your Facebook web that you want to include in your screenshot. Once you've done this, a Snipping Tool window will appear containing your selected screenshot. Within that, you can customize your screenshot by adding text, highlights, annotating words, and more.
Step 4. To finish the process, click the Save button in the upper part of the Snipping Tool window.

Mac
การจับภาพหน้าจอเนื้อหาบน Facebook อาจแตกต่างกันไปในอุปกรณ์ Mac และผู้ใช้ Windows อย่างไรก็ตาม สำหรับกรณีนี้ เราจะแนะนำให้ผู้ใช้ทำตามคำสั่งคีย์ลัดพื้นฐานบนคีย์บอร์ด Mac เท่านั้น
Step 1. Using your Mac devices, open your Safari web browser and proceed to the Facebook website.
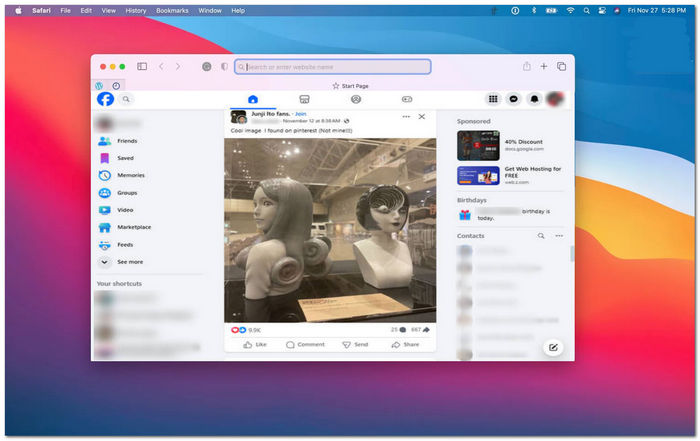
Step 2. On your Mac keyboard, to screenshot your Facebook webpage, hold down the following command + shift + 4.

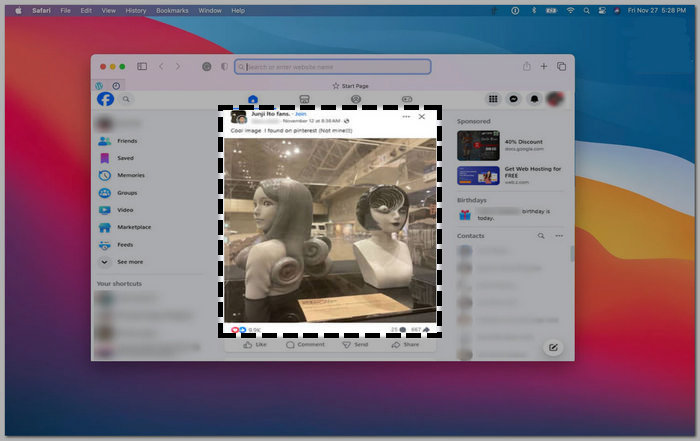
Step 3. Using your cursor, click, hold, and drag onto the area you want to capture.
Step 4. Release the cursor to instantly screenshot the Facebook consent using your Mac’s Safari web browser.
ไอแพด/ไอโฟน
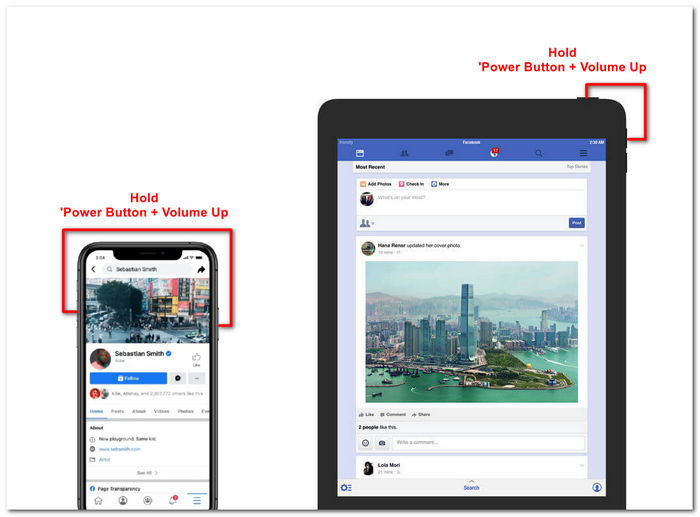
การจับภาพหน้าจอบนอุปกรณ์พกพาเช่น iPad หรือ iPhone นั้นทำได้ง่าย เนื่องจากทั้งสองอุปกรณ์ใช้ปุ่มเปิดปิดและปุ่มเพิ่มระดับเสียงร่วมกันเท่านั้น ไม่ว่าคุณจะใช้ iPad หรือ iPhone คุณสามารถทำตามขั้นตอนต่อไปนี้ได้
Step 1. Open your iPhone or iPad’s Facebook App and browse through your feed to find a post or perhaps a screenshot of Facebook story content.
Step 2. Once you are all set, take a screenshot of Facebook content; hold your device's Power Button + Volume Up button to capture it and have it saved in your Photos App.
ซัมซุง กาแล็คซี่
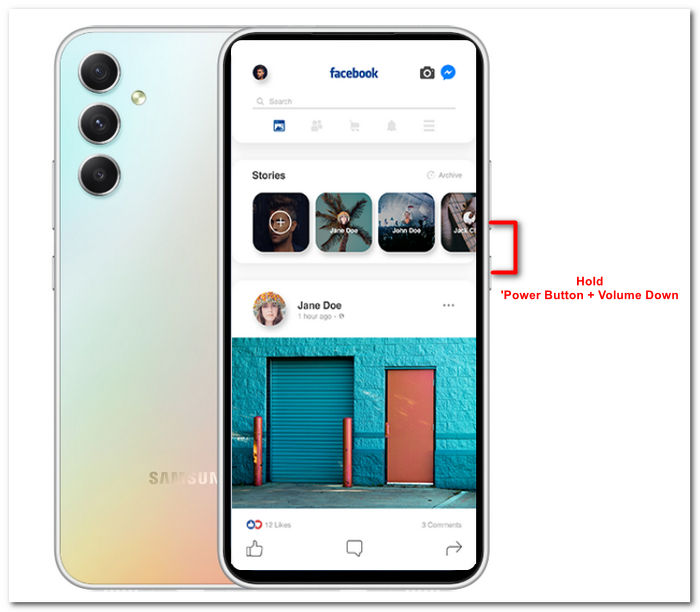
หากคุณใช้ Samsung Galaxy และไม่ทราบวิธีจับภาพหน้าจอในแอป Facebook ขั้นตอนต่อไปนี้จะช่วยคุณได้
Step 1. Through your Samsung Galaxy device, open your Facebook App and look for content within the platform you want to save as a screenshot to your device.
Step 2. Once you find the Facebook content you want to capture, hold your Power Button + Volume Down to screenshot it effectively.
It can also help you how to screenshot Samsung-specific models, like S23. You can use it to solve all your screenshot problems.
Android
ขั้นตอนการจับภาพหน้าจอจะแตกต่างกันไปตามอุปกรณ์ Android และ iOS เนื่องจากอุปกรณ์ Android จะใช้ปุ่มลดระดับเสียงแทนปุ่มเพิ่มระดับเสียง หากต้องการจับภาพหน้าจอ Facebook ได้อย่างง่ายดาย ให้ทำตามขั้นตอนด้านล่าง
Step 1. Open the Facebook mobile app on your Android device and browse your timeline for content you want to save as a screenshot in your Gallery.
Step 2. Once you find one, hold your mobile’s Power Button and Volume Down to screenshot it and save it directly in your Gallery App.

ส่วนที่ 2. เครื่องบันทึกหน้าจอที่ยอดเยี่ยมสำหรับบันทึกทุกอย่างบนเดสก์ท็อป
If you are looking for a more convenient way to take screenshots on your Facebook with a feature that allows you to instantly make edits, annotate, highlight, crop, and more in the screenshot, then you might like using the FVC-picked screen recorder. This free-to-use screen record tool can double function as a tool to record your screen in real time and take a snapshot for easy and quick sharing of content. Moreover, this comprises four screenshot settings to cater to all types of screen capture needs, no matter whether you want to screenshot on Mac or Dell. and using it in the likes of Facebook is beneficial. To learn more about these screenshot features offered by FVC-picked screen record, it is best to show you how to do it.
Step 1. On your desktop, download and install the FVC-picked screen recorder software, then start the application.
ดาวน์โหลดฟรีสำหรับ Windows 7 ขึ้นไปดาวน์โหลดอย่างปลอดภัย
ดาวน์โหลดฟรีสำหรับ MacOS 10.7 ขึ้นไปดาวน์โหลดอย่างปลอดภัย
Step 2. Access your Facebook web using any of your preferred web browsers. In the screen recording tool, click on the Snapshot drop-down menu, then select a screenshot type to capture your Facebook screen.
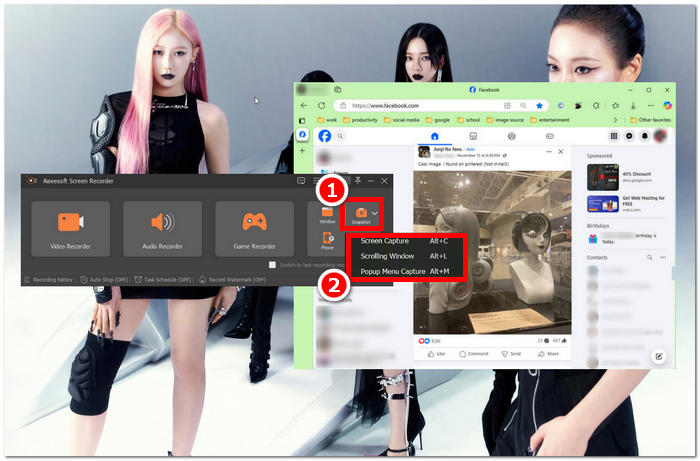
คุณสามารถบันทึกภาพหน้าจอของโฮมเพจทั้งหมดได้โดยใช้ Screen Capture ฟังก์ชัน Scrolling Window จะบันทึกภาพโฮมเพจทั้งหมดตั้งแต่บนลงล่าง ผู้ใช้สามารถเลือกส่วนของเว็บเพจได้ขณะจับภาพหน้าจอที่กำหนดเองด้วย Popup Menu Capture
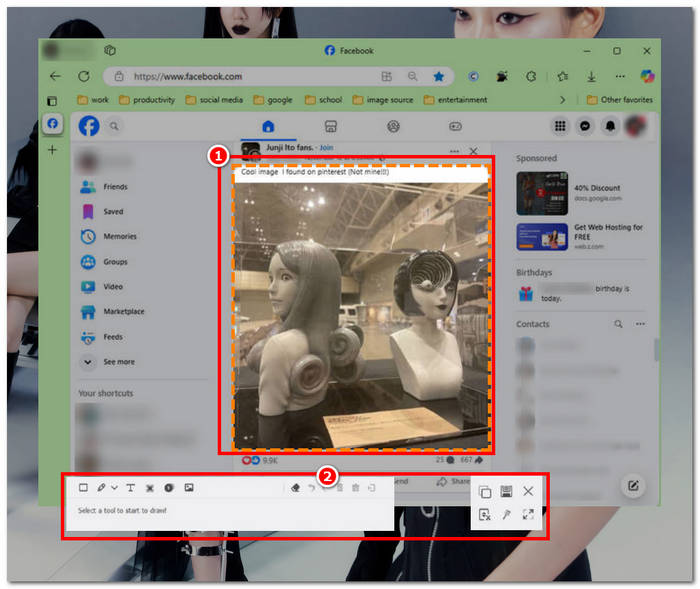
Step 3. In your Facebook timeline, click, hold, and drag your cursor on the area of the Facebook content you wish to capture as a screenshot.
Step 4. Once done, you can utilize the tools below to edit your screenshots before you can download them to your desktop download folder.
ส่วนที่ 3. คำถามที่พบบ่อยเกี่ยวกับภาพหน้าจอบน Facebook
คนอื่นจะสามารถดูได้ไหมว่าฉันแคปภาพหน้าจอโปรไฟล์ โพสต์ หรือรูปถ่ายของพวกเขา?
ไม่ ผู้ใช้รายอื่นจะไม่ได้รับการแจ้งเตือนหากคุณถ่ายภาพหน้าจอโปรไฟล์ Facebook ของพวกเขา คุณเท่านั้นที่สามารถดูได้ เว้นแต่คุณจะแชร์ภาพหน้าจอนั้นกับพวกเขา
สามารถตรวจจับภาพหน้าจอของ Messenger ได้หรือไม่
ไม่ เนื่องจากถือเป็นข้อกังวลเกี่ยวกับความปลอดภัยและการละเมิดข้อมูล Facebook จึงไม่แจ้งให้ผู้ใช้รายอื่นทราบว่าคุณเพิ่งถ่ายภาพหน้าจอการสนทนาของคุณ
การจับภาพหน้าจอเนื้อหาบน Facebook เป็นเรื่องถูกกฎหมายหรือไม่?
ภาพหน้าจอของเนื้อหาบน Facebook ไม่ผิดกฎหมาย เนื่องจากโพสต์สาธารณะเป็นสาธารณะและทุกคนสามารถดูได้ อย่างไรก็ตาม ถือเป็นสิ่งผิดกฎหมายที่จะใช้เนื้อหาหรือโพสต์ของผู้อื่นเพื่อประโยชน์ของตนเองโดยไม่ได้รับอนุญาต
สรุป
Taking screenshots of Facebook content is a great way to store and quickly share it with another user. While it is greatly helpful, learning how to do it, especially using other devices, from desktop to mobile, is also helpful. Through this guide, you learn different approaches to taking a Facebook screenshot using any available device you may have. While it is very convenient, the ability to edit and highlight instantly the screenshot using the FVC-picked screen recorder is the best way to take when you want to crop or highlight a certain part of the screenshot so that you won’t have to edit them later.
-
 วิธีถ่ายภาพหน้าจอบน Alcatel เพื่อจับภาพช่วงเวลา
 กำลังดิ้นรนที่จะจับภาพหน้าจอบนอุปกรณ์ Alcatel ของคุณหรือไม่? ลองใช้โซลูชันซอฟต์แวร์โทรศัพท์มือถือและเดสก์ท็อปนี้ แล้วบันทึกหน้าจอของคุณไว้สำหรับการดูแบบออฟไลน์
-
 วิธีจับภาพหน้าจอใน Minecraft: การจับภาพหน้าจอเกมที่ง่ายที่สุด
 เรียนรู้วิธีที่ง่ายที่สุดในการจับภาพหน้าจอใน Minecraft ลองใช้เครื่องมือในตัวและซอฟต์แวร์บันทึกหน้าจอเพื่อบันทึกการสร้าง Minecraft ของคุณ
-
 วิธีถ่ายภาพหน้าจอบน Chromebook [คำแนะนำทีละขั้นตอน]
 ค้นพบวิธีจับภาพหน้าจอบน Chromebook ของคุณอย่างง่ายดายด้วยคำแนะนำทีละขั้นตอนที่ครอบคลุมนี้ รับคำแนะนำและรับภาพหน้าจอที่สมบูรณ์แบบทันที!