


[แก้ไขแล้ว] 4 วิธีในการจับภาพหน้าจอบน Android
Taking screenshots is one of the most common things we can do with our phones today. When we want to save a picture, a text, or a post that we have seen on our screens while scrolling through it, we take a screenshot of it. Now, if you’re using an Android device and wondering how to take advantage of its screenshot features, we've got you covered! In this article, learn how to take screenshots on Android in 4 ways and make the most out of your device's capabilities. Keep reading to save the content that matters to you by taking a screenshot!

ส่วนที่ 1: วิธีถ่ายภาพหน้าจอบนโทรศัพท์ Android
คุณอาจสงสัยสิ่งนี้ แต่การจับภาพหน้าจอบน Android จะแตกต่างกันไปขึ้นอยู่กับผู้ผลิตอุปกรณ์และเวอร์ชันของระบบปฏิบัติการ ดังนั้น หากคุณเป็นผู้ใช้ Android และไม่รู้ว่าจะใช้วิธีใดเมื่อต้องการจับภาพหน้าจอ ให้ตรวจสอบขั้นตอนด้านล่าง:
วิธีที่ 1: การใช้ปุ่มฮาร์ดแวร์
วิธีทั่วไปในการจับภาพหน้าจอบนอุปกรณ์ Android คือการใช้ฮาร์ดแวร์หรือปุ่มทางกายภาพ เป็นวิธีที่รู้จักมากที่สุดในการจับภาพหน้าจอบน Android เนื่องจากสามารถเข้าถึงได้และสะดวก
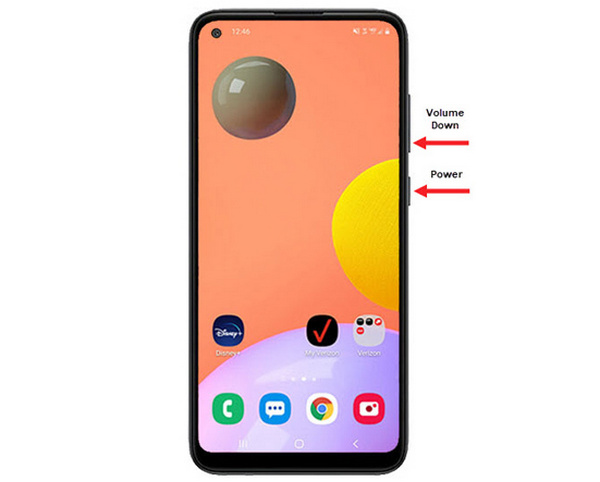
Step 1. First, on your Android phone, press the Volume Down and Power buttons together. Hold them until the screenshot is taken.
Step 2. After that, access your screenshot in the Gallery app.
ดังนั้น หากปุ่มฮาร์ดแวร์ของคุณทำงานอย่างถูกต้อง คุณสามารถทำตามวิธีนี้เพื่อจับภาพหน้าจอบน Android ของคุณได้อย่างง่ายดาย
วิธีที่ 2: การใช้ทางลัด
ปัจจุบัน อุปกรณ์ Android บางรุ่นมีคุณลักษณะภาพหน้าจอในตัวในแผงการตั้งค่าด่วน ซึ่งมีประโยชน์ในการจับภาพหน้าจออย่างรวดเร็ว
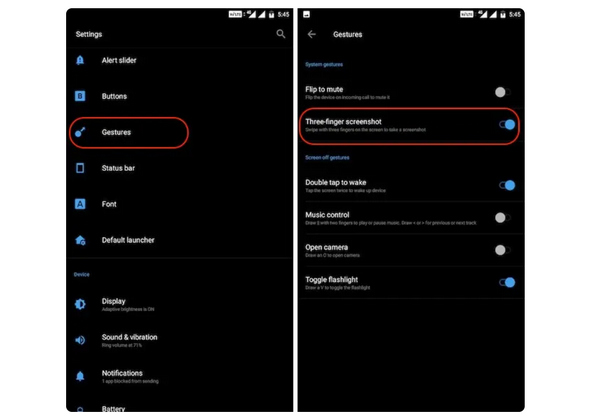
Step 1. First, on your Android phone, go to Settings. Scroll down a bit and select the Gestures or Buttons option.
Step 2. From there, look for the Screenshot option and toggle it on.
Step 3. Finally, in order for you to take a screenshot using this, simply swipe down with your three fingers on the screen you want to capture.
วิธีนี้เหมาะที่สุดเมื่อคุณไม่ต้องการกดปุ่มเพื่อจับภาพหน้าจอ อย่างไรก็ตาม คุณต้องตั้งค่านี้ในการตั้งค่าของคุณก่อน ดังนั้นหากคุณไม่คุ้นเคย เพียงทำตามขั้นตอนข้างต้น
วิธีที่ 3: การใช้ Google Assistant
ในขณะเดียวกัน หากโทรศัพท์ Android ของคุณมี Google Assistant คุณก็สามารถใช้เพื่อจับภาพหน้าจอได้อย่างง่ายดาย
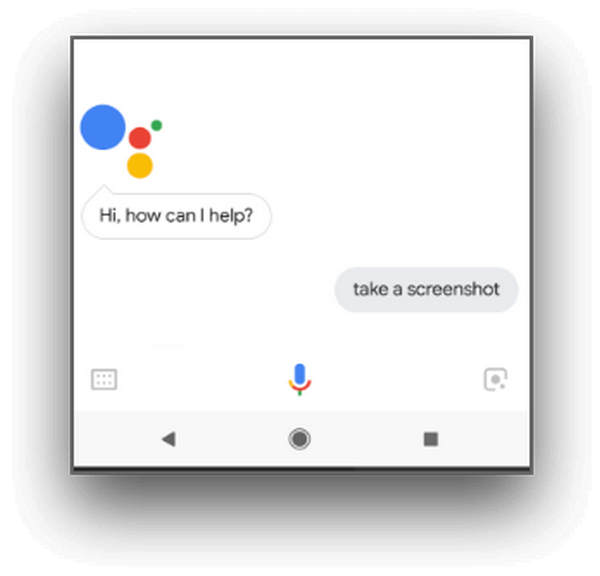
Step 1. First, you need to activate the Google Assistant by pressing the home button or by doing a voice command saying, OK, Hello Google.
Step 2. When activated, say, Take a screenshot or Screenshot.
Note: There must be an animation or you must hear a sound that indicates the screenshot has been taken.
Step 3. You can access your screenshot in your phone's Gallery app in the Screenshots folder.
Note: This is not applicable for all Android devices, so if your phone happens to have a Google Assistant that allows you to take screenshots by giving a voice command, then just follow the steps here.
ส่วนที่ 2: วิธีถ่ายภาพหน้าจอบนแท็บเล็ต Android
หากคุณเป็นเจ้าของแท็บเล็ต Android และหากคุณสงสัยว่าจะจับภาพหน้าจอโดยใช้แท็บเล็ตได้อย่างไร ให้ทำดังนี้:
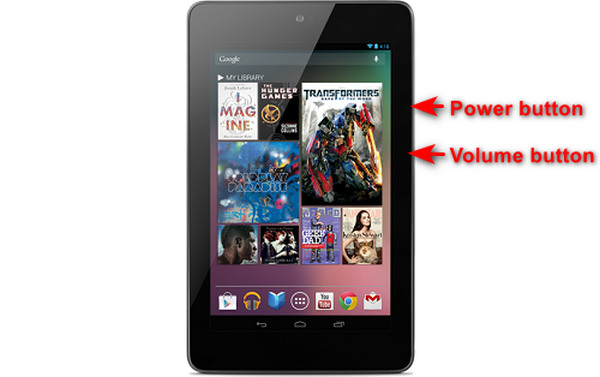
Step 1. On your Android tablet, simultaneously press the Power and the Volume Down button and hold it for a few seconds.
Note: You should be notified if your screenshot has been taken.
Step 2. After that, access your screenshot on your tablet's Gallery in the Screenshots folder.
หากวิธีนี้ใช้ไม่ได้กับแท็บเล็ต Android ของคุณ สิ่งถัดไปที่คุณต้องทำคือใช้แอปจาก Google Play Store เพื่อให้คุณสามารถจับภาพหน้าจอได้
ส่วนที่ 3: วิธีถ่ายภาพหน้าจอบน Android ด้วยคอมพิวเตอร์
Now, if you want to take a screenshot on Android using a computer, maybe because any of those methods are not working on your phone, the best tool you can use for this is the FVC Screen Recorder. This tool is designed to take screenshots of any phone’s screen mirrored to the computer, so it is perfectly compatible with Android devices. So by using its Phone Recorder feature, users can take a screenshot on Android using a computer without any hassle. Moreover, compared to any third-party tool that’s available today, this tool has a very intuitive and user-friendly interface that will surely not trouble you in using it.
Step 1. First, download and open FVC Screen Recorder on your computer.
ดาวน์โหลดฟรีสำหรับ Windows 7 ขึ้นไปดาวน์โหลดอย่างปลอดภัย
ดาวน์โหลดฟรีสำหรับ MacOS 10.7 ขึ้นไปดาวน์โหลดอย่างปลอดภัย
Step 2. Now, click on the Phone recorder option. You’ll find this on the right side of the tool’s window, together with the other 3 options.
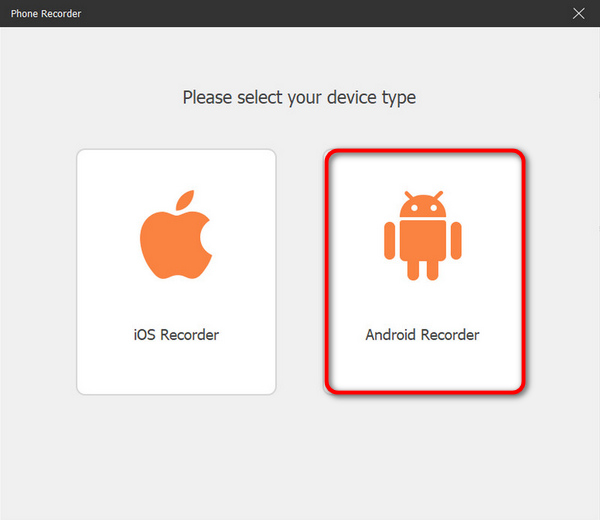
Step 3. Next, click on Android Recorder.
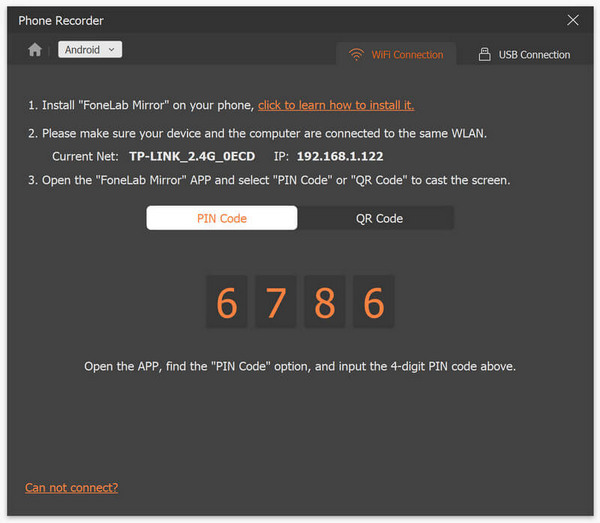
Step 4. To cast your phone’s screen, you can do it through WiFi or USB. However, if you choose WiFi, you can easily cast your phone to the tool’s phone recorder feature on your computer via PIN Code or QR Code.
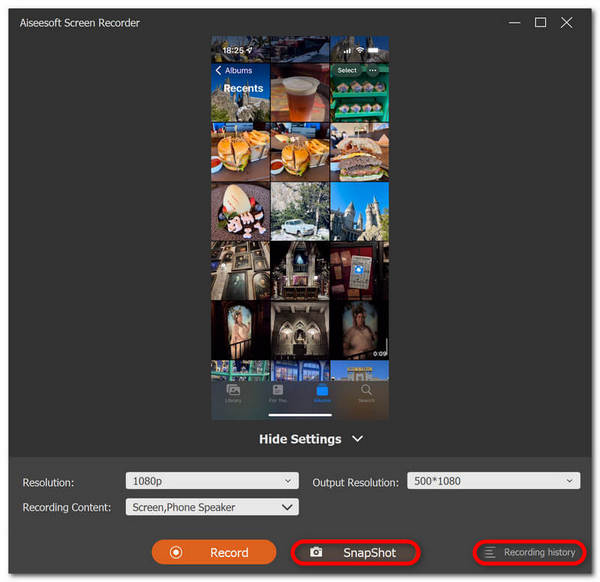
Step 5. When the mirroring is finally enabled, to take a screenshot on your Computer from your Android screen, just click on the Snapshot icon.
Step 6. Lastly, access your screenshot images directly to their designated folder on your Windows computer.
FVC Screen Recorder เป็นเครื่องมือที่สมบูรณ์แบบเมื่อคุณต้องการจับภาพหน้าจอบน Android ด้วยคอมพิวเตอร์ ด้วยการใช้ฟีเจอร์บันทึกโทรศัพท์ ทุกอย่างจะเป็นเรื่องง่ายสำหรับคุณ ตั้งแต่การตั้งค่าทั้งอุปกรณ์ไปจนถึงการจับภาพหน้าจอจริงๆ เครื่องมือนี้มีทุกสิ่งที่คุณต้องการ
ส่วนที่ 4: วิธีถ่ายภาพหน้าจอแบบเลื่อนบน Android
หากคุณต้องการจับภาพหน้าจอของหน้าเว็บหรือการสนทนาที่ยาวนานบน Android ในช็อตเดียว แทนที่จะจับภาพหน้าจอจำนวนมาก ให้ทำตามขั้นตอนด้านล่าง:
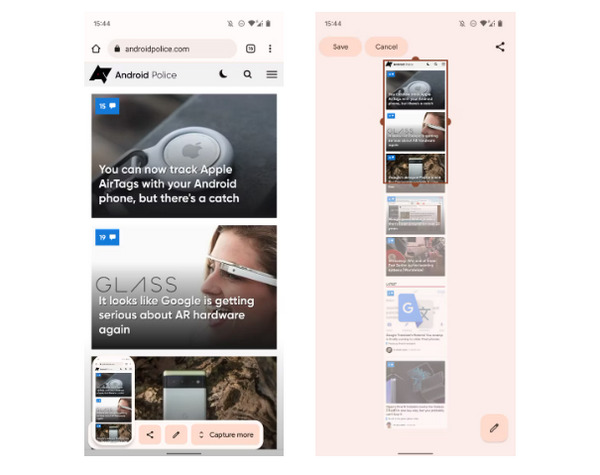
Step 1. First, on your Android phone, take a screenshot.
Step 2. Next, tap the Capture More button after clicking the preview of your screenshot.
Note: When you use the window to expand a screenshot, the system shows a magnifier for better precision.
Step 3. Lastly, tap Save to save your screenshot.
คุณจะไม่ถ่ายภาพหน้าจอเพื่อแสดงทั้งหน้าเว็บหรือบทสนทนาทั้งหมดอีกต่อไป
ส่วนที่ 5: คำถามที่พบบ่อยเกี่ยวกับการจับภาพหน้าจอบน Android
ฉันสามารถเปลี่ยนโฟลเดอร์ภาพหน้าจอเริ่มต้นบนอุปกรณ์ Android ของฉันได้หรือไม่
ใช่. คุณสามารถเปลี่ยนโฟลเดอร์สกรีนช็อตเริ่มต้นได้หากต้องการ สิ่งที่คุณต้องทำคือสร้างโฟลเดอร์ใหม่หรือเลือกโฟลเดอร์อื่นสำหรับภาพหน้าจอของคุณบนโทรศัพท์ Android ของคุณ
จะถ่ายภาพหน้าจอบนโทรศัพท์ Android ได้อย่างไรหากปุ่มฮาร์ดแวร์ไม่ทำงาน
อันดับแรก หากคุณสงสัยว่าคุณยังสามารถจับภาพหน้าจอได้หรือไม่ หากปุ่มฮาร์ดแวร์ของโทรศัพท์ Android ของคุณไม่ทำงาน คำตอบก็คือ ใช่ ดังนั้นในกรณีเช่นนี้ วิธีที่ดีที่สุดคือใช้เครื่องมือบันทึกหน้าจอของบริษัทอื่น เช่น การบันทึกหน้าจอ FVC ซึ่งจะทำให้ผู้ใช้สามารถจับภาพหน้าจอบนโทรศัพท์ Android ของตนได้เพียงแค่ใช้คุณสมบัติเครื่องบันทึกโทรศัพท์
ฉันสามารถใส่คำอธิบายประกอบหรือแก้ไขภาพหน้าจอบนอุปกรณ์ Android ของฉันได้หรือไม่
ใช่. คุณสามารถใส่คำอธิบายประกอบหรือแก้ไขภาพหน้าจอและรูปภาพบนอุปกรณ์ Android ของคุณได้ ซึ่งสามารถทำได้โดยตรงหลังจากที่คุณจับภาพหน้าจอโดยใช้คุณสมบัติการแก้ไขในตัว คุณสามารถเพิ่มข้อความ ภาพวาด ลูกศร และรูปร่างลงในภาพหน้าจอของคุณได้ เช่นเดียวกับการครอบตัด ปรับขนาด และการใช้ตัวกรอง
สรุป
There you have it. Taking screenshots on your Android is just now a piece of cake. You just need to know what method fits your device, and everything will work perfectly for you. So, choose your method and start capturing those memorable moments on your Android today!
-
 วิธีถ่ายภาพหน้าจอบน Mac ได้อย่างง่ายดายด้วยคำแนะนำพื้นฐานนี้
 ต้องการจับภาพหน้าจอบน Mac ของคุณแต่ไม่แน่ใจว่าต้องทำอย่างไร เราเข้าใจคุณแล้ว! เราจะแสดงวิธีที่ง่ายและรวดเร็วที่สุดในการจับภาพหน้าจอและบันทึกภาพหน้าจอของคุณ
-
 วิธีถ่ายภาพหน้าจอบน Mac ได้อย่างง่ายดายด้วยคำแนะนำพื้นฐานนี้
 ต้องการจับภาพหน้าจอบน Mac ของคุณแต่ไม่แน่ใจว่าต้องทำอย่างไร เราเข้าใจคุณแล้ว! เราจะแสดงวิธีที่ง่ายและรวดเร็วที่สุดในการจับภาพหน้าจอและบันทึกภาพหน้าจอของคุณ
-
 สกรีนช็อตวิดีโออย่างง่ายดายด้วยคำแนะนำพื้นฐานนี้ [2024]
 เรียนรู้วิธีถ่ายภาพหน้าจอจากวิดีโอด้วยวิธีง่ายๆ เหล่านี้ได้อย่างง่ายดาย ทำตามคำแนะนำของเราและเริ่มจับภาพหน้าจอวิดีโอโปรดของคุณทันที!