


เรียนรู้ 4 วิธีในการจับภาพหน้าจอบน Iphone ได้อย่างง่ายดาย
ฟังก์ชันการจับภาพหน้าจอบน iPhone เป็นคุณสมบัติที่มีประโยชน์มากสำหรับพวกเราส่วนใหญ่ เราสามารถทำอะไรได้มากมายด้วยฟังก์ชันนี้ เช่น บันทึกข้อมูลสำคัญ ความทรงจำ และคอนเทนต์ที่น่าสนใจ เรียกได้ว่าเราสามารถจับภาพหน้าจอทุกอย่างที่ปรากฏบนจอของเราได้เลย นอกจากนี้ ยังใช้เพียงไม่กี่ขั้นตอนในการทำ จึงมีโอกาสสูงที่ทุกคนจะเรียนรู้ได้ อีกทั้งความสามารถในการแชร์ภาพหน้าจอเหล่านี้ไปยังแอปแชตหรือแพลตฟอร์มโซเชียลมีเดียต่าง ๆ ได้อย่างง่ายดาย ยังช่วยให้เราสื่อสารกันได้อย่างมีประสิทธิภาพ และยังเป็นวิธีที่ดีในการมีปฏิสัมพันธ์กับผู้อื่นอย่างสร้างสรรค์อีกด้วย หากตอนนี้คุณกำลังมองหาวิธีถ่ายภาพหน้าจอ iPhone ด้วย 4 วิธีที่แตกต่างกัน ลองอ่านบทความนี้เพื่อเรียนรู้เพิ่มเติม.

ส่วนที่ 1: ถ่ายภาพหน้าจอบน iPhone ด้วย Face ID
การจับภาพหน้าจอบน iPhone จะแตกต่างกันไปขึ้นอยู่กับรุ่น รุ่นล่าสุดตั้งแต่ iPhone X มีการเปลี่ยนแปลงเมื่อต้องถ่ายภาพหน้าจอเนื่องจากฟังก์ชัน Face ID คุณสมบัตินี้ถูกนำมาใช้กับ iPhone รุ่นใหม่เพื่อให้การตรวจสอบผ่านการจดจำใบหน้าราบรื่นและปลอดภัย ด้วยเหตุนี้ ปุ่มโฮมซึ่งมักใช้ในการจับภาพหน้าจอจึงถูกลบออก บน iPhone ที่มี Face ID การจับภาพหน้าจอยังคงทำได้ง่าย แต่แทนที่จะกดปุ่มโฮม ผู้ใช้จะใช้ปุ่มทางกายภาพผสมกันเพื่อให้ได้ผลลัพธ์เดียวกัน
สิ่งที่คุณต้องปฏิบัติตามเมื่อต้องการถ่ายภาพหน้าจอบน iPhone 14 และรุ่นอื่นๆ ด้วย Face ID:
ขั้นตอนที่ 1. ก่อนอื่น ให้กดปุ่ม ด้านข้าง (Side) และปุ่ม เพิ่มเสียง (Volume up) พร้อมกัน.
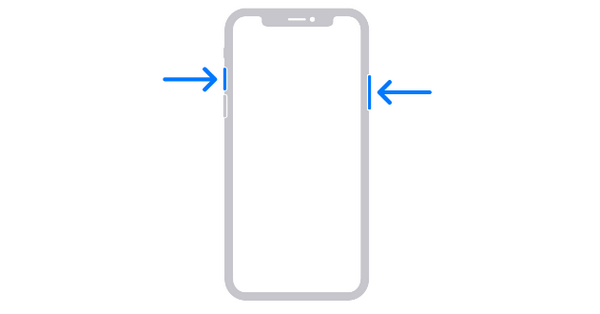
ขั้นตอนที่ 2. หลังจากนั้น ให้ปล่อยทั้งสองปุ่มอย่างรวดเร็ว.
นี่เป็นวิธีทั่วไปในการจับภาพหน้าจอบน iPhone โดยเฉพาะรุ่นใหม่ล่าสุด
ส่วนที่ 2: ภาพหน้าจอบน iPhone พร้อมปุ่มโฮม
ในขณะเดียวกัน หากคุณใช้ iPhone ที่มีปุ่มโฮม เช่น iPhone SE รุ่นที่ 1, iPhone 5, 6, 7 และ 8 คุณจะต้องใช้วิธีดั้งเดิมในการจับภาพหน้าจอ วิธีนี้เกี่ยวข้องกับการกดทั้งปุ่มเปิดปิดและปุ่มโฮมเท่านั้น เมื่อทำเช่นนี้ iPhone ของคุณจะได้รับแจ้งให้จับภาพสิ่งที่แสดงบนหน้าจอในปัจจุบัน เป็นวิธีที่ง่ายและรวดเร็วในการถ่ายภาพหน้าจอ และเป็นคุณสมบัติมาตรฐานของ iPhone มาอย่างยาวนาน
ขั้นตอนที่ 1. กดปุ่ม ด้านข้าง (Side) และปุ่ม โฮม (Home) พร้อมกัน.
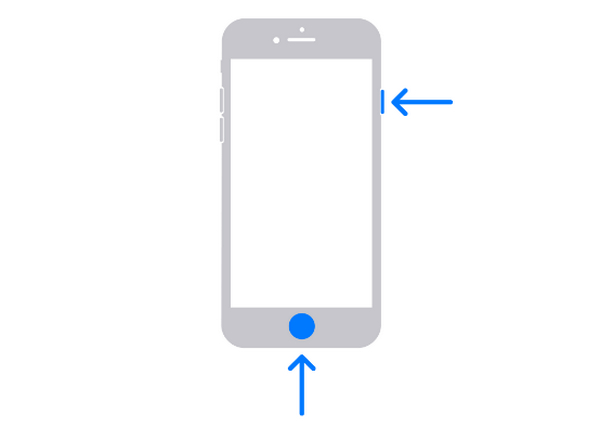
ขั้นตอนที่ 2. ปล่อยทั้งสองปุ่มทันที.
นอกจากนี้ ในวิธีนี้ การแสดงตัวอย่างจะปรากฏขึ้นชั่วครู่ แตะเพื่อเปิดหรือปัดไปทางซ้ายเพื่อปิด
ดังนั้น หากคุณยังคงใช้ iPhone ที่มีปุ่มโฮม วิธีการแบบคลาสสิกนี้ยังคงเป็นวิธีที่ดีที่สุดในการจับภาพหน้าจอบน iPhone
ส่วนที่ 3: ภาพหน้าจอบน iPhone โดยไม่มีปุ่มใด ๆ
หาก iPhone ของคุณไม่มีปุ่มบางปุ่ม หรือฟังก์ชันการถ่ายภาพหน้าจอทำงานได้ไม่ดี การใช้เครื่องมือจากผู้พัฒนารายอื่นอย่าง FVC Screen Recorder ก็ถือเป็นทางเลือกที่ดีในการถ่ายภาพหน้าจอ iPhone ได้อย่างง่ายดาย เครื่องมือนี้ช่วยให้คุณจับภาพสิ่งที่อยู่บนหน้าจอ iPhone ได้อย่างสะดวกโดยไม่ต้องพึ่งปุ่มกด เพียงทำไม่กี่ขั้นตอน และเมื่อเซ็ตค่าเรียบร้อยแล้ว คุณก็แค่คลิกทุกครั้งที่ต้องการถ่ายภาพหน้าจอจาก iPhone ของคุณ สุดท้าย ด้วยหน้าตาโปรแกรมที่ใช้งานง่าย ผู้ใช้จะไม่รู้สึกสับสนเหมือนกับโปรแกรมอัดหน้าจอบางตัวที่มีอินเทอร์เฟซซับซ้อน.
คำแนะนำในการถ่ายภาพหน้าจอบน iPhone โดยไม่ต้องใช้ปุ่มใดๆ มีดังนี้
ขั้นตอนที่ 1. ดาวน์โหลดและเปิดโปรแกรม FVC Screen Recorder บนคอมพิวเตอร์ Windows ของคุณ.
ดาวน์โหลดฟรีสำหรับ Windows 7 ขึ้นไปดาวน์โหลดอย่างปลอดภัย
ดาวน์โหลดฟรีสำหรับ MacOS 10.7 ขึ้นไปดาวน์โหลดอย่างปลอดภัย
ขั้นตอนที่ 2. จากนั้น ที่ด้านขวาของหน้าต่างโปรแกรม ซึ่งแสดงพร้อมกับตัวเลือกอื่นอีก 3 ตัว ให้คลิกที่ตัวเลือก Phone Recorder.
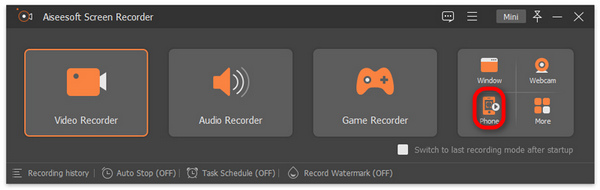
ขั้นตอนที่ 3. หลังจากนั้น ให้คลิกตัวเลือก iOS Recorder.
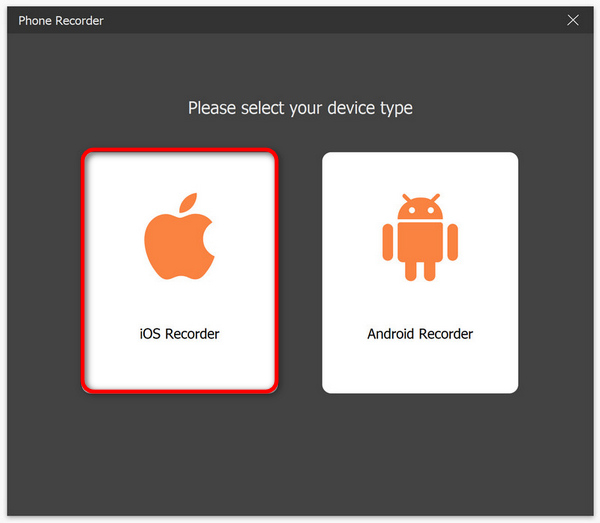
ขั้นตอนที่ 4. จะมีหน้าต่างใหม่ที่มีคำแนะนำบนหน้าจอปรากฏขึ้น และคุณจะถูกถามให้เลือกระหว่าง Screen Mirroring หรือ Audio Mirroring ในกรณีนี้ให้เลือก Screen Mirroring.
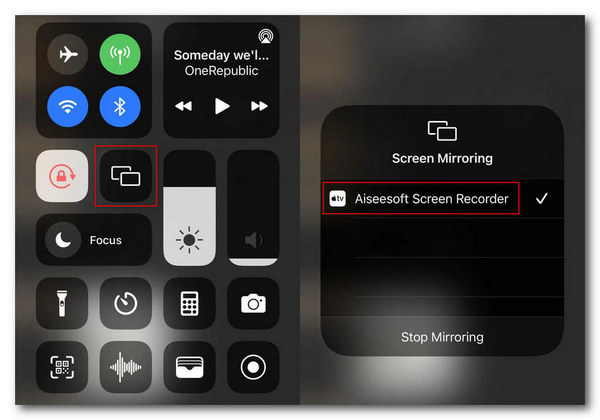
ขั้นตอนที่ 5. จากนั้น บน iPhone ของคุณ ให้เปิด ศูนย์ควบคุม (Control Center) แตะ Screen Mirroring เพื่อเปิดรายการแบบดรอปดาวน์ แล้วแตะเลือก Aiseesoft Screen Recorder เพื่อเชื่อมต่อ iPhone เข้ากับคอมพิวเตอร์.
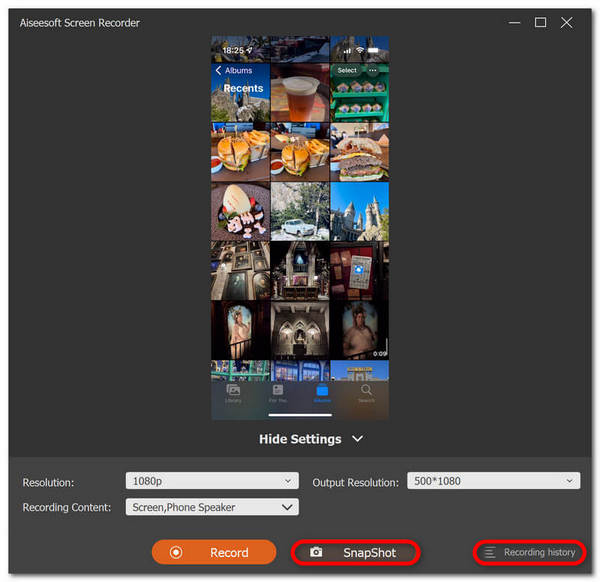
ขั้นตอนที่ 6. สุดท้าย หากต้องการถ่ายภาพหน้าจอ iPhone ให้คลิกที่ไอคอน Snapshot และภาพหน้าจอเหล่านี้จะถูกบันทึกลงในโฟลเดอร์ของระบบ Windows บนคอมพิวเตอร์โดยอัตโนมัติ.
เป็นเรื่องจริงที่การถ่ายภาพหน้าจอบน iPhone โดยใช้เครื่องมือบันทึกหน้าจอ FVC จะกลายเป็นเรื่องง่ายเนื่องจากมีอินเทอร์เฟซที่ใช้งานง่ายและปฏิบัติตามได้ง่าย ดังนั้นเครื่องมือนี้จึงกลายเป็นเครื่องมือที่ต้องมีสำหรับทุกคนที่กำลังมองหาวิธีที่เชื่อถือได้ในการจับภาพหน้าจอบน iPhone
ส่วนที่ 4: จับภาพหน้าจอบน iPhone โดยการแตะ
สำหรับ iPhone ที่รุ่นเริ่มต้นด้วย iPhone 8 ไปจนถึงล่าสุด มีวิธีอื่นในการถ่ายภาพหน้าจอ สำหรับบางคน โปรแกรมนี้ให้ความสะดวก แต่สำหรับบางคน การตั้งค่าจะซับซ้อนเล็กน้อย อย่างไรก็ตาม คุณลักษณะนี้ช่วยให้ผู้ใช้สามารถจับภาพหน้าจอได้ด้วยการแตะบนหน้าจอ ทำให้ไม่จำเป็นต้องคลิกด้วยปุ่มทางกายภาพหรือใช้แอปพลิเคชันภายนอกอื่นๆ
ขั้นตอนที่ 1. ก่อนอื่น บน iPhone ของคุณ ให้เข้าไปที่ การตั้งค่า (Settings).
ขั้นตอนที่ 2. จากนั้น เลื่อนลงไปด้านล่างและมองหาเมนู การช่วยการเข้าถึง (Accessibility).
ขั้นตอนที่ 3. ต่อมา ภายในเมนู Accessibility ให้มองหา การสัมผัส (Touch) แล้วแตะเข้าไป.
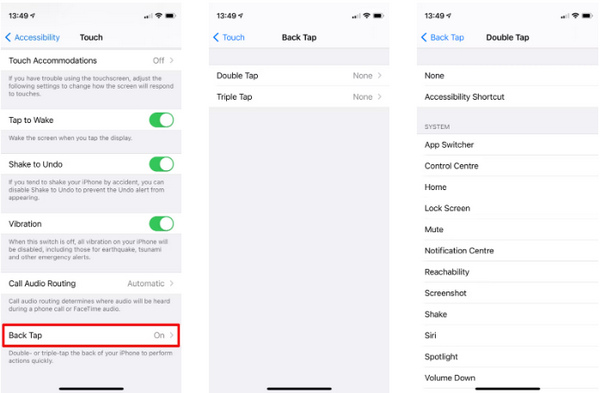
ขั้นตอนที่ 4. เลื่อนลงอย่างช้า ๆ แล้วที่ด้านล่างสุดคุณจะพบเมนู แตะด้านหลัง (Back Tap) ให้แตะเข้าไป.
หมายเหตุ: ในหน้านี้คุณจะมีตัวเลือก 2 แบบ คือจะตั้งให้แตะสองครั้ง (Double Tap) หรือแตะสามครั้ง (Triple Tap) เพื่อใช้ในการถ่ายภาพหน้าจอ iPhone ด้วยฟีเจอร์นี้.
ขั้นตอนที่ 5. สุดท้าย คุณจะเห็นรายการการทำงานต่าง ๆ ที่มีให้เลือก เนื่องจากคุณต้องการใช้เพื่อถ่ายภาพหน้าจอ ให้เลือก Screenshot จากรายการ.
ด้วยการเปิดใช้งานและใช้งานคุณสมบัติในตัวนี้จาก iPhone ของคุณ คุณสามารถจับภาพหน้าจอบน iPhone ของคุณได้อย่างมีประสิทธิภาพ ทำให้รวดเร็วและใช้งานง่ายยิ่งขึ้น อย่างไรก็ตาม การตั้งค่านี้อาจยุ่งยากเล็กน้อยสำหรับผู้ใช้ iPhone บางราย
ส่วนที่ 5: คำถามที่พบบ่อยเกี่ยวกับการจับภาพหน้าจอบน iPhone
จะเกิดอะไรขึ้นกับภาพหน้าจอบน iPhone
หลังจากที่คุณถ่ายภาพหน้าจอบน iPhone ภาพหน้าจอจะถูกจัดเก็บหรือบันทึกในคลังภาพโดยอัตโนมัติ เพื่อให้คุณเข้าถึงสิ่งนี้ได้ คุณต้องเปิด Photos แล้วเลือก Albums เลื่อนลงมาเล็กน้อย และในประเภทสื่อ ให้คลิกที่ภาพหน้าจอ
การจับภาพหน้าจอโดยใช้ท่าทางสัมผัสจะทำให้แบตเตอรี่ iPhone ของฉันหมดเร็วขึ้นหรือไม่
ไม่เลย. แม้ว่ากิจกรรมใดๆ ก็ตามที่เราทำบน iPhone จะเป็นเรื่องจริงที่ใช้พลังงานแบตเตอรี่ อย่างไรก็ตาม การใช้ท่าทางการแตะเพื่อจับภาพหน้าจอบน iPhone จะไม่ส่งผลต่ออายุการใช้งานแบตเตอรี่ของ iPhone มากนัก โปรดทราบว่าท่าทางเหล่านี้ได้รับการออกแบบมาเพื่อให้ iPhone ของคุณมีประสิทธิภาพ ดังนั้น จึงใช้พลังงานแบตเตอรี่ของ iPhone เพียงเล็กน้อยเท่านั้น และจะไม่ทำให้หมดเร็วขึ้น
การใช้ท่าทางสัมผัสเพื่อจับภาพหน้าจอจะรบกวนฟังก์ชันอื่นๆ บน iPhone ของฉันหรือไม่
ไม่ การใช้ท่าทางการแตะเพื่อจับภาพหน้าจอบน iPhone ของคุณจะไม่ส่งผลต่อฟังก์ชันอื่นๆ ของอุปกรณ์ของคุณ เนื่องจากคุณสมบัติประเภทนี้ได้รับการออกแบบมาให้แตกต่างและไม่ก้าวก่ายเพื่อให้แน่ใจว่าจะไม่ทำให้เกิดปัญหาหรือความขัดแย้งกับคุณสมบัติอื่นๆ การกระทำหรือคำสั่งบน iPhone ของคุณ
สรุป
โดยสรุป การเรียนรู้วิธีต่าง ๆ ในการถ่ายภาพหน้าจอ iPhone นั้นมีประโยชน์อย่างมาก โดยเฉพาะสำหรับผู้ใช้มือใหม่ที่อยากลองใช้งาน นอกจากนี้ ยังอาจมีบางกรณีที่ผู้ใช้รู้สึกสับสนว่าจะเลือกใช้วิธีไหนดี เพราะมีหลายวิธีให้เลือก ทั้งการกดปุ่ม การใช้ท่าทางแตะด้านหลัง และการใช้เครื่องมือจากผู้พัฒนารายอื่น ในตอนนี้ให้เลือกเทคนิคการถ่ายภาพหน้าจอที่เหมาะกับ iPhone ของคุณมากที่สุด แล้วเริ่มจับภาพหน้าจอของคุณได้เลย!
-
 วิธีถ่ายภาพหน้าจอบน Mac ได้อย่างง่ายดายด้วยคำแนะนำพื้นฐานนี้
 ต้องการจับภาพหน้าจอบน Mac ของคุณแต่ไม่แน่ใจว่าต้องทำอย่างไร เราเข้าใจคุณแล้ว! เราจะแสดงวิธีที่ง่ายและรวดเร็วที่สุดในการจับภาพหน้าจอและบันทึกภาพหน้าจอของคุณ
-
 วิธีแก้ไขภาพหน้าจออย่างง่ายดาย [คู่มือสำหรับผู้เริ่มต้น]
 กำลังมองหาวิธีแก้ไขภาพหน้าจอบนอุปกรณ์ต่างๆ อยู่ใช่ไหม? คุณมาถูกทางแล้ว ในบทความนี้ เรียนรู้วิธีการต่างๆ ที่จัดไว้ให้เพื่อความสะดวกของคุณ
-
 ภาพหน้าจอบน Windows โดยไม่ต้องพิมพ์หน้าจอ [คู่มือปี 2025]
 กำลังมองหาวิธีจับภาพหน้าจอบน Windows โดยไม่ต้องพิมพ์หน้าจอ บทความนี้ทำให้มันง่ายสำหรับคุณ อ่านตอนนี้และจับภาพหน้าจอของคุณได้อย่างง่ายดาย!