

วิจารณ์อย่างกว้างขวางในการแก้ปัญหาไม่ซิงค์ [เสียงและวิดีโอ]
คุณมีโปรเจกต์รายงานออนไลน์สำหรับชั้นเรียนในวันพรุ่งนี้ คุณกำลังมองหาแอปพลิเคชันหรือซอฟต์แวร์ที่ดีที่สุดที่สามารถใช้บันทึกวิดีโอของคุณเพื่อให้ได้รายงานที่ต้องส่งในวันพรุ่งนี้ แต่แทนที่จะได้คำตอบให้ปัญหา กลับกลายเป็นความวุ่นวายและปัญหาที่ทำให้คุณคิดมาก เพราะเสียงกับภาพไม่ตรงกัน คุณไม่ต้องกังวลกับสถานการณ์นี้ เพราะถือเป็นวันโชคดีของคุณ บทความนี้ได้รวบรวมทุกอย่างที่คุณต้องรู้เพื่อแก้ไขปัญหานี้แล้ว.

ส่วนที่ 1 เหตุใดเสียงจึงไม่ซิงค์กับวิดีโอ
เสียงและวิดีโออาจไม่ซิงค์กันด้วยเหตุผลหลายประการ ได้แก่ การออกอากาศหรือการเชื่อมต่อระหว่างกล่องรับสัญญาณเคเบิล/ดาวเทียมของคุณอาจเป็นปัญหาได้เมื่อดูรายการทีวี เครื่องเล่น DVD หรือ Blu-ray DiscTM ที่ไม่น่าเชื่อถือหรือตัวแผ่นดิสก์อาจถูกตำหนิหากคุณมีอุปกรณ์เหล่านี้เชื่อมต่อกับทีวีของคุณ หากระบบโฮมเธียเตอร์ของคุณเชื่อมต่อกับทีวีผ่านสายออปติคัล คุณอาจสังเกตเห็นว่าเสียงแล็กที่ต้องแก้ไขด้วยตนเอง ในทางกลับกัน การตั้งค่าทีวีของคุณอาจถูกตำหนิ
ส่วนที่ 2 3 เครื่องมือที่ได้รับการพิสูจน์ที่ดีที่สุด: วิธีซิงค์เสียงและวิดีโอ
1. ใช้ Video Converter Ultimate
มีหลายวิธีและซอฟต์แวร์ที่พร้อมใช้งานออนไลน์ที่สามารถช่วยแก้ปัญหานี้ได้ และนี่เป็นหนึ่งในเครื่องมือที่ดีที่สุดที่เราแนะนำให้ใช้ ดาวน์โหลด FVC Video Converter Ultimate บนคอมพิวเตอร์ของคุณ ซึ่งเป็นซอฟต์แวร์ที่มีคุณสมบัติหลากหลายที่ช่วยเพิ่มประสิทธิภาพวิดีโอคลิป หนึ่งในคุณสมบัติที่นำเสนอสามารถแก้ไขปัญหาการซิงค์เสียงและวิดีโอของคลิปวิดีโอใน Windows 10 - ตัวอย่างเช่น - โดยการปรับการหน่วงเวลา ทำตามขั้นตอนด้านล่างเพื่อทราบวิธีใช้ซอฟต์แวร์:
ขั้นตอนที่ 1: เพื่อดาวน์โหลดซอฟต์แวร์ลงบนเดสก์ท็อปของคุณ ให้คลิกปุ่มดาวน์โหลดฟรี จากนั้นติดตั้งซอฟต์แวร์และปรับแต่งการตั้งค่าตามที่ต้องการ หากทุกอย่างเรียบร้อยแล้ว ให้เปิดซอฟต์แวร์หลังการติดตั้ง.
ดาวน์โหลดฟรีสำหรับ Windows 7 หรือใหม่กว่าดาวน์โหลดอย่างปลอดภัย
ดาวน์โหลดฟรีสำหรับ MacOS 10.7 หรือใหม่กว่าดาวน์โหลดอย่างปลอดภัย
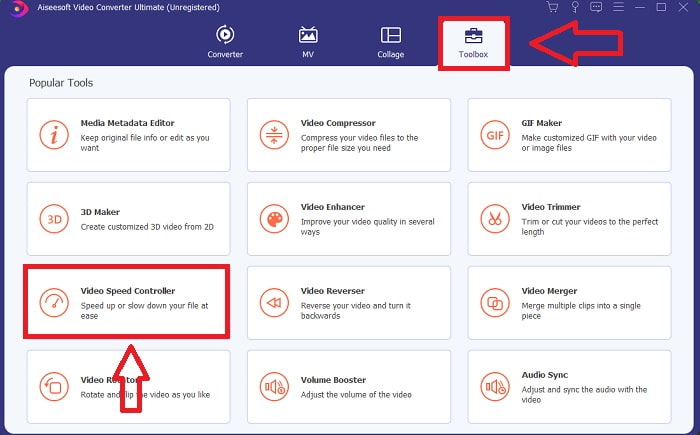
ขั้นตอนที่ 2: บนอินเทอร์เฟซหลัก ให้คลิกฟีเจอร์กล่องเครื่องมือ (Toolbox) แล้วไปที่ Audio Sync.
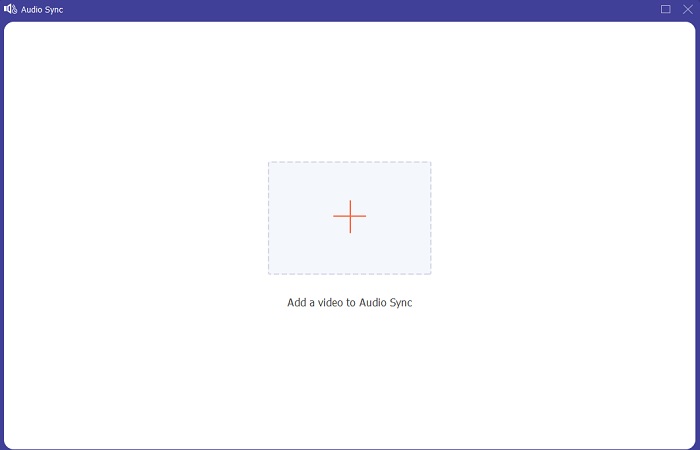
ขั้นตอนที่ 3: เพิ่มไฟล์ใด ๆ ตามต้องการโดยการคลิกปุ่ม + แล้วดำเนินการแก้ไขคลิปวิดีโอต่อไป.
ขั้นตอนที่ 4: ปรับแถบเลื่อน (slider) ของเสียงเพื่อให้ซิงค์กับคลิปวิดีโอ คุณยังสามารถเปลี่ยนอุปกรณ์เอาต์พุตและปรับระดับเสียงของคลิปวิดีโอได้อีกด้วย.
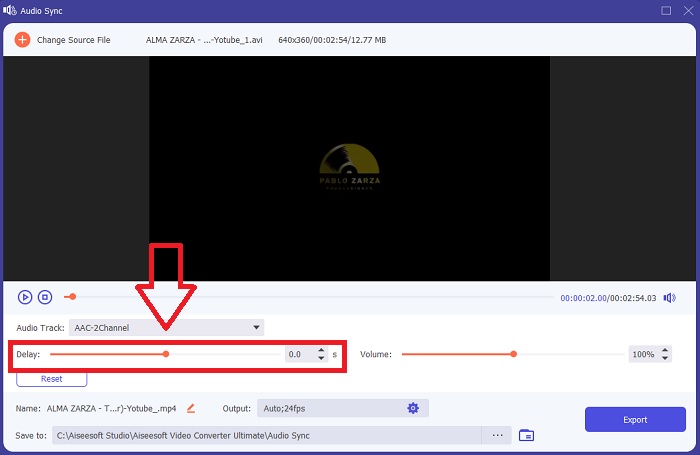
ขั้นตอนที่ 5: เมื่อคุณแก้ไขการซิงค์ของคลิปวิดีโอเสร็จแล้ว ให้คลิกส่งออก (Export) และเลือกตำแหน่งที่คุณต้องการบันทึกไฟล์.
2. ใช้ VLC Media Player
โปรแกรมเล่นสื่อ VLC (VLC media player) เป็นแอปพลิเคชันที่มีให้ใช้งานบนทุกระบบปฏิบัติการ ทั้ง Windows, Mac, iPhone และ Android แม้ว่าจะใช้งานได้บนทุกอุปกรณ์ แต่แต่ละอุปกรณ์ก็มีวิธีแก้ปัญหาเสียงหน่วงและการซิงค์เสียงกับคลิปวิดีโอแตกต่างกันไป โปรแกรมเล่นสื่อนี้มักจะขึ้นชื่อเรื่องการทำงานที่มีปัญหาอยู่บ้าง แต่ในขณะเดียวกัน คุณก็สามารถใช้โปรแกรมนี้เพื่อแก้ปัญหาเสียงกับวิดีโอไม่ตรงกันได้อย่างถาวรด้วย
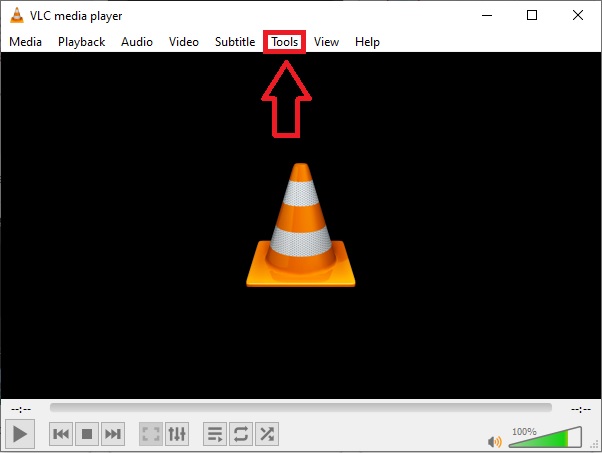
ขั้นตอนที่ 1: เปิดโปรแกรม VLC media player บน Windows แล้วคลิกแท็บเครื่องมือ (Tools) หลังจากคลิกแท็บเครื่องมือ (Tools) แล้ว ให้คลิกการตั้งค่า (Preference).
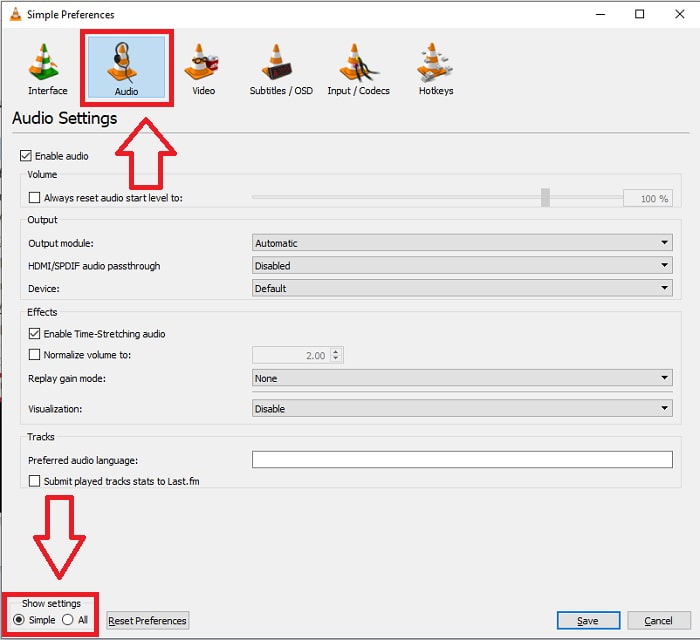
ขั้นตอนที่ 2: จะมีอินเทอร์เฟซอีกหน้าหนึ่งปรากฏบนหน้าจอของคุณ ดำเนินการต่อโดยคลิกแท็บเสียง (Audio) ที่มุมล่างซ้ายให้เลือก ทั้งหมด (All) เพื่อเข้าสู่การตั้งค่าขั้นสูง.
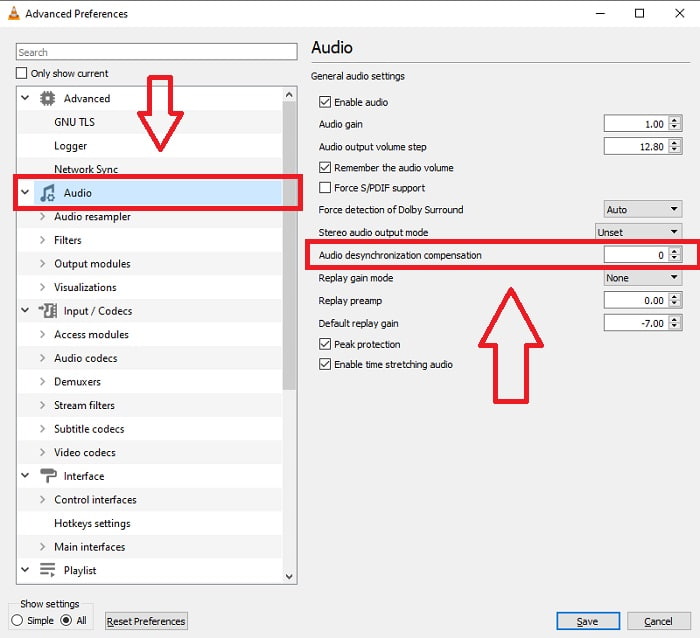
ขั้นตอนที่ 3: การตั้งค่าขั้นสูงจะเปิดตัวเลือกทั้งหมดให้คุณ จากนั้นให้ไปที่ส่วนเสียง (Audio) ในแท็บการตั้งค่าขั้นสูง หลังจากกดแล้ว คุณจะเห็นการตั้งค่าเสียงทั่วไป และสามารถปรับค่าชดเชยการไม่ตรงกันของเสียง (Audio Desynchronization Compensation) ได้ หากเสียงช้ากว่าภาพ ให้เปลี่ยนค่าเป็นค่าบวกเพื่อชดเชย หากเสียงเร็วกว่าภาพ ให้ใช้ค่าเป็นลบ ปัญหา VLC เสียงกับภาพไม่ตรงกัน จะถูกแก้ไขอย่างถาวรด้วยขั้นตอนนี้.
ที่เกี่ยวข้อง:
วิธีแก้ปัญหา VLC Player เปิดไฟล์ MKV ไม่ได้
วิธีแก้ปัญหา VLC เล่นแผ่น DVD ไม่ได้
3. ใช้ Premiere Pro
เมื่อต้องการสร้างวิดีโอความละเอียดสูงในระดับออกอากาศ Premiere Pro ถือเป็นเครื่องมือหลัก ซอฟต์แวร์นี้สามารถใช้ในการนำเข้าสื่อทุกประเภท ทั้งวิดีโอและเสียง จากนั้นสามารถใช้ตัดต่อสื่อเหล่านั้นและส่งออกในรูปแบบไฟล์ที่ต้องการสำหรับการเผยแพร่ สามารถตัดต่อวิดีโอและภาพนิ่งหลาย ๆ ชิ้นเข้าด้วยกันใน Premiere Pro เพื่อสร้างเป็นวิดีโอ พร้อมทั้งใส่ไตเติล ฟิลเตอร์ และเอฟเฟกต์อื่น ๆ ได้ ซอฟต์แวร์นี้ช่วยได้มากเมื่อเกิดปัญหาเสียงกับภาพไม่ตรงกัน โดยเฉพาะสำหรับผู้ใช้เดสก์ท็อปหรือแล็ปท็อป ต่อไปนี้คือขั้นตอนการดำเนินการอย่างถูกต้อง.
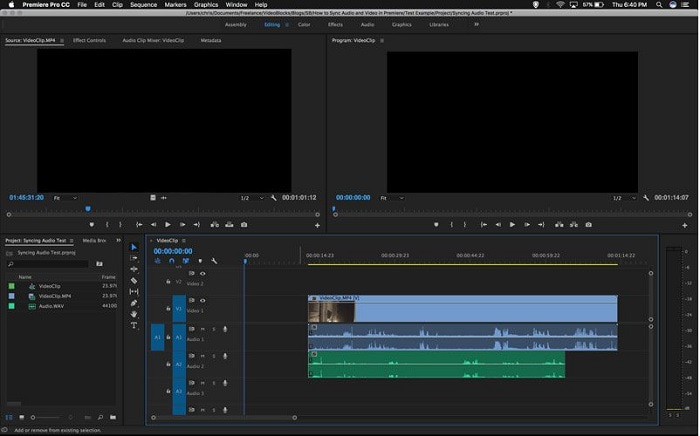
ขั้นตอนที่ 1: ตรวจสอบให้แน่ใจว่าคุณวางเลเยอร์ไฟล์เสียงและไฟล์วิดีโอไว้ในไทม์ไลน์แล้ว ตามตัวอย่างภาพประกอบ.
ขั้นตอนที่ 2: คลิกขวาเพื่อเลือกทั้งแทร็กเสียงและแทร็กวิดีโอ จะมีเมนูดรอปดาวน์ปรากฏขึ้น ให้เลือก Synchronize จากเมนูดรอปดาวน์นั้น.
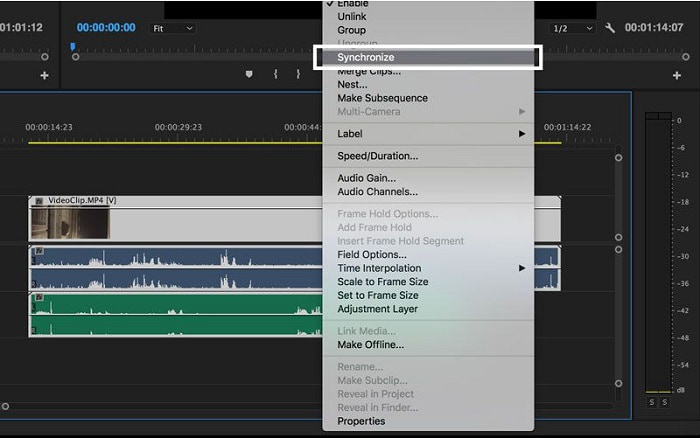
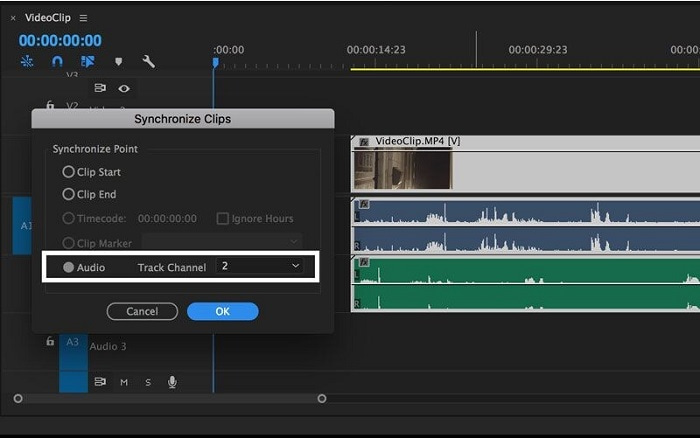
ขั้นตอนที่ 3: จากนั้นให้เลือกAudio เป็นจุดอ้างอิงสำหรับการซิงค์ เลือกแทร็กที่คุณต้องการซิงค์ สุดท้าย ลบสแครชแทร็กออก และเลือกตัวเลือกLink เพื่อเชื่อมคลิปเข้าด้วยกัน.
ส่วนที่ 3 คำถามที่พบบ่อยเกี่ยวกับ Audio and Video Out of Sync
ถ้าฉันเปลี่ยนอัตราตัวอย่าง คุณภาพเสียงจะลดลงหรือไม่
หากคุณต้องการฟังเฉพาะเสียงในคลิปวิดีโอของคุณและไม่ทำการเปลี่ยนแปลงใดๆ คุณต้องเปลี่ยนอัตราตัวอย่างเพื่อให้ทัน คุณจะสามารถซิงโครไนซ์เสียงของวิดีโอได้โดยการปรับการหน่วงเวลาเสียงของวิดีโอคลิปใน FVC Video Converter Ultimate คุณจะไม่ต้องกังวลเรื่องคุณภาพเสียงที่เสื่อมลงอีกต่อไปเมื่อทำการปรับอัตราตัวอย่าง ด้วยซอฟต์แวร์นี้ คุณจะไม่ต้องกังวลกับเสียงที่ไม่ได้ซิงค์ในวิดีโอ ซอฟต์แวร์นี้มีคุณลักษณะที่สามารถแก้ไขปัญหาที่กำหนดได้ นอกจากนี้ยังมีคุณสมบัติอื่น ๆ ที่เป็นประโยชน์ต่อผู้ใช้ทุกคนและใช้งานได้สะดวก
การชดเชยการซิงโครไนซ์เสียงคืออะไร?
ตั้งค่าการหน่วงเวลาการชดเชยการดีซิงโครไนซ์เสียงบวกหรือลบเป็นมิลลิวินาทีในการตั้งค่า VLC โดยคลิกที่เสียง จากนั้นทำเครื่องหมายที่ช่องตัวเลือกขั้นสูง
สาเหตุอื่นที่ทำให้วิดีโอและเสียงไม่ตรงกันคืออะไร
อีกสาเหตุหนึ่งที่วิดีโอและเสียงไม่ซิงค์กันเนื่องจากเอาต์พุตวิดีโอที่ไม่รองรับซึ่งอุปกรณ์เสียงไม่สามารถใช้งานได้ และในทางกลับกัน
สรุป
กล่าวโดยสรุป การที่เสียงกับวิดีดีโอหน่วงหรือไม่ตรงกันเป็นสถานการณ์ที่ลำบากสำหรับคนส่วนใหญ่มากในโลกออนไลน์ โดยเฉพาะในช่วงการแพร่ระบาด ที่อุปกรณ์และของใช้จำเป็นสำหรับโลกออนไลน์กำลังได้รับความนิยม แต่เราจะใช้งานให้มีประสิทธิภาพหรือทำงานต่าง ๆ ได้อย่างถูกต้องได้อย่างไร หากยังมีอุปสรรคจากปัญหาออนไลน์เหล่านี้ เช่น ปัญหาจะซิงค์เสียงกับวิดีโออย่างไร เมื่อมีอาการหน่วงเกิดขึ้น เพื่อสรุปรวม ทุกวิธีการและทางเลือกในการคลายข้อสงสัย ได้ถูกรวบรวมไว้ในบทความนี้แล้ว เราขอแนะนำให้ใช้ Video Converter Ultimate เพื่อแก้ปัญหาที่ไม่พึงประสงค์เหล่านี้ในอนาคต.
-
 เครื่องเล่นวิดีโอสโลว์โมชั่น 5 อันดับแรกบนคอมพิวเตอร์ (Windows/Mac/Linux)
 ภาพช้าเป็นคุณสมบัติที่มีประโยชน์มากในหลาย ๆ สถานการณ์ หากต้องการดูวิดีโอด้วยความเร็วต่ำเพื่อทราบข้อมูลรายละเอียดเพิ่มเติมในช็อตที่หายวับไป คุณสามารถเรียนรู้เครื่องเล่นวิดีโอสโลว์โมชั่น 5 อันดับแรกได้ในบทความนี้
-
 [2 โซลูชั่นที่ดีที่สุด] วิธีเล่นภาพยนตร์ AVI บน iPhone/iPad ได้อย่างง่ายดาย
 ไม่สามารถเล่นภาพยนตร์ AVI บน iPhone/iPad ของคุณและไม่ต้องการดาวน์โหลดเครื่องเล่นวิดีโอของบริษัทอื่นใช่หรือไม่ คุณสามารถเรียนรู้ 2 วิธีที่มีประสิทธิภาพในการแปลงวิดีโอ AVI เพื่อเล่นบน iPhone
-
 Wii / Wii U สามารถเล่น DVD โดยไม่มี Homebrew ได้หรือไม่? 2 โซลูชั่นสำหรับคุณ
 เมื่อคุณใส่แผ่น DVD ลงใน Wii คุณจะพบว่า Wii ไม่สามารถอ่านและเล่น DVD ได้เนื่องจากการล็อกระดับภูมิภาค ในบทความนี้ คุณจะได้เรียนรู้วิธีเล่นดีวีดีบน Wii/Wii U อย่างง่ายดายโดยไม่ต้องแฮ็ค Homebrew