

Profesyonellere Benzeri Sonuçlar İçin iPhone'daki Fotoğrafları Bulanıklaştırmanın 4 Yolu
Akıllı telefon fotoğrafçılığının hızlı temposunda, iPhone kullanıcılarına unutulmaz anları benzersiz bir kolaylıkla yakalamaları için geniş bir özellik yelpazesi sunan güçlü bir cihaz olarak öne çıkıyor. iPhone’un fotoğraf düzenleme araçları arasında çoğu zaman gözden kaçan bir mücevher, görüntüleri bulanıklaştırma özelliğidir. Bu teknik, anlık çekimlerinize derinlik, dramatik bir hava ve profesyonellik katabilir. Bu yazıda, portre modunu kullanmaktan çevrimiçi araçlara ve üçüncü taraf uygulamalara kadar uzanan yöntemlerle, iPhone’unuzda fotoğrafları bulanıklaştırma sürecini adım adım anlatarak parmaklarınızın ucunda bir yaratıcılık dünyasının kapılarını açacağız.

Bölüm 1. iPhone'da Fotoğraflar Nasıl Bulanıklaştırılır
Portre modu
iPhone'daki Portre modu, kişinin fotoğraflarının kalitesine derinlik katmak için tasarlanmış özel bir özelliktir. Nesnenin arka plandan öne çıkmasını sağlayan bu sığ alan derinliğini yaratır. Bir iPhone'daki fotoğrafın arka planını bulanıklaştırabilir misiniz gibi sorular genellikle Apple ekosisteminde yeni olan biri tarafından sorulur. İOS, 7 Plus modelinde en son sürüme kadar portre modunu sunduğundan, iPhone'da fotoğraflarınızı bulanıklaştırmak mümkündür; bunu yapmanın adımları aşağıda listelenmiştir.
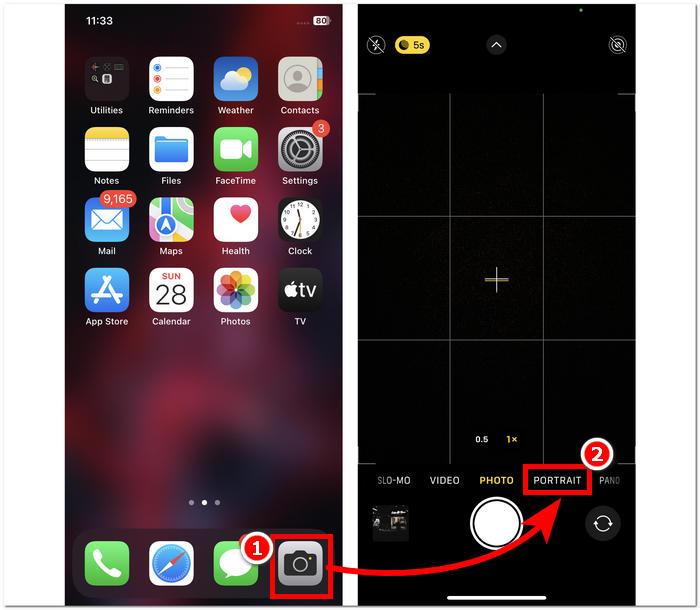
Adım 1. iPhone cihazınızda Kamera uygulamanızı açın.
Adım 2. Kamera ayarlarınızda Portre bölümüne dokunun.
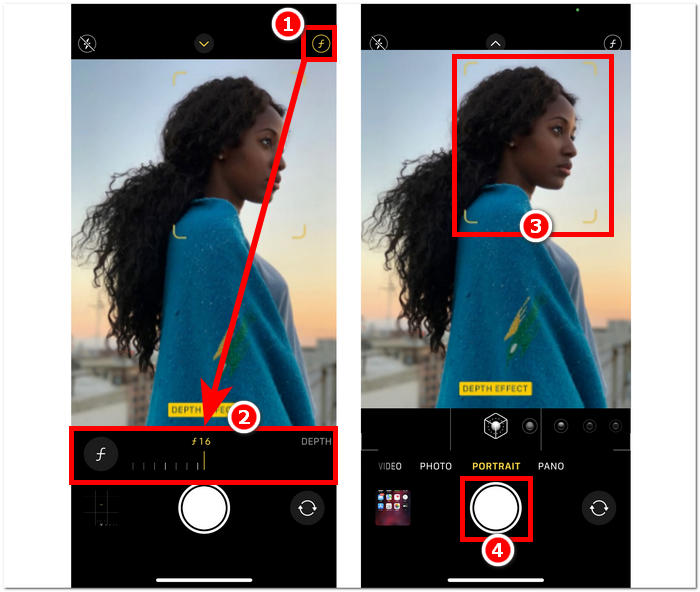
Adım 3. Ekranınızda, sağ üst köşede bulunan f simgesine dokunun ve fotoğraflarınızda istediğiniz alan derinliğini ayarlayın.
Adım 4. Derinlikten memnun kaldığınızda, fotoğrafınızda odaklanmak istediğiniz konuya dokunun ve son olarak fotoğrafı çekmek için Deklanşör düğmesine basın.
iPhone’da portre modunu kullanmak, alan derinliğinin fotoğraflarınız üzerindeki etkisini anladığınızda ve kamera uygulamasının arayüzünde rahatça dolaşabildiğinizde oldukça kolaydır. Ayrıca, bundan pişman olursanız, görüntüleri kolayca bulanıklık giderme yöntemiyle netleştirebilirsiniz.
Portre Modu Olmadan
Portre modu olmadan iPhone'daki bir fotoğraf nasıl bulanıklaştırılır? Portre modu olmadığında iPhone'unuzu kullanarak fotoğrafları bulanıklaştırmak, 7 Plus ve üzeri modellerde portre modu sunulduğundan zorlayıcı olabilir. Bu nedenle iPhone'larında portre modu olmayan kullanıcılar için yollar buluyoruz. Bu daha çok bir ipucu veya hack gibidir ve kullanıcının el emeğini gerektirir. Etkili bir şekilde yapılırsa portre moduna benzer sonuçlar elde edebilirsiniz.
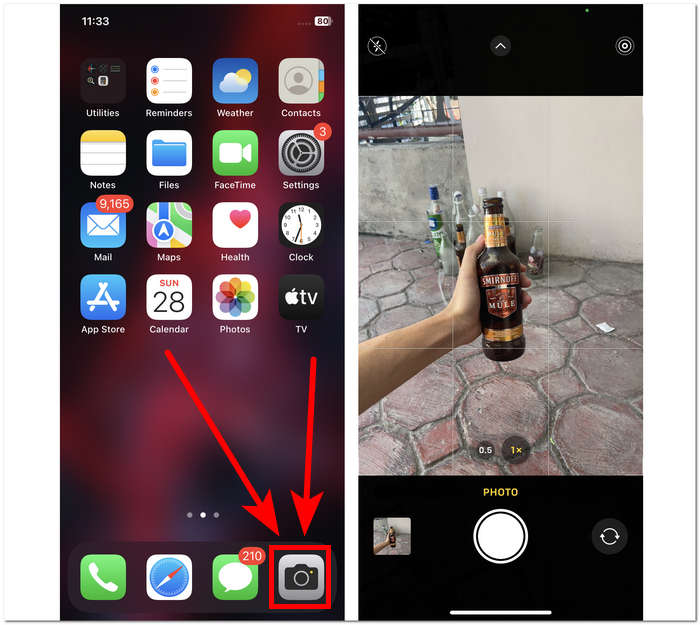
Adım 1. iPhone’unuzda Kamera uygulamasını açın.
Adım 2. Ana arayüzde, siz ve konunuzun arka plandan uzaklaşmasını sağlamak için geri doğru hareket ederek kendinizi ve konuyu arka plandan ayırın.
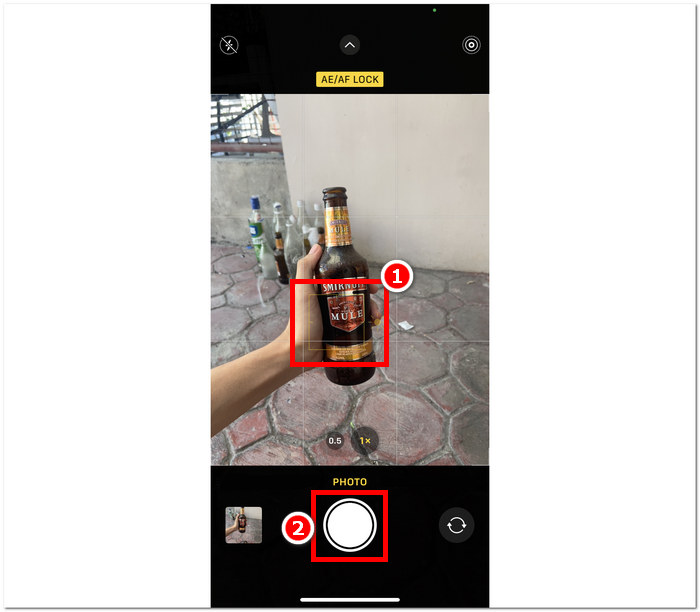
Adım 3. Konuya uzun basın; üst kısımda AE/AF KİLİDİ ifadesi belirdiğinde, bu konuya odaklanmanızı sağlayacak ve arka planın bulanık olmasına yol açacaktır.
Adım 4. Konu, bulanık arka plandan net bir şekilde ayrıldığında fotoğraf çekmeye hazırsınız. Fotoğrafınızı çekmek için yalnızca Deklanşör düğmesine basın.
Nesnenizle arka planı arasında manuel olarak bir mesafe oluşturarak ve odaklamayı doğru yaparak, kamera ayarlarında portre modu özellikleri olmasa bile iPhone'daki fotoğrafları bulanıklaştırmak mümkündür. Bu adım yalnızca iOS kullanıcıları için değil, kamera ayarlarında portre modu bulunmayan Android kullanıcıları için de geçerlidir.
Üçüncü Taraf Uygulaması: Snapseed
Snapseed, Google tarafından geliştirilen güçlü ve profesyonel düzeyde fotoğraf düzenleme uygulamaları arasında yer almaktadır. Bu uygulama, kullanıcının her fotoğraf düzenleme görevi için ihtiyaç duyduğu özellik ve araçlarla doludur ve bunların arasında yalnızca iPhone'unuzu kullanarak fotoğraflarınızı bulanıklaştırmak da vardır. Üçüncü taraf bir uygulamaya başvurmak, iPhone'daki fotoğraflarda insanların yüzlerinin nasıl bulanıklaştırılacağına ilişkin endişelerinizi gidermenize de yardımcı olabilir; çünkü uygulama, yalnızca seçebileceğiniz veya seçebileceğiniz portre modunun aksine, hangi kısmı bulanıklaştıracağınıza karar vermenize olanak tanır. Odaklanmak için konulara dokunun.
Adım 1. App Store’dan Snapseed uygulamasını iPhone’unuza indirin ve açın.
Adım 2. Uygulama arayüzüne girdikten sonra, bulanıklık eklemek istediğiniz fotoğrafı eklemek için ekrana dokunun.
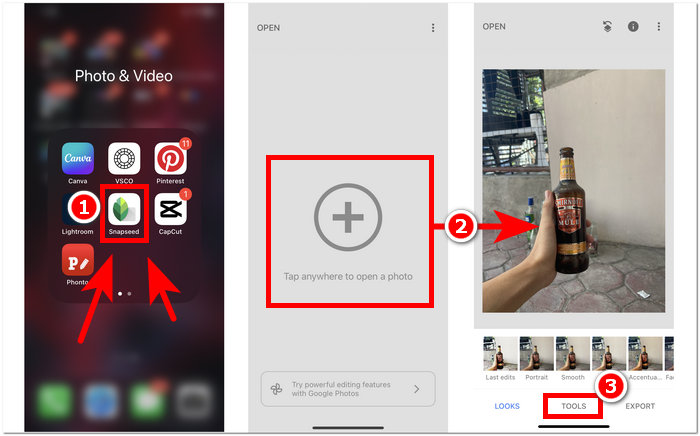
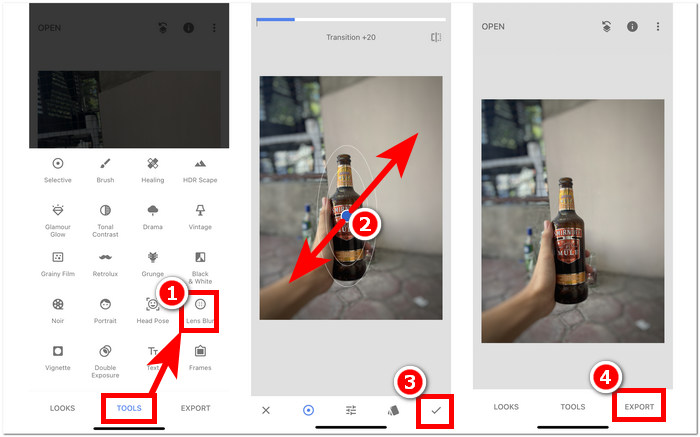
Adım 3. ARAÇLAR (TOOLS) bölümünde Lens Blur ayarını bulun ve dokunun. Fotoğrafınız, odak alanını temsil eden dairesel bir çerçeveyle görünecektir; bu dairenin dışındaki alanlar bulanık olacaktır.
Adım 4. Dairenin boyutunu ayarlamak için parmaklarınızı birleştirerek yakınlaştırın veya uzaklaştırın. Dairenin boyutunu konunuza göre belirlemeyi unutmayın; düzenlemenizden memnun kaldığınızda onay işaretine dokunun ve fotoğraflarınızdaki değişiklikleri kaydetmek için DIŞA AKTAR (EXPORT) seçeneğine basın.
Snapseed'in çok yönlülüğü, resimlerinize kesintisiz bulanıklık eklenmesi de dahil olmak üzere çeşitli fotoğraf düzenleme görevlerine kadar uzanır. Bu uygulamaya yalnızca iPhone'lardan erişilemiyor, aynı zamanda diğer cihazlarda da mevcut olması onu kapsamlı bir düzenleme deneyimi arayan kullanıcılar için ideal ve kullanışlı bir araç haline getiriyor. Snapseed'in kullanıcı dostu arayüzü ve cihazlar arası uyumluluğu sayesinde, fotoğraflarınızda istediğiniz bulanıklık efektini elde etmek hiç bu kadar kolay olmamıştı.
Bölüm 2. iPhone Fotoğrafınızdan Bulanıklaştırmadan Bir Nesne Nasıl Kaldırılır
iPhone fotoğraflarında kusursuz bir bulanıklık efekti elde etmek, tüm görüntünün fazla bulanık olması ya da bazı nesnelerin net görünmemesi gibi sorunlar nedeniyle zorlayıcı olabilir. Bulanıklaştırma ile düzeltilemeyen nesnelerle karşılaştığınızda, bunları tamamen kaldırmak çoğu zaman en iyi çözümdür. Neyse ki, FVC Free Watermark Remover, iOS ve hatta mobil olmayan cihaz kullanıcılarına, fotoğraflarındaki bulanık, istenmeyen nesneleri ve filigranları ücretsiz olarak kaldırma imkânı sunar. FVC, çok çeşitli cihazlarda her tür web tarayıcısından erişilebilen web tabanlı bir araçtır. Kullanıcılardan herhangi bir kurulum veya abonelik talep etmeyen, tamamen ücretsiz bir hizmet sunar. Aşağıdaki adımları izlemeniz, nesneleri bulanıklaştırmaya gerek kalmadan pürüzsüz bir sonuç elde etmenizi sağlayacaktır.
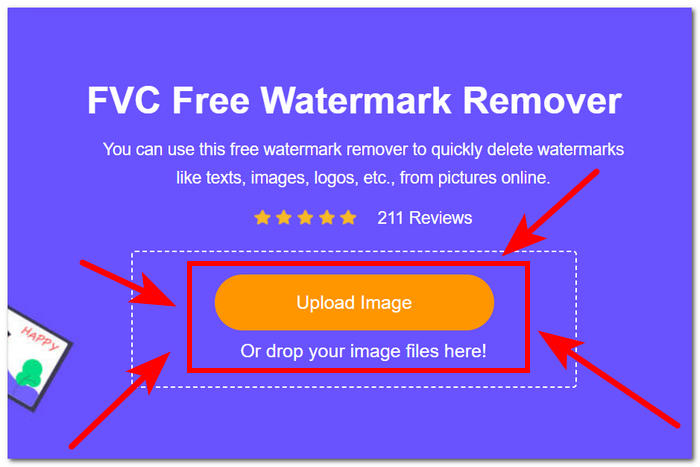
Adım 1. Mobil ya da masaüstü cihazınızda yerel tarayıcınızdan FVC Free Watermark Remover sitesini ziyaret edin ve Görüntü Yükle (Upload Image) alanına tıklayarak görselinizi yükleyin.
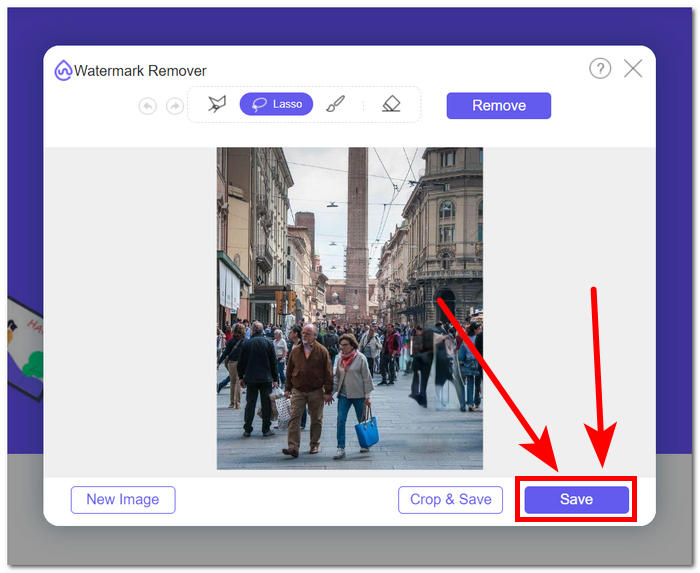
Adım 2. Fotoğrafınız arayüzde göründüğünde, üst kısımdaki Kement aracı (Lasso tool)na tıklayın ve bulanık nesne veya metnin etrafını çizin; ardından bunları fotoğrafınızdan kaldırmak için son olarak Kaldır (Remove) düğmesine tıklayın.
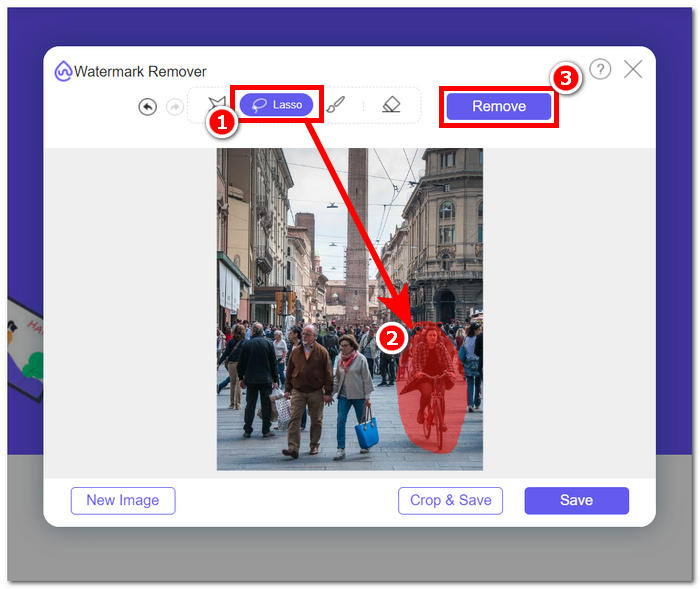
Adım 3. Fotoğrafınızın işlenmesi tamamlandığında, yeni düzenlenmiş fotoğrafınızın ön izlemesini görebileceksiniz; nesne kaldırma sonucundan memnun kalırsanız, fotoğrafınızı indirmek için Kaydet düğmesine tıklayın.
FVC Free Watermark Remover, fotoğraflarınızdaki nesneleri herhangi bir bulanıklığa yol açmadan kaldırma konusundaki başarısını kanıtlamıştır. Bu nedenle, fotoğraflarınızı ister portre modu ile ister üçüncü taraf bir uygulama aracılığıyla bulanıklaştırıyor olun, bu aracın süreç boyunca karşılaşabileceğiniz her türlü sorunu çözmede son derece iyi bir tamamlayıcı olduğu gönül rahatlığıyla söylenebilir. Ayrıca, başlangıçta JPG’den filigran kaldırma, PNG ve daha birçok format için tasarlanmıştır.
Bölüm 3. iPhone'da Fotoğrafların Bulanıklaştırılması Hakkında SSS
Uygulama olmadan iPhone'daki bir resmi nasıl bulanıklaştırırsınız?
Bir uygulamayı kullanmadan iPhone'daki bir resmi bulanıklaştırmak için yerleşik düzenleme özelliklerini kullanabilirsiniz. Fotoğraflar uygulamasını açın, düzenlemek istediğiniz fotoğrafı seçin, Düzenle'ye dokunun, üç nokta simgesini seçin ve İşaretle'yi seçin. Buradan, bulanıklaştırmak istediğiniz alanların üzerine çizim yapmak için kalem aracını kullanabilirsiniz.
iPhone Fotoğraf uygulamasında bulanıklaştırma aracı var mı?
iPhone Fotoğraf uygulamasının özel bir bulanıklaştırma aracı yoktur. Yine de Portre modundaki fotoğraflarda arka plan bulanıklığını ayarlamak için Derinlik aracı da dahil olmak üzere çeşitli düzenleme seçenekleri sunar. Fotoğraf uygulamasını açın, Portre modunda bir fotoğraf seçin, Düzenle'ye dokunun ve arka plan bulanıklığını kontrol etmek için Derinlik kaydırıcısını kullanın.
Tüm iPhone'larda portre modu var mı ve arka planı bulanıklaştırıyor mu?
Tüm iPhone'larda Portre modu ve arka planı bulanıklaştırma özelliği yoktur. Portre modu iPhone 7 Plus ve üzeri modellerde mevcuttu. iPhone'unuzun Portre moduna sahip olup olmadığını kontrol etmek için Kamera uygulamasını açın ve Portre'nin bir seçenek olarak görünüp görünmediğine bakın.
Fotoğraf çektikten sonra iPhone'daki arka plan nasıl bulanıklaştırılır?
Fotoğraf çektikten sonra iPhone'daki arka planı bulanıklaştırmak için iPhone'unuz destekliyorsa Portre Modu özelliğini kullanabilirsiniz. Fotoğraflar uygulamasını açın, fotoğrafı seçin, Düzenle'ye dokunun ve ardından Derinlik kaydırıcısını kullanarak arka plan bulanıklığını ayarlayın. Bu özelliğin belirli iPhone modellerinde mevcut olduğunu unutmayın.
Bir iPhone'daki fotoğrafın bir kısmı nasıl bulanıklaştırılır?
iPhone'daki bir fotoğrafın bir bölümünü bulanıklaştırmak, Fotoğraflar uygulamasındaki İşaretleme aracı kullanılarak yapılabilir. Fotoğraflar uygulamasını açın, fotoğrafı seçin, Düzenle'ye dokunun, üç nokta simgesini seçin ve İşaretle'yi seçin. Bulanıklaştırmak istediğiniz alanın üzerine çizim yapmak için kalem aracını kullanın ve yoğunluğu gerektiği gibi ayarlayın.
Sonuç
Sonuç olarak, iPhone’unuzda fotoğrafları bulanıklaştırmak, kullanıcılara görüntülerini derinlik, dramatik etki ve profesyonel bir dokunuşla zenginleştirme imkânı sunan sınırsız olasılıklar yaratır. Yerleşik Portre modunu kullanmaktan Snapseed gibi üçüncü taraf uygulamalardan yararlanmaya kadar süreç, hem yeni başlayanlar hem de deneyimli fotoğrafçılar için büyük bir esneklik sağlar. Buna ek olarak, FVC Free Watermark Remover gibi araçlar, fotoğraflarda istenmeyen nesnelerle ilgili endişeleri netlikten ödün vermeden ortadan kaldırır. iPhone kullanıcıları bu teknikleri ve araçları keşfetmeye devam ettikçe, fotoğraf bulanıklaştırmanın büyüleyici dünyasına yolculuk heyecan verici ve erişilebilir bir deneyime dönüşür. Öyleyse iPhone’unuzu alın, bu yöntemleri deneyin ve fotoğrafçılığınızı profesyonel düzeye taşıyın!
-
 GIMP Kullanarak Görüntüden Arka Plan Nasıl Kaldırılır
 GIMP'e ve görüntülerden arka planların adım adım kaldırılması sürecine başlayın. Bugün GIMP kullanarak şeffaf görüntüler oluşturmanın etkili yollarını keşfedin!
-
 Görüntü Boyutu Çevrimiçi ve Çevrimdışı Nasıl Artırılır
 Kaliteyi kaybetmeden görüntü boyutunu artırmanın en kolay yolunu keşfedin. Resimleriniz için en iyi kaliteyi sağlamak için yeniden boyutlandırma araçlarımıza ve yazılımımıza bakın.
-
 PPT Arka Plan Resmini Nasıl Kaldırır? Kapsamlı Kılavuz
 Sunumunuzu bir sonraki seviyeye taşımaya hazır mısınız? Bu makalede, PPT'nin arka plan resimlerini nasıl kaldırdığını ve kolayca olağanüstü PowerPoint sunumları oluşturduğunu keşfedin.