


Trình thay đổi kích thước video hàng đầu để thay đổi video thành kích thước hoàn hảo cho dự án của bạn
Trình thay đổi kích thước video là một phần của phần mềm cho phép mọi người thay đổi kích thước và hình dạng của tệp video. Một trong những điều phổ biến nhất mà trình thay đổi kích thước video có thể làm là cắt video. Điều này có nghĩa là loại bỏ các phần của khung hình video để tạo kích thước khung hình mới, nhỏ hơn. Điều này có thể hữu ích cho một số việc, chẳng hạn như tối ưu hóa nội dung video cho các thiết bị hoặc nền tảng truyền thông xã hội khác nhau, cắt bỏ các phần không mong muốn của khung hình hoặc kết hợp nhiều video đã cắt xén để tạo bố cục mới.
Video editors, people in charge of social media, and people who make content regularly need to resize videos. Video content is becoming more and more popular, so video resizers are now a must-have for anyone who works with video files often. If you share the same predicament who wants to maximize the abilities of video resizers, then this article is for you. Check out handpicked programs to resize videos.

Phần 1. Trình thay đổi kích thước video mạnh mẽ nhất với nhiều chức năng khác nhau
Nếu bạn thích các công cụ thay đổi kích thước video mạnh mẽ có thể thực hiện công việc cắt video trên Windows và Mac OS, thì bạn có thể dựa vào các công cụ sau. Các chương trình này đảm bảo kết quả và chất lượng đầu ra. Nếu không có gì khó chịu, hãy xem các công cụ thay đổi kích thước video bên dưới.
1. Chuyển đổi video cuối cùng
FVC Video Converter Ultimate is a popular software tool offering a range of video conversion and editing features, including resizing and cropping videos. This program makes it easy to resize videos to different aspect ratios and resolutions with a range of preset options. The software supports all major video formats, including MP4, AVI, MKV, and more, and you can resize multiple videos simultaneously.
Hơn nữa, tính năng cắt xén video của FVC cũng rất hiệu quả, cho phép người dùng loại bỏ các phần không mong muốn của khung hình video một cách dễ dàng. Điều này có thể hữu ích cho nhiều mục đích khác nhau, chẳng hạn như xóa hộp thư, thay đổi kích thước video cho các tỷ lệ khung hình khác nhau hoặc xóa các thành phần không mong muốn khỏi khung. Không cần phải nói, nó cũng hoạt động như một công cụ thay đổi tỷ lệ khung hình. Trong khi chờ đợi, bạn có thể xem qua các tính năng chính của nó cho sự nhìn chăm chú của mình.
Key Features:
◆ Thay đổi kích thước video thành các độ phân giải khác nhau.
◆ Đầu ra chất lượng cao.
◆ Xử lý hàng loạt và nhanh chóng.
Step 1. To start using FVC Video Converter Ultimate to crop your videos, you must download and set up the program on your computer. Just click the Free Download button for your operating system and follow the on-screen instructions to install the program.
Tải Miễn PhíDành cho Windows 7 trở lênTải xuống an toàn
Tải miễn phíDành cho MacOS 10.7 trở lênTải xuống an toàn
Step 2. Once the program is set up, you can open it and click on the Toolbox tab to get to the toolbox.
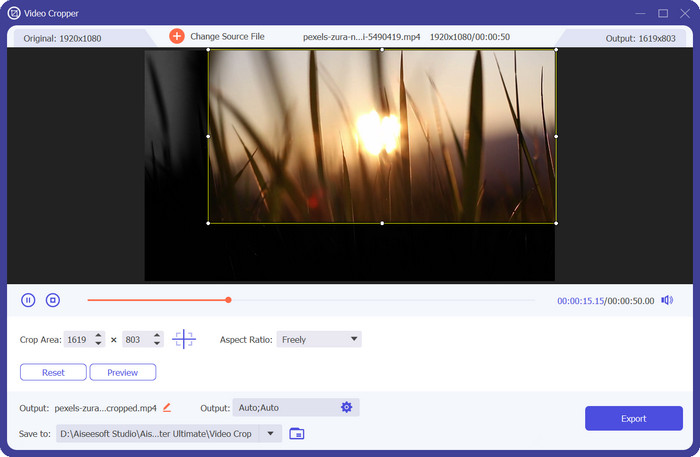
Step 3. From there, choose Video Cropper to open the tool for cropping. Click the plus sign in the upload area of the Video Cropper option to add a video to crop.
Step 4. The next step is to choose the aspect ratio for your video. The best proportion for Snapchat is 9:16. (vertical). Below the video preview is a dropdown menu where you can choose the aspect ratio you want.
Step 5. Click the Export button in the bottom right corner of the interface to save your cropped video file once you're happy with it. Then, you can send it to your followers or post it on Snapchat to show your friends how great you are at editing videos.
2. Công chiếu
Với Premiere Pro, người dùng có thể cắt video để tạo bố cục mới, xóa các phần tử không mong muốn khỏi khung hoặc thay đổi kích thước video cho các nền tảng hoặc thiết bị khác nhau. Phần mềm hỗ trợ tất cả các định dạng video chính và cung cấp một loạt các tùy chọn đặt trước để thay đổi kích thước và cắt xén, cũng như các công cụ nâng cao để tùy chỉnh khung cắt và xem trước kết quả trong thời gian thực. Bên cạnh đó, nó còn cung cấp các tính năng hữu ích khác, như hiệu chỉnh màu sắc, hiệu ứng đặc biệt nâng cao và chỉnh sửa âm thanh. Bạn cũng có thể tìm hiểu cách thay đổi kích thước khung hình trong Premiere vì chương trình này hỗ trợ tính năng này. Bây giờ, hãy tìm hiểu cách cắt video trong Premiere bên dưới và tìm hiểu các tính năng chính của nó.
Key Features:
◆ Nó hoạt động như một công cụ thay đổi độ phân giải video.
◆ Chỉnh sửa và trộn các bản âm thanh.
◆ Nó cung cấp một loạt các hiệu ứng đặc biệt.
Dưới đây là các bước về cách thay đổi tỷ lệ khung hình trong Premiere hoặc cắt video:
Step 1. Import your video clip into Premiere Pro by clicking File > Import and selecting your video file. Drag your video clip from the Project panel to the timeline.
Step 2. Select the video clip on the timeline by clicking on it. Go to the Effects Control panel, located in the top-left corner of the interface.
Step 3. Look for the Motion effect in the Effects Control panel and click on the triangle to expand it. Adjust the Scale setting to resize your video. This will adjust the size of the entire video frame.
Step 4. To crop the video, click on the Crop effect in the Effects Control panel and expand it. Use the sliders to adjust the amount of cropping you want for each side of the video frame. You can also enter specific values in the text boxes to get more precise control over the cropping.
Step 5. Preview your cropped video by playing it on the Program Monitor. If you're not happy with the output, adjust the cropping values until you achieve the desired look. When you're finished, export your cropped video by clicking File > Export and selecting your desired output format and settings.

3. DaVinci Resolve
DaVinci Resolve là một phần mềm chỉnh sửa video toàn diện cung cấp các tính năng nâng cao dành cho các nhà chỉnh sửa và chỉnh màu video chuyên nghiệp. Một trong những tính năng nổi bật của DaVinci Resolve là khả năng cắt xén chính xác và linh hoạt, cho phép người dùng điều chỉnh khung hình và tỷ lệ khung hình của video một cách dễ dàng.
Ngoài khả năng cắt xén, DaVinci Resolve còn cung cấp một loạt các tính năng mạnh mẽ khác, bao gồm chỉnh sửa màu sắc, chỉnh sửa âm thanh và các hiệu ứng đặc biệt nâng cao. Cho dù bạn đang chỉnh sửa phim dài tập, tạo nội dung truyền thông xã hội hay sản xuất video công ty, DaVinci Resolve cung cấp các công cụ và sự linh hoạt mà bạn cần để đạt được tầm nhìn của mình. Bạn có thể tìm hiểu thêm về công cụ này thông qua các tính năng chính và hướng dẫn cách cắt video trong DaVinci Resolve.
Key Features:
◆ Điều chỉnh khung hình và tỷ lệ khung hình.
◆ Nó hỗ trợ các định dạng video phổ biến.
◆ Hiệu ứng hình ảnh kết hợp để tổng hợp, theo dõi 3D và tạo khóa.
Step 1. Open DaVinci Resolve and create a new project. Import your video clip into the Media Pool by hitting the Import button and selecting your video file.
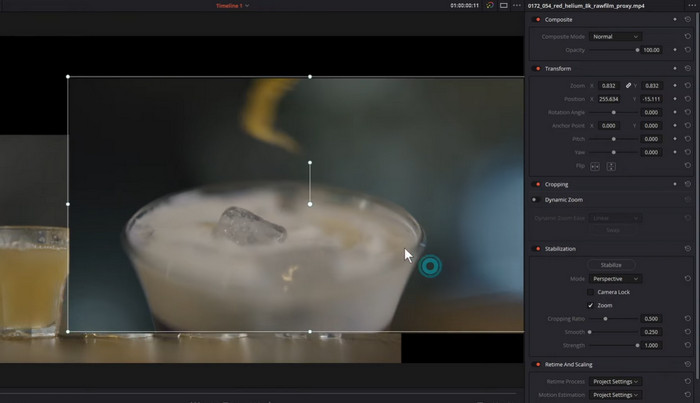
Step 2. Drag your video clip from the Media Pool to the timeline. Select the video clip on the timeline by clicking on it. Next, go to the Inspector panel on the right-hand side of the interface.
Step 3. In the Inspector panel, click on the Crop button to reveal the cropping controls. Adjust the cropping handles to remove unwanted portions of the video frame. You can also use the sliders in the Inspector panel to adjust the crop values numerically.
Step 4. Preview your cropped video by playing it in the viewer. If you're unhappy with the results, adjust the cropping values until you achieve the desired look.
Step 5. When you're finished, export your cropped video by clicking on the Deliver tab at the bottom of the interface. Select your desired output format and settings, then click the Add to Render Queue button to export your video.
4. Hiệu ứng sau
Adobe After Effects là phần mềm chỉnh sửa video hàng đầu được biết đến với tính linh hoạt và các tính năng mạnh mẽ. Khả năng cắt xén của nó là một trong những tính năng nổi bật, cho phép người dùng điều chỉnh khung hình và tỷ lệ khung hình của video một cách chính xác và dễ dàng. Với After Effects, người dùng có thể cắt video của mình để loại bỏ các phần không mong muốn của khung hình, điều chỉnh tỷ lệ khung hình để phù hợp với các màn hình khác nhau hoặc thậm chí tạo các tác phẩm video độc đáo. Cho dù bạn là người chỉnh sửa video chuyên nghiệp, nhà thiết kế đồ họa chuyển động hay người có sở thích, khả năng cắt xén của After Effects khiến nó trở thành một công cụ không thể thiếu để chỉnh sửa và bố cục video.
Step 1. Open After Effects and create a new composition. Add your video clip to the project by clicking on File > Import > File. Select your video file and click Open.
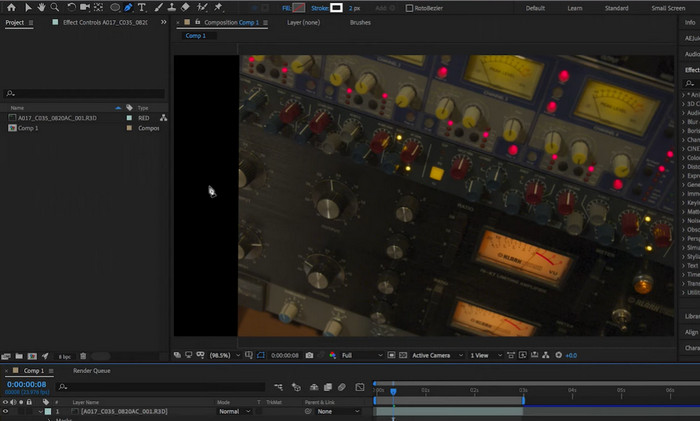
Step 2. Drag the video clip from the Project panel to the timeline. Select the video layer by clicking on it in the timeline. In the Effect Controls panel, tick on the Motion dropdown to reveal the Motion controls.
Step 3. Adjust the Scale and Position values to crop the video to your desired size and position.
Step 4. You can also crop the video using the Crop effect. To do this, go to Effect > Video Effects > Transform > Crop. Drag the Crop effect onto your video layer.
Step 5. Use the Crop Left, Crop Right, Crop Top, and Crop Bottom sliders to adjust the crop values in the Effect Controls panel. Preview your cropped video by playing it in the Composition panel.
Step 6. When you're finished, export your cropped video by going to Composition > Add to Render Queue. Select your desired output format and settings, then click on the Render button to export your video. That is how to crop videos in After Effects.
5. Bản cắt cuối cùng
Nếu bạn muốn tìm hiểu cách cắt video trên Mac, Final Cut Pro là phần mềm chỉnh sửa video mạnh mẽ được thiết kế dành riêng cho người dùng Mac. Với giao diện trực quan và các tính năng nâng cao, Final Cut Pro giúp người dùng dễ dàng tạo các video chuyên nghiệp, từ các clip ngắn đến các bộ phim có thời lượng đầy đủ. Với nó, bạn có thể làm việc trên một bài đăng trên mạng xã hội hoặc một kiệt tác điện ảnh. Các công cụ cắt xén của Final Cut Pro cung cấp nhiều tùy chọn để đạt được bố cục hoàn hảo.
Do đó, nếu bạn là người dùng Mac muốn tạo video chất lượng cao một cách chính xác và dễ dàng, thì khả năng cắt xén của Final Cut Pro sẽ khiến nó trở thành công cụ không thể thiếu để đạt được kết quả ở cấp độ chuyên nghiệp. Ngoài ra, đây là cách thay đổi độ phân giải video trong Final Cut Pro và các tính năng chính của nó.
Key Features:
◆ Nó hỗ trợ các plugin của bên thứ ba.
◆ Công cụ chỉnh sửa video âm thanh mạnh mẽ.
◆ Công cụ chỉnh sửa video nâng cao.
Step 1. Launch Final Cut Pro and open the project that contains the video clip you want to crop. Select the video clip in the timeline by clicking on it.
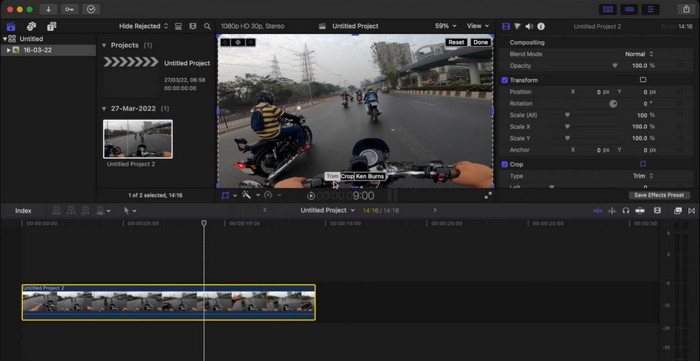
Step 2. Click on the Crop button located in the top-left corner of the Viewer window. Alternatively, you can press Command+4 on your keyboard to open the Crop tool.
Step 3. Use the handles around the video frame to adjust the crop. You can also manually enter values for the crop size and position in the Crop Inspector window.
Step 4. To adjust the aspect ratio of the cropped video, go to the Video Properties section of the Crop Inspector window and select the desired aspect ratio from the dropdown menu.
Step 5. Preview the cropped video by playing it in the Viewer window. If you're satisfied with the result, you can save the changes.
Step 6. To save the cropped video, go to File > Share and select your desired output format and settings. Finally, click on the Share button to export the cropped video.
Phần 2. Công cụ thay đổi kích thước video miễn phí
Đúng như vậy, các công cụ trước đây giúp bạn cắt các cạnh của video hoặc loại bỏ các phần không mong muốn của video. Tuy nhiên, chúng có thể là một chút khó khăn để điều hướng. Tuy nhiên, có nhiều chương trình khác sẽ phù hợp với sở thích của bạn. Do đó, chúng tôi đã nghiên cứu và chọn các lựa chọn thay thế dễ dàng mà bạn cũng có thể muốn xem qua.
1. iMovie
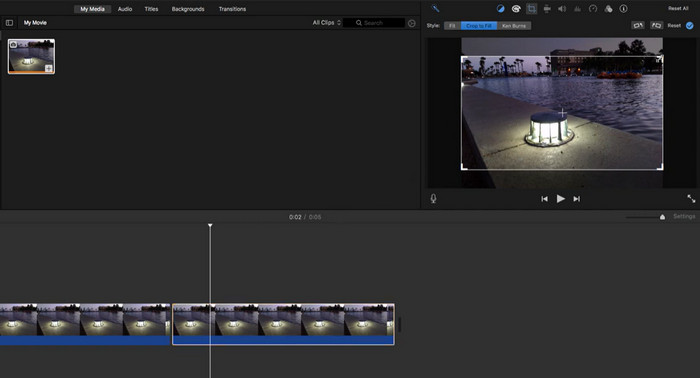
With iMovie, you can trim, crop, and add effects to your videos, as well as adjust their color, sound, and speed. You can also add text, transitions, and music to your videos and even create stunning movie trailers with pre-designed templates. And thanks to its seamless integration with other Apple products and services, iMovie makes it easy to share your videos on social media, iCloud, or directly to your Apple devices. You can learn more about this program by checking out its key features and guidelines on how to use it. To use iMovie to crop videos, see the sweets below.
Key Features:
◆ Bao gồm các mẫu tiêu đề khác nhau.
◆ Thêm hiệu ứng chuyển tiếp mượt mà giữa các video clip.
◆ Đoạn giới thiệu phim được thiết kế sẵn.
Step 1. Open iMovie on your Mac. Import the video you want to crop by going to File > Import Media and selecting the video file.
Step 2. Move the video clip into the timeline at the bottom of the iMovie interface by dragging and dropping it there. By clicking on the video clip in the timeline, you can choose it.
Step 3. Click the Crop button in the preview window's upper right corner. The button is shaped like a square with two arrows pointing in the same direction.
Step 4. A cropping rectangle will cover the video clip. You can choose the part of the video you want to keep by dragging the edges of the rectangle.
Step 5. You can also move the rectangle by clicking on it and dragging it to where you want it. Once you have chosen the part of the video you want to crop, click Done to apply the crop.
Step 6. Play back the cropped video in the preview window to see how it looks. If you're happy with the crop, save your project by clicking File > Save and then export the cropped video by clicking File > Share.
2. VLC
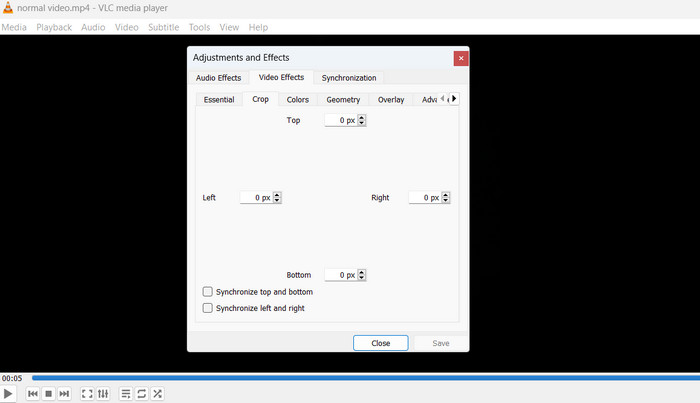
VLC Media Player là một trình phát đa phương tiện với nhiều tính năng được sử dụng bởi hàng triệu người trên thế giới. VLC Media Player là trình phát đa phương tiện nổi tiếng nhất vì nó dễ sử dụng và có tất cả các công cụ bạn cần để phát, truyền phát và thậm chí chỉnh sửa video. Nhưng VLC Media Player không chỉ là một trình chỉnh sửa video. Nó cũng hỗ trợ các định dạng phương tiện khác nhau, bao gồm âm thanh, video và phát trực tuyến và có thể phát hầu như mọi loại tệp. Ngoài ra, nó miễn phí và mã nguồn mở,
Key Features:
◆ Nó hỗ trợ nhiều nền tảng.
◆ Điều khiển phát lại nâng cao.
◆ Ghi và chuyển đổi phương tiện.
Step 1. To know how to VLC crops videos, click Media from the top menu of VLC Media Player. Click Open File and choose the video file you want to crop.
Step 2. Once the video is playing, go to the top menu bar and click on Tools. Then click on Effects and Filters. Click on Video Effects, and then click on Geometry.
Step 3. By checking the Crop box, the cropping feature will be turned on. Use the sliders next to Crop to change the area that will be cropped. You can also type the pixel numbers into the boxes by hand.
Step 4. When you're happy with how you've cropped the picture, click Close to save the changes. Lastly, save the cropped video by going to the top menu bar, clicking on Media, selecting Convert/Save, and then choosing the folder and file format.
3. Phanh tay
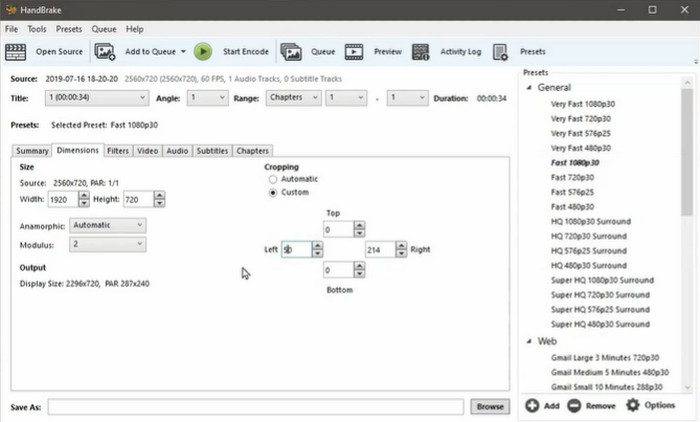
Handbrake is an exceptional open-source video transcoder that allows users to convert, compress, and even crop their videos easily. This free software boasts an impressive array of features that make it a popular choice for amateur and professional videographers. Moreover, Handbrake offers a wide range of video editing tools, such as trimming, resizing, adding subtitles, changing the frame rate, and cropping. This makes it a complete solution for video editing. The software is also easy to understand and use. Its clean, simple interface makes it easy for beginners and experts to find their way around. Look into the steps and learn how to utilize Handbrake to change the size of videos.
Key Features:
◆ Điều chỉnh chất lượng video.
◆ Xuất hàng đợi.
◆ Cài đặt mã hóa nâng cao.
Step 1. Download and install Handbrake from the official website. Next, open Handbrake and click on the Open Source button to load the video file you want to crop.
Step 2. After the video is loaded, select the Crop tab on the right-hand side of the window. In the Crop section, use the sliders to adjust the cropping area or manually input the pixel values.
Step 3. Once you're satisfied with the cropping, click on the Start button to begin the transcoding process.
Step 4. After the transcoding is complete, your cropped video will be saved in the specified destination folder.
4. OpenShot
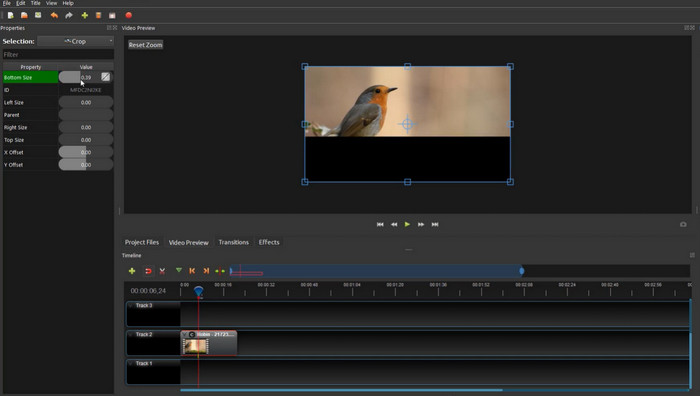
OpenShot là phần mềm mã nguồn mở và miễn phí để chỉnh sửa video. Nó có nhiều tính năng và công cụ có thể được sử dụng để tạo và chỉnh sửa video. Nó hoạt động với các hệ điều hành Windows, macOS và Linux, đồng thời được thiết kế để dễ sử dụng, ngay cả đối với những người chưa từng chỉnh sửa video trước đây. Nhìn chung, OpenShot là một chương trình chỉnh sửa video mạnh mẽ và linh hoạt, cung cấp cho người dùng nhiều công cụ và tính năng để tạo và chỉnh sửa video trông giống như các chuyên gia đã tạo ra chúng. Là phần mềm nguồn mở, nó cũng miễn phí sử dụng. Điều này làm cho nó trở thành một lựa chọn tuyệt vời cho những người có ngân sách hạn hẹp với việc chỉnh sửa video.
Key Features:
◆ Nó có nhiều rãnh và lớp.
◆ Nó có trình chỉnh sửa tiêu đề tích hợp.
◆ Nó đi kèm với các công cụ hoạt hình 3-D.
Để có trải nghiệm thực tế, bạn có thể làm theo hướng dẫn về cách cắt video trong OpenShot bên dưới:
Step 1. You can get OpenShot from the official website and install it. Start up OpenShot and start a new project.
Step 2. Click Import Files and then choose the video file you want to crop. Drag the video file from the Project Files section to the Timeline section. In the Timeline section, right-click on the video file and choose Properties.
Step 3. Select the Crop tab in the Properties window. To change the cropping area, use the sliders or type in the pixel values.
Step 4. Once you're happy with the cropping, click the Export Video button to send the video somewhere else.
Phần 3. Chọn cái nào
Để giúp bạn chọn công cụ thay đổi kích thước video phù hợp theo nhu cầu của mình, chúng tôi đã cung cấp biểu đồ so sánh bên dưới.
| Dụng cụ | Chất lượng | Tốc độ | Giao diện người dùng | Xử lý hàng loạt |
| Chuyển đổi video Ultimate | Tốt | Nhanh | Trực giác | Đúng |
| công chiếu | Tốt | Nhanh | Chuyên nghiệp | Đúng |
| DaVinci Resolve | Tốt | Nhanh | Chuyên nghiệp | Đúng |
| After Effects | Tốt | Nhanh | Chuyên nghiệp | Đúng |
| Final Cut Pro | Tốt | Nhanh | Chuyên nghiệp | Đúng |
| iMovie | Tốt | Nhanh | Đơn giản | Đúng |
| VLC | Trung bình | Nhanh | Đơn giản | Không |
| Phanh tay | Tốt | Chậm | Đơn giản | Đúng |
| OpenShot | Trung bình | Chậm | Đơn giản | Đúng |
Phần 4. Câu hỏi thường gặp về Video Resizers
Tôi có thể sử dụng trình thay đổi kích thước video để thay đổi tỷ lệ khung hình của video không?
Có, nhiều trình thay đổi kích thước video cho phép bạn thay đổi tỷ lệ khung hình của video. Nó có thể hữu ích nếu bạn cần thay đổi kích thước video của mình cho một nền tảng hoặc thiết bị cụ thể.
Làm cách nào để thay đổi tỷ lệ khung hình trong Resolve?
Bạn có thể thay đổi tỷ lệ khung hình của video bằng cách chọn clip trong dòng thời gian, đi tới bảng Thanh tra ở phía bên tay phải và điều chỉnh các giá trị Tỷ lệ hoặc Cắt xén trong phần Định cỡ. Bạn có thể kéo dài hoặc nén video theo chiều ngang hoặc chiều dọc để thay đổi tỷ lệ khung hình.
Tôi có thể cắt video trong Google Trang trình bày không?
Không thể trực tiếp cắt video trong Google Trang trình bày. Mặc dù Google Trang trình bày cho phép bạn thêm video vào bản trình bày của mình, nhưng nó chủ yếu là một công cụ và không cung cấp các tính năng chỉnh sửa video nâng cao như cắt xén.
Phần kết luận
Video resizers are powerful tools that allow you to resize videos, change their aspect ratios, and convert them to different file formats. While many video resizers are available, each utility has its strengths and weaknesses. By comparing different video resizers and choosing the one that best meets your needs, you can ensure that your videos are optimized for the platforms and devices you want to share.
-
 5 Trình thay đổi kích thước GIF tốt nhất hiện có trên mọi nền tảng [2023]
 Bạn muốn biết các công cụ thay đổi kích thước GIF mà bạn có thể sử dụng? Trong trường hợp đó, thông tin được cung cấp bên dưới sẽ nói về các công cụ thay đổi kích thước bạn có thể sử dụng trên GIF của mình trên tất cả các nền tảng.
-
 Cắt xén dễ dàng: Cách cắt video TikTok để tương tác đầy đủ
 Tìm hiểu cách cắt video TikTok của bạn bằng hướng dẫn đơn giản của chúng tôi! Bạn có thể tạo các video trực quan hấp dẫn hơn chỉ bằng một vài lần nhấn và vuốt.
-
 Cắt xén dễ dàng: Cách cắt video TikTok để tương tác đầy đủ
 Tìm hiểu cách cắt video TikTok của bạn bằng hướng dẫn đơn giản của chúng tôi! Bạn có thể tạo các video trực quan hấp dẫn hơn chỉ bằng một vài lần nhấn và vuốt.