


Hướng dẫn toàn diện để xuất iMovie sang MP4
iMovie là một trong những công cụ chỉnh sửa video phổ biến và được sử dụng nhiều nhất do Apple phát triển cho người dùng Mac, iPhone và iPad. Công cụ này có một bộ tính năng chỉnh sửa phong phú mà bất kỳ người biên tập nào cũng muốn sở hữu. Nhưng ở một khía cạnh khác, có một vấn đề mà người dùng đang gặp phải. Video từ công cụ này được xuất ra ở định dạng MOV. Định dạng mặc định này có thể gây ra những hạn chế về khả năng tương thích với các thiết bị và nền tảng khác. Vì vậy, hầu hết người dùng phải chuyển đổi các tệp MOV sang một định dạng được công nhận rộng rãi khác như MP4 để có thể phát trên các trình phát video khác. Nếu bạn cũng đang tìm cách xuất iMovie sang MP4, hãy đọc toàn bộ bài viết này.

Phần 1: Cách xuất iMovie sang MP4 trên máy Mac
Khi nói đến việc xuất video từ iMovie, có rất nhiều định dạng đầu ra để lựa chọn. Chỉ là chúng ta đã quen với định dạng MOV mặc định của nó. Với định dạng này, chúng ta thường gặp phải các vấn đề về khả năng tương thích khi phát video được xuất từ iMovie. Vì vậy, việc tìm hiểu cách xuất iMovie sang MP4 đang trở thành một vấn đề vì định dạng này được sử dụng rộng rãi và hầu hết được hỗ trợ bởi tất cả các thiết bị kỹ thuật số và trình phát phương tiện. Để xuất iMovie sang MP4 trên máy Mac, hãy làm theo các bước dưới đây:
Bước 1. Trước tiên, khởi chạy iMovie trên máy Mac của bạn.
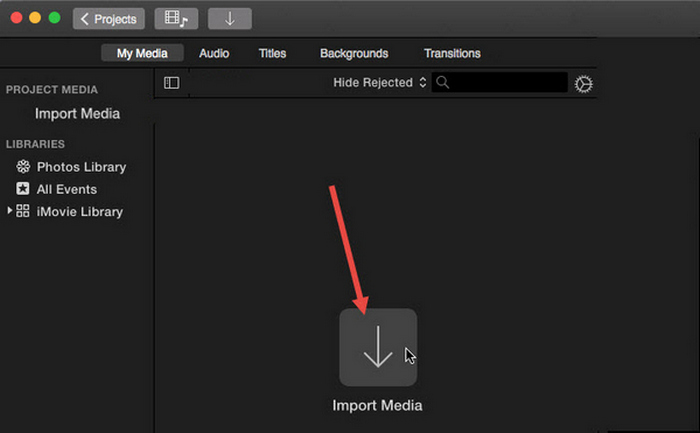
Bước 2. Tiếp theo, nhập video của bạn vào phần mềm bằng cách nhấp vào nút Import Media.
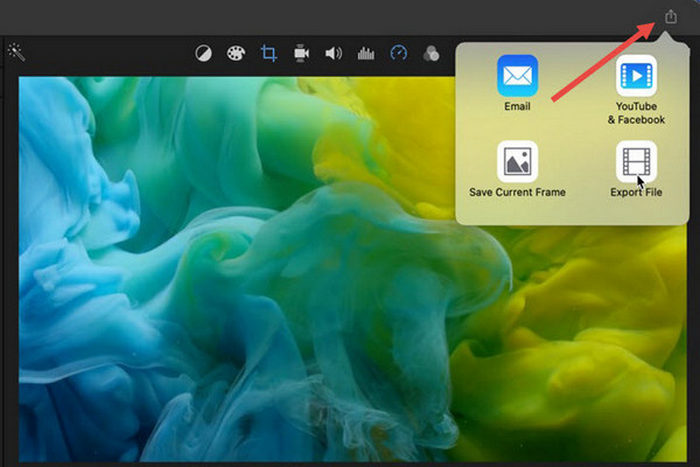
Bước 3. Bây giờ, trên thanh công cụ ở trên cùng, nhấp vào nút File, đi đến Share, sau đó đến File, hoặc trong cửa sổ xem trước, nhấp biểu tượng Share rồi chọn tùy chọn File trong hộp thoại bật lên.
Bước 4. Chọn Video and Audio trong cửa sổ tệp bật lên mới làm định dạng đầu ra, và điều chỉnh độ phân giải, chất lượng, cũng như các thông số khác theo nhu cầu của bạn.
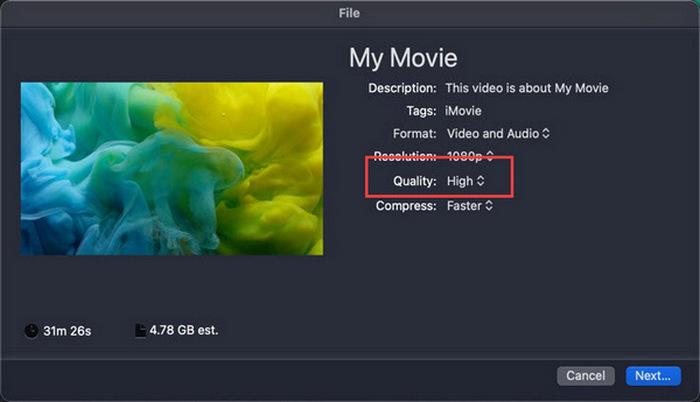
Lưu ý: Đừng chọn tùy chọn chất lượng ProRes nếu bạn muốn xuất tệp video ở định dạng MP4, vì nó sẽ được lưu ở định dạng MOV.
Bước 5. Cuối cùng, nhấp vào nút Next và đặt tên cho tệp iMovie MP4 mà bạn sắp xuất. Đừng quên chọn thư mục đầu ra và nhấp Next để lưu nó dưới dạng MP4.
Thực sự có một cách để xuất iMovie sang MP4 trực tiếp từ Mac. Tuy nhiên, quá trình này có vẻ hơi phức tạp, đặc biệt là khi xử lý định dạng tệp mặc định khi lưu video.
Nếu bạn muốn dùng iMovie trên Windows, đừng bỏ lỡ bài viết này.
Phần 2: Cách khắc phục lỗi iMovie Export không hoạt động [Giải pháp phổ biến]
Có thể có một số lý do khiến việc xuất iMovie không hoạt động bình thường. Dưới đây là một số giải pháp và phương án thay thế để giải quyết vấn đề xuất iMovie không hoạt động:
Giải pháp 1: Kiểm tra dung lượng lưu trữ
Một nguyên nhân phổ biến gây ra sự cố xuất iMovie là không đủ dung lượng đĩa trên máy Mac của bạn. Nếu bạn gặp sự cố khi xuất video, hãy bắt đầu bằng cách kiểm tra khả năng lưu trữ của bạn.
Đối với macOS Ventura hoặc mới hơn: Điều hướng đến biểu tượng menu Apple, chọn System Preferences, nhấp General, rồi chọn Storage ở phía bên phải.
Đối với các phiên bản macOS cũ hơn: Vào biểu tượng menu Apple, sau đó nhấp About This Mac và đi đến Storage.
Sau đó, nếu máy Mac của bạn sắp hết dung lượng lưu trữ, hãy cân nhắc xóa các tệp hoặc ứng dụng không cần thiết để giải phóng dung lượng. Sau khi thực hiện xong, hãy quay lại iMovie và thử xuất lại.
Giải pháp 2: Kiểm tra lại tên tệp
Nếu iMovie không xuất được video sau khi thử xuất nhiều lần, thì bạn cần xem lại tên tệp trong cài đặt đầu ra để đảm bảo tên tệp không chứa bất kỳ ký tự đặc biệt nào như dấu gạch nối, dấu gạch chéo, dấu phẩy, v.v. Thông thường, iMovie không hỗ trợ các ký tự đặc biệt khi đặt tên tệp.
Giải pháp 3: Khởi động lại iMovie
Nếu vấn đề vẫn tiếp diễn, hãy thử khởi động lại ứng dụng và xuất video lại. Nhưng đừng quên lưu dự án hiện tại trước. Để tắt hoàn toàn iMovie, nhấp vào biểu tượng ứng dụng và chọn tùy chọn Quit. Sau đó, khởi chạy lại iMovie, mở một dự án và kiểm tra xem bây giờ đã xuất được video hay chưa. Bạn cũng có thể thử khởi động lại Mac để khắc phục vấn đề.
Giải pháp 4: Cập nhật iMovie
Phiên bản iMovie đã lỗi thời thường gây ra lỗi xuất do một số lỗi và vấn đề hệ thống chưa được cập nhật. Để cập nhật iMovie, mở App Store, nhấp Updates ở bên trái, kiểm tra các bản cập nhật có sẵn cho iMovie rồi nhấp vào đó.
Giải pháp 5: Cài đặt lại iMovie
Nếu các giải pháp khác không khắc phục được lỗi xuất, hãy cân nhắc cài đặt lại iMovie. Để gỡ cài đặt iMovie khỏi Mac, mở Launchpad và nhấn phím Option, nhấp và giữ iMovie, sau đó nhấp nút X cạnh ứng dụng và nhấp Delete để xác nhận. Sau đó, vào App Store để tải xuống và cài đặt lại iMovie.
Phần thưởng: Cách khắc phục lỗi iMovie Export không hoạt động [Cách khác]
Nếu không có giải pháp nào hiệu quả với bạn, đã đến lúc thử cách thay thế này để khắc phục lỗi iMovie không xuất được. FVC Video Converter Ultimate được biết đến với khả năng chuyển đổi toàn diện, cho phép người dùng chuyển đổi video sang bất kỳ định dạng nào họ muốn. Không chỉ vậy, nó còn có các tính năng khác như MV được thiết kế cho người dùng muốn chỉnh sửa video. Tương tự iMovie, bạn chỉ cần nhập các tệp muốn chỉnh sửa, sau đó sử dụng các tính năng chỉnh sửa như cắt và xoay clip, thêm hiệu ứng và bộ lọc, cũng như chèn nhạc nền để video thêm hấp dẫn, và nhiều hơn nữa. Sau đó, xuất tệp sang MP4.
Hơn nữa, công cụ này hỗ trợ độ phân giải HD/4K/8K, đảm bảo chất lượng đầu ra hàng đầu. Và phần tuyệt nhất? Nó hoạt động với tốc độ cực nhanh, hoàn thành chuyển đổi nhanh hơn 120 lần so với các phương pháp khác.
Bước 1. Trước tiên, trên máy tính Windows hoặc Mac của bạn, tải về và cài đặt FVC Video Converter Ultimate.
Tải xuống miễn phí cho Windows 7 trở lên. Tải xuống an toàn.
Tải xuống miễn phí cho MacOS 10.7 trở lên. Tải xuống an toàn.
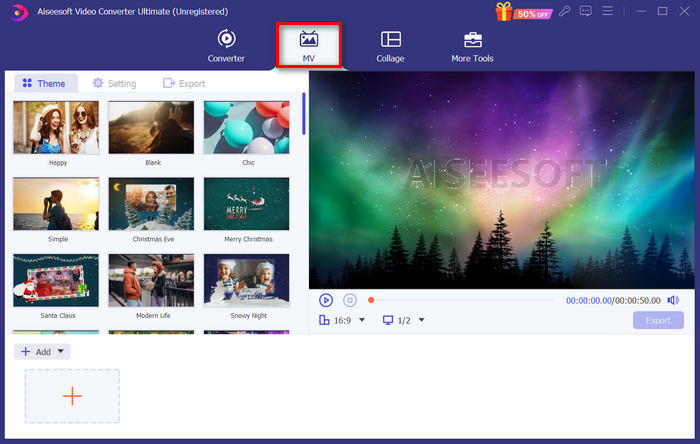
Bước 2. Sau đó, khi ở giao diện của công cụ, hãy đi đến tab MV.
Bước 3. Bây giờ, nhấp nút Add File để thêm các tệp mà bạn muốn chuyển sang MP4.
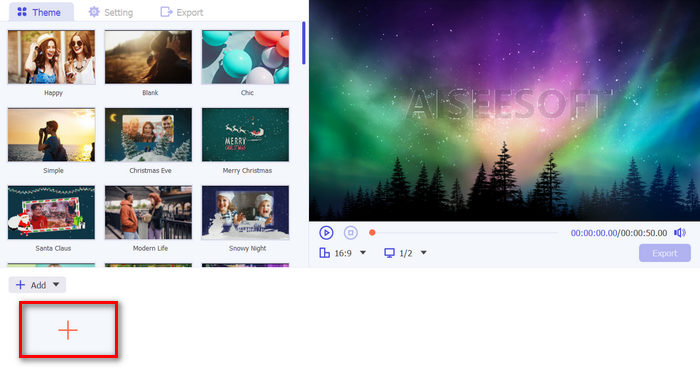
Bước 4. Để thêm, chỉnh sửa và cắt video MP4 của bạn, nhấp vào nút ở phía trên của nút Add File. Ngoài ra, bạn có thể thêm chủ đề cho video bằng cách chọn từ danh sách các chủ đề có sẵn trong tab Theme phía trên.
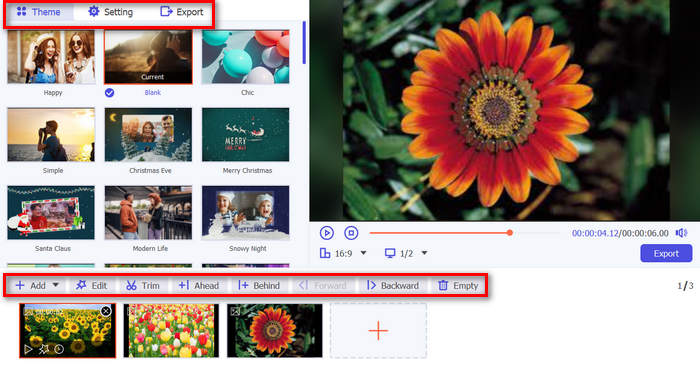
Bước 5. Để tăng cường hơn nữa tệp MP4 mà bạn đang chỉnh sửa, bạn có thể thêm bộ lọc và hiệu ứng bằng cách nhấp vào biểu tượng Edit bên dưới. Bạn cũng có thể thêm watermark để cá nhân hóa tệp.

Bước 6. Khi hoàn tất, nhấp nút Export, tại đây bạn có thể đổi định dạng sang MP4 và thay đổi tốc độ khung hình, độ phân giải và chất lượng.
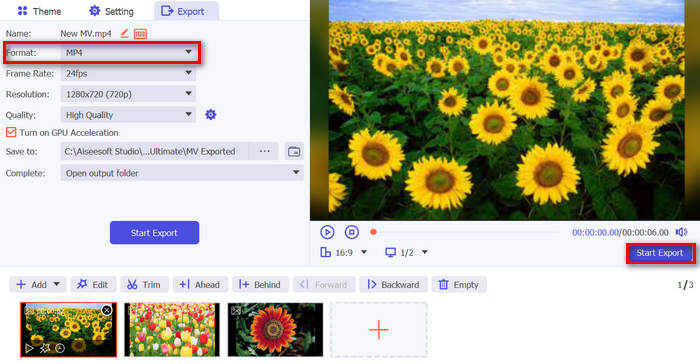
Bước 7. Cuối cùng, để lưu tệp của bạn, hãy nhấp vào nút Start Export.
Với FVC Video Converter Ultimate, bạn không cần phải lo lắng về cách chuyển đổi tệp iMovie sang MP4 khi xuất sang định dạng MOV. Ngoài ra, đây là giải pháp thay thế tuyệt vời bất cứ khi nào bạn gặp sự cố xuất với iMovie, vì đây là công cụ đầy đủ tính năng. Bạn có thể có mọi thứ mình cần, đặc biệt là về việc chuyển đổi tệp từ định dạng này sang định dạng khác.
Phần 3: Cách xuất iMovie sang MP4 trên iPad/iPhone
Đối với những người sử dụng iOS hoặc iPadOS và muốn xuất và chuyển đổi iMovie sang MP4 trên iPhone hoặc iPad, sau đây là cách xuất iMovie sang MP4 trên iPad/iPhone.
Bước 1. Trước tiên, trên iPhone hoặc iPad của bạn, mở ứng dụng iMovie.
Bước 2. Sau đó, từ tab Projects, chọn dự án mà bạn muốn xuất sang MP4.
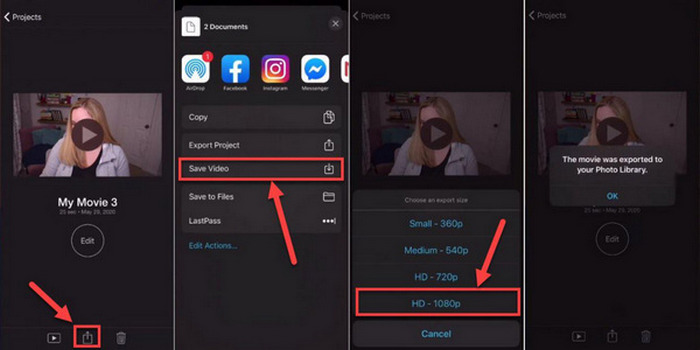
Bước 3. Tiếp theo, chạm nút Share và chọn Export Project.
Bước 4. Cuối cùng, chọn Save Video, sau đó chọn kích thước xuất và chuyển đổi, lưu iMovie sang MP4 trên iPhone hoặc iPad của bạn.
Khi xuất và chuyển đổi iMovie sang MP4 trực tiếp trên iPhone hoặc iPad, hãy nhớ đảm bảo rằng bạn có đủ dung lượng lưu trữ trên thiết bị để chứa tệp MP4 đã xuất, vì điều này có thể dẫn đến các sự cố và lỗi khi xuất.
Phần 4: Câu hỏi thường gặp về việc xuất iMovie sang MP4
Tại sao tệp video iMovie của tôi không tương thích với QuickTime?
Tệp iMovie có thể không tương thích với QuickTime do sự khác biệt về codec hoặc định dạng tệp. QuickTime hỗ trợ một số loại codec video và loại tệp hạn chế, vì vậy nếu tệp iMovie của bạn sử dụng codec hoặc định dạng không được QuickTime hỗ trợ, có thể phát sinh sự cố về khả năng tương thích. Để giải quyết vấn đề này, hãy thử xuất dự án iMovie của bạn ở định dạng hoặc codec khác tương thích với QuickTime.
Phải mất bao lâu để xuất một file iMovie?
Thông thường, phải mất 1,5 đến 2 lần thời gian phát lại của dự án để kết xuất và mã hóa trong quá trình xuất. Các yếu tố như độ phức tạp của dự án, độ phân giải video và sức mạnh xử lý của thiết bị có thể ảnh hưởng đến thời gian xuất. Ngoài ra, việc xuất các dự án lớn hơn hoặc phức tạp hơn có thể mất nhiều thời gian hơn so với các dự án nhỏ hơn hoặc đơn giản hơn.
Việc xuất iMovie sang MP4 có ảnh hưởng đến chất lượng video của tôi không?
Xuất iMovie sang MP4 sẽ không ảnh hưởng đáng kể đến chất lượng video của bạn miễn là bạn chọn cài đặt xuất phù hợp. Tuy nhiên, điều quan trọng là đảm bảo rằng bạn chọn độ phân giải, tốc độ bit và cài đặt nén mong muốn để duy trì chất lượng video bạn muốn xuất.
Phần kết luận
Việc học cách xuất iMovie sang MP4 rất quan trọng để đảm bảo tính tương thích và linh hoạt khi chia sẻ các dự án video của bạn trên nhiều thiết bị và nền tảng khác nhau. Vì vậy, nếu bạn gặp bất kỳ sự cố nào trong quá trình xuất trên iMovie, hãy đảm bảo xem qua các giải pháp phổ biến được nêu ở đây. Hãy bắt đầu xuất các dự án iMovie của bạn sang MP4 ngay hôm nay với hướng dẫn này.
-
 Các cách tốt nhất để sử dụng iMovie trong việc tạo video chuyển động chậm [Đã giải quyết]
 Bạn đã bao giờ sử dụng iMovie để chuyển đổi video tốc độ bình thường sang chuyển động chậm chưa? Đây là cơ hội để biết thêm về nó.
-
 Cách đồng bộ hóa âm thanh và video trong iMovie trên iPhone và Mac
 Bạn gặp sự cố vì âm thanh và video không được đồng bộ hóa trên iPhone và Mac? Vì vậy, bây giờ, chúng ta hãy tiến hành cách sử dụng iMovie bằng cách đọc bài viết này.
-
 Cách thêm hình mờ vào video trong iMovie trên máy Mac [All Embracing]
 Bạn có muốn biết bí quyết thêm hình mờ vào video trong iMovie không? Đừng làm đổ trà vào bất cứ ai, và hãy học nó bằng cách đọc bài viết này.