


Những cách tốt nhất để nén hình ảnh trong PowerPoint
Một PPT có thể không quá lớn ngay từ đầu, nhưng sau khi bạn chèn đủ loại hình ảnh rõ nét, video chất lượng cao và các đoạn văn bản lớn vào đó, nó có thể trở thành một tệp rất lớn. Lúc này, bạn sẽ thấy rằng khi bạn cố gắng gửi PPT đã hoàn thành của mình cho người khác qua email hoặc phương tiện truyền thông xã hội, bạn sẽ gặp phải giới hạn về kích thước tệp. Nếu hình ảnh trong PPT mà chúng ta trình bày trước công chúng quá lớn, nó cũng có thể gây ra sự chậm trễ trong việc tải toàn bộ nội dung của trang. Điều này ảnh hưởng đến ấn tượng của khán giả về chúng ta.
Vậy chúng ta nên bắt đầu từ đâu để giải quyết kiểu vấn đề này? Hãy thử nén ảnh trong PowerPoint. Các công cụ PowerPoint trên cả Windows và Mac đều hỗ trợ nén hình ảnh. Trong hướng dẫn này, chúng tôi sẽ chỉ cho bạn cách áp dụng chi tiết. Xét đến việc bạn có thể có nhiều nhu cầu khác với các hình ảnh phức tạp hơn, chúng tôi cũng sẽ giới thiệu những công cụ nén ảnh bên thứ ba chuyên dụng nhất. Tất cả nhằm giúp bạn tạo được bài thuyết trình mượt mà nhất có thể.

Phần 1. Cách nén ảnh trong PowerPoint trên Windows
Chúng ta hãy bắt đầu với máy tính cá nhân.
Sau đây là cách nén ảnh trong PowerPoint trên máy tính Windows.
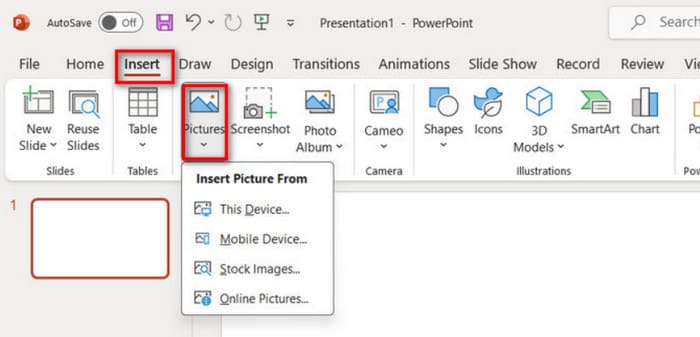
Bước 1. Mở PowerPoint, vào Insert > Pictures và thêm các hình ảnh bạn muốn nén.
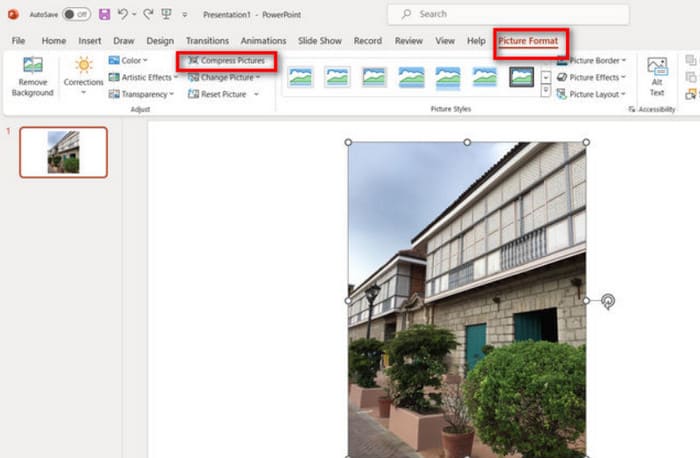
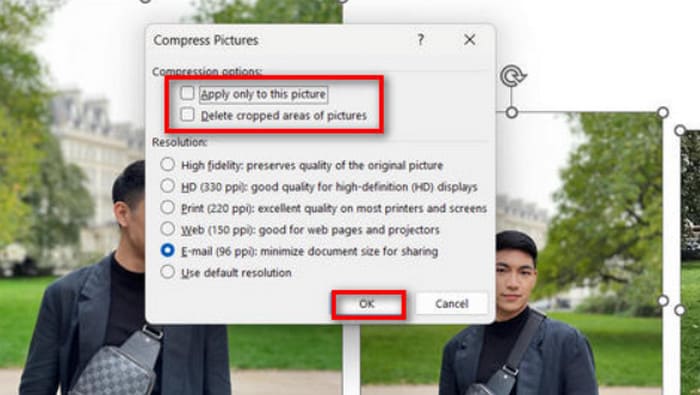
Bước 2. Chọn hình ảnh, sau đó nhấp vào Compress Pictures dưới thẻ Picture Format.
Bước 3. Chọn tùy chọn nén và độ phân giải mục tiêu. Các tùy chọn PowerPoint cung cấp khá linh hoạt. Bạn có thể tùy chỉnh độ phân giải của hình sau khi nén.
Bước 4. Để chỉ thay đổi hình ảnh đang chọn, hãy đánh dấu Apply only to this picture, rồi xác nhận.
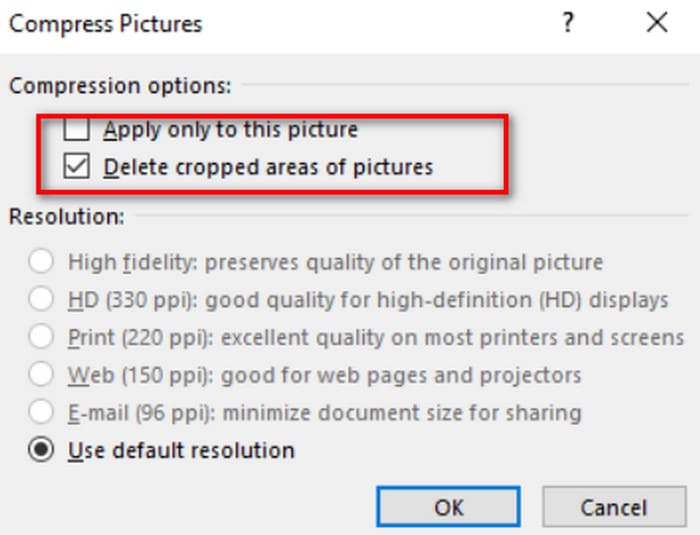
Các bước trên áp dụng khi bạn muốn nén ảnh hiện tại. Nếu đây là ảnh bạn đã cắt, vui lòng đừng quên bật tùy chọn Xóa vùng ảnh đã cắt. Thao tác này cũng sẽ giảm kích thước tệp của ảnh hiện tại ở một mức độ nào đó.
Nếu bạn muốn nén nhiều hình ảnh cùng lúc trên Windows, hãy đọc tiếp.
Sau đây là cách nén hình ảnh trong PPT.
Bước 1. Vào thẻ Insert và chọn Pictures để nhập ảnh của bạn.
Bước 2. Nhấp chuột phải để chọn tất cả ảnh, sau đó vào thẻ Picture Format và nhấp Compress Pictures.
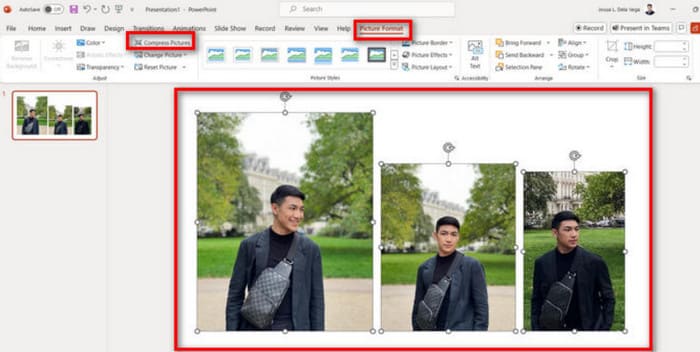
Bước 3. Chọn thiết lập nén. Để nén tất cả hình trong bản trình chiếu, hãy bỏ chọn Apply only to this picture. Khi đã sẵn sàng, nhấp OK.
Phần 2. Nén ảnh trong PowerPoint trên máy Mac
PowerPoint trên máy tính Mac cũng hỗ trợ nén kích thước hình ảnh. Nếu bạn là người dùng Mac, vui lòng xem phần phụ này.
Sau đây là cách nén hình ảnh trong PowerPoint trên MacBook.
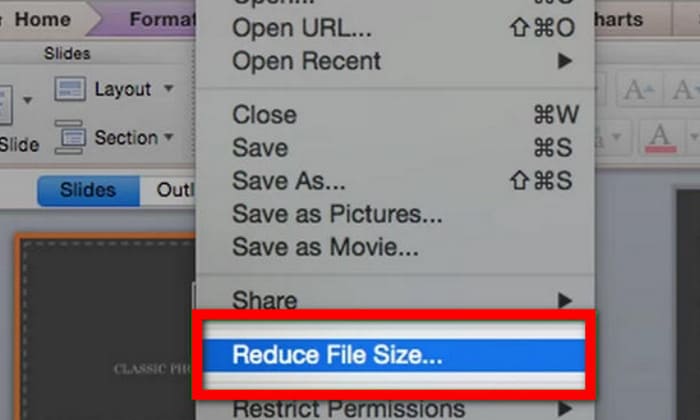
Bước 1. Mở tệp PowerPoint, vào menu File và chọn Reduce File Size.
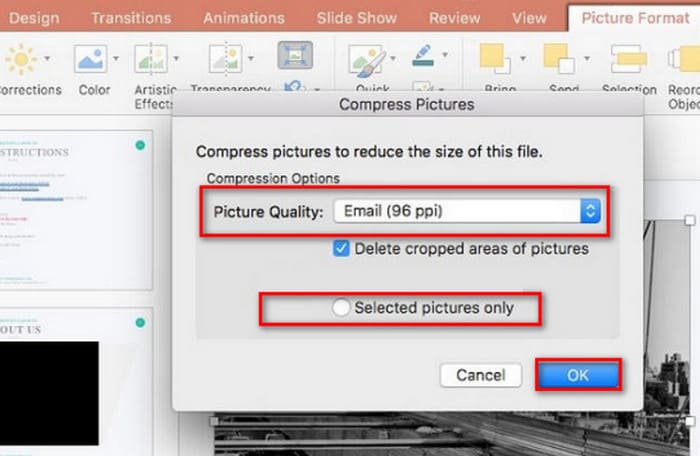
Bước 2. Trong hộp thoại hiện ra, chọn Email (96 ppi) trong danh sách thả xuống Picture Quality và đánh dấu Delete cropped areas of pictures.
Bước 3. Chọn Selected pictures only, rồi nhấp OK.
Nếu bạn muốn nén kích thước của nhiều hình ảnh trên máy Mac cùng lúc, vui lòng làm theo các bước sau.
Bước 1. Từ menu File, chọn Reduce File Size.
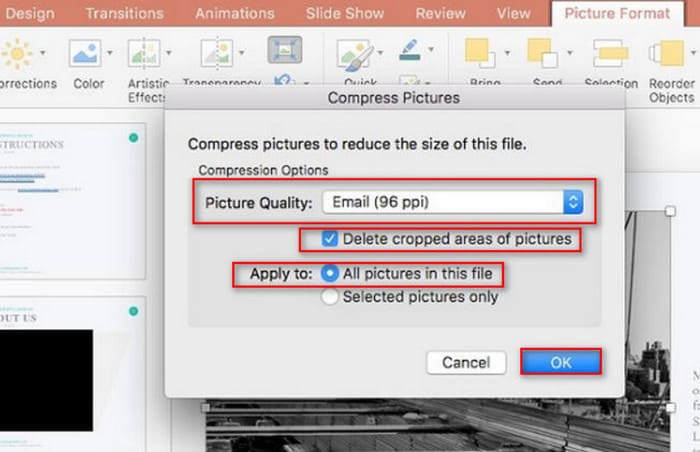
Bước 2. Chọn Email (96 ppi) dưới mục Picture Quality. Đánh dấu Delete cropped areas of pictures.
Bước 3. Chọn All pictures in this file,, rồi nhấp OK.
Phần 3. Cách nén hình ảnh cho PowerPoint bằng công cụ của bên thứ ba
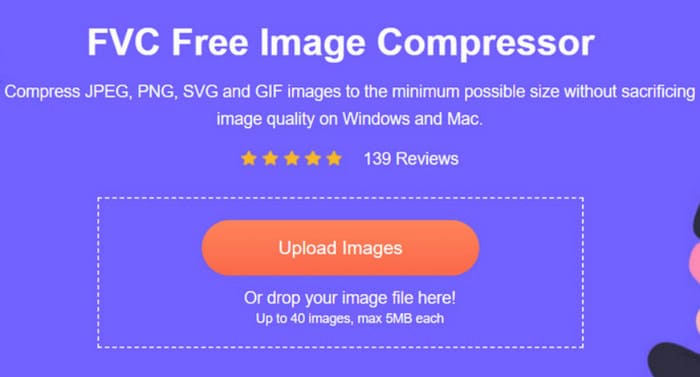
Tính năng Compress Photo trong PowerPoint dễ thao tác và hiệu quả, nhưng có thể ảnh hưởng đáng kể đến chất lượng hình ảnh. Điều này sẽ khiến bài trình chiếu trông thiếu chuyên nghiệp và hiển thị không đủ tốt. Vì vậy, chúng tôi khuyên bạn sử dụng một công cụ chuyên nghiệp như FVC Free Image Compressor. Trước hết, hãy tải lên các hình ảnh bạn muốn chèn vào PPT lên nền tảng trực tuyến này. Bạn có thể nén chúng xuống kích thước mong muốn chỉ với một cú nhấp. Nền tảng tích hợp các tính năng chỉnh sửa ảnh cơ bản, cho phép xoay, lật hoặc thay đổi kích thước hình ảnh. Khi mọi thứ đã xong, hãy lưu hình đã chỉnh sửa về máy tính, rồi chèn vào PPT. Lưu ý rằng bạn không cần tải hoặc cài đặt bất kỳ phần mềm nào trong suốt quá trình. Chỉ cần mở trình duyệt. Điều còn đáng ngạc nhiên hơn là FVC Free Image Compressor hoàn toàn miễn phí.
Sau đây là cách nén ảnh trong PowerPoint bằng FVC Free Image Compressor.
Bước 1. Mở FVC Free Image Compressor bằng trình duyệt của bạn.
Bước 2. Nhấp Upload Images để thêm tệp bạn muốn nén.
Bước 3. Quá trình nén sẽ tự động bắt đầu. Sau đó, kiểm tra kết quả và nhấp Download để lưu hình ảnh đã giảm dung lượng.
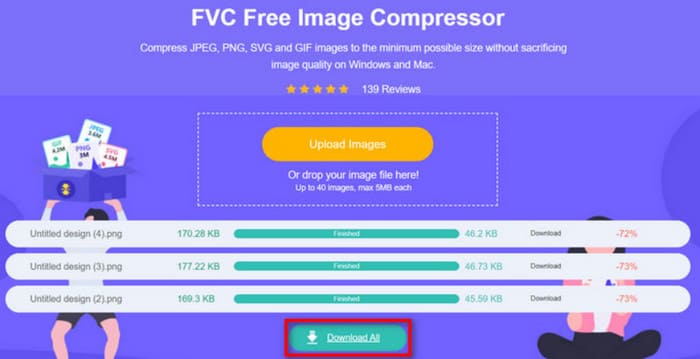
Sau khi quá trình nén hoàn tất, FVC Free Image Compressor sẽ hiển thị phần trăm hình ảnh được nén và kích thước trước và sau khi nén trên màn hình.
Mặc dù tỷ lệ nén rất lớn, chúng ta sẽ ngạc nhiên khi thấy chất lượng hình ảnh không bị ảnh hưởng đáng kể. FVC Free Image Compressor sử dụng các thuật toán nén và tối ưu hóa tiên tiến.
Phần 4. Câu hỏi thường gặp về việc nén ảnh trong PowerPoint
Tại sao kích thước tệp PowerPoint của tôi lại lớn như vậy?
Nhiều người sẽ quen với việc chèn hình ảnh có độ phân giải cao khi tạo tệp PowerPoint. Và nhúng hoạt ảnh video và hiệu ứng chuyển tiếp vào các vị trí phù hợp. Tất cả các yếu tố thiết kế này sẽ làm cho tệp của bạn lớn. Nếu bạn muốn biến PowerPoint thành một dạng dễ lưu trữ và truyền tải hơn, chúng tôi khuyên bạn nên nén hình ảnh hoặc video được chèn vào đó. Nhưng hãy ghi nhớ điều này và đừng đánh đổi quá nhiều vào chất lượng hình ảnh mà ảnh mang lại.
Làm thế nào để nén hình ảnh trong PowerPoint?
Ngay trong PowerPoint đã có sẵn tính năng nén hình. Để bắt đầu sử dụng, bạn cần chọn các hình cần xử lý rồi tìm Picture Format > Compress Pictures trên thanh thao tác.
Làm thế nào để nén ảnh?
Có rất nhiều công cụ nén ảnh chuyên nghiệp. Bạn có thể lựa chọn Adobe Photoshop, FVC Free Image Compressor, Google Photos, TinyPNG và nhiều công cụ khác. Nếu bạn đang tìm trình nén GIF, hãy xem qua EZgif, VEED.io, FreeConvert và một số dịch vụ khác.
Phần kết luận
Dù dùng Windows hay Mac, bạn đều có thể tìm thấy cách để nén ảnh trong PowerPoint trong bài hướng dẫn này. Mặc dù PowerPoint có sẵn chức năng nén hình, nó có thể không giúp bạn tìm được sự cân bằng tốt hơn giữa chất lượng và dung lượng ảnh.
Để thực hiện nén ảnh PowerPoint hiệu quả hơn, hãy cân nhắc sử dụng một công cụ chuyên nghiệp như FVC Free Image Compressor để đáp ứng nhu cầu của bạn. Công cụ này dễ sử dụng và tải nhanh. Các bước vận hành để xử lý ảnh cũng đã được đề cập ở trên.
-
 Cách thay đổi kích thước ảnh trong PowerPoint [Cách nhanh nhất để thay đổi kích thước]
 Học cách thay đổi kích thước ảnh trong PowerPoint là điều cần thiết, đặc biệt nếu bạn muốn sử dụng nó trong bản trình bày của mình. Đọc bài viết này để biết làm thế nào để làm điều đó.
-
 Cách khắc phục video không phát trong PowerPoint | Hướng dẫn nhanh
 Video PowerPoint của bạn không phát? Vượt qua nỗi thất vọng về việc video nhúng hiện không phát bằng năm giải pháp tốt nhất của chúng tôi để giải quyết chúng một cách dễ dàng.
-
 2 cách nén video cho YouTube
 Video YouTube có dung lượng lớn và tải lên chậm? Chỉ cần nén kích thước tệp video thành nhỏ hơn cho YouTube theo 2 cách trực tuyến và trên máy tính.