


Cách xóa hình mờ khỏi đồ thị gốc một cách hiệu quả trên đồ thị
Bạn có thể cần dùng Origin Graph để tạo một mẫu biểu đồ cho dữ liệu toán học hoặc khoa học quá phức tạp để diễn đạt bằng lời. Phần mềm này đã hỗ trợ sinh viên, nhà nghiên cứu, giáo sư, người làm kinh doanh và nhiều đối tượng khác khi họ cần tự tạo đồ thị. Với bộ mẫu (template) có sẵn để lựa chọn, bạn có thể tạo ra một biểu đồ bắt mắt, thu hút sự chú ý của người xem. Vấn đề bạn có thể gặp phải nếu dùng bản miễn phí là phần mềm sẽ chèn chữ watermark vào kết quả cuối cùng. Bạn đang khó xử vì watermark này? Đừng lo nữa! Vì chúng tôi đã có giải pháp cho bạn. Tại đây, chúng tôi sẽ giới thiệu những mẹo hữu ích về cách xóa watermark khỏi Origin Graph để bạn có thể dùng biểu đồ đó trong bài thuyết trình Word hoặc PowerPoint của mình.

Phần 1. Cách xóa hình mờ khỏi đồ thị gốc bằng công cụ xóa hình mờ hình ảnh trực tuyến
FVC Free Watermark Remover Online là công cụ xóa chữ watermark hàng đầu mà bạn có thể dùng để loại bỏ watermark của Origin Graph. Công cụ này cực kỳ hiệu quả trong việc xóa mọi đối tượng trên ảnh, giúp hình ảnh trông chuyên nghiệp hơn sau khi watermark được loại bỏ. Với nó, chúng tôi có thể khẳng định đây là một trình xóa watermark chuyên dụng mà bạn có thể sử dụng và tin cậy bất cứ khi nào gặp vấn đề này. Bạn thắc mắc không biết công cụ này có dễ dùng không? Đừng lo nữa! Vì các bước chúng tôi nêu dưới đây chính là những gì bạn có thể làm theo để loại bỏ chữ watermark trên ảnh mà Origin Graph thêm vào.
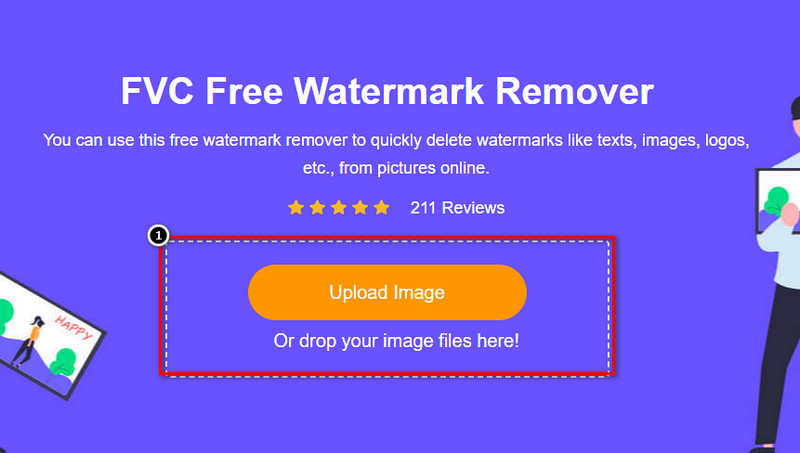
Bước 1. Bạn hãy nhấp vào liên kết này để mở trình xóa watermark ảnh trực tuyến; một thẻ mới sẽ được mở ra để bạn truy cập công cụ.
Bước 2. Nhấn Upload Image để thêm ảnh có watermark, tìm file ảnh trong thư mục rồi nhấp Open để tải ảnh lên thành công.
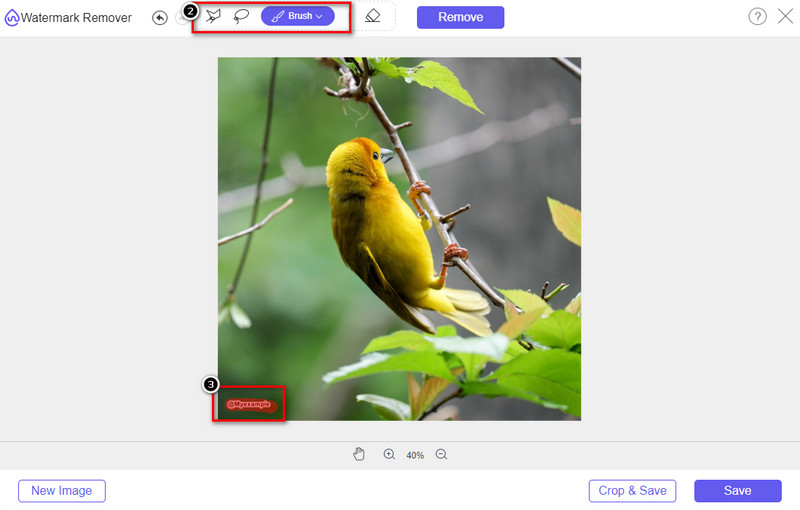
Bước 3. Bạn có thể dùng ba công cụ để tô vùng watermark; dù cách hoạt động khác nhau, hiệu quả của chúng là như nhau. Hãy chọn một công cụ rồi đánh dấu vùng ảnh có chứa watermark.
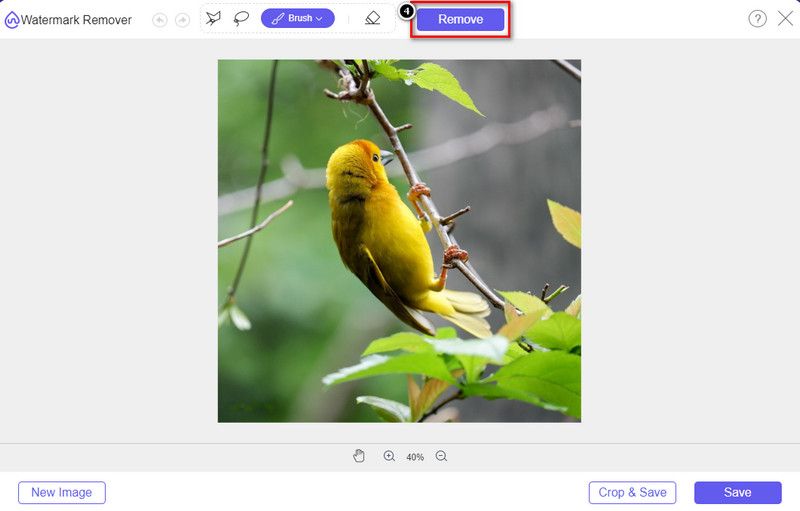
Bước 4. Đảm bảo bạn nhấp vào biểu tượng Remove sau khi đã tô vùng watermark bằng công cụ. Bước này rất quan trọng để khi xuất ảnh, bạn sẽ có được hình ảnh không còn watermark.
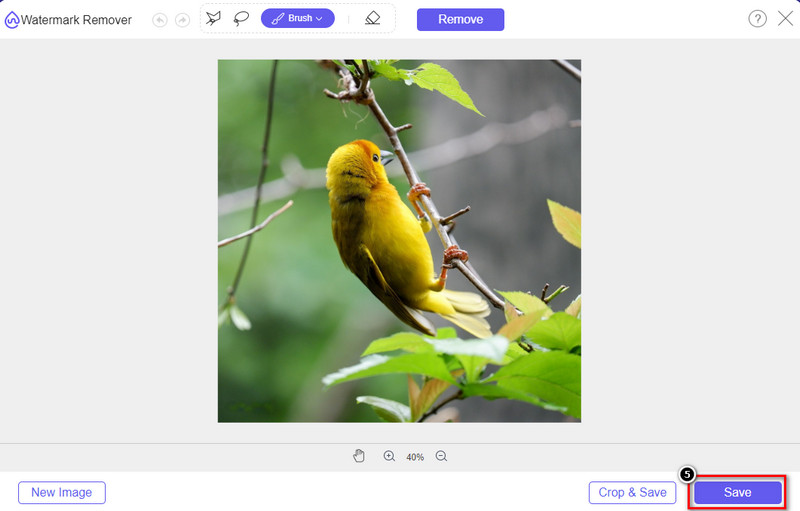
Bước 5. Để bắt đầu quá trình xuất ảnh, bạn có thể nhấp vào nút Save. Chờ quá trình hoàn tất, sau đó bạn có thể kiểm tra lại ảnh, lúc này watermark Origin Graph sẽ không còn xuất hiện trên khu vực đó nữa.
Ưu điểm
- Một công cụ xóa hình mờ hình ảnh dựa trên web miễn phí mà bạn có thể truy cập.
- Nó hoạt động hiệu quả trong việc xóa hình mờ với sự hỗ trợ của Công nghệ AI.
- Nó hỗ trợ nhiều định dạng hình ảnh mà bạn có thể có trên ổ đĩa cục bộ của mình.
- Không có hình mờ nào được thêm vào hình ảnh đã xuất.
Nhược điểm
- Cần kết nối internet để hoạt động.
- Trọng tâm của nó là loại bỏ hình mờ và không có gì khác.
Phần 2. Cách sao chép đồ thị từ Origin sang Word hoặc PowerPoint mà không có Watermark
Trong phần này của bài viết, chúng tôi sẽ cung cấp cho bạn quy trình bạn sẽ cần biết để thêm đồ thị bạn đã tạo trên Đồ thị gốc mà không có hình mờ. Hãy làm theo nó để thêm biểu đồ bạn tạo thành công trên Microsoft Word và PowerPoint mà không có hình mờ.
Bạn sẽ cần giải phóng ít nhất 1,9GB vì kích thước tệp lớn của nó. Trong tệp 1,9GB, bạn có thể có sự trợ giúp bạn cần, nhưng nếu bạn không muốn trợ giúp, bạn có thể tải xuống phiên bản 652 MB của nó thông qua .zip hoặc .exe.
Các bước về Cách tạo Đồ thị trên Đồ thị Gốc mà không có Hình mờ:
Bước 1. Trước tiên, hãy tải Origin Graph về hệ điều hành của bạn bằng cách truy cập trang web chính thức của họ. Mở phần mềm để bắt đầu tạo biểu đồ bạn muốn.
Bước 2. Sau khi khởi chạy phần mềm, hãy thêm các giá trị của bảng dữ liệu bạn cần. Bạn có thể thêm nhiều biến và tương ứng là nhiều biểu đồ tại đây.
Bổ sung: Bạn có thể nhấp vào Plot để xem các dạng biểu đồ khác có thể dùng, như Basic 2D, Bar, Statistical và nhiều loại khác.
Bước 3. Nhấp File, rồi chọn Save để xuất biểu đồ bạn đã tạo.
Bước 4. Bạn có thể làm theo các bước chúng tôi đã nêu ở Phần 1 và áp dụng hướng dẫn xóa watermark khỏi Origin Graph với sự trợ giúp của FVC Free Watermark Remover Online.
Cách sử dụng Biểu đồ trên Word mà không có Hình mờ:
Bước 1. Mở ứng dụng Word trên máy tính, rồi nhấp Trang Trống (Blank Page). Nếu bạn đã có sẵn tệp Word, hãy mở tệp đó.
Bước 2. Vào mục Insert, sau đó nhấp Pictures. Tìm file biểu đồ trong ổ đĩa nội bộ, nhấp chọn một lần rồi nhấn Open để chèn vào Word.
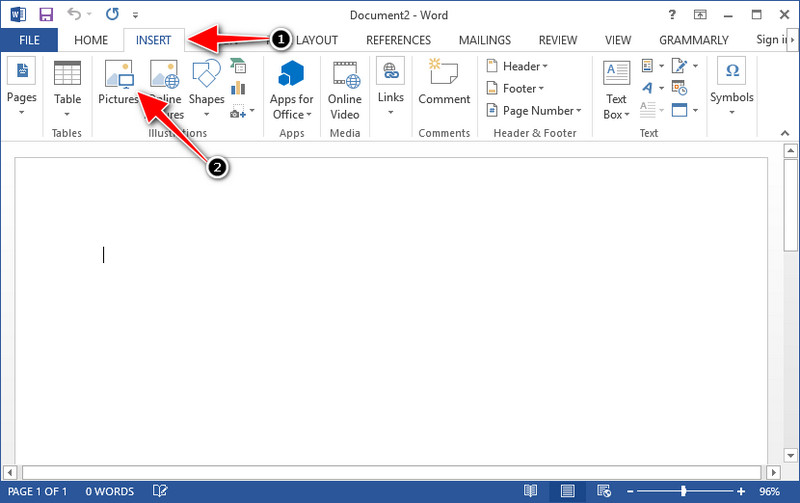
Bước 3. Biểu đồ sẽ tự động được tải vào tài liệu Word bạn đang mở hoặc đã tạo; bạn có thể đặt vị trí biểu đồ bằng cách giữ và kéo nó trong trang Word.
Cách sử dụng Biểu đồ trên Powerpoint mà không có Hình mờ:
Bước 1. Mở PowerPoint trên máy tính và nhấp Blank Presentation. Bạn cũng có thể xem lại các bản trình chiếu gần đây ở bên trái. Nếu có tệp cần chèn biểu đồ, hãy nhấp để mở tệp đó.
Bước 2. Nhấn Insert rồi chọn Picture để chèn hình ảnh biểu đồ bạn đã tạo bằng Origin Graph.

Bước 3. Điều chỉnh kích thước và vị trí hình biểu đồ trên slide.
Đọc thêm:
Cách xóa watermark B612 khỏi ảnh của bạn
Cách xóa watermark WOW Slider miễn phí
Phần 3. Câu hỏi thường gặp về Cách xóa Hình mờ khỏi Đồ thị gốc
Origin Pro là bao nhiêu?
Đối với người dùng cá nhân, bạn có thể tải xuống phiên bản cao cấp của Origin Graph cho $435 bắt đầu. Bạn có thể ghé thăm cửa hàng chính thức của nó trên Origin Lab.
Tôi có thể chính thức tải xuống Đồ thị gốc ở đâu?
Truy cập Phòng thí nghiệm Nguồn gốc để tải xuống Đồ thị Nguồn gốc. Trước khi bạn có thể tải xuống phần mềm trên máy tính để bàn của mình, nó sẽ đặt câu hỏi. Sau đó, sẽ có hai tùy chọn để tải file, bạn muốn tải về có cần trợ giúp hay không dưới dạng .exe hoặc zip.
Excel và Origin có giống nhau không?
Excel và Origin có GUI giống như bảng tính để sắp xếp dữ liệu, tính toán và xác định nhãn. Tuy nhiên, Excel tập trung vào việc chứa nhiều cột và hàng mà bạn có thể sử dụng. Nhưng với Origin, nó là để sắp xếp các thuộc tính sử dụng công thức cột chứ không phải công thức ô như những gì Excel hỗ trợ.
Phần kết luận
Bây giờ bạn đã học cách xóa hình mờ khỏi Biểu đồ gốc, đã đến lúc bạn sử dụng biểu đồ bạn đã tạo và trình bày nó một cách chuyên nghiệp. Nếu mục đích của bạn là sử dụng trên Word hoặc Powerpoint, bạn có thể đọc Phần 2 để biết cách thực hiện. Xóa hình mờ bằng công cụ này cho đến nay là mong muốn cao nhất của những ai muốn xóa hình mờ trên hình ảnh. Vấn đề được giải quyết với công cụ này. Nếu bài viết này giúp ích cho bạn, vui lòng để lại 5 sao bên dưới.
-
 Cách xóa hình mờ bằng Pixlr trong các bước chi tiết [Hiệu quả]
 Bạn muốn biết cách xóa hình mờ bằng Pixlr? Nếu vậy, hãy tiếp tục đọc phần bên dưới để biết cách thực hiện và các giải pháp thay thế bạn có thể sử dụng.
-
 Xóa hình mờ Animotica trên các video đã xuất với 3 cách đã được chứng minh
 Bạn đã bao giờ tự hỏi liệu có thể xóa hình mờ Animotica trên các video bạn đã xuất hay không? Bài viết này cung cấp cách thực hiện.
-
 Các cách miễn phí để xóa hình mờ VideoShop trên video [Dễ dàng]
 Để xóa hình mờ VideoShop, thiết bị của bạn sẽ cần một trình xóa hình mờ. Để biết đây là những gì, hãy đọc bài viết này.