

如何在 Mac 上使用截圖工具:最詳細的指南
說到截屏,不同的作業系統有各自的處理方式。在 Windows 上,你可以使用鍵盤快速鍵調出截圖工具來截取螢幕上的內容,Mac 也是。
無論你使用的是 MacBook Pro 還是 MacBook Air,它們都內建螢幕截圖工具。若你不確定如何找到這些工具,或如何在 Mac 上使用剪取工具,本指南將適合你。在本指南中,我們會說明 Mac 上各種截圖模式的差異、如何啟用與使用它們,以及如何自訂這些模式來配合你日常的工作流程。
對於需要截圖工具但需要比標準 Mac 截圖工具更高級產品的用戶,我們也推薦最佳的替代軟體。

第一部分:截圖工具的不同模式
Mac 電腦有截圖工具嗎?答案很明顯——有。
我們相信,在開始使用之前,您應該了解Mac截圖工具包含哪些功能,以及每個功能如何幫助您截圖。
因此,我們將利用本節向您介紹它們。
Mac截圖工具主要有全螢幕截圖、視窗截圖、矩形截圖三種模式,這裡詳細介紹一下。全螢幕截圖
此模式可讓您截取電腦螢幕上顯示的全部內容。當您需要截取整個螢幕,尤其是同時截取多個視窗的內容時,可以啟用此模式。
窗戶剪
此模式可協助您截取螢幕上的特定窗口,例如開啟的瀏覽器頁面、軟體介面、對話框或資料夾內容。啟用此模式後,只需單擊即可選擇目標視窗。
長方形剪
這是最靈活且最常用的模式。它允許您使用滑鼠繪製任意形狀的矩形進行螢幕截取。如果您需要截取螢幕上不規則的區域,例如帶有圖示或按鈕的區域,則可以使用此模式。
以這三種模式擷取的螢幕截圖,會以 Screen Shot [日期] at [時間].png 這種格式儲存到桌面上。如果找不到,請到 Finder 中查看。
第 2 部分。如何在 Mac 上使用截圖工具
在大致了解概念之後,我們將立即開始學習如何在 Mac 上使用截圖工具。通常,啟動截圖工具有兩種方式:快捷鍵和工具列。本節將詳細介紹這兩種方式,並提供如何使用截圖工具錄製影片的額外指導。
如何在 Mac 上使用熱鍵截圖工具
在 Mac 上啟動截圖命令的最快方法是使用熱鍵。只需按下鍵盤上指定的組合鍵即可啟動對應的截圖模式。
這裡有一些 Mac 截圖工具的快捷方式,您可能會覺得很有用。
• 全螢幕截圖
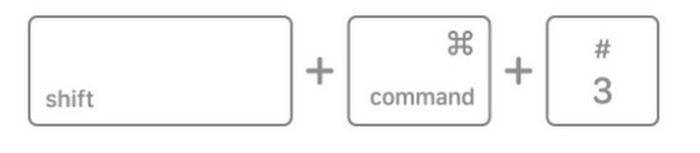
若要擷取整個螢幕的截圖,同時按下並放開這三個按鍵:Shift + Command + 3。
• 視窗截圖
同時按下並放開這三個按鍵:Shift + Command + 4。不要拖曳游標跨過螢幕,而是按下並放開空白鍵,然後等待游標變成相機圖示。將相機圖示拖曳到你想要擷取的視窗上,接著點擊滑鼠即可完成截圖。
如果您選擇了錯誤的視窗並想要退出螢幕截圖模式,請按 Esc 鍵。

• 矩形選取截圖
同時按下並放開這三個按鍵:Shift + Command + 4。
遊標將變成十字線。
點擊並按住滑鼠按鈕,同時拖曳十字線以選擇要截取的螢幕區域。選擇後,放開滑鼠按鈕即可截取螢幕截圖。

如何使用螢幕截圖工具列在 Mac 上截取圖片
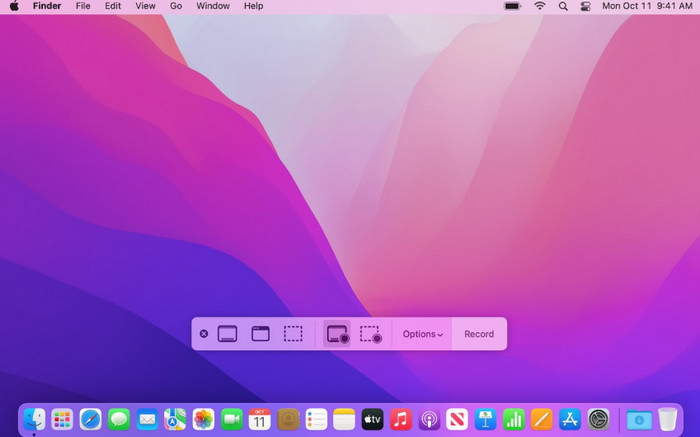
如果您擔心混淆快捷鍵或按錯鍵,可以使用另一種方法:使用 Mac 上的螢幕截圖工具列截取螢幕截圖。在矩形工具列上,您會看到代表幾種螢幕截圖模式的圖示。
以下是如何在 Mac 上透過螢幕截圖工具列使用截圖工具。
若要在螢幕上叫出工具列,你仍需同時按下這組快速鍵:Shift + Command + 5。
此時螢幕會變暗,中間會出現一個矩形工具列。點擊對應的圖示即可開始截圖。
同樣,後續圖像將以縮圖的形式出現在右下角。
如何使用 Mac 上的截圖工具錄製視頻
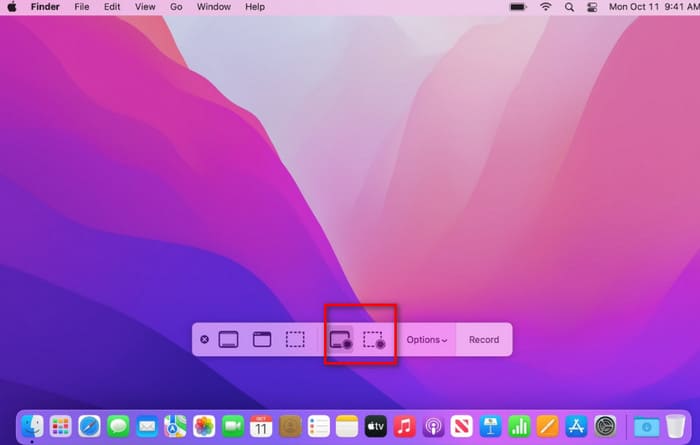
在上一節的工具列中,有一個錄製影片的選項。前三個選項用於錄製靜態影像,後兩個選項用於錄製影片。
第一個圖示可讓您錄製整個螢幕。第二個圖示可讓您錄製選定的螢幕部分。啟動程式後,您可以拖曳滑鼠調整邊框並選擇要錄製的部分。
在開始錄製影片之前,你需要先按一下 選項 按鈕,調整錄製倒數計時、儲存位置、錄音工具及其他選項。
點擊錄製按鈕即可開始錄影。
第3部分。在Mac上使用截圖工具的提示
現在你已經知道如何在 Mac 上截圖。不過,上述方法只允許你在預設設定下進行錄製。如果你想自訂截圖的輸出格式、變更儲存位置,並將螢幕錄影工具放在最方便的位置,就需要額外進行一些設定。
如何變更儲存位置
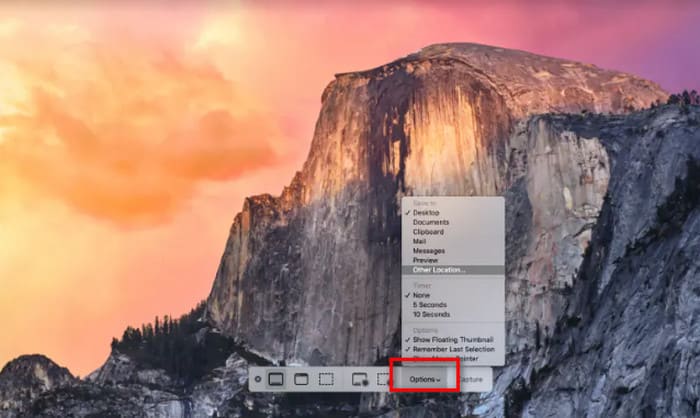
Mac 會預設將你的螢幕截圖儲存到桌面。如果你想變更儲存路徑,先按下 Shift + Command + 5 叫出工具箱,然後點擊「選項」以展開下方選單。
在選單中選擇 儲存到,接著從目錄中挑選你想要的儲存路徑。
如何將截圖工具新增至觸控列
不想每次都按快捷鍵來調出工具箱?那就將其設定為顯示在 Mac Touch Bar 上,方便存取。
以下是具體操作方法。
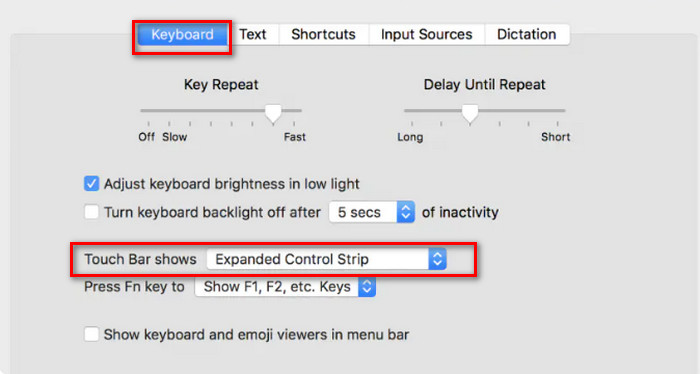
步驟 1.打開 系統偏好設定,進入 鍵盤 設定。
步驟 2.在 Touch Bar 顯示 區段中,使用下拉式選單選擇 App 控制項。
步驟 3.點擊 自訂控制列。
步驟 4.在出現的選項中找到 螢幕截圖,然後將它拖曳到你的 Touch Bar 上。
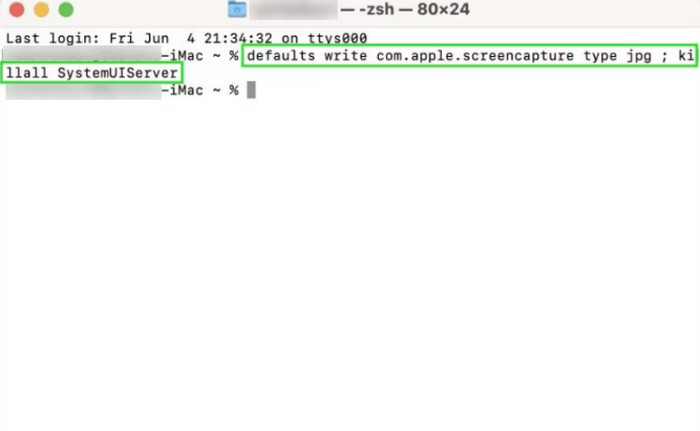
如何更改螢幕截圖檔案格式
Mac 的預設截圖輸出格式為 PNG。不過,您可以自訂將其變更為 JPEG、HEIC、GIF、PDF 或 TIFF。
這是指南。
步驟 1.前往「應用程式」>「工具程式」>「終端機」。
步驟 2.輸入以下指令(將 png 替換成你想要的格式,如 jpg、pdf 或 tiff):
defaults write com.apple.screencapture type jpg
步驟 3.執行下列指令以讓變更生效:
killall SystemUIServer
第 4 部分。 Mac 截圖 Mac 的最佳替代品
Mac 的截圖工具雖然簡單易用,但功能卻比較基礎,後續的截圖和編輯功能也比較有限,而且只能錄製目前螢幕的內容。
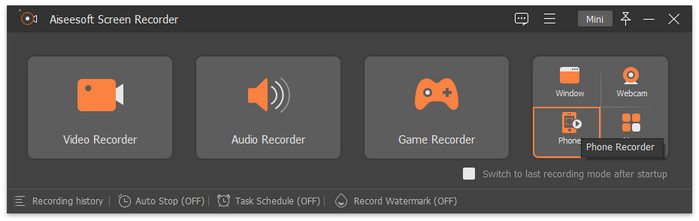
若你希望有更多錄製選項,我們強烈建議改用 FVC 螢幕錄影工具。此軟體不僅支援錄製螢幕上的影像與影片、麥克風或系統喇叭輸出的音訊,還能錄製網路攝影機的畫面。你甚至可以將手機連接到電腦,再使用 FVC 螢幕錄影工具錄下手機螢幕上的內容。
更重要的是,FVC 螢幕錄影機提供了全套的截圖和影片編輯功能,在一個平台上即可完成從錄製到處理再到輸出的整個流程。
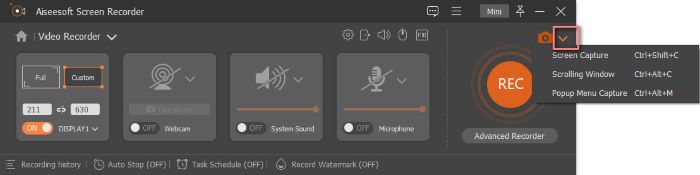
以下是使用 FVC 螢幕錄影機截取螢幕截圖的方法。
步驟 1.先在你的 Windows 電腦上下載並安裝 FVC 螢幕錄影工具。
步驟 2.啟動程式,然後在主畫面中選擇你需要的功能,例如 影片錄製。
步驟 3.點擊 螢幕擷取。你會看到 螢幕擷取、捲動視窗、快顯選單擷取 等選項,只要選擇最符合你需求的一項即可。
結論
以上就是一份完整的 Mac 剪取工具使用教學。你可以學會如何透過熱鍵或工具箱來啟用截圖功能,以及如何進行螢幕錄影。對於想調整錄製設定的使用者,我們也準備了如何變更輸出格式與儲存路徑的指南。
如果你覺得 Mac 內建的剪取工具功能太受限,我們建議你試試 FVC 螢幕錄影工具。
-
 QuickTime屏幕錄製–在Mac和PC上錄製帶有音頻的視頻
 在Mac上帶有音頻的錄製屏幕會派上用場。內置播放器QuickTime Player可以做到。閱讀他的文章,並了解如何在Mac和PC上用聲音捕獲屏幕。
-
 適用於 Windows 和 Mac 的 8 大最佳網絡攝像頭錄像機
 如果您正在尋找最好的網路攝影機錄影機,我們有您想要的。閱讀本文,了解適合您的 Windows 和 Mac 的八個最佳選擇。
-
 Shottr 評測:Mac 最佳截圖軟體工具
 您是否正在尋找適用於 Mac 的最佳截圖軟體?試試 Shottr 截圖工具,這是一款非常令人印象深刻且堪稱典範的免費使用工具。