


提高影像解析度的 7 種快速方法
您是否曾經想在互聯網上分享圖像,但它的分辨率較低?您能做的最好的事情就是提高其品質。但是如何提高低解析度影像的品質呢?
本文將介紹 7 種在不同裝置上提升圖片解析度的實用方法。無論你是想將 JPEG 圖片調成更高解析度以便列印、放大珍藏照片,或是出於其他需求,都可以選擇你偏好的方式來進行圖片放大。

第 1 部分。什麼是低分辨率和高分辨率圖像
低分辨率和高分辨率圖像之間存在很大差異。在這一部分中,我們將首先了解什麼是高分辨率圖像,然後是低分辨率圖像,它們有什麼區別。
高解析度影像
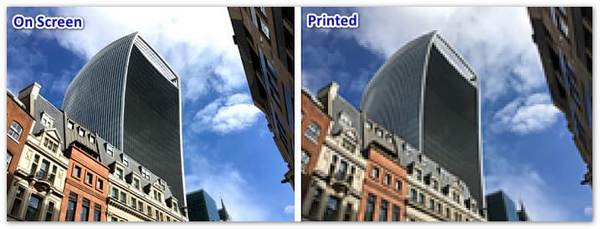
傳統上,高解析度影像為 300 dpi(實際尺寸)及以上。這些圖像通常用於印刷行業,並且通常具有 CMYK 顏色設定。高解析度影像通常需要高 dpi(每英吋點數),因此即使照片在電腦上看起來不錯,但列印時可能看起來模糊或像素化,就像下面的範例一樣。
此外,高解析度影像是最常用的。儘管文件較大,人們仍然使用它們,因為它們質量很好。
低解析度影像
低解析度影像通常為 72dpi。它們的質量較低,這使得它們的尺寸較小。此外,低解析度影像大多具有 RGB 色彩。這些圖像通常用於螢幕上,例如網站和社交媒體平台。與高解析度影像相比,低解析度影像的像素較少。
但誰不想要高解析度的圖像呢?許多人喜歡使用高解析度影像,儘管它們會佔用設備上更多的空間。因此,如果您想免費在線將低解析度圖像轉換為高解析度圖像,請繼續閱讀下一部分。
第 2 部分:提高影像解析度的免費線上方法
免費在線提高影像解析度的最佳工具
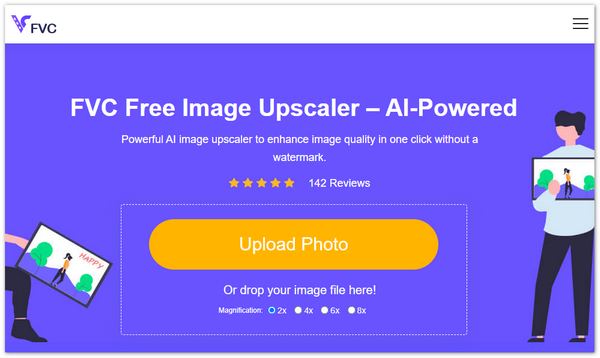
若想快速提升圖片解析度且盡量不失真,你可以嘗試功能強大的 AI 支援工具——FVC 免費圖片放大器。它專門用來提高圖片解析度並增強畫質。FVC 採用先進 AI 技術,能在保留原始細節的情況下,將照片放大為 2 倍、4 倍、6 倍或 8 倍。它可提高 JPEG、JPG、PNG、TIFF、BMP 等多種格式圖片的解析度。
該工具提供了一種免費在線提高圖像解析度的簡單方法。此外,照片上傳後,它會自動填滿更多細節,銳利化模糊部分,調整亮度和顏色,並提高分辨率,以提高整體影像品質。您的模糊、低解析度和舊照片可以輕鬆增強。
如何使用 FVC Free Image Upscaler 將低分辨率圖像轉換為高分辨率:
步驟 1:開啟瀏覽器並搜尋 FVC 免費圖片放大器。點擊搜尋結果中的連結,直接前往其主頁。在主介面上點選「Upload Photo(上傳照片)」以上傳你想放大的圖片。
步驟 2:上傳圖片後,你可以預覽輸出效果。如果畫質仍然不夠理想,你也可以調整圖片的放大倍數。
步驟 3:最後,點選「Save(儲存)」將圖片保存到你的裝置中。完成後,你就能查看高解析度的圖片了。放大後的圖片檔案不會被加上浮水印。
FVC Free Image Upscaler 使您能夠預覽解析度提高的影像。您可以將滑鼠移到圖片上查看詳細資訊。正如我之前提到的,它會在解析度提高過程中增強影像檔案。
使用 VanceAI 提高影像的分辨率
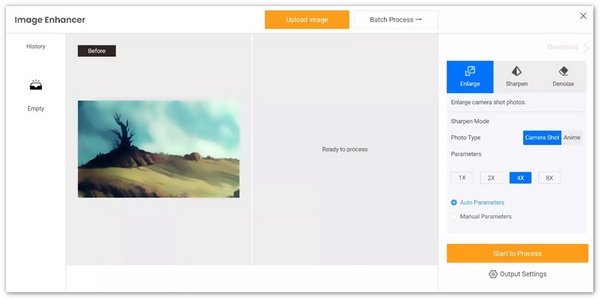
除了 FVC 免費影像升級器。您也可以嘗試其他流行的選項,例如 VanceAI Image Upscaler。在這裡,我將向您展示如何在線上提高影像解析度。
步驟 1:開啟網頁瀏覽器並前往線上圖片放大網站。當你進入 AI Upscale Image(AI 圖片放大)頁面後,點選「Upload Image(上傳圖片)」新增你的照片。
步驟 2:VanceAI 將多種功能歸類在三個主要項目中:Enlarge(放大)、Denoise(去雜訊)及 Sharpen(銳化)。若要在線上提升圖片解析度,請確認你位於 Enlarge(放大)分頁下。依照需求選擇 2X、4X 或 8X。你也可以看到其他參數,用來優化圖片效果。點選「Start to Process(開始處理)」以確認操作。
第 3 部分:如何在 Photoshop 中提高影像的分辨率
沒有人願意分享低品質或低解析度的影像。因此,許多編輯人員正在尋找將低解析度影像轉換為高解析度影像的最佳應用程式。如果您想使用更專業的工具和許多編輯工具,我們將在下面介紹您可以使用的專業應用程式。
Adobe Photoshop 是許多專業編輯人員使用的專業編輯應用程式。許多攝影師使用這個編輯應用程序,因為它有很多功能和編輯工具。 Adobe Photoshop 可讓您透過調整影像的寬度和高度來輕鬆提高影像的解析度。如果您的電腦上已安裝 Photoshop,則可以啟動它並按照以下步驟操作來提高影像解析度。或者您可以從 Adobe 官方網站安裝它並開始 7 天免費試用。
步驟 1:在你的 PC 或 Mac 上開啟 Photoshop,點擊上方的「File(檔案)」選單,然後選擇「Open(開啟)」以匯入圖片。Adobe 能處理常見的圖片格式,例如 JPEG、JPG、PNG、TIFF、WBMP 和 PDF,而且對來源圖片沒有檔案大小等限制。

步驟 2:若要放大圖片解析度,點選「Image(影像)」選單並進入「Image Size(影像大小)」視窗。在這裡,你可以透過多種設定來調整圖片解析度。輸入具體的寬度與高度以放大圖片。你應勾選鏈結圖示,以維持原始長寬比例。
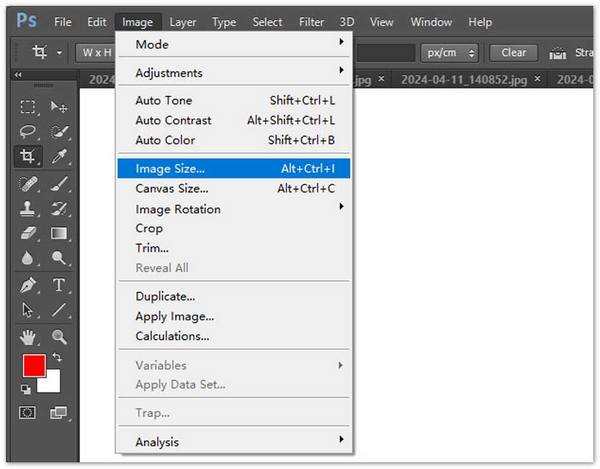
步驟 3:Photoshop 提供數種圖片放大演算法,供你用來提升圖片解析度,包括「Preserve Details(保留細節)」、「Bicubic Smoother(雙立方較平滑)」、「Bicubic Sharper(雙立方較銳利)」及「Nearest Neighbor(最鄰近點)」等。你可以在「Resample(重取樣)」的下拉選單中選擇想要的方式。點擊「OK」儲存變更並開始提升照片解析度。

第 4 部分:如何提高 iPhone 和 Android 上的照片分辨率
許多第三方影像編輯和放大應用程式可用於提高影像的解析度。您可以輕鬆地從手機上的應用程式商店找到關聯的應用程式。還有許多其他選項,例如 Picwand AI 照片編輯器、Pixlr 照片編輯器、Photoshop Express 照片編輯器、Picsart AI 照片影片編輯器、照片和圖片調整器、SuperImage AI 增強器等。在這裡,這一部分我想以Picwand和Pixlr為例向您展示如何提高iPhone或Android手機上的照片解析度。
使用 Picwand AI 照片編輯器提高照片分辨率
Picwand AI 照片編輯器提供了用於提高 iPhone、iPad 或 Android 手機上的圖像解析度的行動應用程式。這些應用程式可以從 App Store 或 Google Play Store 下載。那麼,如何使用Picwand AI照片編輯器來提高照片解析度呢?
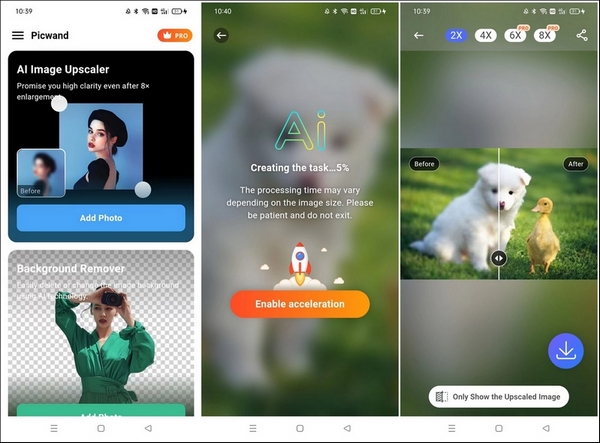
步驟 1:開啟 Picwand AI Photo Editor(Picwand AI 照片編輯器)應用程式,點選「AI Image Upscaler(AI 圖片放大)」選項。接著,點選「Add Photo(新增照片)」加入你想要提升解析度的圖片檔。
步驟 2:你需要允許 Picwand 存取手機中的圖片。加入圖片後,其解析度會先被提升至 2 倍。你也可以選擇 4X、6X 或 8X 來改變該圖片的解析度。
步驟 3:之後,點選「Download(下載)」將照片存到你的裝置中。你也可以點擊「Share(分享)」圖示,選擇你偏好的分享方式。
提高影像解析度將在現有像素之間添加新像素。這可能會導致品質損失。然而,這種人工智慧驅動的圖像放大器使用數學公式來創建細節、定義形狀和顏色、銳化模糊部分,並進行其他調整以減少品質損失。
使用 Pixlr 照片編輯器提高照片分辨率
該工具可讓您輕鬆提高 iPhone 和 Android 上的照片解析度。您可以從 Google Play 和 Apple Store 下載。請參閱以下步驟來使用它來提高照片解析度。
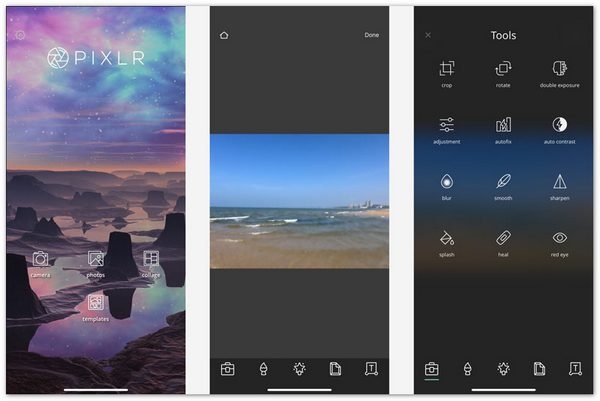
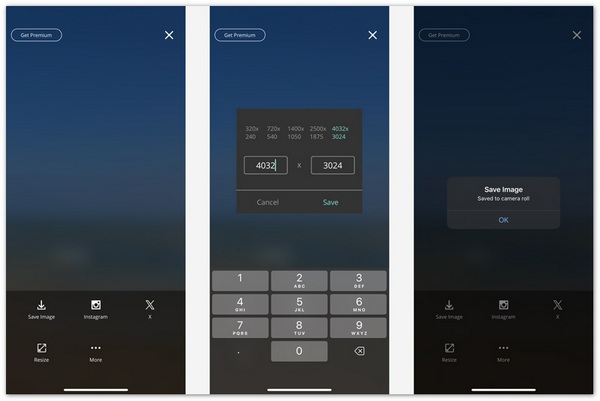
步驟 1:在手機上下載並開啟 Pixlr Photo Editor(Pixlr 照片編輯器)應用程式。Pixlr 允許你直接拍照並進行編輯,也能放大裝置中圖片的解析度。你需要允許 Pixlr 存取你想放大的照片。
步驟 2:當圖片載入後,點選底部的特定圖示以顯示相關工具。Pixlr Photo Editor 提供多種常用編輯功能,例如裁切照片、旋轉、增加細節、調整亮度等。完成編輯後,點選右上角的「Done(完成)」。
步驟 3:此時,你會看到儲存、分享或調整圖片大小等選項。若要提升圖片解析度,請點選「Resize(調整大小)」。輸入你想要的寬度與高度來放大照片。點選「Save(儲存)」,圖片檔案就會被存入相機膠卷。
第 5 部分:用於提高 PC 和 Mac 上影像解析度的內建工具
如果您只需要出於特定目的更改映像大小並提高分辨率,可以嘗試在 Windows PC 上使用 Microsoft Paint 或在 Mac 上使用 Preview。它們並不是為了提高影像的解析度而設計的。但它們帶有一些基本的圖像編輯功能。您可以使用內建工具來提高照片解析度。
使用繪畫提高圖像的分辨率
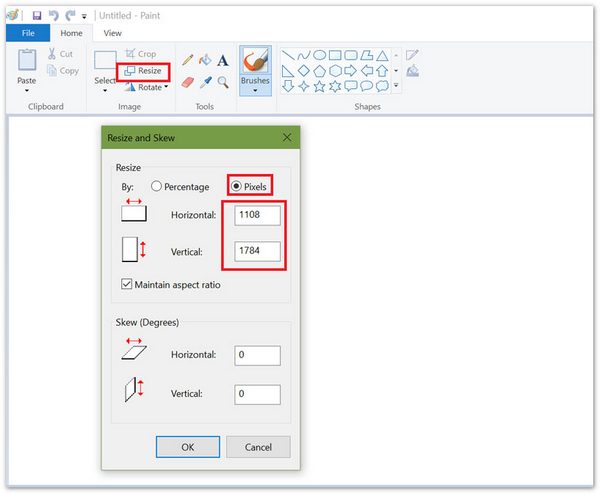
在 Windows PC 上搜尋 Microsoft Paint 並啟動它。在「畫圖」中新增圖像文件,然後點擊頂部的「調整大小」選單。您可以輸入特定的寬度和高度值以提高影像解析度。此外,您還可以選擇一個百分比來放大它。按一下“確定”進行確認。
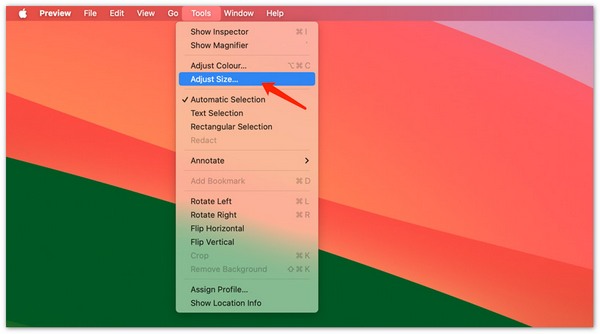
使用預覽提高影像的分辨率
預覽是 Mac 上預設的照片檢視程式。當您找到要提高其解析度的影像檔案時,可以雙擊它以在預覽中開啟它。您也可以右鍵單擊它並選擇“打開並預覽”。點擊頂部的“工具”,然後從下拉清單中選擇“調整大小”。
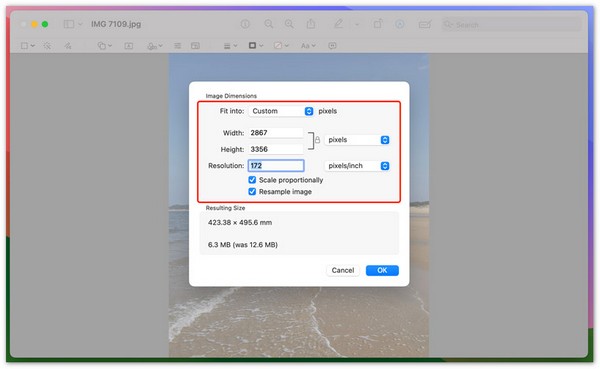
Preview 在 Fit into 中提供了幾種常用的預設。您可以從那裡選擇所需的尺寸或輸入自訂尺寸。按一下「確定」確認增加影像解析度的操作。
繪畫和預覽都提供調整大小功能來更改照片的寬度和高度。然而,與這些人工智慧驅動的影像放大器或專業影像編輯器不同,它們不會為影像檔案添加新資訊或細節。影像調整大小過程會導致質量,尤其是在放大時。
第六部分. 如何提高影像解析度的常見問題解答
問題1.如何提高JPEG的解析度?
要提高 JPEG 圖片的分辨率,您可以使用影像放大工具,例如 FVC Free Image Upscaler。此外,您還可以依靠 Adobe Photoshop、Lightroom 和 GIMP 等流行的照片編輯軟體或免費的線上工具來製作更高解析度的 JPEG。
問題 2. 能否在不損失品質的情況下提高影像解析度?
目前並沒有完全「在不失真情況下」提升圖片解析度的方法,但可以盡量把畫質損失降到最低。一些 AI 驅動的圖片放大工具能智慧分析圖片內容,並在放大的過程中補上新的像素與細節。它們可以銳化主要物體、優化色彩,並做其他調整,以改善整體畫質。
問題3. 有沒有一款可以讓圖片品質更好的app?
是的,有許多應用程式可以幫助你提升照片品質。如上所述,這些圖片編輯工具會利用人工智慧來分析圖像並增強其品質。常見的選擇包括 Picwand AI Photo Editor、Remini 和 Snapseed 等。
問題 4. GIMP 可以提高 Mac 上影像的解析度嗎?
是的,作為一個開源圖像編輯器,GIMP 可以免費提高 Mac 上的圖像解析度。在 GIMP 中開啟圖片,按一下「圖像」選單,然後選擇「縮放影像」選項。現在,您可以在「縮放」對話方塊中設定影像檔案所需的解析度。在“插值”下選擇首選方法,然後按一下“縮放”按鈕。與「繪製」和「預覽」一樣,GIMP 在影像放大過程中不會創造新的細節。
結論
若想在列印或放大檢視時保持清晰度,你可能需要提高圖片的解析度。文中已分享 7 種在手機或電腦上進行圖片放大的方法。你可以選擇自己偏好的工具,輕鬆放大照片。
-
 圖像去噪:圖像噪聲的原因以及如何立即修復它
 您是否正在尋找最好的圖像去噪軟件?在這種情況下,請在我們處理和修復它時閱讀我們在此處包含的信息!
-
 7 種可用於增強和改善每張影像的影像升級工具 [2025]
 您需要圖像升頻器嗎?幸運的是,本文介紹了您可以在桌面上訪問和下載的最佳軟件。
-
 2025 年你必須使用的 5 款影像解析度增強器 [最新精選]
 不知道應該使用哪種圖像分辨率增強器?閱讀本文,我們將回顧五種使用和增強圖像分辨率的工具。