


使用人工智慧在電腦和行動裝置上銳化影像的終極指南
是否曾經拍過看起來黯淡、毫無生氣的圖片?也許你的照片欠缺銳利度與清晰感。但你知道嗎?網路上其實有許多圖片銳化工具可供使用。你不需要昂貴的桌面軟體就能讓影像變得更銳利。只要在網路上搜尋,就能找到很多可以幫你銳化圖片的應用程式。不過你現在已經不必再搜尋了,因為我們已經替你整理出最好的圖片銳化工具,並教你如何使用它們。讀完這篇文章,你就能學會如何在線上或離線免費銳化圖片。

第 1 部分:如何免費線上銳利化影像(無需註冊)
儘管如此,仍有許多應用程序可以銳化圖像。建議您使用安全且最直接的工具。這就是為什麼我們搜索最好的圖像銳化器並為您列出它們。此外,我們將向您演示如何使用這些圖像銳化工具。
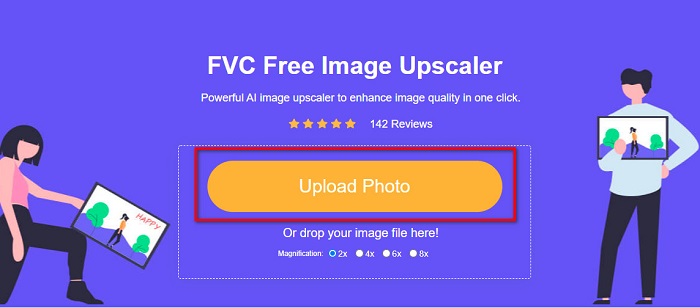
使用 FVC 免費影像升級器銳化圖片
FVC Free Image Upscaler 是銳化圖片的最佳工具。如果你正在找 AI 圖片銳化工具,那麼 FVC Free Image Upscaler 正是你要的。此外,它支援多種圖片格式,例如 PNG、JPG、JPEG 和 BMP。利用其 AI(人工智慧)技術,你可以將圖片放大增強為 2 倍、4 倍、6 倍或 8 倍。更棒的是,這款線上工具可以在所有主流瀏覽器上使用,包括 Google、Firefox 和 Safari。
此外,許多初學者更喜歡使用此工具,因為它具有簡單的用戶界面。此外,雖然它是一個在線應用程序,但它的銳化過程很快,使用起來很方便。您還可以在將輸出圖像下載到設備之前對其進行預覽。因此,如果您想使用此工具來銳化圖像,請按照以下簡單說明進行操作。
如何使用 FVC Free Image Upscaler 銳化圖像:
步驟一: 打開你的瀏覽器,在搜尋框輸入 FVC Free Image Upscaler。你也可以直接點擊連結前往其主頁。
步驟二: 接著,在主介面上點擊Upload Photo按鈕,匯入你想要銳化的圖片。
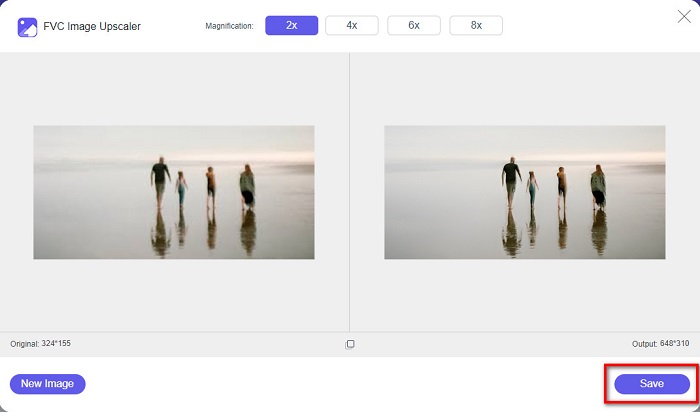
步驟三: 然後,選擇你想要的放大倍率(magnification)預設值。你可以在2x、4x、6x 和 8x 放大倍率中做選擇。之後,你就會看到輸出效果的預覽。

步驟四: 最後,要儲存輸出圖片時,點擊Save按鈕。接著,程式會自動且快速地將圖片儲存在你的電腦資料夾中。
就是這樣!就這麼簡單,您可以輕鬆增強圖像的模糊部分並為其添加清晰度。
使用 VanceAI 銳化影像
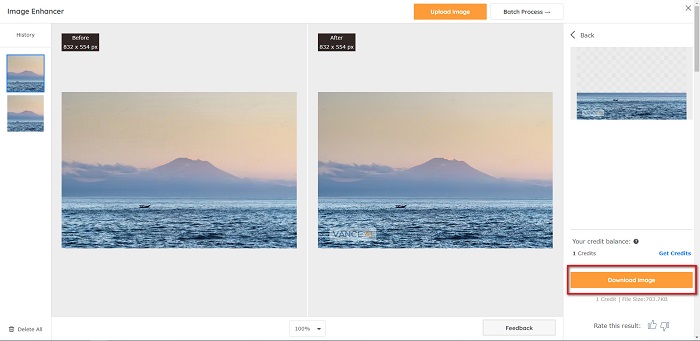
VanceAI 是另一款線上圖片銳化工具,當你想銳化圖片或增加清晰度時可以使用。圖片一旦增加銳利度,看起來就會更好。因此,如果你想快速銳化圖片,VanceAI 會是很好的選擇。此外,你幾乎可以在所有主流瀏覽器(例如 Google 和 Safari)上免費使用它。而且它能在幾次點擊之內,自動強化圖片模糊的部分。由於介面簡單易用,新手也能輕鬆上手。更進一步說,它支援最常見的圖片格式,如 JPG、JPEG 和 PNG。然而,使用 VanceAI 銳化圖片後,圖片上會留下浮水印。
如何使用 VanceAI 銳利化模糊影像:
步驟一: 在瀏覽器上搜尋 VanceAI,進入其主頁。接著在主介面上,點擊Upload Image按鈕,上傳你想銳化的圖片。
步驟二: 上傳圖片後,點擊介面右下角的Start to Process按鈕。
步驟三: 完成後,你會看到圖片輸出的預覽。然後,點擊Download Image按鈕下載已銳化的圖片。
使用 PineTools 銳利化模糊影像
PineTools 是另一款相當容易上手的線上銳化工具。由於介面簡潔,新手也能利用它來修復圖片品質。你可以透過滑桿調整圖片的強度或銳利度。此外,你可以選擇圖片捲積遮罩(convulsion mask)的大小,介於 3x3 與 5x5 之間。更棒的是,這個線上工具幾乎能在所有瀏覽器上開啟,包括 Google 和 Safari。不過,PineTools 的缺點是含有許多廣告,可能會在你銳化圖片時造成干擾。儘管如此,因為相當方便,仍有不少新手愛用這款工具。
如何使用 PineTools 銳利化模糊影像
步驟一: 先在瀏覽器搜尋PineTools,並點擊前往其網站的頁面。接著,在第一個介面點擊Choose Files按鈕,上傳你想銳化的照片。

步驟二: 然後,在Sharpen面板中,拖曳小方塊(mini box)到你想要的強度或銳利度。
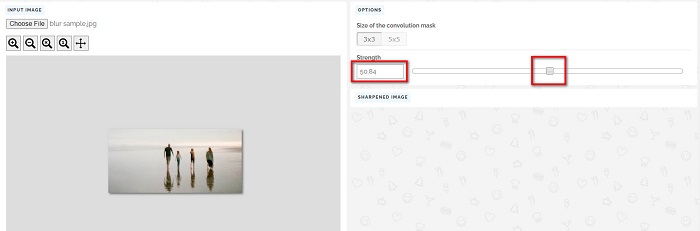
步驟三: 接著,點擊介面下方的Sharpen按鈕來銳化圖片。若想儲存輸出圖片,只要點擊你想要的圖片格式(image format),圖片就會儲存在你的裝置中。
第 2 部分:如何在 Windows/Mac 上銳化影像
如何在 Photoshop 中銳利化影像
Adobe Photoshop 是一款功能強大且廣泛使用的影像編輯軟體,全球用戶眾多。它既適合初學者,也適合專業人士,並包含眾多功能,使用戶能夠精準且富有創意地編輯圖像。從簡單的調整到複雜的設計,Photoshop 都能讓您將創意變成現實。其銳利化濾鏡可透過修改對比度和細節,使照片看起來更清晰銳利。在 Photoshop 中銳利化照片非常簡單,而且由於其先進的圖層和濾鏡功能,不會損壞原始圖片,非常適合社交媒體圖片、商業攝影和平面設計。
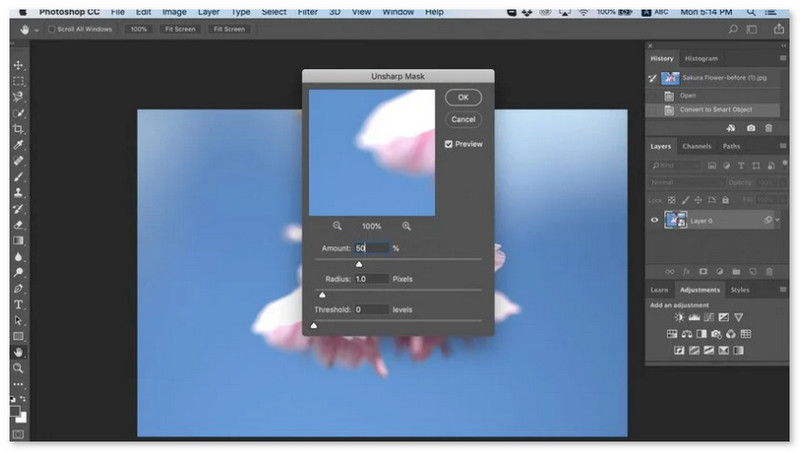
步驟一: 點擊圖層面板(Layers panel) > 濾鏡選單(Filter menu) > Convert for Smart Filters。

步驟二: 選擇Sharpen > Unsharp Mask under Filter。
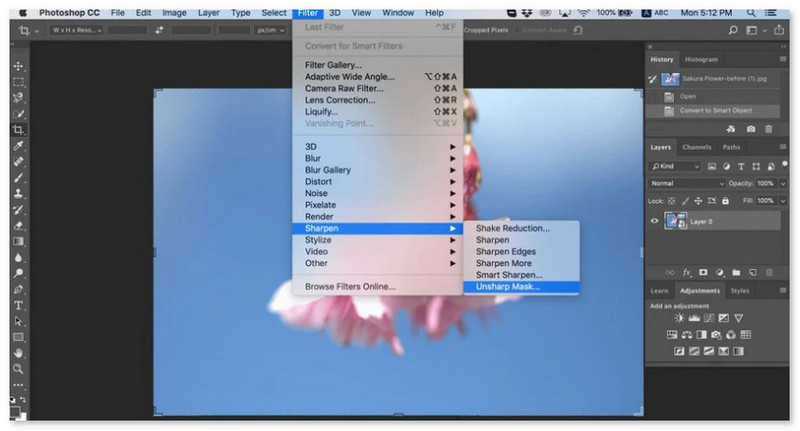
步驟三: 調整各項設定後,點擊OK。
如何在 GIMP 中銳化影像
與上面介紹的銳化圖像應用程序不同,GIMP 是一個離線工具,如果您想銳化圖像或提高其質量,您可以使用它。此外,許多專業人士使用此工具來銳化圖像並改進它們。許多人將此工具視為 Adobe Photoshop 的替代品。它支持幾乎所有的圖像格式,如 PNG、JPG、JPEG、WebP 和 BMP。此外,它還具有許多可供您使用的編輯功能,包括照片修飾、更改構圖等。但這個應用程序的缺點是它的界面很難使用,初學者很難使用它。
不過,如果您是許多照片編輯應用程序的專業人士,您肯定會發現 GIMP 是銳化圖像的好工具。
如何在 GIMP 中銳化圖像:
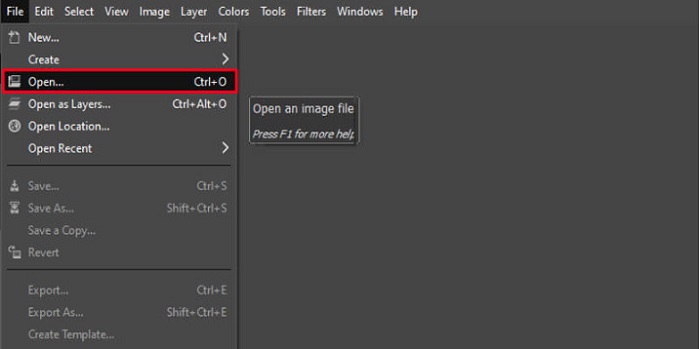
步驟一: 在裝置上下載GIMP 圖片銳化工具。於軟體主介面中,點擊File > Open匯入你的圖片。
步驟二: 然後,透過點擊Layer > Duplicate按鈕建立重複圖層。你也可以使用快捷鍵複製圖層,按下Shift + Ctrl + D,圖層就會被複製。
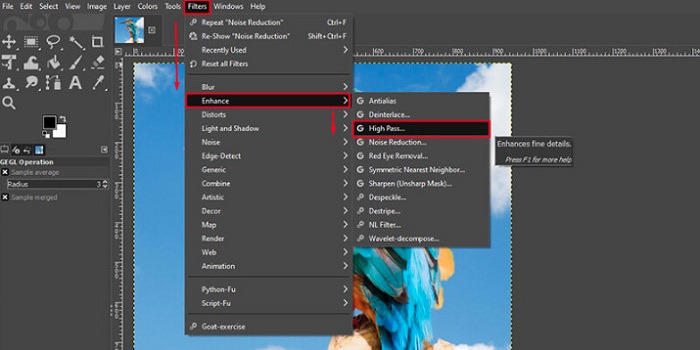
步驟三: 接著,我們先透過 Filter > Enhance > Noise Reduction 來降低雜訊。之後,再利用 High Pass 選項套用所需的銳利度。前往Filters > Enhance > 然後選擇 High Pass 選項。
步驟四: 接著,我們會使用Vivid Light 模式來讓圖片變得更亮並增加細節。前往模式區的Option,將Normal改為Vivid Light。
步驟五: 為最後修飾再建立一次重複圖層,然後前往Filters > Enhance > Sharpen (Unsharp Mask)。接著,你可以調整圖片的Radius、Amount 和 Threshold。最後,在鍵盤上按下Ctrl + S即可儲存輸出。
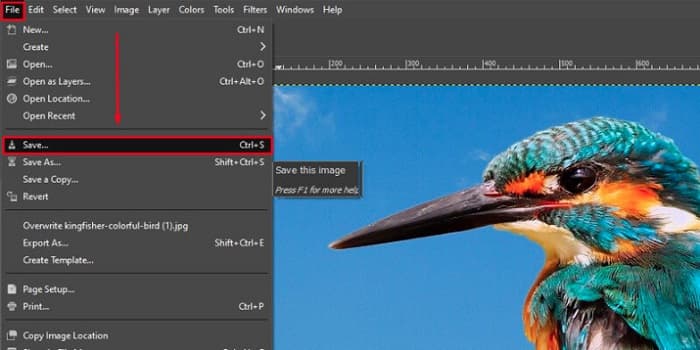
就是這樣!如果你正是那些搜尋如何使用 GIMP 銳化圖片的人,那麼這份指南就是為你準備的。只要依照這些步驟,就能使用 GIMP 來提升圖片品質。
三、如何在 iPhone/Android 上銳化圖片
Picwand AI 照片編輯器是一款功能強大的編輯器,可協助您利用 AI 編輯照片。您可以直接在 Picwand 官網上編輯,也可以下載到您的 iPhone 或 Android 裝置。它擁有眾多智慧功能,例如放大圖片、裁剪背景、提取物件和清晰圖片,所有這些都得益於先進的 AI 技術。使用 Picwand,您可以快速且準確地修復模糊影像、修飾舊照片或移除不需要的內容。其簡潔的介面使任何人都能輕鬆上手,無論經驗如何。
步驟一: 打開應用程式並選擇AI Image Upscaler。
步驟二: 上傳圖片並選擇想要的放大倍率。
步驟三: 點擊下載圖示以匯出。

第 4 部分。關於如何銳利化模糊影像的常見問題解答
有修復像素化圖片的應用程序嗎?
可以。你可以使用圖片放大工具(image upscaler)來調整圖片的像素。其中一款修復馬賽克/像素化照片的最佳工具是 PIXLR,它在去除模糊方面的表現也相當不錯。
GIMP 是免費的嗎?
GIMP 是 Windows、Mac 和 Linux 上可用的圖像編輯應用程序。它是一個免費使用的應用程序,您可以在其中更改其源代碼。但是,您必須購買該應用程序才能訪問其其他編輯功能。
我可以使用 Canva 銳化圖像嗎?
幸運的是,Canva 有一項功能,您可以在其中為圖像添加清晰度。因此,如果您的圖像模糊,Canva 可能是適合您的工具。
結論
我們期望已經解答了你關於如何銳化圖片的疑問。總共有 7 種既快速又不錯的方法,例如使用 Video Converter Ultimate、PhotoShop、VanceAI 等。如果你正在尋找完全免費的工具,不妨將目光轉向 FVC Free Image Upscaler。它是一款 100% 免費的線上工具。
-
 您可以在線和離線使用的前 4 種圖像質量降低器
 由於某些原因,這些圖像質量降低器可以幫助您降低圖像質量。如果您需要,請閱讀本文!
-
 通過動手教程將圖像升級到 4k 的官方方法
 要將圖像升級到 4k,您需要在設備上安裝軟件。如果您還沒有,那麼您需要選擇我們在此處包含的工具。
-
 如何使用免費和付費應用程序編輯照片的清晰度
 如何編輯照片的清晰度?這個問題將在您閱讀本文時得到解答,我們將添加您需要知道的提示!