


En omfattende vejledning til eksport af iMovie til MP4
iMovie er et af de mest brugte og populære videoredigeringsværktøjer, udviklet af Apple til Mac-, iPhone- og iPad‑brugere. Dette værktøj har et godt sæt redigeringsfunktioner, som enhver editor vil sætte pris på. Men på den anden side er der én ting, som brugerne kæmper lidt med. Videoer fra dette værktøj bliver eksporteret i MOV‑format. Dette standardformat kan give begrænsninger, når det gælder kompatibilitet med andre enheder og platforme. Derfor er de fleste brugere nødt til at konvertere MOV‑filer til et andet globalt anerkendt format som MP4 for at kunne afspille dem i andre videoplayer‑apps. Så hvis du også leder efter måder at eksportere iMovie til MP4 på, så læs denne artikel til ende.

Del 1: Sådan eksporteres iMovie til MP4 på Mac
Når det kommer til at eksportere videoer fra iMovie, er der masser af outputformater at vælge imellem. Det er bare, at vi er vant til dets standard MOV-format. Med dette støder vi normalt på kompatibilitetsproblemer, når vi afspiller en video eksporteret fra den. Så at lære at eksportere iMovie til MP4 er ved at blive en ting, da dette format er meget udbredt og for det meste understøttet af alle digitale enheder og medieafspillere. Følg nedenstående trin for at eksportere iMovie til MP4 på Mac:
Trin 1. Start først iMovie på din Mac.
Trin 2. Importér derefter din video i softwaren ved at klikke på knappen Import Media.
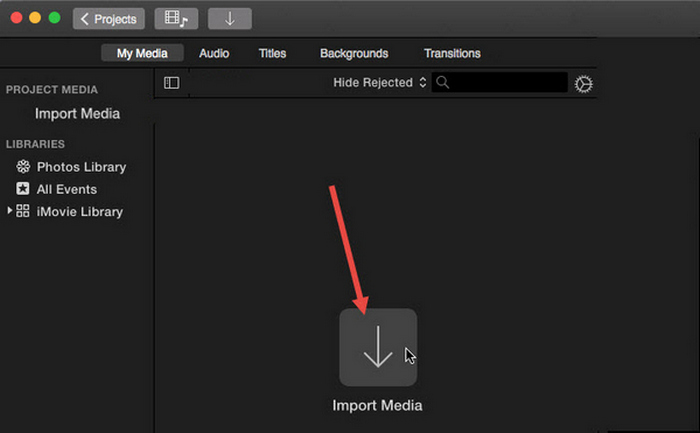
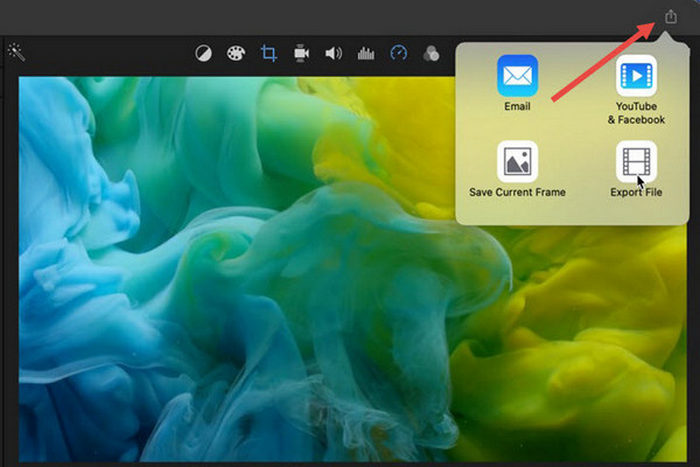
Trin 3. Klik nu på knappen File i værktøjslinjen øverst, gå til Share, derefter til File, eller klik på Share-ikonet i forhåndsvisningsvinduet, og vælg derefter indstillingen File i pop op‑dialogen.
Trin 4. Vælg Video and Audio i det nye pop op‑vindue som outputformat, og justér opløsning, kvalitet og andre parametre efter dine behov.
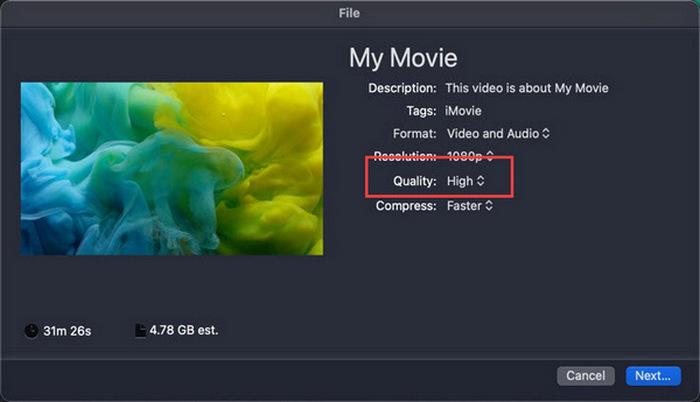
Bemærk: Vælg ikke kvalitetsindstillingen ProRes, hvis du ønsker at eksportere videofilen i MP4‑format, for så bliver den gemt i MOV‑format.
Trin 5. Klik til sidst på knappen Next, og giv den iMovie‑MP4‑fil, du skal til at eksportere, et navn. Glem ikke at vælge en outputmappe og klik på Next for at gemme den som MP4.
Der er virkelig en måde at eksportere iMovie til MP4 direkte fra Mac. Processen kan dog virke en smule kompliceret, især når man beskæftiger sig med dets standardfilformat, når man gemmer videoen.
Hvis du vil bruge iMovie på Windows, så må du ikke gå glip af dette indlæg.
Del 2: Sådan rettes iMovie-eksport, der ikke fungerer [fælles løsning]
Der kan være flere årsager til, at iMovie-eksport muligvis ikke fungerer korrekt. Nedenfor er nogle løsninger og alternativer til at løse problemet med, at iMovie-eksport ikke fungerer:
Løsning 1: Kontrol af lagerpladsen
En almindelig årsag til problemer med iMovie-eksport er utilstrækkelig diskplads på din Mac. Hvis du støder på problemer med at eksportere videoer, skal du starte med at kontrollere tilgængeligheden af din lagerplads.
For macOS Ventura eller nyere: Gå til Apple‑menulogoet, vælg Systemindstillinger, klik på Generelt, og vælg derefter Lagring i højre side.
For tidligere macOS‑versioner: Gå til Apple‑menulogoet, klik derefter på Om denne Mac, og gå til Lagring.
Hvis din Mac er ved at løbe tør for lagerplads, kan du overveje at slette unødvendige filer eller apps for at frigøre plads. Når du har gjort det, skal du vende tilbage til iMovie og forsøge at eksportere igen.
Løsning 2: Dobbelttjek filnavnet
Hvis iMovie ikke eksporterer en video efter at have forsøgt at eksportere et par gange, er det vigtigt at gennemgå filnavnet i outputindstillingerne for at sikre, at det ikke indeholder specialtegn som bindestreger, skråstreger, kommaer osv. Normalt gør iMovie det. understøtter ikke specialtegn ved navngivning af filen.
Løsning 3: Genstart iMovie
Hvis problemet stadig opstår, kan du prøve at genstarte appen og eksportere videoen igen. Glem dog ikke at gemme dit aktuelle projekt først. For at lukke iMovie helt skal du klikke på appens ikon og vælge Quit. Start derefter iMovie igen, åbn et projekt, og se, om du nu kan eksportere videoer. Prøv også at genstarte din Mac for at løse problemet.
Løsning 4: Opdater iMovie
En forældet version af iMovie forårsager ofte eksportfejl på grund af fejl og systemproblemer, som ikke er blevet rettet. For at opdatere iMovie skal du åbne App Store, klikke på Updates i venstre side og se efter tilgængelige opdateringer til iMovie og derefter klikke på den.
Løsning 5: Geninstaller iMovie
Hvis andre løsninger ikke kan løse eksportproblemet, kan du overveje at geninstallere iMovie. For at afinstallere iMovie fra en Mac skal du åbne Launchpad og trykke på tasten Option, klikke og holde på iMovie, derefter klikke på knappen X ved siden af appen og klikke på Delete for at bekræfte. Gå derefter til App Store for at downloade og installere iMovie igen.
Bonus: Sådan rettes iMovie-eksport, der ikke virker [Alternativ måde]
Hvis ingen af løsningerne virker for dig, er det på tide at prøve denne alternative måde at løse problemet med, at eksport fra iMovie ikke fungerer. FVC Video Converter Ultimate er kendt for sine omfattende konverteringsmuligheder, som giver brugerne mulighed for at konvertere videoer til ethvert format, de foretrækker. Men ud over det har den andre funktioner som MV, der er designet til brugere, der vil redigere videoer. Ligesom iMovie skal du blot importere de filer, du vil redigere, og derefter bruge redigeringsfunktionerne, såsom at beskære og rotere klip, tilføje effekter og filtre samt indsætte baggrundsmusik for at gøre videoen mere engagerende og meget mere. Derefter eksporterer du filen til MP4.
Desuden understøtter dette værktøj HD/4K/8K-opløsninger, hvilket sikrer udgangskvalitet i top. Og den bedste del? Den fungerer med en lynhurtig hastighed og fuldfører konverteringer 120 gange hurtigere end andre metoder.
Trin 1. Download og installer først FVC Video Converter Ultimate på din Windows‑ eller Mac‑computer.
Gratis download til Windows 7 eller nyere Sikker download
Gratis download til MacOS 10.7 eller nyere Sikker download
Trin 2. Når du derefter er i værktøjets grænseflade, skal du gå til fanen MV.
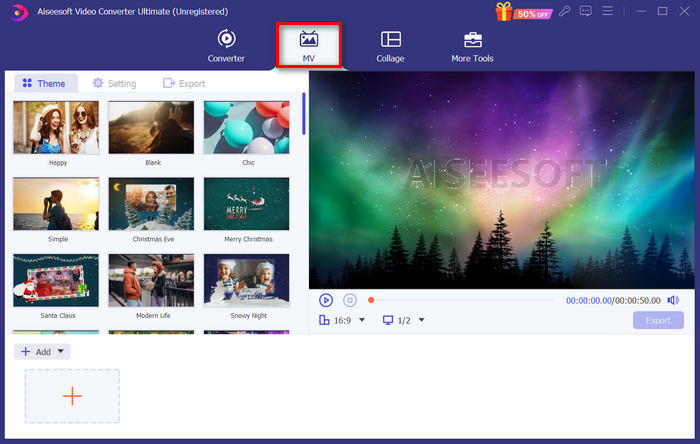
Trin 3. Klik nu på knappen Add File for at tilføje de filer, du vil konvertere til MP4.
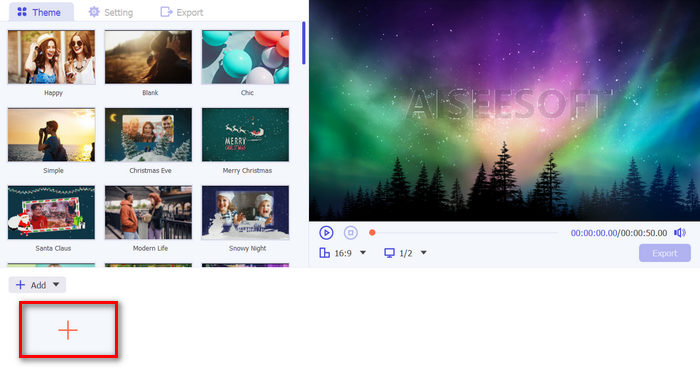
Trin 4. For at tilføje, redigere og klippe din MP4‑video skal du klikke på knappen øverst over knappen Add File. Derudover kan du tilføje et tema til din video ved at vælge mellem listen over forudindstillede temaer i fanen Theme ovenfor.
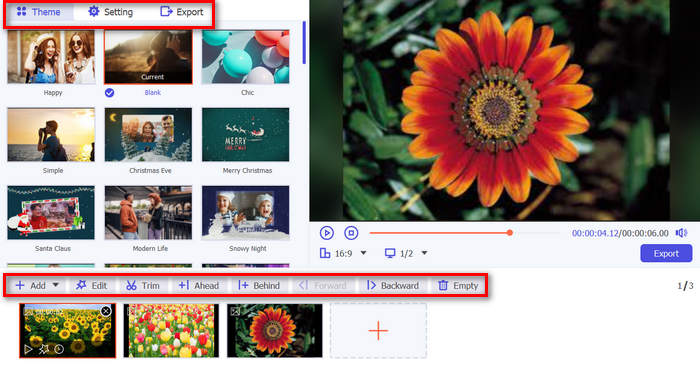
Trin 5. For yderligere at forbedre den MP4‑fil, du redigerer, kan du tilføje filtre og effekter ved at klikke på ikonet Edit nedenfor. Du kan også tilføje et vandmærke for at gøre filen personlig.

Trin 6. Når du er færdig, skal du klikke på knappen Export, hvor du kan ændre formatet til MP4 og justere billedhastighed, opløsning og kvalitet.
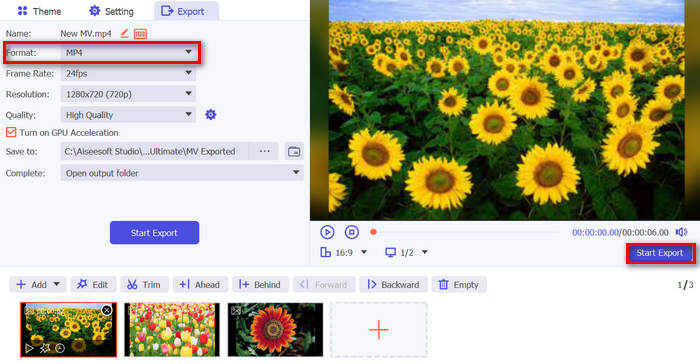
Trin 7. Klik til sidst på knappen Start Export for at gemme din fil.
Med FVC Video Converter Ultimate behøver du ikke bekymre dig om, hvordan du konverterer dine iMovie til MP4-filer, når den eksporteres i MOV-format. Det er også et godt alternativ, når du støder på et eksportproblem med iMovie, da dette er et fuldt udstyret værktøj. Du kan få alt, hvad du har brug for, især om at konvertere filer fra et format til et andet.
Del 3: Sådan eksporteres iMovie til MP4 på iPad/iPhone
For dem, der bruger iOS eller iPadOS og ønsker at eksportere og konvertere iMovie til MP4 på deres iPhone eller iPad, kan du her se, hvordan du eksporterer iMovie til MP4 på iPad/iPhone.
Trin 1. Åbn først iMovie‑appen på din iPhone eller iPad.
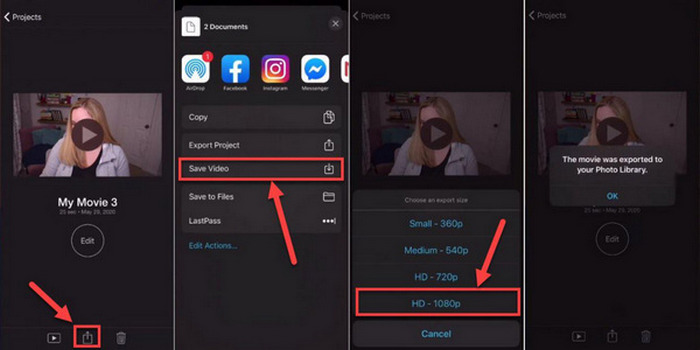
Trin 2. Vælg derefter det projekt på fanen Projects, som du vil eksportere til MP4.
Trin 3. Tryk derefter på knappen Share, og vælg Export Project.
Trin 4. Vælg til sidst Save Video, vælg derefter en eksportstørrelse, og konvertér og gem iMovie som MP4 på din iPhone eller iPad.
Når du eksporterer og konverterer iMovie til MP4 direkte på din iPhone eller iPad, skal du huske at sikre, at du har tilstrækkelig lagerplads til rådighed på din enhed til at rumme den eksporterede MP4-fil, da dette fører til eksportproblemer og problemer.
Del 4: Ofte stillede spørgsmål om eksport af iMovie til MP4
Hvorfor er min iMovie-videofil ikke kompatibel med QuickTime?
iMovie-filer er muligvis ikke kompatible med QuickTime på grund af forskelle i codecs eller filformater. QuickTime understøtter et begrænset udvalg af video-codecs og filtyper, så hvis din iMovie-fil bruger et codec eller et format, der ikke understøttes af QuickTime, kan der opstå kompatibilitetsproblemer. For at løse dette, prøv at eksportere dit iMovie-projekt i et andet format eller codec, der er kompatibelt med QuickTime.
Hvor lang tid tager det at eksportere en iMovie?
Det tager normalt 1,5 til 2 gange projektets afspilningstid at gengive og kode under eksportprocessen. Faktorer som projektkompleksitet, videoopløsning og din enheds processorkraft kan påvirke eksporttider. Derudover kan eksport af større eller mere komplekse projekter tage længere tid end mindre eller enklere.
Eksport af iMovie til MP4 påvirker kvaliteten af mine videoer?
Eksport af iMovie til MP4 bør ikke påvirke kvaliteten af dine videoer væsentligt, så længe du vælger de relevante eksportindstillinger. Det er dog vigtigt at sikre, at du vælger den ønskede opløsning, bitrate og komprimeringsindstillinger for at opretholde kvaliteten af de videoer, du vil eksportere.
Konklusion
At lære hvordan man eksporterer iMovie til MP4 er vigtigt for at sikre kompatibilitet og fleksibilitet, når du deler dine videoprojekter på tværs af forskellige enheder og platforme. Hvis du støder på problemer under eksportprocessen i iMovie, bør du derfor gennemgå de almindelige løsninger, der er beskrevet her. Begynd at eksportere dine iMovie‑projekter til MP4 i dag med denne vejledning.
-
 Bedste måder at bruge iMovie til at lave slowmotion-videoer [Løst]
 Har du nogensinde brugt iMovie til at konvertere din normale hastighedsvideo til slowmotion? Dette er muligheden for at vide mere om det.
-
 Sådan synkroniserer du lyd og video i iMovie på iPhone og Mac
 Har du et problem, fordi lyd og video ikke er synkroniseret på iPhone og Mac? Så lad os nu fortsætte med, hvordan man bruger iMovie ved at læse denne artikel.
-
 Sådan tilføjes vandmærke til en video i iMovie på Mac [All Embracing]
 Vil du kende hemmelighederne ved at tilføje et vandmærke til en video i iMovie? Spild ikke te på nogen, og lær det ved at læse denne artikel.