


Die besten Video-Trimmer mit Möglichkeiten, wie man einen Teil aus einem Video herausschneidet
Möchten Sie Teile Ihres Videos herausschneiden, um ein Highlight zu erstellen? Oder möchten Sie die Länge Ihres Videos verkürzen? Dann könnte dieser Leitfaden genau das Richtige für Sie sein. Wir stellen Ihnen zahlreiche Videobearbeitungsprogramme zum Kürzen von Videos vor. Außerdem erfahren Sie mehr über deren Funktionen, Kompatibilität und Beschreibung. Darüber hinaus zeigt Ihnen der Beitrag auch die einzelnen Schritte zum Trimmen eines Videos mit diesen Werkzeugen. Wenn Sie mehr über diese Video-Trimmer erfahren möchten, klicken Sie auf diesen Beitrag und lesen Sie weiter.

Teil 1. Gründe, ein Video zu trimmen
Es gibt verschiedene Gründe, warum Benutzer ein Video zuschneiden müssen. Siehe die Gründe unten für ein besseres Verständnis.
Highlights erstellen.
Wie wir in dieser modernen Ära beobachten, gibt es mehr kurze Clips im Internet. Sie können Videos in nur einer Minute ansehen. Wenn Sie auch diese Art von Video erstellen und nur die Highlights zeigen möchten, ist das Trimmen eines Videos die beste Methode, die Sie tun können.
Unnötige Aufnahmen.
Ein weiterer Grund, warum Sie ein Video zuschneiden müssen, ist das Entfernen unnötiger Aufnahmen. Wenn Sie einige Teile eines Videos entfernen möchten, insbesondere die unnötigen, ist das Trimmen die beste Lösung.
Längenbeschränkungen.
Einige Social-Media-Plattformen unterstützen keine langen Videos oder Clips. Beispielsweise ist ein langes Video verboten, wenn Sie ein Video in Ihrer Story posten, insbesondere auf Facebook oder Instagram. Auf diese Weise müssen Sie das Video am besten schneiden.
Video an Musik anpassen.
Einige Benutzer möchten das Video mit dem Audio synchronisieren. In diesem Fall ist das Trimmen eines Videos eine weitere Lösung, um die Anforderungen beim Synchronisieren des Audios zu erfüllen.
Teil 2. Der einfachste Video-Trimmer
Heutzutage finden Sie viele Videobearbeitungsprogramme online und offline. Einige davon sind sehr hilfreich, andere sind schwierig zu bedienen. Wenn das Ihr Anliegen ist, gibt es einen hervorragenden Offline-Video-Trimmer, mit dem Sie Ihre Videos kürzen können. Dieses Programm heißt Video Converter Ultimate. Mit Hilfe dieses Tools können Sie Ihr Video ganz einfach verkürzen und aufteilen. Außerdem bietet es eine intuitive Oberfläche mit einfachen Arbeitsabläufen und ist damit perfekt für alle Nutzer geeignet. Während des Trimmvorgangs können Sie noch mehr tun. Sie können zu den Ausgabeeinstellungen wechseln und Änderungen vornehmen. Sie können die Qualität, Bildrate, den Encoder, die Auflösung und andere Parameter des Videos anpassen. Sie können Ihr Endergebnis sogar in verschiedenen Formaten speichern, darunter MOV, AVI, MP4, MKV und mehr. Zudem versieht das Programm das bearbeitete Video nicht mit Wasserzeichen. So können Sie Ihr bearbeitetes Video ohne Störungen genießen. Darüber hinaus ist Video Converter Ultimate sowohl unter Windows als auch unter Mac verfügbar. Das bedeutet, dass das Programm für Windows- wie auch für Mac-Nutzer bequem einsetzbar ist.
Bewertung: 9,5/10
Kompatibilität: Windows und Mac
Hauptfunktionen:
◆ Es bietet eine Toolbox zum Trimmen von Videos, Drehen, Bearbeiten, Entfernen von Wasserzeichen und mehr.
◆Es ist in der Lage, verschiedene Video-, Audio- und Bilddateien zu konvertieren.
◆ Es bietet einen Collage Maker.
Sehen Sie sich das grundlegende Vorgehen unten an, um zu lernen, wie man ein Video verkürzt.
Schritt 1 Laden Sie Video Converter Ultimate auf Ihr Gerät herunter. Klicken Sie auf die Download-Schaltfläche unten, entsprechend dem Gerät, das Sie verwenden. Versionen für Windows und Mac sind verfügbar. Fahren Sie dann mit der Installation fort. Starten Sie anschließend das Programm.
Gratis DownloadFür Windows 7 oder neuerSicherer Download
Gratis DownloadFür MacOS 10.7 oder neuerSicherer Download
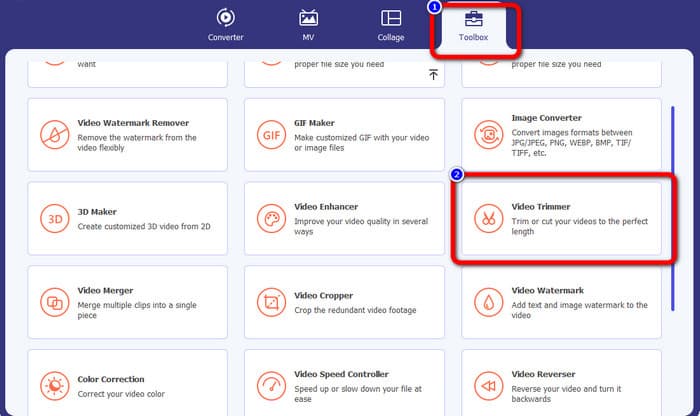
Schritt 2 Nachdem Sie das Programm gestartet haben, erscheint die Benutzeroberfläche auf dem Bildschirm. Wählen Sie oben die Option Toolbox und klicken Sie auf das Werkzeug Video Trimmer.
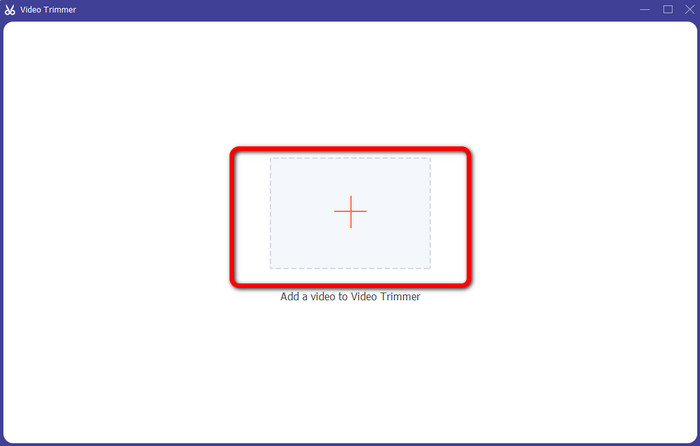
Schritt 3 Eine weitere Oberfläche erscheint auf dem Bildschirm. Klicken Sie auf das Plus-Symbol in der Mitte der Oberfläche. Öffnen Sie dann das Video, das Sie trimmen möchten, aus dem Ordner auf Ihrem Computer.
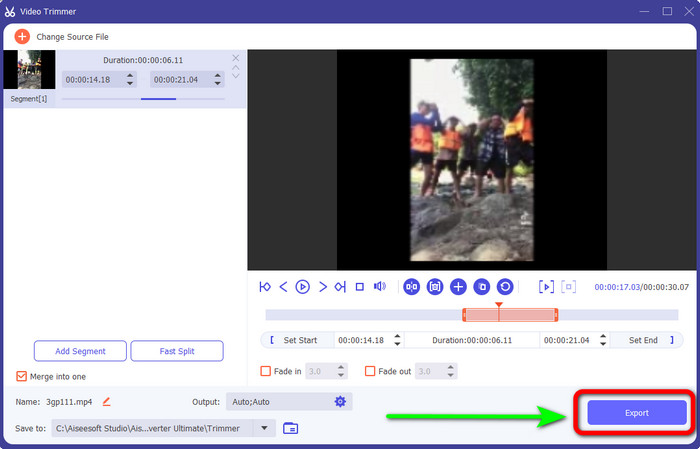
Schritt 4 In diesem Teil können Sie das Video bereits trimmen. Navigieren Sie zum Bereich mit der verstellbaren Leiste. Steuern Sie dann die rechten und linken Enden der Leiste, um das Video zu kürzen. Gehen Sie zu dem Abschnitt des Videos, den Sie trimmen möchten.

Schritt 5 Nach dem Trimmen können Sie das bearbeitete Video speichern, indem Sie auf die Schaltfläche Export klicken. Öffnen Sie anschließend das Video im Ausgabeverzeichnis, um es abzuspielen.
Teil 3. Der beste kostenlose Video-Cutter
1. VLC Mediaplayer
VLC Media Player ist nicht nur zum Abspielen von Videos zuverlässig. Sie können dieses Offline-Programm auch verwenden, um Videos zu schneiden und unnötige Teile zu entfernen. Auf diese Weise gilt VLC als Software zum Videoschneiden. Mit Hilfe dieses Offline-Programms können Sie Videos schneiden, um Videoclips zu erstellen. Es ermöglicht Ihnen, einen bestimmten Teil des Videos auszuwählen und herauszuschneiden. Außerdem können Sie den Anfangs- und Endpunkt eines Videos kürzen. Wie wir wissen, ist VLC keine fortschrittliche Videobearbeitungssoftware, aber das Schneiden von Videos ist einfach. Da es sich jedoch nicht um eine hochentwickelte Software handelt, hat VLC viele Einschränkungen. Wenn Sie das Video abspielen möchten, müssen Sie es zuerst in seinen Ordnern öffnen, was sehr zeitaufwendig ist. Auch der Installationsprozess könnte schneller sein. Sie müssen geduldig sein, wenn Sie versuchen, dieses Offline-Programm zu verwenden.
Bewertung: 8/10
Kompatibilität: Windows und Mac
Hauptfunktionen:
◆ Trimmen und Schneiden von Videos.
◆ Einfaches und sofortiges Abspielen von Videos.
◆ Konvertieren Sie verschiedene Videoformate.
◆ Audio normalisiert für Gehörschutz.
Verwenden Sie die folgenden Schritte, um das Video in VLC zu schneiden.
Schritt 1 Laden Sie den VLC Media Player auf Ihren Computer herunter. Folgen Sie danach dem Installationsprozess und starten Sie das Programm. Öffnen Sie dann das Video, das Sie schneiden möchten.
Schritt 2 Klicken Sie im oberen Teil der Oberfläche auf das Menü Ansicht. Klicken Sie dann auf die Option Erweiterte Steuerung.
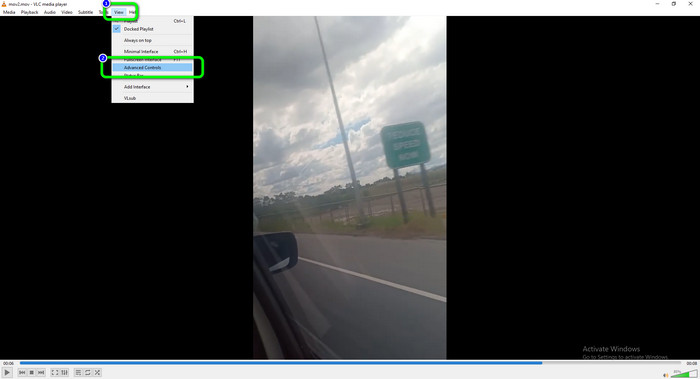
Schritt 3 Die Schaltfläche Aufnehmen erscheint oberhalb der Player-Steuerungstasten. Klicken Sie auf die Aufnahmetaste, um mit dem Schneiden des Videos zu beginnen. Sie können die Aufnehmen-Taste an dem Startpunkt des Videos drücken, den Sie ausschneiden möchten. Wenn Sie den Endpunkt erreicht haben, klicken Sie erneut auf die Aufnahmetaste. Die Aufnahmetaste ist der rote Kreis auf dem Bildschirm.
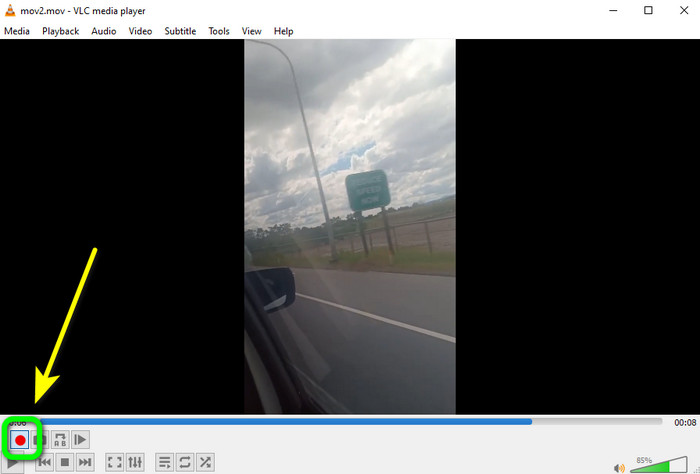
Schritt 4 Danach können Sie das bearbeitete Video über die Option Computer > Videos öffnen.
2. FFmpeg
Wenn Sie Teile Ihres Videos herausschneiden möchten, können Sie auch FFmpeg verwenden. Es handelt sich um ein Kommandozeilenprogramm, das in der Lage ist, verschiedene Medientypen zu erstellen, zu verarbeiten und zu bearbeiten. FFmpeg ist in diesem Bereich sehr nützlich. Es hat jedoch einige Nachteile. FFmpeg ist schwierig zu bedienen. Beim Herunterladen des Programms müssen Sie viele Schritte ausführen. Auch die Einrichtung ist kompliziert und daher für nicht professionelle Anwender ungeeignet. Außerdem gibt es zahlreiche Befehle, die Sie sich vor der Bedienung des Programms zunächst einprägen müssen. Wenn Sie also kein Profi sind, müssen Sie sich zunächst mit dem Programm vertraut machen. Eine andere Möglichkeit ist, nach einem wesentlich einfacheren Video-Cutter zu suchen, um einige Videos zu schneiden.
Bewertung: 7/10
Kompatibilität: Windows und Mac
Hauptfunktionen:
◆ Trimmen und Schneiden von Videos.
◆ Schneiden Sie das Video zu einer bestimmten Zeit.
◆ Videoformat miteinander kodieren und dekodieren.
Wie man mit FFmpeg Videos trimmt
Schritt 1 Laden Sie FFmpeg auf Ihren Computer herunter. Folgen Sie allen Schritten, um FFmpeg auf Ihrem Gerät einzurichten. Navigieren Sie danach zur Startschaltfläche auf Ihrem Computer und geben Sie cmd ein.

Schritt 2 Geben Sie dann im Eingabeaufforderungsfenster $ ffmpeg -i input.mp4 -ss 00:05:10 -to 00:15:30 -c:v -c:a copy output2.mp4 ein. Der Befehl -to wird verwendet, um die genaue Zeit anzugeben, die von einem Startpunkt an ausgeschnitten werden soll. Im Beispiel wird das Video von 00:05:10 bis 00:15:30 geschnitten. Das Ergebnis ist ein Video von 10 Minuten und 20 Sekunden.

Schritt 3 Drücken Sie abschließend die Eingabetaste auf Ihrer Tastatur, um den Vorgang zu starten. Danach können Sie das Video bereits auf Ihrem Computer öffnen.
3. iMovie
Wenn Sie Mac-Benutzer sind, können Sie iMovie verwenden, um Ihre Videos zu schneiden. Dieses Programm bietet ein Schnittwerkzeug, mit dem Sie unnötiges Material aus Ihrem Film entfernen können. Außerdem ist der Prozess der Videobearbeitung sehr einfach. So können sowohl erfahrene als auch unerfahrene Nutzer das Programm problemlos verwenden. Darüber hinaus bietet iMovie noch weitere Funktionen. Sie können Ihr Video mit diesem Offline-Programm auch skalieren und in der Größe anpassen. Allerdings hat iMovie auch viele Nachteile. Wenn Sie mit großen Dateien arbeiten, wird der Prozess sehr langsam. Und wenn Sie ein fortschrittliches Programm mit professionellen Funktionen suchen, ist iMovie nicht die beste Wahl. Sie sollten dann nach einem anderen Tool suchen, das Ihren Erwartungen entspricht.
Bewertung: 7,5/10
Kompatibilität: Mac
Hauptfunktionen:
◆ Trimmen und Schneiden von Videos.
◆ Es bietet einen Video Rescaler und Resizer.
Folgen Sie den folgenden Methoden, um zu lernen, wie man Clips in iMovie schneidet.
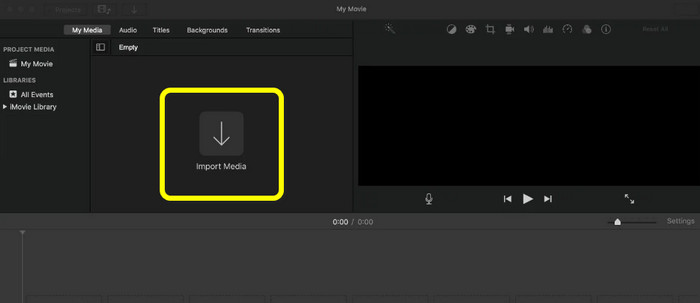
Schritt 1 Starten Sie zuerst iMovie auf Ihrem Mac. Navigieren Sie dann zur Registerkarte Projekt. Klicken Sie anschließend auf die Option Neu erstellen und wählen Sie Film.
Schritt 2 Klicken Sie dann auf die Option Medien importieren, um das Video hinzuzufügen, das Sie in iMovie bearbeiten möchten.
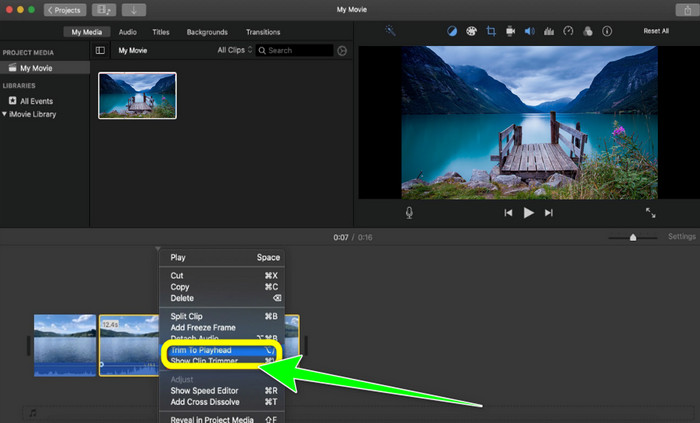
Schritt 3 Ziehen Sie nun den Film in die Zeitleiste, um das Video zu trimmen. Klicken Sie mit der rechten Maustaste auf das Video und wählen Sie die Option Auf Abspielposition kürzen. Danach ist Ihr Video bereits fertig. Sie können das unnötige Material entfernen und nur das bearbeitete Video sehen.
4. Openshot
Ein weiteres Werkzeug ist Openshot. Dieses Programm ist ebenfalls zuverlässig, wenn es darum geht, ein Video zu schneiden oder zu trimmen. Es ist zudem für Anfänger geeignet. Es bietet nur eine einfache Methode für den Trimmvorgang. So können Sie das Programm auch ohne Bearbeitungskenntnisse verwenden. Allerdings hat Openshot viele Nachteile. Sie können nur grundlegende Bearbeitungen an Videos vornehmen. Erweiterte Bearbeitungstools sind nicht verfügbar.
Bewertung: 8/10
Kompatibilität: Windows und Mac
Hauptfunktionen:
◆ Ein Tool zum Zuschneiden von Videos ist verfügbar.
◆ Es bietet eine Echtzeit-Vorschau.
◆ Videoübergänge, Maks und Wipes
◆ Bildsequenzen und 2D-Animationen.
Wie man mit Openshot Videos schneidet
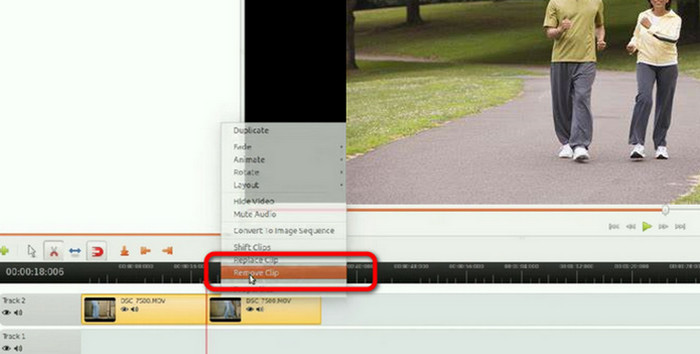
Schritt 1 Laden Sie Openshot auf Ihren Computer herunter. Nachdem Sie es installiert haben, starten Sie das Programm. Wenn die Benutzeroberfläche erscheint, klicken Sie auf die Option Datei importieren, um das Video einzufügen. Platzieren Sie das Video anschließend auf der Zeitleiste.
Schritt 2 Klicken Sie auf das Symbol Schneiden und gehen Sie zu der Stelle im Video, an der Sie schneiden möchten.
Schritt 3 Wenn das Video in zwei Teile unterteilt ist, klicken Sie mit der rechten Maustaste auf den unerwünschten Teil und wählen Sie die Option Clip entfernen. Danach können Sie Ihr Ergebnis bereits speichern.
5. Windows Mediaplayer
Möchten Sie wissen, wie Sie Videos mit Windows Media Player schneiden? Mit Windows Media Player können Benutzer Mediendateien auf Windows-Betriebssystemen abspielen. Windows-Benutzer möchten häufig einen Weg finden, Videos direkt im Windows Media Player zu bearbeiten oder zu trimmen. Kann Windows Media Player also Videos bearbeiten? Leider kann diese Windows-Software keine Videos bearbeiten. Dies bedeutet jedoch nicht, dass Windows Media Player aufgegeben werden muss, wenn Sie Ihre Filme ändern möchten. Der beste Weg ist, ein Plug-in zu verwenden. Es heißt SolveigMM. Dieses Plug-In hilft dem Windows Media Player, Videos effektiv zu schneiden.
Bewertung: 7/10
Kompatibilität: Windows
Hauptfunktionen:
◆ Spielen Sie ein Video ab.
◆ Schneiden Sie ein Video auf einfache Weise.
◆ Konvertieren Sie verschiedene Videoformate.
Um Videos in Windows 11 zu trimmen, verwenden Sie den Windows Media Player. Sehen Sie sich die folgenden Schritte an, um ein Video zu trimmen.
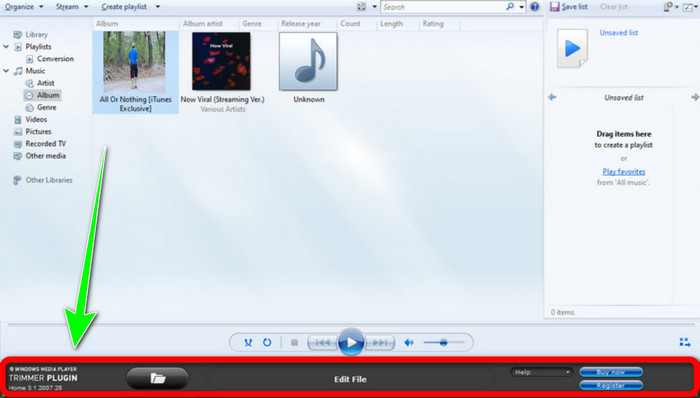
Schritt 1 Beginnen Sie damit, das SolveigMM Trimmer Plugin von der offiziellen Website herunterzuladen. Installieren Sie das Programm dann auf Ihrem Computer, indem Sie den Installationsprozess abschließen.
Schritt 2 Starten Sie den Windows Media Player und binden Sie das Plugin ein, um die Trimmfunktion verfügbar zu machen. Wählen Sie Extras > Plug-ins > SolveigMM WMP. Anschließend sollten Sie eine weitere Option am unteren Rand der Bedienoberfläche bemerken.
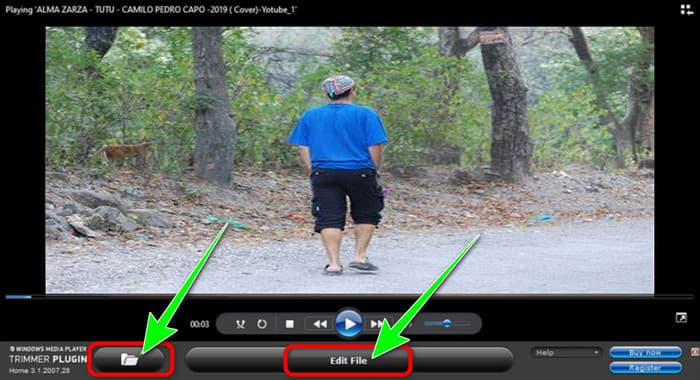
Schritt 3 Fügen Sie nun das Video hinzu, das Sie schneiden möchten. Klicken Sie dazu auf das Ordner-Symbol und wählen Sie das Video, das Sie in die Software laden möchten. Das Video sollte sofort mit der Wiedergabe beginnen. Klicken Sie danach auf Datei bearbeiten, um mit dem Kürzen des Videos zu beginnen.
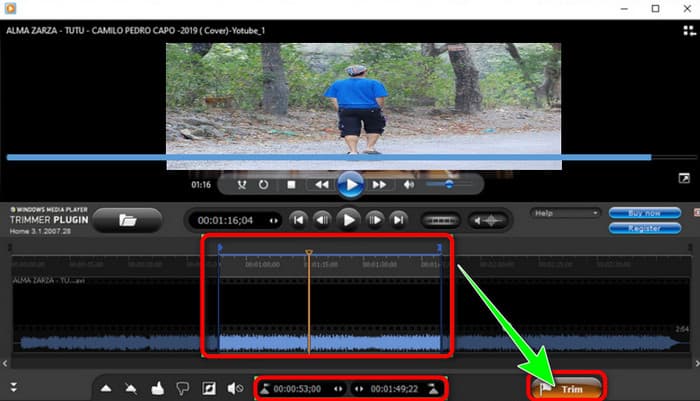
Schritt 4 Wählen Sie anschließend die genaue Zeit oder Position, die Sie verkürzen möchten. Sie können sich dabei auch an der Zeitangabe orientieren, um Start- und Endpunkte festzulegen. Klicken Sie nach Abschluss des Vorgangs auf die Schaltfläche Trimmen und sehen Sie sich das Video in der Vorschau an, um zu überprüfen, ob die Änderungen übernommen wurden.
6. QuickTime-Player
Apples standardmäßiger Medienplayer ist QuickTime, Sie können damit aber auch Ihre Videos bearbeiten und schneiden. Mit den Funktionen von QuickTime Player können Videos gedreht, neu angeordnet und beschnitten werden. Ein Video kann in einzelne Clips unterteilt werden, von denen jeder separat bearbeitet werden kann. QuickTime ist immer kostenlos nutzbar, da es Bestandteil von macOS ist. Allerdings verfügt QuickTime Player nur über eingeschränkte Funktionen. Wenn Sie Videos professionell bearbeiten möchten, sollten Sie eine andere Videobearbeitungssoftware verwenden.
Bewertung: 8 /10
Kompatibilität: Mac
Hauptfunktionen:
◆ Es bietet Möglichkeiten zum Trimmen eines Videos.
◆ Geeignet zum Drehen und Anordnen von Videos.
◆ Spielen Sie ein Video in verschiedenen Formaten ab.
Folgen Sie den folgenden Schritten, um ein Video in QuickTime zu trimmen.
Schritt 1 Starten Sie QuickTime Player auf dem Mac. Gehen Sie danach zu Ablage > Öffnen und fügen Sie das Video hinzu.
Schritt 2 Nachdem Sie das Video geöffnet haben, gehen Sie zum Menü Bearbeiten und klicken Sie auf die Option Trimmen. Auf diese Weise können Sie mit dem Trimmen des Videos beginnen.
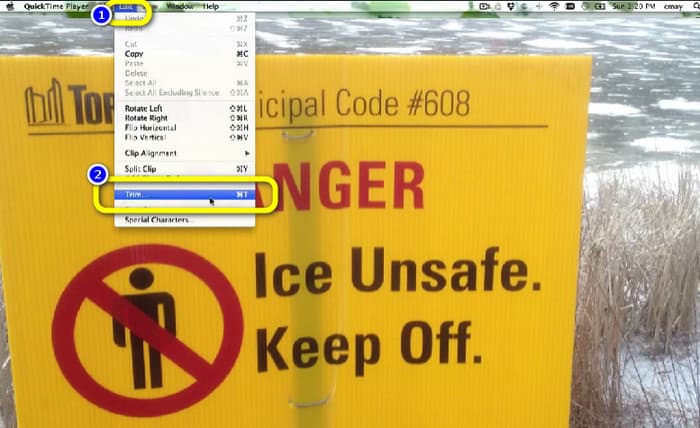
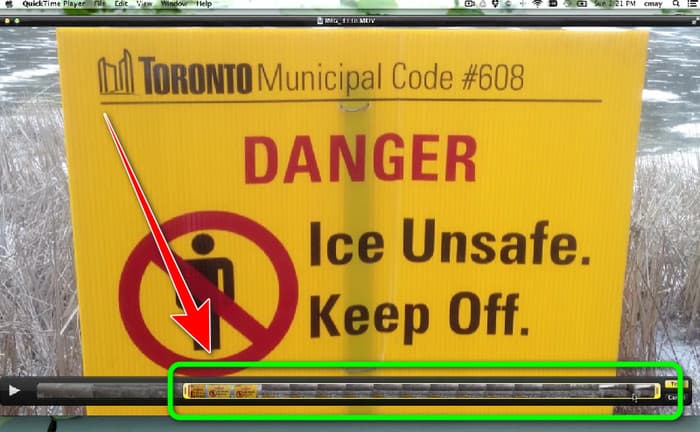
Schritt 3 In diesem Teil können Sie das Video bereits kürzen. Klicken und ziehen Sie die Enden der Leiste. Sie können sowohl links als auch rechts anpassen. Nachdem Sie das Video getrimmt haben, können Sie zum Menü Ablage gehen und Ihr Endergebnis exportieren.
Teil 4. Bezahlter und professioneller Videoschneider
1. Nachwirkungen
Angenommen, Sie sind ein versierter Nutzer und suchen nach einem fortgeschrittenen Videobearbeitungsprogramm, dann ist After Effects ideal. Das Bearbeiten in After Effects kann anspruchsvoll sein – und das aus gutem Grund, denn streng genommen ist es keine Schnittsoftware. Obwohl After Effects ein leistungsstarkes Animations‑Toolset ist, mit dem Sie fantastische Effekte erstellen können, ist es nicht für das schnelle Schneiden kurzer Clips ausgelegt. Auch wenn Sie Ihr Projekt wahrscheinlich in Premiere Pro fertig schneiden werden, ist es dennoch wichtig zu wissen, wie Sie Ihre Clips in Adobe After Effects teilen und schneiden. Wenn Sie Anfänger sind, ist dieses Programm möglicherweise zu viel für Sie. Die Benutzeroberfläche ist komplex und bietet zahlreiche Optionen, was für Einsteiger verwirrend ist.
Bewertung: 8 /10
Kompatibilität: Mac und Windows
Hauptfunktionen:
◆ Animation ist verfügbar.
◆ Trimmen und Schneiden von Videos.
So schneiden Sie einen Clip in After Effects
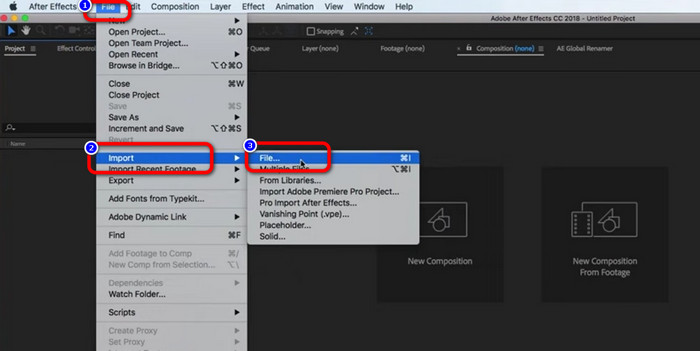
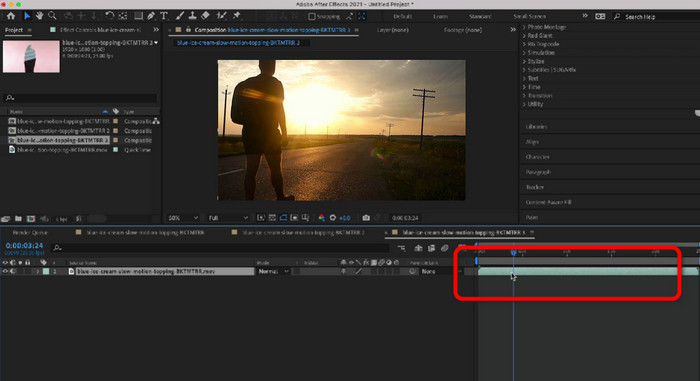
Schritt 1 Starten Sie Adobe After Effects auf Ihrem Computer. Gehen Sie dann zum Menü File. Wählen Sie die Option Open > File, um das Video hinzuzufügen.
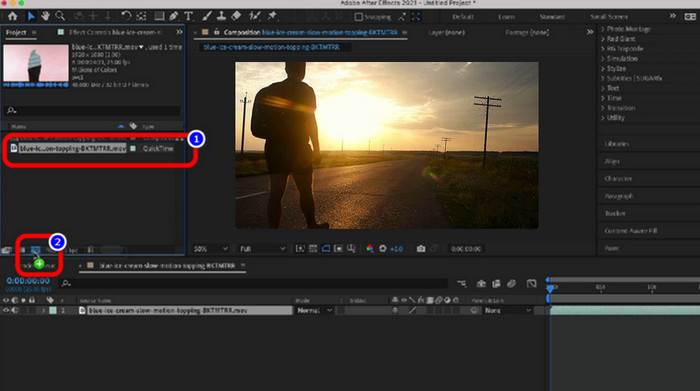
Schritt 2 Ziehen Sie das Video auf das Symbol New Comp im Layer panel, um eine neue Komposition zu starten.
Schritt 3 Setzen Sie den Abspielkopf an die Stelle, an der Sie die Ebene trennen möchten. Wenn Sie keine volle Tastatur haben, können Sie den Abspielkopf Bild für Bild mit Page Up/Down oder Cmd+Left Arrow & Cmd+Right Arrow verschieben.
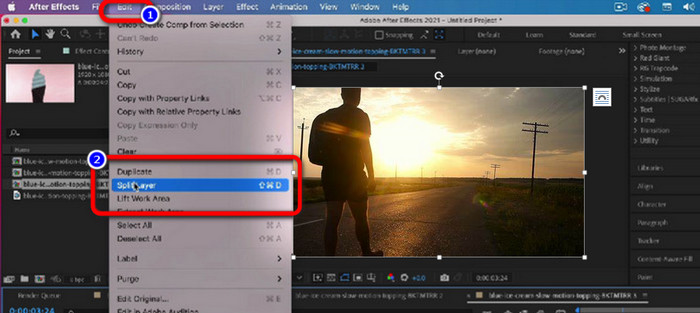
Schritt 4 Um den unerwünschten Teil des Videos zu entfernen, gehen Sie zum Menü Edit und klicken Sie auf die Option Split Layer. Sie können den unnötigen Teil entfernen und das bearbeitete Video speichern.
2. DaVinci-Lösung
Ein weiteres fortgeschrittenes Schnittprogramm, das Sie offline verwenden können, ist DaVinci Resolve. Dieses Programm ist sehr zuverlässig beim Trimmen/Schneiden von Videos. Mit Hilfe dieses herunterladbaren Programms können Sie alle störenden Teile Ihres Videos entfernen. Außerdem gibt es noch viele weitere Funktionen, die Sie bei der Verwendung von DaVinci Resolve entdecken können. Sie können die Videoqualität verbessern, Effekte hinzufügen, Audio entrauschen und vieles mehr. Für Einsteiger ist es jedoch schwierig, da DaVinci eine professionelle Videobearbeitungssoftware ist. Das Offline‑Programm hat eine unübersichtliche Oberfläche, was die Einarbeitung kompliziert macht. Zudem müssen Sie ein Abonnement erwerben, um weitere großartige Funktionen zu nutzen.
Bewertung: 8,5/10
Kompatibilität: Mac und Windows
Hauptfunktionen:
◆ Schneiden und Trimmen von Videoclips.
◆ Kann Audio entrauschen.
◆ Es kann die Videoqualität verbessern.
So schneiden Sie einen Clip in DaVinci Resolve
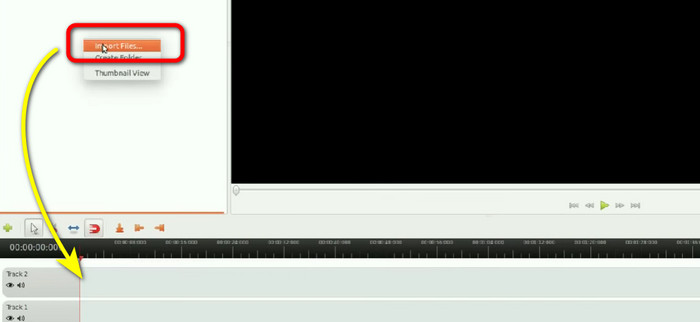
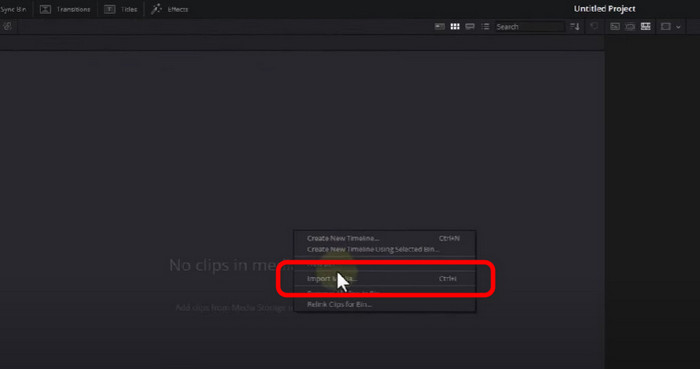
Schritt 1 Starten Sie DaVinci Resolve auf Ihrem Windows‑ oder Mac‑Computer. Klicken Sie danach mit der rechten Maustaste auf den leeren Bereich und wählen Sie die Option Import Media. Wählen Sie das Video aus Ihrem Dateiverzeichnis.
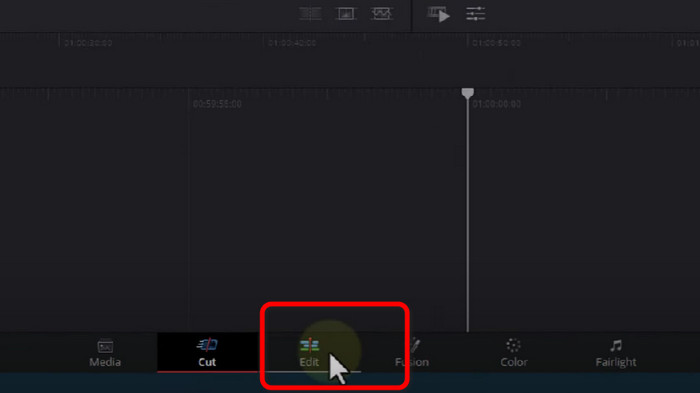
Schritt 2 Gehen Sie in den unteren Bereich der Oberfläche und stellen Sie sicher, dass Sie sich im Layout Edit befinden.
Schritt 3 Ziehen Sie anschließend das Video auf die Timeline, um den Trimmvorgang zu starten.
Schritt 4 Teilen Sie das Filmmaterial mit dem Blade Edit Mode und bearbeiten Sie es von dort aus. Mit dieser einfachen Technik können Sie das Video nach Bedarf schneiden.
3. Adobe Premiere Pro
Allgemein gesprochen sind Videoschnitt und Trimmen grundlegende Fähigkeiten für jeden Videoeditor. Es wird vorausgesetzt, dass jeder früher oder später ungewollte Szenen und peinliche Momente aus den Aufnahmen herausschneidet. Zweifellos bietet Adobe Premiere Pro eine Komplettlösung für die Nachbearbeitung von Videos, einschließlich Videoschnitt. Wenn Sie also wissen möchten, wie man Clips in Premiere Pro schneidet, lesen Sie weiter. Dieses Offline‑Programm eignet sich jedoch nur für fortgeschrittene Anwender. Wenn Sie keine Erfahrung im Videoschnitt haben, wird es Ihnen schwerfallen, das Programm zu nutzen. Außerdem ist Adobe Premiere Pro teuer. Sie müssen ein Abonnement erwerben, um die fortgeschrittenen Funktionen nutzen zu können.
Bewertung: 8/10
Kompatibilität: Mac und Windows
Hauptfunktionen:
◆ Videoclips effizient schneiden und trimmen.
◆ Schneiden Sie einen Clip in verschiedene Teile.
◆ Fügen Sie dem Video Filter und Effekte hinzu.
So schneiden Sie Clips in Premiere
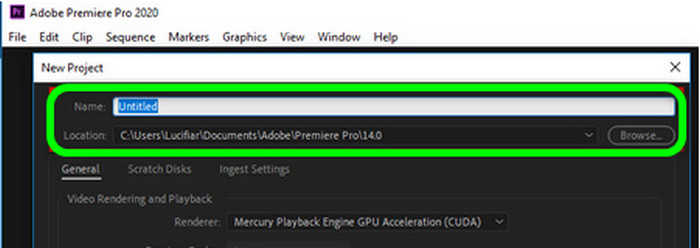
Schritt 1 Öffnen Sie Adobe Premiere Pro, starten Sie ein neues Projekt, benennen Sie Ihr Projekt und wählen Sie den Speicherort für die Premiere‑Dateien aus.
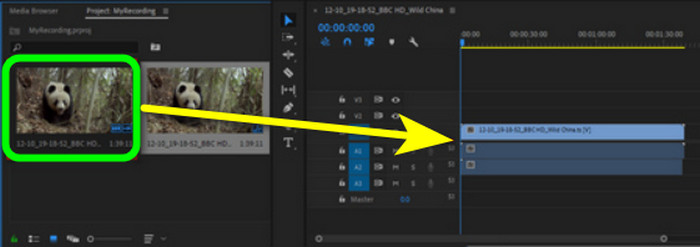
Schritt 2 Gehen Sie dann in den leeren Bereich und importieren Sie den Clip. Legen Sie ihn anschließend auf der Timeline ab.
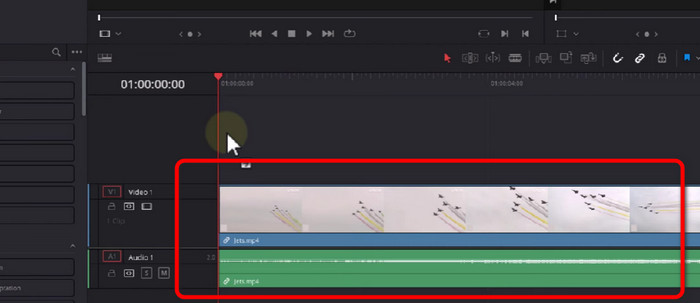
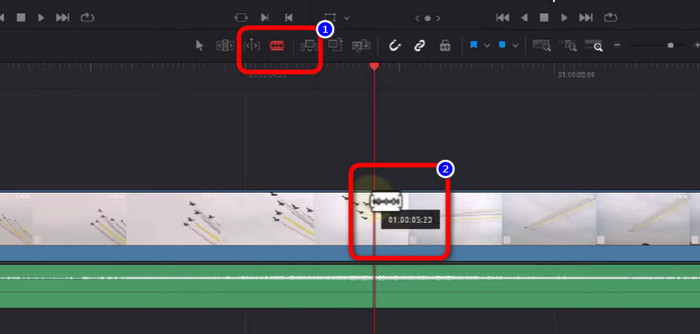
Schritt 3 Um einen Startpunkt zu trimmen, ziehen Sie den blauen Schieberegler dorthin, wählen Sie Sequence > Add Edit oder drücken Sie einfach Ctrl + K. Sie sehen eine Trennlinie, die das Filmmaterial in zwei Abschnitte teilt. Entfernen Sie danach das gesamte unnötige Material von der Timeline und speichern Sie das getrimmte Video.
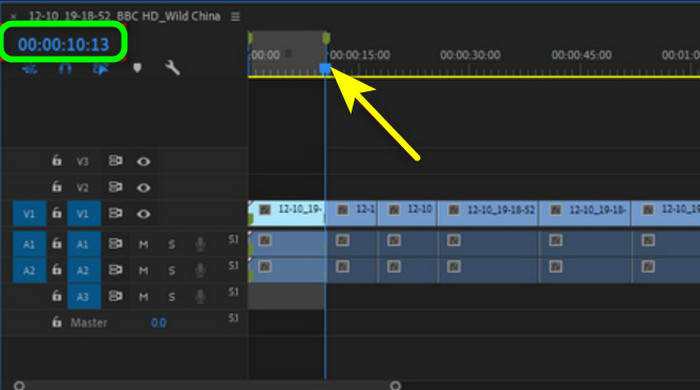
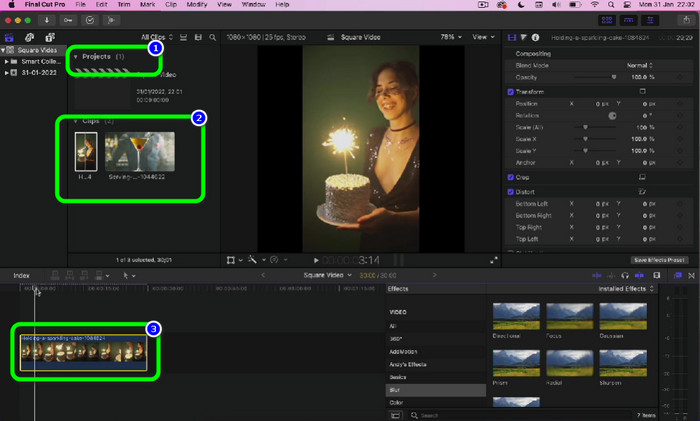
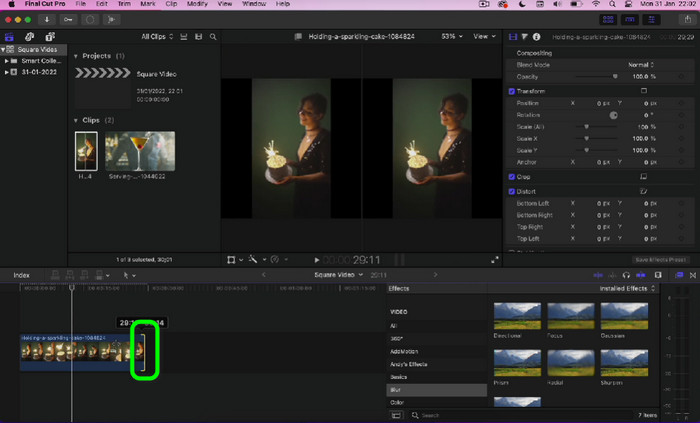
4. Final Cut Pro
Wenn Sie einen weiteren Video‑Trimmer für Mac und Windows möchten, verwenden Sie Final Cut Pro. Dieses Programm kann Ihnen helfen, alle unerwünschten Teile Ihres Videos zu entfernen. Außerdem bietet Final Cut Pro eine Oberfläche mit zahlreichen Optionen. So gibt es neben dem Trimmen noch viele weitere Bearbeitungsmöglichkeiten. Allerdings erfordert das Programm ein Abonnement, um in den Genuss weiterer fantastischer Funktionen zu kommen. Zudem ist der Installationsprozess zeitaufwendig. Es beansprucht auch viel Speicherplatz, stellen Sie also sicher, dass Sie über genügend Speicher verfügen.
Bewertung: 8,5/10
Kompatibilität: Mac und Windows
Hauptfunktionen:
◆ Trimmen und schneiden Sie ein Video effektiv.
◆ Erstellen Sie Videos mit hoher Qualität.
◆ Es bietet Werkzeuge zur Licht- und Farbkorrektur.
Hier ist die Anleitung, mit der Sie lernen können, wie man Videos in Final Cut Pro trimmt.
Schritt 1 Laden Sie Final Cut Pro auf Ihren Windows‑ oder Mac‑Computer herunter. Öffnen Sie das Programm nach Abschluss der Installation.
Schritt 2 Gehen Sie zur Option Projects > Clips, um das Video anzuzeigen. Ziehen Sie anschließend das Video auf die Timeline.
Schritt 3 Gehen Sie dann zu dem Teil des Videos, den Sie trimmen möchten. Klicken Sie auf den Rand des Videos und ziehen Sie ihn, um das Video zu kürzen. Sie können die linken und rechten Ränder des Videos ziehen. Und damit sind Sie fertig – Sie können das Video nach dem Trimmen speichern.
Teil 5. Häufig gestellte Fragen zum Video Trimmer
1. Verringert das Trimmen eines Videos seine Qualität?
Wenn Sie einen hervorragenden Video-Trimmer kaufen, führt das Trimmen im Allgemeinen nicht zu einem Verlust der Videoqualität. Sie sollten sich darüber im Klaren sein, dass Auflösung, Bitrate und Frames entscheidende Faktoren für die Videoqualität sind. Stellen Sie also sicher, dass Sie die ursprünglichen Parameter beibehalten, wenn Sie ein bearbeitetes Video exportieren.
2. Welcher Videotrimmer ist der beste?
Wenn Sie den leistungsstärksten Video‑Trimmer möchten, verwenden Sie Video Converter Ultimate. Mit diesem herunterladbaren Programm können Sie Videos auf einfache Weise trimmen. Zudem ist die Benutzeroberfläche leicht verständlich. Außerdem ist es im Gegensatz zu manch anderer Videobearbeitungssoftware kostenlos herunterzuladen.
3. Was ist Videotrimmen?
Zur weiteren Erläuterung: Einer der wesentlichen Schritte beim Bearbeiten ist das Trimmen. Dabei wird der Anfang oder das Ende eines Videos aufgenommen. Oft ist das Ziel, alles außer dem wertvollsten Material aus dem Video herauszuschneiden.
4. Wie trimmt man Videos in PowerPoint?
Starten Sie PowerPoint und navigieren Sie zur Option Einfügen > Video. Klicken Sie im Bearbeitungsbereich der Multifunktionsleiste auf Video trimmen. Sie können die Markierungen verwenden, um die Start- und Endpunkte auszuwählen, die Start- und Endzeiten manuell einzugeben oder eine Kombination aus beidem vorzunehmen. Wenn Sie es wissen, können Sie die genauen Start- und Endzeiten in die entsprechenden Bereiche eingeben. Indem Sie die Dauer oben unmittelbar nach dem Zuschneiden des Videos überprüfen, können Sie möglicherweise feststellen, ob Sie aufgrund von Zeitbeschränkungen nur einen bestimmten Teil sehen können. Klicken Sie auf OK, sobald der gewünschte Teil des Videos vorbereitet wurde.
Fazit
Wenn Sie ein langes Video verkürzen möchten, ist die beste Lösung, es zu trimmen. Daher stellt dieser Leitfaden die bewährtesten und getesteten Video‑Trimmer vor. Allerdings ist manche Videoschnittsoftware schwierig zu bedienen. Wenn Sie also eine leichter zugängliche Software möchten, verwenden Sie Video Converter Ultimate. Dieses herunterladbare Programm kann Ihnen helfen, ein Video zu trimmen, ohne auf Schwierigkeiten zu stoßen.
-
 Entdecken Sie den besten MP4-Trimmer mit Verfahren und Informationen
 Möchten Sie lernen, wie Sie Videos wie die Vlogger schneiden, die Sie sich ansehen? Dann lesen Sie diesen Beitrag weiter, um zu erfahren, welche MP4-Trimmer Sie verwenden können.
-
 Entdecken Sie den besten MP4-Trimmer mit Verfahren und Informationen
 Möchten Sie lernen, wie Sie Videos wie die Vlogger schneiden, die Sie sich ansehen? Dann lesen Sie diesen Beitrag weiter, um zu erfahren, welche MP4-Trimmer Sie verwenden können.
-
 Der beste MP4-Editor für Windows und Mac im Jahr 2023
 Unabhängig davon, ob Sie Ihren Computer für die MP4-Videobearbeitung verwenden oder nur an Ihrem Telefon arbeiten, finden Sie hier einige großartige Optionen, darunter den besten MP4-Editor für Windows und Mac.