

4 Möglichkeiten, Fotos auf dem iPhone zu verwischen, um professionelle Ergebnisse zu erzielen
In der schnelllebigen Welt der Smartphone-Fotografie ragt das iPhone als echtes Kraftpaket heraus und bietet Nutzerinnen und Nutzern eine große Auswahl an Funktionen, um unvergessliche Momente mit unvergleichlicher Leichtigkeit festzuhalten. Ein oft übersehener Schatz im Bearbeitungsarsenal des iPhones ist die Möglichkeit, Bilder zu verwischen. Diese Technik kann deinen Aufnahmen mehr Tiefe, Dramatik und einen Hauch von Professionalität verleihen. In diesem Artikel führen wir dich Schritt für Schritt durch den Prozess, wie du Fotos auf deinem iPhone verwischst und damit eine Welt kreativer Möglichkeiten direkt an deinen Fingerspitzen freischaltest – angefangen bei der Nutzung des Porträtmodus über Online-Tools bis hin zu Drittanbieter-Apps.

Teil 1. So verwischen Sie Fotos auf dem iPhone
Portraitmodus
Der Porträtmodus auf dem iPhone ist eine spezielle Funktion, die der Qualität der Fotos mehr Tiefe verleiht. Dadurch entsteht eine geringe Schärfentiefe, die das Motiv vom Hintergrund abhebt. Fragen wie „Können Sie den Hintergrund eines Fotos auf einem iPhone verwischen“ werden häufig von jemandem gestellt, der neu im Apple-Ökosystem ist. Das Verwischen Ihrer Fotos auf dem iPhone ist möglich, da iOS bis zur neuesten Version den Porträtmodus in seinem 7 Plus-Modell eingeführt hat. Die dazu erforderlichen Schritte sind unten aufgeführt.
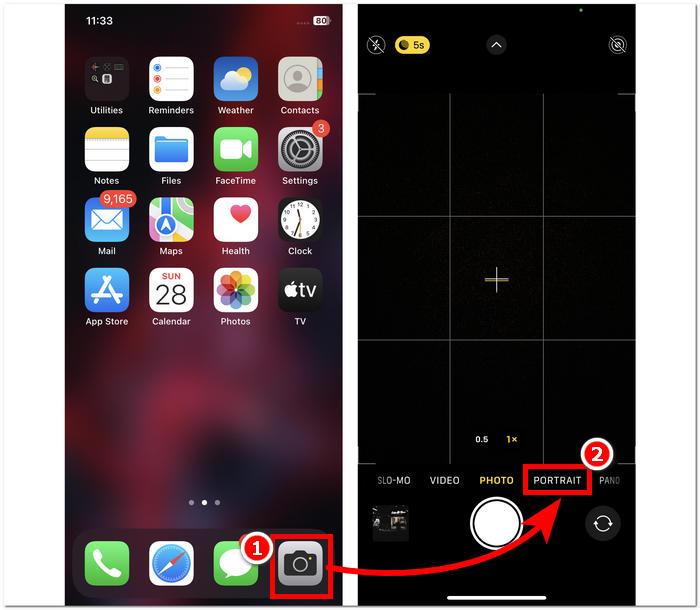
Schritt 1. Öffne auf deinem iPhone die Kamera-App.
Schritt 2. Tippe in den Kameraeinstellungen auf den Bereich Porträt.
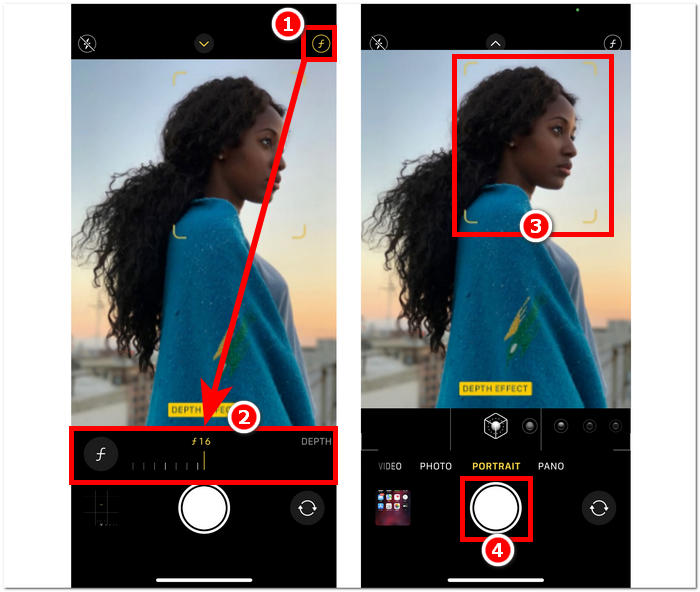
Schritt 3. Tippe auf deinem Bildschirm auf das f-Symbol oben rechts und passe die gewünschte Tiefenschärfe für deine Fotos an.
Schritt 4. Wenn du mit der eingestellten Tiefe zufrieden bist, tippe auf dein Motiv, um es zu fokussieren, und drücke anschließend auf den Auslöser, um dein Foto aufzunehmen.
Die Nutzung des Porträtmodus auf dem iPhone ist unkompliziert, sobald du die Wirkung der Tiefenschärfe auf deine Fotos verstehst und dich in der Oberfläche der Kamera-App zurechtfindest. Und falls du es dir anders überlegst, kannst du Bilder auch ganz einfach wieder entwischen.
Ohne Porträtmodus
Wie verwische ich ein Foto auf einem iPhone ohne Porträtmodus? Das Verwischen von Fotos mit Ihrem iPhone, wenn es nicht über den Porträtmodus verfügt, kann eine Herausforderung sein, da der Porträtmodus in den Modellen 7 Plus und höher eingeführt wird. Daher finden wir Möglichkeiten für Benutzer, die auf ihren iPhones keinen Porträtmodus haben. Dies ähnelt eher einem Tipp oder Hack und erfordert die manuelle Arbeit des Benutzers. Bei effektiver Vorgehensweise können Sie ähnliche Ergebnisse wie im Porträtmodus erzielen.
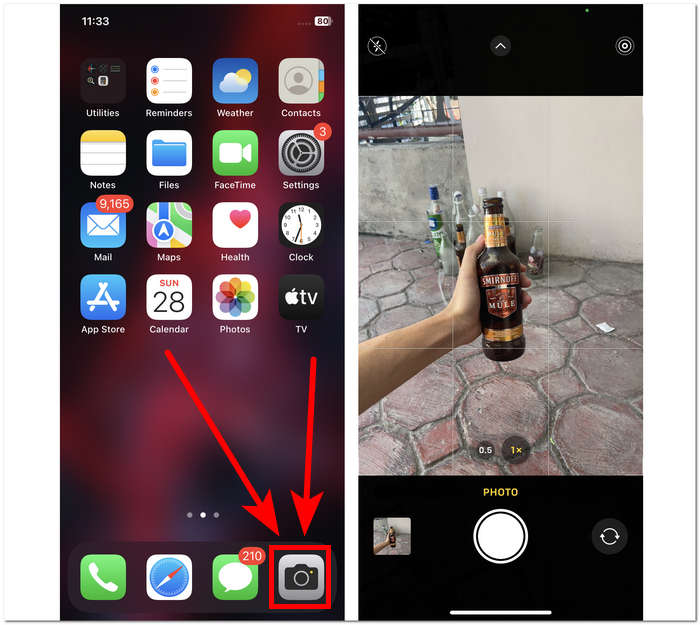
Schritt 1. Öffne auf deinem iPhone die Kamera-App.
Schritt 2. Positioniere dich und dein Motiv auf der Hauptoberfläche so, dass ihr weit vom Hintergrund entfernt seid, indem du dich nach hinten bewegst.
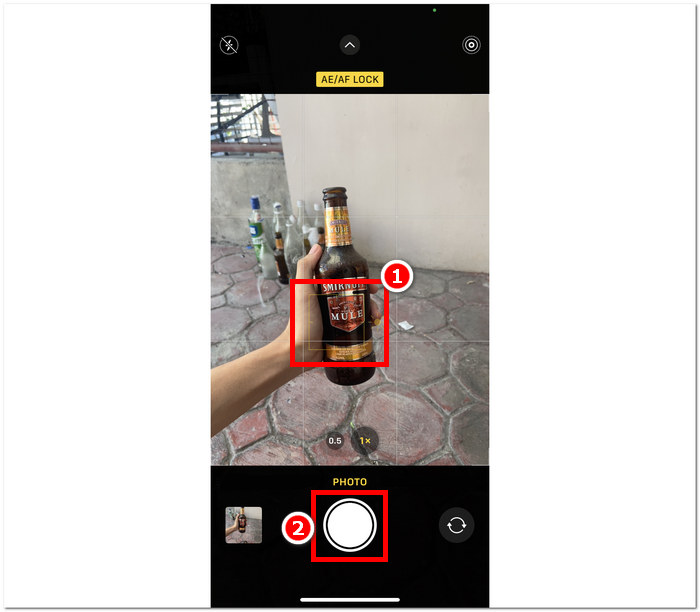
Schritt 3. Drücke lange auf das Motiv, bis oben auf dem Bildschirm AE/AF-SPERRE erscheint. Dadurch wird dein Motiv zum Fokus der Kamera, während der Hintergrund unscharf wird.
Schritt 4. Sobald sich das Motiv deutlich vom unscharfen Hintergrund abhebt, bist du bereit, deine Fotos aufzunehmen. Tippe einfach auf den Auslöser, um deine Bilder zu machen.
Es ist möglich, Fotos auf einem iPhone auch ohne die Porträtmodus-Funktionen in den Kameraeinstellungen unscharf zu machen, indem Sie manuell einen Abstand zwischen Ihrem Motiv und seinem Hintergrund erstellen und den Fokus richtig einstellen. Dieser Schritt gilt nicht nur für iOS-Benutzer, sondern auch für Android-Benutzer, die in ihren Kameraeinstellungen keinen Porträtmodus haben.
Drittanbieter-App: Snapseed
Snapseed gehört zu den leistungsstarken und professionellen Fotobearbeitungsanwendungen, die von Google entwickelt wurden. Diese App ist voll von Funktionen und Tools, die ein Benutzer für jede Fotobearbeitungsaufgabe benötigt, darunter das Verwischen Ihrer Fotos nur mit Ihrem iPhone. Der Rückgriff auf eine Drittanbieteranwendung kann Ihnen auch dabei helfen, Ihre Bedenken hinsichtlich der Unkenntlichmachung der Gesichter von Personen auf Fotos auf dem iPhone auszuräumen, da Sie mit der App entscheiden können, welchen Teil Sie unkenntlich machen möchten, im Gegensatz zum Porträtmodus, bei dem Sie nur oder auswählen können Tippen Sie auf Motive, um sie zu fokussieren.
Schritt 1. Lade Snapseed aus dem App Store auf dein iPhone herunter und öffne die App.
Schritt 2. Sobald du in der App-Oberfläche bist, tippe auf den Bildschirm, um die Fotos hinzuzufügen, bei denen du einen Unschärfeeffekt anwenden möchtest.
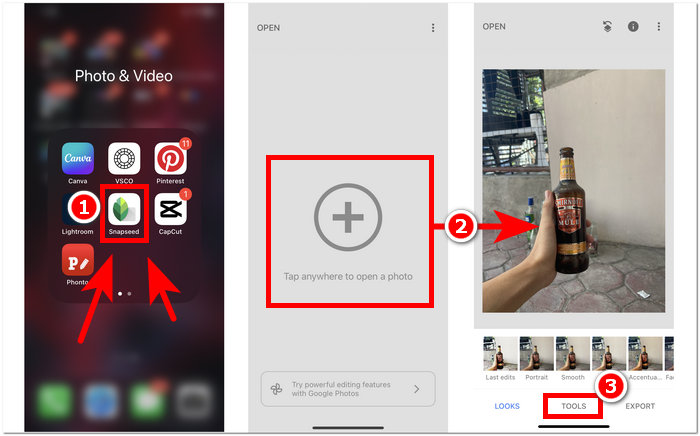
Schritt 3. Suche im Bereich TOOLS nach der Einstellung Lens Blur und tippe darauf. Dein Foto erscheint dann mit einem kreisförmigen Rahmen; dieser Kreis stellt den Fokusbereich dar, während der Bereich außerhalb des Kreises verwischt wird.
Schritt 4. Führe deine Finger zusammen (Zuschneidegeste), um die Größe des Kreises anzupassen. Richte die Größe des Kreisrahmens auf dein Motiv aus, und wenn du mit deiner Bearbeitung zufrieden bist, tippe auf das Häkchen und anschließend auf EXPORT, um die Änderungen zu speichern.
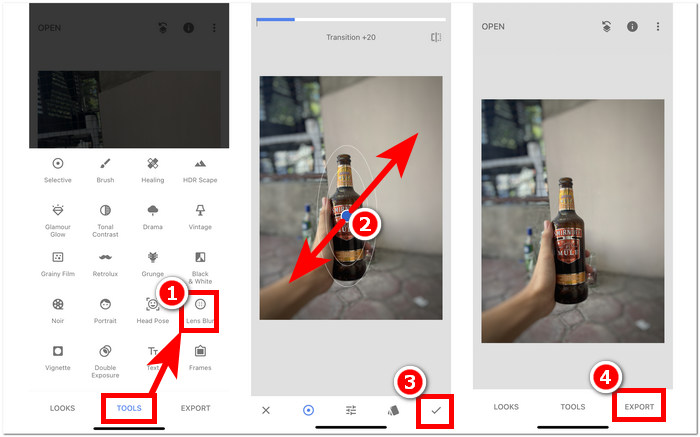
Die Vielseitigkeit von Snapseed erstreckt sich auf verschiedene Fotobearbeitungsaufgaben, einschließlich der nahtlosen Hinzufügung von Unschärfe zu Ihren Bildern. Diese App ist nicht nur auf iPhones, sondern auch auf anderen Geräten verfügbar, was sie zu einem idealen und praktischen Tool für Benutzer macht, die ein umfassendes Bearbeitungserlebnis suchen. Mit der benutzerfreundlichen Oberfläche und der geräteübergreifenden Kompatibilität von Snapseed war es noch nie einfacher, den gewünschten Unschärfeeffekt auf Ihren Fotos zu erzielen.
Teil 2. So entfernen Sie ein Objekt von Ihrem iPhone-Foto, ohne es zu verwischen
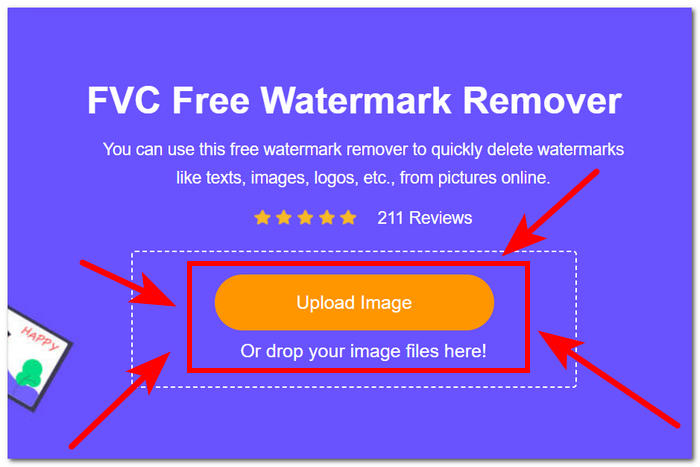
Einen perfekt aussehenden Unschärfeeffekt in iPhone-Fotos zu erzielen, kann herausfordernd sein – etwa wenn das gesamte Bild zu unscharf wird oder Objekte unklar erscheinen. Stehst du vor Objekten, die sich durch Verwischen nicht sinnvoll 'reparieren' lassen, ist es am besten, sie zu entfernen. Zum Glück hilft dir der FVC Free Watermark Remover – sowohl auf iOS als auch auf anderen Geräten – dabei, unerwünschte, verwackelte Objekte und sogar Wasserzeichen kostenlos aus deinen Fotos zu entfernen. FVC ist ein webbasiertes Tool, das über alle gängigen Browser auf verschiedenen Geräten zugänglich ist. Es unterstützt die kostenlose Nutzung für alle, ganz ohne Installation und Abonnement. Wenn du einfach die folgenden Schritte befolgst, erhältst du ein sauberes Ergebnis – ganz ohne zusätzliches Verwischen.
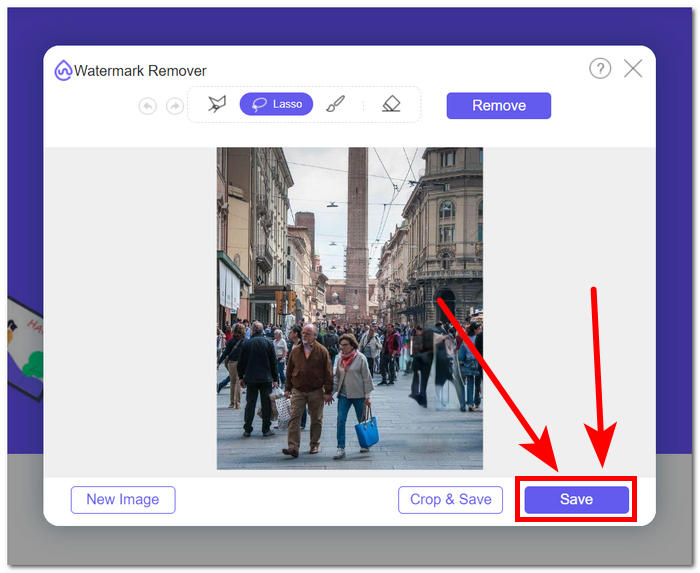
Schritt 1.Besuche den FVC Free Watermark Remover in deinem Browser – auf dem Smartphone oder am Desktop – und lade dein Bild hoch, indem du auf das Feld Bild hochladen klickst.
Schritt 2. Sobald dein Foto in der Oberfläche angezeigt wird, klicke oben auf das Lasso-Werkzeug und markiere damit das verwackelte Objekt oder den Text. Klicke anschließend auf die Schaltfläche Remove, um sie aus deinem Foto zu entfernen.
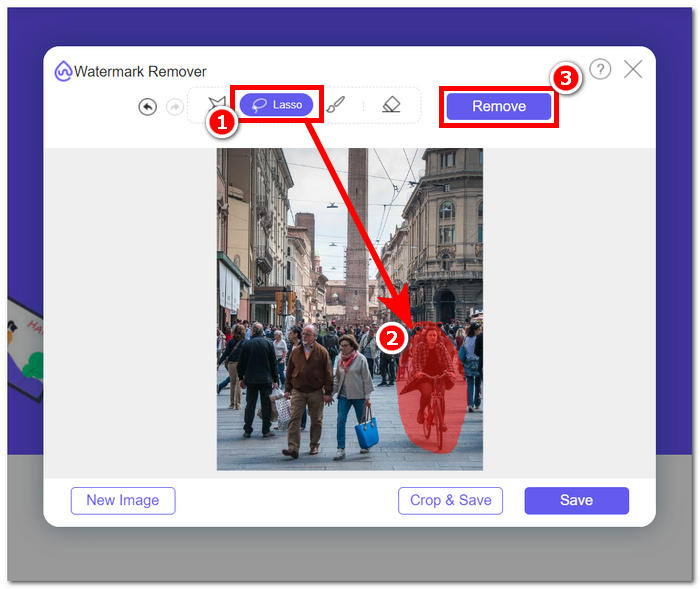
Schritt 3. Wenn die Verarbeitung deines Fotos abgeschlossen ist, kannst du eine Vorschau deines neu bearbeiteten Bildes sehen. Bist du mit der Objektentfernung zufrieden, klicke auf die Schaltfläche Speichern, um das Foto herunterzuladen.
Der FVC Free Watermark Remover hat gezeigt, dass er Objekte entfernen kann, ohne zusätzliche Unschärfe in deine Fotos zu bringen. Man kann daher mit gutem Gewissen sagen, dass dieses Tool – ganz gleich, ob du deine Bilder per Porträtmodus oder mit einer Drittanbieter-App verwischst – hervorragend dazu geeignet ist, alle Probleme zu beheben, die dabei auftreten können. Außerdem wurde es ursprünglich dafür entwickelt, Wasserzeichen aus JPG-, PNG- und anderen Bildformaten zu entfernen.
Teil 3. FAQs zum Verwischen von Fotos auf dem iPhone
Wie kann man ein Bild auf einem iPhone ohne die App verwischen?
Um ein Bild auf einem iPhone zu verwischen, ohne eine App zu verwenden, können Sie die integrierten Bearbeitungsfunktionen nutzen. Öffnen Sie die Foto-App, wählen Sie das Foto aus, das Sie bearbeiten möchten, tippen Sie auf Bearbeiten, wählen Sie das Drei-Punkte-Symbol und wählen Sie Markup. Von dort aus können Sie mit dem Stiftwerkzeug über Bereiche zeichnen, die Sie unkenntlich machen möchten.
Verfügt die iPhone-Foto-App über ein Unschärfe-Tool?
Die iPhone-Foto-App verfügt nicht über ein spezielles Unschärfe-Tool. Dennoch bietet es verschiedene Bearbeitungsoptionen, einschließlich des Tiefenwerkzeugs zum Anpassen der Hintergrundunschärfe bei Fotos im Porträtmodus. Öffnen Sie die Foto-App, wählen Sie ein Foto im Porträtmodus aus, tippen Sie auf „Bearbeiten“ und steuern Sie die Hintergrundunschärfe mit dem Schieberegler „Tiefe“.
Verfügen alle iPhones über einen Porträtmodus und verwischen den Hintergrund?
Nicht alle iPhones verfügen über den Porträtmodus und die Möglichkeit, den Hintergrund unscharf zu machen. Der Porträtmodus war auf dem iPhone 7 Plus und höher verfügbar. Um zu überprüfen, ob Ihr iPhone über den Porträtmodus verfügt, öffnen Sie die Kamera-App und prüfen Sie, ob Porträt als Option angezeigt wird.
Wie verwischt man den Hintergrund auf einem iPhone, nachdem man ein Foto aufgenommen hat?
Um den Hintergrund auf einem iPhone nach dem Aufnehmen eines Fotos unscharf zu machen, können Sie die Funktion „Porträtmodus“ verwenden, sofern Ihr iPhone dies unterstützt. Öffnen Sie die Fotos-App, wählen Sie das Foto aus, tippen Sie auf Bearbeiten und passen Sie dann die Hintergrundunschärfe mit dem Tiefenregler an. Beachten Sie, dass diese Funktion auf bestimmten iPhone-Modellen verfügbar ist.
Wie kann man einen Teil eines Fotos auf einem iPhone verwischen?
Das Verwischen eines Teils eines Fotos auf einem iPhone kann mit dem Markup-Tool in der Fotos-App erfolgen. Öffnen Sie die Foto-App, wählen Sie das Foto aus, tippen Sie auf Bearbeiten, wählen Sie das Dreipunktsymbol und dann Markup aus. Zeichnen Sie mit dem Stiftwerkzeug über den Bereich, den Sie verwischen möchten, und passen Sie die Intensität nach Bedarf an.
Fazit
Abschließend lässt sich sagen, dass das Verwischen von Fotos auf deinem iPhone nahezu unbegrenzte Möglichkeiten eröffnet und es Nutzerinnen und Nutzern erlaubt, ihre Bilder mit Tiefe, Dramatik und einem Hauch von Professionalität zu veredeln. Von der Nutzung des integrierten Porträtmodus bis hin zum Einsatz von Drittanbieter-Apps wie Snapseed bietet der Prozess genügend Flexibilität – sowohl für Einsteiger als auch für erfahrene Fotografen. Zusätzlich helfen Tools wie der FVC Free Watermark Remover dabei, unerwünschte Objekte zu entfernen, ohne die Bildschärfe zu beeinträchtigen. Während iPhone-Nutzer diese Techniken und Werkzeuge weiter erkunden, wird die Reise in die faszinierende Welt der Bildunschärfe zu einem spannenden und leicht zugänglichen Erlebnis. Also schnapp dir dein iPhone, probiere diese Methoden aus und hebe deine Fotografie auf ein professionelles Niveau!
-
 So entfernen Sie den Hintergrund aus einem Bild mit GIMP
 Beginnen Sie mit GIMP und erfahren Sie Schritt für Schritt, wie Sie Hintergründe aus Bildern entfernen. Entdecken Sie noch heute effiziente Möglichkeiten, transparente Bilder mit GIMP zu erstellen!
-
 So erhöhen Sie die Bildgröße online und offline
 Entdecken Sie den einfachsten Weg, die Bildgröße zu erhöhen, ohne an Qualität zu verlieren. Sehen Sie sich unsere Tools und Software zur Größenänderung an, um eine optimale Qualität Ihrer Bilder sicherzustellen.
-
 Wie entfernt PPT das Hintergrundbild? Umfassender Leitfaden
 Sind Sie bereit, Ihre Präsentation auf die nächste Stufe zu heben? Entdecken Sie in diesem Artikel, wie PPT Hintergrundbilder entfernt und ganz einfach herausragende PowerPoint-Präsentationen erstellt.