


راهنمای جامع استفاده از هوش مصنوعی برای بهبود کیفیت تصویر در کامپیوتر و موبایل
تا حالا عکسی داشتهاید که کدر و بیروح به نظر برسد؟ شاید عکس شما وضوح و تیزی لازم را ندارد. اما میدانستید تعداد زیادی برنامه برای شارپکردن (تیز کردن) تصویر در اینترنت وجود دارد؟ برای تیز کردن عکس لازم نیست از راهحلهای دسکتاپی گرانقیمت استفاده کنید. اگر در اینترنت جستوجو کنید، اپلیکیشنهای زیادی پیدا میکنید که میتوانند به شما در شارپکردن تصویر کمک کنند. اما دیگر نیازی به جستوجو نیست، چون ما بهترین ابزارهای شارپکردن تصویر را فهرست کردهایم و طرز استفاده از آنها را به شما آموزش میدهیم. این مقاله را تا انتها بخوانید تا یاد بگیرید چطور بهصورت رایگان، تصاویر را بهصورت آنلاین یا آفلاین شارپ کنید.

قسمت 1. نحوه شارپ کردن تصویر به صورت آنلاین و رایگان و بدون نیاز به ثبت نام
با وجود آن، برنامه های کاربردی زیادی برای وضوح تصویر وجود دارد. توصیه می شود از ایمن ترین و ساده ترین ابزار استفاده کنید. به همین دلیل است که ما بهترین شارپنرهای تصویر را جستجو کردیم و آنها را فقط برای شما فهرست کردیم. علاوه بر این، نحوه استفاده از این ابزارهای شفاف کننده تصویر را به شما نشان خواهیم داد.
وضوح تصویر از طریق ارتقا دهنده تصویر رایگان FVC
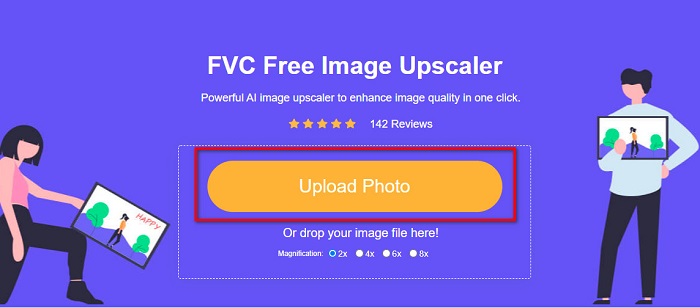
FVC Free Image Upscaler بهترین ابزار برای تیز کردن تصویر است. اگر بهدنبال یک ابزار هوش مصنوعی برای شارپکردن عکس هستید، FVC Free Image Upscaler همان ابزاری است که میخواهید. علاوه بر این، از فرمتهای مختلف تصویر مانند PNG، JPG، JPEG و BMP پشتیبانی میکند. و با استفاده از فناوری هوش مصنوعی (AI) میتوانید تصویر خود را تا بزرگنمایی 2 برابر، 4 برابر، 6 برابر و 8 برابر ارتقا دهید. نکته شگفتانگیز دیگر درباره این ابزار آنلاین این است که در تمام مرورگرهای وب، از جمله گوگل کروم، فایرفاکس و سافاری، قابل دسترسی است.
علاوه بر این، بسیاری از مبتدیان استفاده از این ابزار را ترجیح می دهند زیرا رابط کاربری ساده ای دارد. همچنین، اگرچه این یک برنامه آنلاین است، اما فرآیند شارپ کردن سریعی دارد که استفاده از آن را راحت می کند. همچنین می توانید پیش نمایش تصویر خروجی خود را قبل از دانلود آن در دستگاه خود مشاهده کنید. بنابراین، اگر می خواهید از این ابزار برای وضوح تصویر خود استفاده کنید، دستورالعمل های آسان زیر را دنبال کنید.
چگونه یک تصویر را با استفاده از FVC Free Image Upscaler واضح کنیم:
مرحله 1. مرورگر خود را باز کنید و در نوار جستوجو عبارت FVC Free Image Upscaler را جستوجو کنید. همچنین میتوانید مستقیماً روی لینک کلیک کنید تا به صفحه اصلی آن منتقل شوید.
مرحله 2. سپس، در رابط کاربری اصلی روی دکمه Upload Photo کلیک کنید تا تصویری را که میخواهید تیز کنید، وارد کنید.
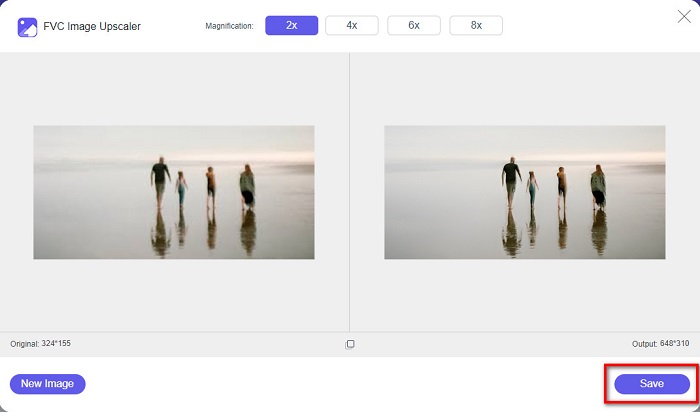
مرحله 3. بعد، پیشتنظیم magnification موردنظر خود را برای تصویر انتخاب کنید. میتوانید بین بزرگنماییهای 2x، 4x، 6x و 8x یکی را انتخاب کنید. سپس پیشنمایش خروجی را مشاهده خواهید کرد.

مرحله 4. در نهایت، برای ذخیره خروجی تصویر، روی دکمه Save کلیک کنید. سپس برنامه بهصورت خودکار و سریع تصویر شما را در پوشههای کامپیوترتان ذخیره میکند.
و بس! به همین سادگی، می توانید به راحتی قسمت تاری تصویر خود را افزایش دهید و وضوح را به آن اضافه کنید.
وضوح تصویر با VanceAI
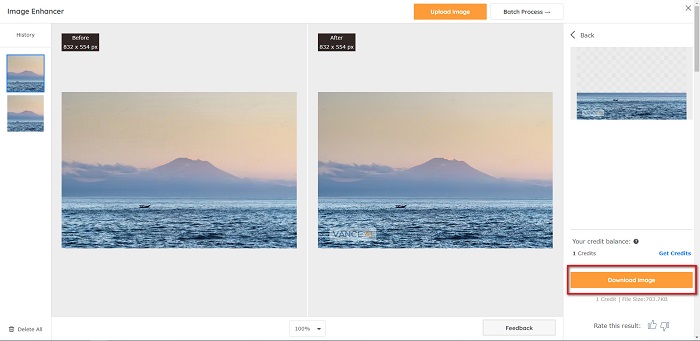
VanceAI یک شارپنر آنلاین تصویر است که میتوانید برای تیز کردن عکس یا افزودن وضوح و جزئیات به آن استفاده کنید. وقتی به تصویر خود تیزی اضافه میکنید، بدون شک بهتر به نظر میرسد. به همین دلیل اگر میخواهید خیلی سریع عکس خود را شارپ کنید، VanceAI ابزاری است که باید استفاده کنید. علاوه بر این، میتوانید تقریباً در تمام مرورگرهای وب، مانند گوگل کروم و سافاری، بهصورت رایگان از آن استفاده کنید. همچنین این ابزار، بخشهای تار تصویر شما را تنها با چند کلیک بهطور خودکار بهبود میدهد. با توجه به رابط کاربری سادهاش، مبتدیها هم بهراحتی میتوانند از این برنامه استفاده کنند. از همه مهمتر، از رایجترین فرمتهای تصویری مانند JPG، JPEG و PNG پشتیبانی میکند. با این حال، وقتی با VanceAI تصویر خود را شارپ میکنید، روی عکس شما واترمارک قرار میدهد.
نحوهی واضح کردن یک تصویر تار با استفاده از VanceAI:
مرحله 1. در مرورگر خود VanceAI را جستوجو کنید و سپس وارد صفحه اصلی آن شوید. بعد در رابط کاربری اصلی، روی دکمه Upload Image کلیک کنید تا تصویری را که میخواهید تیز کنید، بارگذاری کنید.
مرحله 2. پس از آپلود تصویر، روی دکمه Start to Process در گوشه پایین سمت راست رابط کلیک کنید.
مرحله 3. در نهایت، پیشنمایش خروجی تصویر خود را خواهید دید. سپس برای دانلود تصویر شارپشده، روی دکمه Download Image کلیک کنید.
واضح کردن تصویر تار با استفاده از PineTools
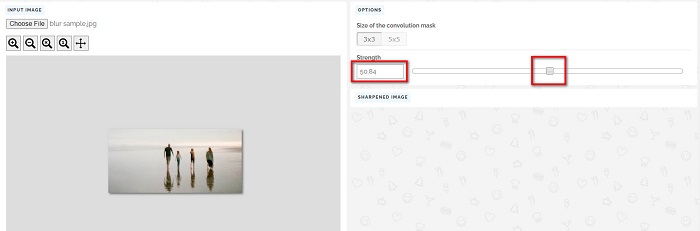
PineTools یکی دیگر از برنامههای آنلاین برای شارپکردن است که استفاده از آن بسیار آسان است. به دلیل رابط کاربری ساده، مبتدیها نیز میتوانند از این ابزار برای بهبود کیفیت عکس استفاده کنند. با استفاده از گزینه اسلایدر، میتوانید شدت یا تیزی تصویر خود را تنظیم کنید. علاوه بر این، میتوانید اندازه ماسک کانولوشن تصویر را بین 3x3 و 5x5 انتخاب کنید. نکته جالب دیگر این برنامه آنلاین این است که تقریباً در تمام مرورگرهای وب، از جمله گوگل کروم و سافاری، قابل دسترسی است. ایراد PineTools این است که تبلیغات زیادی دارد که ممکن است هنگام شارپکردن تصویر حواس شما را پرت کند. با این حال، بسیاری از مبتدیها از این ابزار استفاده میکنند زیرا کار با آن راحت است.
چگونه با استفاده از PineTools یک تصویر تار را واضح کنیم
مرحله 1. ابتدا در مرورگر خود PineTools را جستوجو کنید و روی صفحهای که به وبسایت آن منتهی میشود کلیک کنید. سپس در اولین رابط، روی دکمه Choose Files کلیک کنید تا عکسی را که میخواهید تیز کنید، آپلود کنید.

مرحله 2. سپس در پنل Sharpen، جعبه کوچک را روی میزان شدت یا تیزی دلخواه برای تصویرتان جابهجا کنید.
مرحله 3. سپس روی دکمه Sharpen در پایین رابط کلیک کنید تا تصویر شما تیز شود. اگر میخواهید خروجی را ذخیره کنید، روی فرمت تصویری موردنظر خود کلیک کنید تا روی دستگاه شما ذخیره شود.
بخش ۲. نحوهی شارپ کردن تصویر در ویندوز/مک
نحوه شارپ کردن تصویر در فتوشاپ
ادوبی فتوشاپ یک نرمافزار ویرایش تصویر قدرتمند و پرکاربرد است که توسط افراد زیادی در سراسر جهان استفاده میشود. این نرمافزار هم برای مبتدیان و هم برای متخصصان مناسب است و شامل ویژگیهای بیشماری است که افراد را قادر میسازد تصاویر را به طور دقیق و خلاقانه ویرایش کنند. از تنظیمات ساده گرفته تا طرحهای پیچیده، فتوشاپ به شما این امکان را میدهد که ایدههای خود را به واقعیت تبدیل کنید. فیلترهای شارپکننده آن با تغییر کنتراست و جزئیات، به واضحتر شدن عکسها کمک میکنند. شارپ کردن عکس در فتوشاپ ساده است و به دلیل لایهها و فیلترهای پیشرفته آن به تصویر اصلی آسیبی نمیرساند - ایدهآل برای تصاویر رسانههای اجتماعی، عکاسی تجاری و طراحی گرافیک.
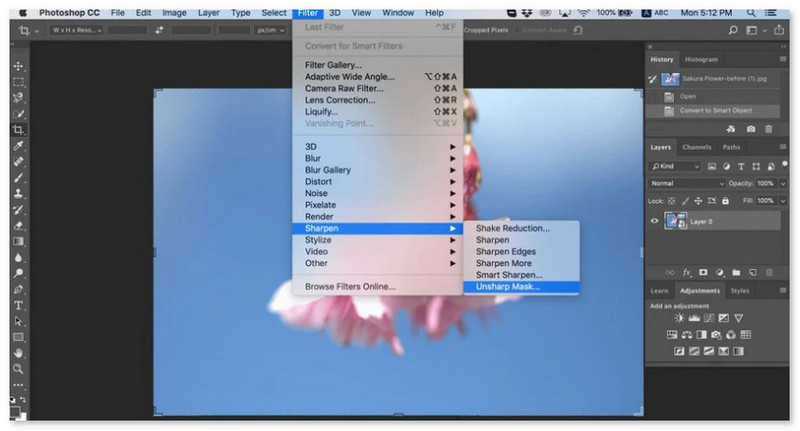
مرحله 1. روی Layers panel > Filter menu > Convert for Smart Filters کلیک کنید.

مرحله 2. Sharpen > Unsharp Mask under Filter را انتخاب کنید.
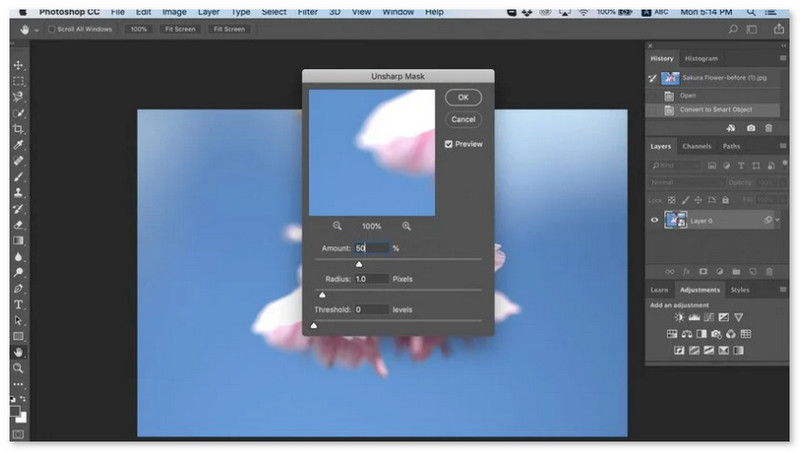
مرحله 3. تنظیمات را تغییر دهید و روی OK کلیک کنید.
نحوه شارپ کردن تصویر در GIMP
بر خلاف برنامه وضوح تصویر ارائه شده در بالا، GIMP یک ابزار آفلاین است که اگر می خواهید تصویر خود را واضح کنید یا کیفیت آن را افزایش دهید، می توانید از آن استفاده کنید. علاوه بر این، بسیاری از متخصصان از این ابزار برای وضوح تصاویر و بهبود آنها استفاده می کنند. بسیاری از مردم این ابزار را به عنوان جایگزینی برای Adobe Photoshop می شناسند. تقریباً از تمام فرمت های تصویر مانند PNG، JPG، JPEG، WebP و BMP پشتیبانی می کند. علاوه بر این، دارای بسیاری از ویژگی های ویرایش است که می توانید از آنها استفاده کنید، از جمله روتوش عکس، تغییر ترکیب بندی و موارد دیگر. اما نقطه ضعف این برنامه این است که رابط کاربری سختی دارد که استفاده از آن را برای مبتدیان دشوار می کند.
با این وجود، اگر در بسیاری از برنامه های ویرایش عکس حرفه ای هستید، مطمئناً GIMP را ابزاری عالی برای وضوح تصویر خواهید یافت.
نحوه شارپ کردن تصویر در GIMP:
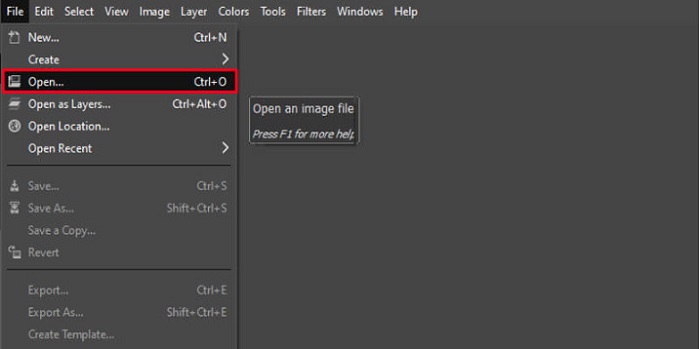
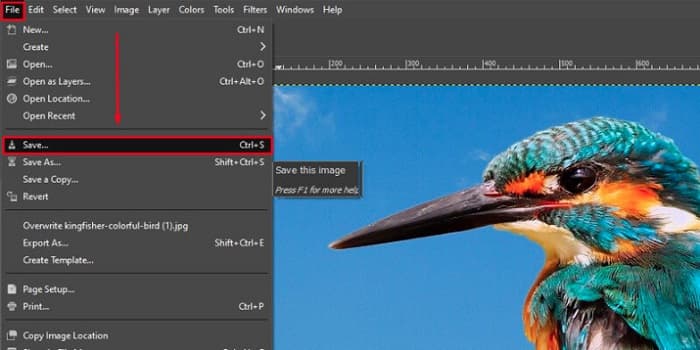
مرحله 1. برنامهی شارپنر تصویر GIMP را روی دستگاه خود دانلود کنید. سپس در رابط اصلی نرمافزار، با کلیک روی File > Open تصویر خود را وارد کنید.
مرحله 2. سپس با کلیک روی دکمه Layer > Duplicate یک لایه تکراری بسازید. همچنین میتوانید با استفاده از کلیدهای میانبر لایه را تکرار کنید. دکمههای Shift + Ctrl + D را فشار دهید تا لایه تکرار شود.
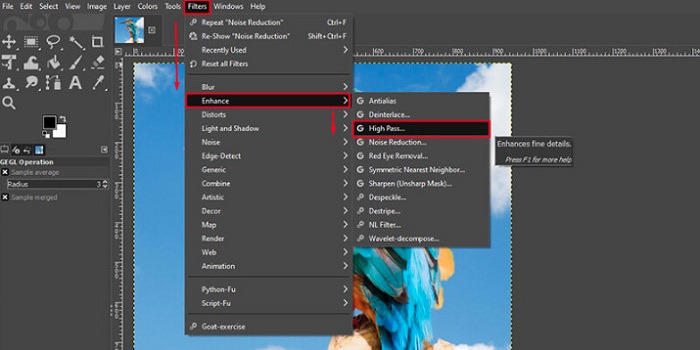
مرحله 3. در ادامه، نویز را با رفتن به Filter > Enhance > Noise Reduction کاهش میدهیم. سپس برای اعمال تیزی موردنظر، از گزینه High Pass استفاده میکنیم. به Filters > Enhance > سپس گزینه High Pass بروید.
مرحله 4. سپس از گزینه Vivid Light استفاده میکنیم تا تصویر را روشنتر کرده و جزئیات اضافه کنیم. به بخش Option در قسمت mode بروید و حالت را از Normal به Vivid Light تغییر دهید.
مرحله 5. برای انجام تنظیمات نهایی، یکبار دیگر یک لایه تکراری ایجاد کنید و سپس به Filters > Enhance > Sharpen (Unsharp Mask) بروید. بعد میتوانید Radius، Amount و Threshold تصویر خود را تنظیم کنید. سپس برای ذخیره خروجی، روی صفحهکلید خود Ctrl + S را فشار دهید.
و تمام! اگر از آن دسته افرادی هستید که بهدنبال روش شارپکردن تصاویر با GIMP میگردید، این راهنما مخصوص شماست. فقط این مراحل را دنبال کنید تا با استفاده از GIMP، کیفیت تصویر خود را افزایش دهید.
بخش ۳. نحوهی واضح کردن تصویر در آیفون/اندروید
ویرایشگر عکس Picwand AI یک ویرایشگر قدرتمند است که به شما در ویرایش تصاویر با هوش مصنوعی کمک میکند. میتوانید مستقیماً در وبسایت Picwand ویرایش کنید یا آن را در دستگاههای آیفون یا اندروید خود دانلود کنید. ویژگیهای هوشمند متعددی مانند بزرگنمایی تصاویر، برش پسزمینه، استخراج اشیاء و شفافسازی تصاویر وجود دارد که همه به لطف هوش مصنوعی پیشرفته است. تصاویر تار را اصلاح کنید، تصاویر قدیمی را روتوش کنید یا موارد ناخواسته را با Picwand حذف کنید و این کار را به سرعت و با دقت انجام دهید. رابط کاربری ساده آن، آن را برای هر کسی صرف نظر از تجربهاش مناسب میکند.
مرحله 1. برنامه را باز کنید و گزینه AI Image Upscaler را انتخاب کنید.
مرحله 2. یک تصویر آپلود کنید و ضریب بزرگنمایی دلخواه را انتخاب کنید.
مرحله 3. برای خروجی گرفتن، روی آیکون دانلود ضربه بزنید.

بخش ۴. سوالات متداول در مورد نحوهی واضح کردن تصویر تار
آیا اپلیکیشنی برای تعمیر تصاویر پیکسلی وجود دارد؟
بله. میتوانید برای تنظیم پیکسلهای تصویر خود از یک بزرگکننده تصویر (Image Upscaler) استفاده کنید. یکی از بهترین ابزارها برای رفع پیکسلیشدن عکس، PIXLR است. این ابزار برای رفع تاری تصویر هم گزینه خوبی است.
آیا GIMP رایگان است؟
GIMP یک برنامه ویرایش تصویر است که در ویندوز، مک و لینوکس موجود است. این یک برنامه رایگان برای استفاده است که می توانید کد منبع آن را تغییر دهید. با این حال، برای دسترسی به سایر ویژگی های ویرایش آن باید برنامه را خریداری کنید.
آیا می توانم یک تصویر را با استفاده از Canva شارپ کنم؟
خوشبختانه Canva دارای قابلیتی است که در آن می توانید وضوح تصویر خود را اضافه کنید. بنابراین، اگر تصویری تار دارید، Canva میتواند ابزار مناسبی برای شما باشد.
نتیجه
امیدواریم به پرسشهای شما درباره نحوه شارپکردن تصاویر پاسخ داده باشیم. ۷ روش وجود دارد که میتوانید با آنها بهخوبی و بهسرعت این کار را انجام دهید، مانند استفاده از Video Converter Ultimate، فتوشاپ، VanceAI و غیره. همچنین، اگر بهدنبال یک ابزار کاملاً رایگان هستید، میتوانید نگاه خود را به سمت FVC Free Image Upscaler معطوف کنید. این یک ابزار آنلاین 100% رایگان است.
-
 4 کاهش دهنده کیفیت تصویر برتر که می توانید به صورت آنلاین و آفلاین استفاده کنید
 این کاهش دهنده های کیفیت تصویر به دلایلی می توانند به شما کمک کنند تا کیفیت تصویر خود را کاهش دهید. اگر به یکی نیاز داشتید، این مقاله را بخوانید!
-
 راه های رسمی برای ارتقاء تصویر به 4k با آموزش عملی
 برای ارتقای کیفیت تصویر به 4k به یک نرم افزار در دستگاه خود نیاز دارید. اگر ابزاری ندارید، باید ابزاری را که در اینجا قرار داده ایم انتخاب کنید.
-
 نحوه ویرایش وضوح عکس با استفاده از برنامه های رایگان و پولی
 چگونه وضوح عکس را ویرایش کنیم؟ با خواندن این مقاله به این سوال پاسخ داده می شود و نکاتی را اضافه می کنیم که باید بدانید!