


نحوه تغییر اندازه تصاویر در ایلاستریتور در رایانه
امروزه ویرایشهای پیچیدهی فراوانی رواج پیدا کرده است، بهویژه با ظهور برنامههای حرفهای ویرایش عکس مانند Adobe Illustrator. با این حال، هنوز هم میتوان ویرایشهای ساده را با این برنامههای قدرتمند انجام داد. برای نمونه، اگر میخواهید ابعاد تصویر خود را تغییر دهید، همچنان میتوانید از Adobe Photoshop استفاده کنید. و آیا میدانستید؟ شما میتوانید تصویر خود را در Illustrator با دو روش تغییر اندازه دهید. یکی با مقیاسدهی دستی تصویر و دیگری با وارد کردن مقادیر عددیِ دلخواه برای عکس. در این راهنما، ما این دو روش را برایتان در مورد نحوه تغییر اندازه تصاویر در Illustrator نشان خواهیم داد.

قسمت 1. نحوه تغییر اندازه تصاویر در ایلاستریتور
Adobe Illustrator پر استفاده ترین نرم افزار ویرایش عکس توسط افراد حرفه ای است. این برنامه به شما امکان می دهد با استفاده از ابزارهای طراحی دیجیتال پیچیده خود خروجی های استثنایی ایجاد کنید. این برای ایجاد تصاویر، نمادها، تایپوگرافی، لوگوها و موارد دیگر بر اساس وکتور مناسب است. علاوه بر این، دارای گزینه های رنگی پیشرفته برای ایجاد پالت های رنگی، طرح های رنگی گرادیان و ترکیب رنگ های مختلف برای خروجی تصویر شگفت انگیز است.
با Adobe Illustrator می توانید کارهای زیادی انجام دهید. ویژگی های ذکر شده تنها بخشی از بسیاری از ویژگی هایی است که Illustrator ارائه می دهد. و اگر میپرسید که آیا Adobe Illustrator میتواند اندازه تصویر شما را تغییر دهد، پاسخ مثبت است. برای یادگیری مراحل تغییر اندازه تصاویر در ایلاستریتور به طور مداوم این قسمت را بخوانید.
نحوه تغییر اندازه یک تصویر در Illustrator با استفاده از Image Scaler
مرحله ۱. اولین کاری که باید انجام دهید این است که Adobe Illustrator را روی کامپیوتر خود دانلود کنید. پس از دانلود و نصب برنامه، آن را روی دستگاه خود اجرا کنید. سپس، تصویر خود را در Illustrator با رفتن به مسیر File > Open باز کنید. همچنین میتوانید تصویر خود را کپی کرده و در یک آرتبوردِ از پیش بازشده، پیست کنید.
مرحله ۲. سپس روی Selection Tool (کلید میانبر Cmd + V روی صفحهکلید) کلیک کنید و روی تصویر خود کلیک کنید تا انتخاب شود. پس از انتخاب تصویر، دستهها در گوشههای تصویر ظاهر میشوند. این دستهها شبیه مربعهای کوچک سفید با حاشیه آبی هستند. با استفاده از این دستهها میتوانید تصویر خود را مقیاسدهی/تغییر اندازه دهید، آن را بچرخانید یا کج (Shear) کنید.
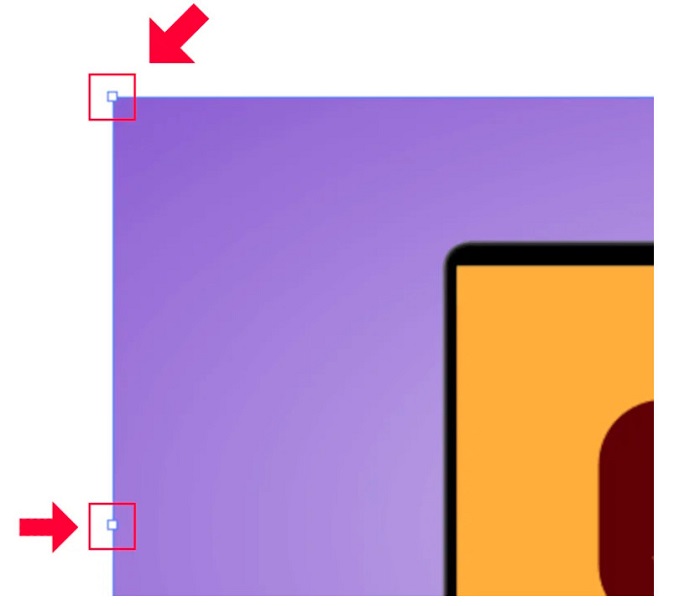
مرحله ۳. برای تغییر اندازه تصویر از طریق مقیاسدهی، هر یک از دستهها را گرفته و بکشید تا به اندازه دلخواه برسید. همچنین میتوانید نسبت طول به عرض تصویر را قفل کنید؛ برای این کار، هنگام حرکت دادن نشانگر ماوس، کلید Shift را روی صفحهکلید نگه دارید.
پس از تغییر اندازه تصویر بر اساس اولویت خود، اکنون می توانید با کلیک روی دسته ها، آن را رها کنید.
نحوه استفاده از Adobe Illustrator برای تغییر اندازه یک تصویر با تنظیم مقادیر عددی
اکنون، ما به شما آموزش می دهیم که چگونه با وارد کردن مقادیر عددی با استفاده از منوی Transform به جای مقیاس دستی تصویر خود با استفاده از ابزار Selection، اندازه عکس خود را تغییر دهید.
مرحله ۱. زمانی که Adobe Illustrator را روی دستگاه خود باز کردید، با کلیک روی Windows > Transform، منوی Transform را باز کنید. همچنین میتوانید با فشردن کلیدهای Shift + F8 روی صفحهکلید این منو را فراخوانی کنید. ظاهر منوی Transform به این صورت است.
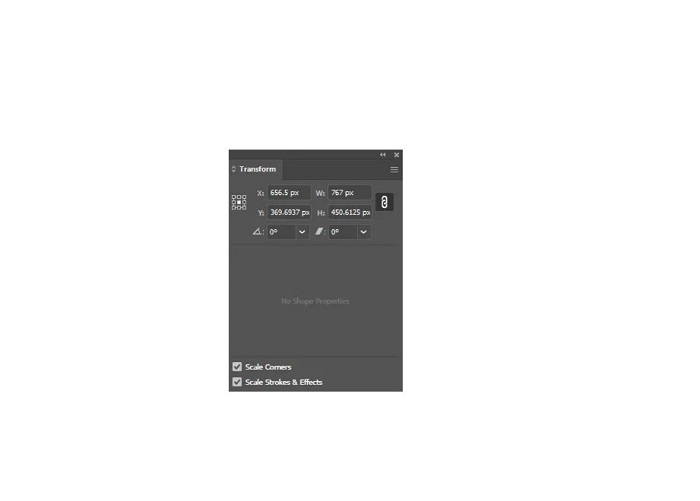
منوی Transform به شما امکان میدهد مکان شیء خود را نسبت به محورهای X و Y تغییر دهید. همچنین میتوانید از این منو برای چرخاندن، کجکردن (Shear) و تغییر اندازه تصویر خود از طریق وارد کردن یک مقدار عددی استفاده کنید.
مرحله ۲. سپس، با استفاده از Selection Tool تصویری را که میخواهید اندازهاش را تغییر دهید انتخاب کنید. پس از آن، در منوی Transform با تغییر اعداد مربوط به عرض و ارتفاع، آنها را متناسب با اندازه دلخواه برای عکس خود تنظیم کنید. حرف W نشاندهنده عرض و حرف H نشاندهنده ارتفاع تصویر شماست.
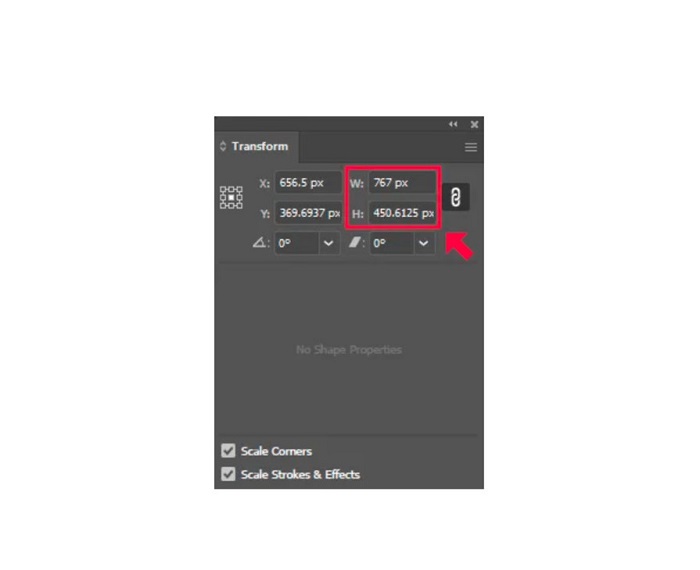
مرحله ۳. همچنین بهتر است نسبت طول به عرض عکس خود را با کلیک روی آیکون Chain کنار فیلدهای عرض و ارتفاع قفل کنید. وقتی گزینه Chain را فعال کنید و ارتفاع تصویر را تغییر دهید، عرض نیز به همان نسبت تنظیم خواهد شد.
نکته. شما میتوانید واحد پیشفرض اندازهگیری تصویر خود را نیز تغییر دهید. Illustrator از پیکسل (px) بهعنوان واحد پیشفرض استفاده میکند. میتوانید واحد را به این صورت تغییر دهید:
◆ سانتی متر (سانتی متر)
◆ میلی متر (میلی متر)
◆ اینچ (اینچ)
◆ درصد (%)
برای تغییر واحد اندازهگیری تصویر، واحد مورد نظر را بعد از عدد اندازه وارد کنید. پس از تغییر مقدار عددی و واحد تصویر، کلید Enter را روی صفحهکلید فشار دهید.
حالا تصویر شما را خروجی میگیریم. تصویر را با استفاده از Selection Tool انتخاب کنید، روی آن راستکلیک کرده و گزینه Export Selection را انتخاب کنید.
پس از انتخاب گزینه Export Selection، منوی Export for Screens ظاهر خواهد شد. این منو به شما امکان میدهد تصویر تغییر اندازهدادهشده خود را در قالبی قابل استفاده ذخیره کنید.
در زیر تصویر بندانگشتی (Thumbnail)، میتوانید نتیجه نهایی را پیشنمایش کنید و نام فایل خود را به نام دلخواه تغییر دهید. سپس، در پنل Export to، روی آیکون پوشه کلیک کنید تا محل ذخیره خروجی را در سیستم خود انتخاب کنید. همچنین مطمئن شوید که فیلد Scale روی 1x تنظیم شده باشد. سپس، فرمت خروجی خود را انتخاب کنید. پیشنهاد میشود از فرمت PNG یا JPG استفاده کنید.
و در نهایت، برای ذخیره خروجی خود روی دکمه Export Asset کلیک کنید.
شگفت انگیز است، درست است؟ Adobe Illustrator به شما امکان می دهد تصاویر خود را مطابق با دلخواه خود ویرایش کنید. اگر نحوه تغییر اندازه تصاویر را در illustrator بدون اعوجاج جستجو کنید، این قسمت نیز پاسخی است. با این حال، این برنامه یک ابزار کاربر پسند نیست زیرا رابط کاربری آسانی ندارد. بنابراین، اگر میخواهید اندازه تصویر خود را با استفاده از یک برنامه کاربردی آسان تغییر دهید، قسمت بعدی را به طور کامل بخوانید.
قسمت 2. جایگزین آنلاین برای ایلاستریتور
Adobe Illustrator یک ابزار آفلاین است و رایگان نیست. بنابراین، اگر میخواهید از یک تغییر اندازهدهنده تصویر خارقالعاده استفاده کنید که رایگان است و به شما کمک میکند تصویر خود را ارتقا دهید، پس آموزشی که در زیر ارائه میدهیم را دنبال کنید.
ابزار FVC Free Image Upscaler یک بزرگنمای تصویر آنلاین است که میتواند به بهبود تصاویر بیکیفیت شما کمک کند. این ابزار آنلاین میتواند تصویر شما را با بزرگنمایی ۲ برابر، ۴ برابر، ۶ برابر و ۸ برابر ارتقا دهد. علاوه بر این، از فناوری هوش مصنوعی (AI) استفاده میکند که بهطور خودکار بخشهای کمکیفیت تصویر را شناسایی کرده و آنها را بهبود میبخشد. این ابزار از تمام فرمتهای تصویری، از جمله JPEG، JPG، PNG و BMP پشتیبانی میکند. افزون بر این، استفاده از آن امن و کاملاً رایگان است. و با رابط کاربری سادهای که دارد، میتوانید بهآسانی تصویر خود را تغییر اندازه/بزرگنمایی کنید.
نحوه تغییر اندازه یک تصویر با استفاده از FVC Free Image Upscaler:
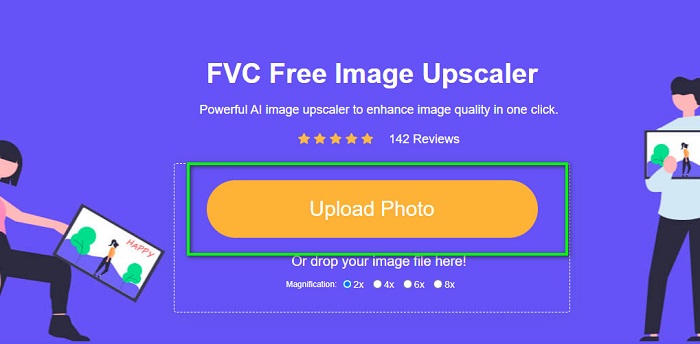
مرحله ۱. در مرورگر خود بهدنبال FVC Free Image Upscaler بگردید یا روی این لینک کلیک کنید تا مستقیماً به صفحه اصلی آن بروید. سپس در رابط اصلی نرمافزار، روی دکمه Upload Photo کلیک کنید تا برنامه روی دستگاه شما اجرا شود.
مرحله ۲. سپس، دوباره روی دکمه Upload Photo کلیک کنید تا تصویری را که میخواهید بزرگنمایی کنید، وارد (Import) نمایید.
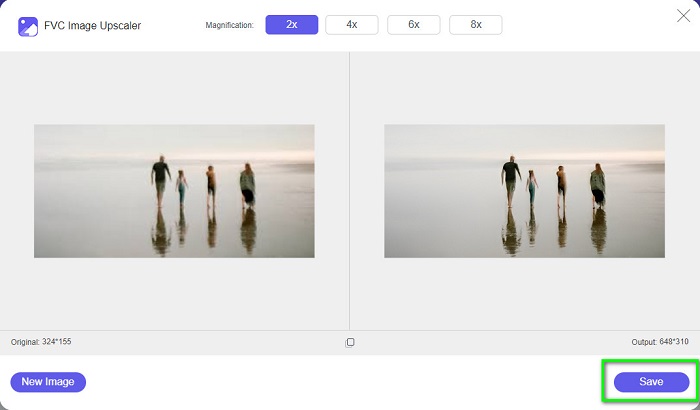
مرحله ۳. پس از بارگذاری عکس، پیشتنظیم بزرگنمایی (Magnification Preset) مورد نظر خود را برای تصویر انتخاب کنید. میتوانید بین گزینههای 2x, 4x, 6x, و 8x یکی را برگزینید.

مرحله ۴. در نهایت، روی دکمه Save کلیک کنید تا خروجی روی دستگاه شما ذخیره شود.
مرتبط با:
نحوه استفاده از GIMP برای تغییر اندازه تصاویر: راهنمای گامبهگام
چگونه عکس را برای فیسبوک تغییر اندازه دهیم [مراحل سریع و آسان]
بخش 3. سوالات متداول در مورد نحوه تغییر اندازه تصویر در ایلاستریتور
چرا Adobe Illustrator اندازه تصاویر را تغییر نمی دهد؟
شما نمی توانید اندازه یک تصویر را در Illustrator تغییر دهید زیرا احتمالاً کادر محدود فعال نشده است. برای روشن کردن کادر محدود، به View > Show Bounding Box بروید. با فعال کردن آن، اکنون می توانید اندازه تصویر خود را در Illustrator تغییر دهید.
آیا می توانم اندازه یک تصویر را در Illustrator بدون از دست دادن کیفیت تغییر دهم؟
آره. راهی وجود دارد که می توانید اندازه تصویر خود را با Adobe Illustrator تغییر دهید. با این حال، در اکثر مواقع، وقتی اندازه یک تصویر را با استفاده از مقیاسکننده تغییر اندازه میدهید، کیفیت تصویر شما تحت تأثیر قرار میگیرد.
آیا Adobe Illustrator رایگان است؟
خیر. Adobe Illustrator رایگان نیست. قبل از استفاده از این برنامه قدرتمند ویرایش عکس، باید آن را با $20.99 در ماه خریداری کنید.
نتیجه
با دنبال کردن روشهایی که نشان دادیم، آموختید چگونه در Illustrator اندازه تصاویر را تغییر دهید. ممکن است مراحل آن زیاد بهنظر برسد، اما استفاده از آن ارزش امتحان کردن را دارد. مشکلی که در مورد Adobe Illustrator وجود دارد این است که رایگان نیست و رابط کاربری پیچیدهای دارد. بنابراین، اگر یک تغییردهنده اندازه تصویر راحتتر و رایگان میخواهید، از FVC Free Image Upscaler استفاده کنید.
-
 نحوه تغییر اندازه تصویر – Adobe Resize Image [آنلاین و آفلاین]
 اگر به دنبال تغییر اندازه تصویر Adobe هستید، ما راه حلی برای شما داریم. برای یادگیری نحوه تغییر اندازه تصاویر با استفاده از Adobe در رایانه شخصی خود، این پست را به طور کامل مشاهده کنید.
-
 بهترین برنامه تغییر اندازه عکس آنلاین، آفلاین، اندروید و آیفون
 بهترین برنامه های تغییر اندازه عکس کدامند؟ روی صفحه کلیک کنید تا با پنج برنامه برتر تغییر اندازه عکس که می توانید برای بهبود یا تغییر اندازه فایل خود استفاده کنید، آشنا شوید
-
 7 تقویت کننده پیکسل برتر برای همه مرورگرهای وب که باید استفاده کنید
 اگر می خواهید بهترین تقویت کننده های پیکسل را بشناسید، بهتر است این پست را بررسی کنید. این مقاله هفت بهترین تقویت کننده پیکسل عکس را برای همه مرورگرهای وب فهرست می کند.