


[حل شد] 4 روش برای گرفتن اسکرین شات در اندروید
گرفتن اسکرینشات امروز یکی از رایجترین کارهایی است که میتوانیم با گوشیهای خود انجام دهیم. هر وقت بخواهیم عکسی، متنی یا پستی را که هنگام اسکرول کردن روی صفحه دیدهایم ذخیره کنیم، از آن اسکرینشات میگیریم. حالا اگر از یک دستگاه اندرویدی استفاده میکنید و میخواهید بدانید چطور از امکانات اسکرینشات آن بیشترین بهره را ببرید، ما همه چیز را برایتان آماده کردهایم! در این مقاله، در ۴ روش مختلف یاد میگیرید چطور در اندروید اسکرینشات بگیرید و حداکثر استفاده را از قابلیتهای دستگاهتان داشته باشید. به خواندن ادامه دهید تا با گرفتن اسکرینشات، محتوای مهم برای خودتان را ذخیره کنید!

قسمت 1: نحوه گرفتن اسکرین شات در گوشی اندروید
ممکن است تعجب کنید، اما گرفتن اسکرین شات در اندروید واقعاً بسته به سازنده دستگاه و نسخه سیستم عامل متفاوت است. بنابراین، اگر کاربر اندروید هستید و نمیدانید هنگام گرفتن اسکرین شات از چه روشی استفاده کنید، مراحل زیر را بررسی کنید:
روش 1: با استفاده از دکمه های سخت افزاری
رایج ترین راه برای گرفتن اسکرین شات در دستگاه اندرویدی استفاده از دکمه های سخت افزاری یا فیزیکی آن است. این شناخته شده ترین روشی است که برای گرفتن اسکرین شات در اندروید استفاده می شود، زیرا در دسترس بودن و راحتی آن است.
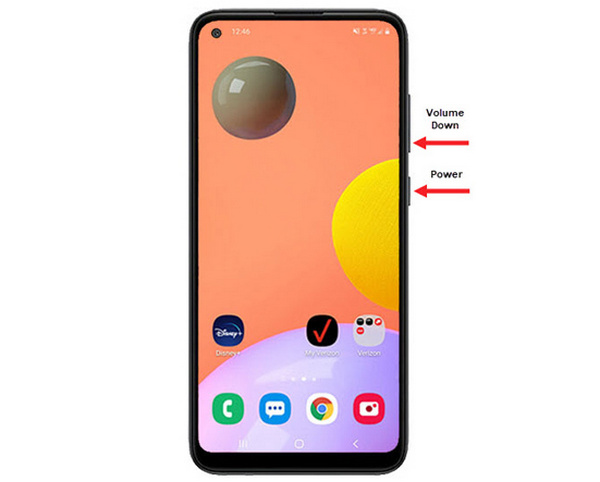
مرحله ۱. ابتدا در گوشی اندرویدی خود دکمههای کم کردن صدا و پاور را همزمان فشار دهید. آنها را نگه دارید تا اسکرینشات گرفته شود.
مرحله ۲. بعد از آن، اسکرینشات خود را در برنامه گالری پیدا کنید.
بنابراین، اگر دکمههای سختافزاری شما به درستی کار میکنند، میتوانید این روش را دنبال کنید تا به راحتی در اندروید خود اسکرین شات بگیرید.
روش 2: استفاده از میانبرها
امروزه برخی از دستگاه های اندرویدی دارای قابلیت اسکرین شات داخلی در پنل تنظیمات سریع هستند که برای گرفتن سریع اسکرین شات مفید است.
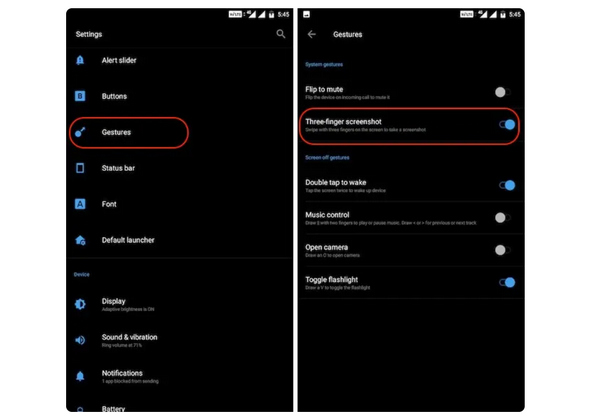
مرحله ۱. ابتدا در گوشی اندرویدی خود به تنظیمات (Settings) بروید. کمی به پایین اسکرول کنید و گزینه Gestures (ژستها) یا Buttons (دکمهها) را انتخاب کنید.
مرحله ۲. از آنجا به دنبال گزینه Screenshot (اسکرینشات) بگردید و آن را روشن (فعال) کنید.
مرحله ۳. در نهایت، برای اینکه با استفاده از این روش اسکرینشات بگیرید، کافی است با سه انگشت خود روی صفحهای که میخواهید از آن عکس بگیرید، رو به پایین سوایپ کنید.
این روش زمانی بهترین است که نمی خواهید دکمه ها را برای گرفتن اسکرین شات فشار دهید. با این حال، ابتدا باید این را در تنظیمات خود تنظیم کنید. بنابراین، اگر با آن آشنا نیستید، فقط مراحل بالا را دنبال کنید.
روش 3: استفاده از Google Assistant
در همین حال، اگر گوشی اندرویدی شما دارای دستیار گوگل است، می توانید از آن برای گرفتن اسکرین شات به راحتی استفاده کنید.
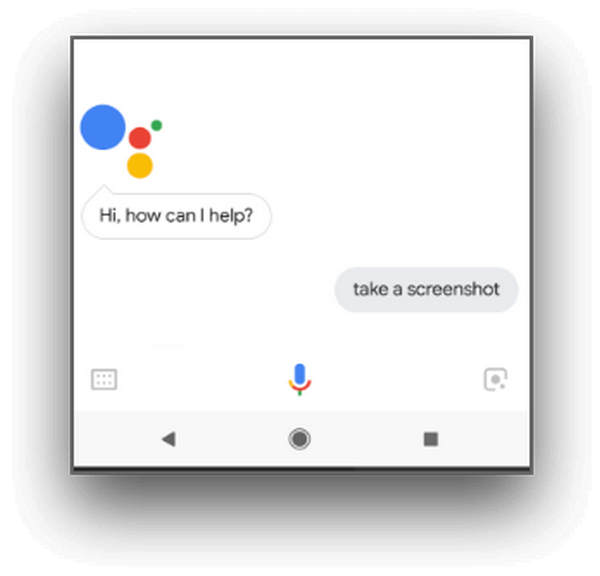
مرحله ۱. ابتدا باید «دستیار گوگل» (Google Assistant) را با فشردن دکمه هوم یا با دستور صوتی OK یا Hello Google فعال کنید.
مرحله ۲. وقتی فعال شد، بگویید Take a screenshot یا Screenshot.
توجه: باید یک انیمیشن ببینید یا صدایی بشنوید که نشان میدهد اسکرینشات گرفته شده است.
مرحله ۳. میتوانید اسکرینشات خود را در برنامه گالری گوشیتان و در پوشه Screenshots پیدا کنید.
توجه: این روش روی همه دستگاههای اندرویدی قابل استفاده نیست. اگر گوشی شما «دستیار گوگل» دارد و اجازه میدهد با فرمان صوتی اسکرینشات بگیرید، در این صورت فقط مراحل گفتهشده را دنبال کنید.
قسمت 2: نحوه گرفتن اسکرین شات در تبلت اندروید
اگر صاحب یک تبلت اندرویدی هستید و نمیدانید که چگونه با استفاده از آن اسکرین شات بگیرید، به این صورت است:
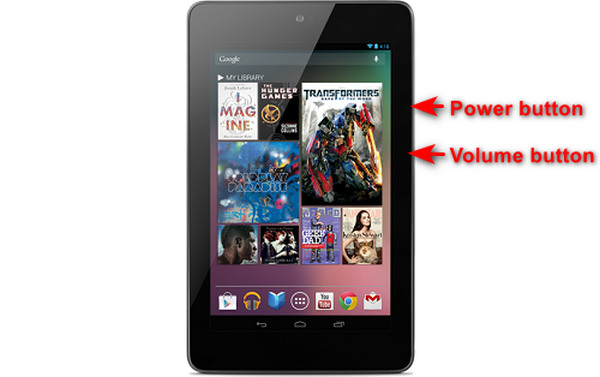
مرحله ۱. در تبلت اندرویدی خود، به طور همزمان دکمه پاور و دکمه کم کردن صدا را فشار دهید و چند ثانیه نگه دارید.
توجه: در صورتی که اسکرینشات گرفته شده باشد، باید روی صفحه به شما اعلان داده شود.
مرحله ۲. بعد از آن، اسکرینشات خود را در گالری تبلت و در پوشه Screenshots پیدا کنید.
اگر این روش روی تبلت اندرویدی شما کار نمی کند، کاری که باید انجام دهید این است که از برنامه های شخص ثالث از فروشگاه Google Play استفاده کنید تا بتوانید از صفحه نمایش عکس بگیرید.
قسمت 3: نحوه گرفتن اسکرین شات در اندروید با کامپیوتر
حالا اگر میخواهید با استفاده از کامپیوتر از صفحه اندروید اسکرینشات بگیرید، شاید چون هیچیک از روشهای قبلی روی گوشی شما کار نمیکند، بهترین ابزاری که میتوانید استفاده کنید FVC Screen Recorder است. این ابزار طوری طراحی شده که از صفحه هر گوشیای که روی کامپیوتر آینه (Mirroring) شده باشد اسکرینشات بگیرد، بنابراین کاملاً با دستگاههای اندرویدی سازگار است. با استفاده از قابلیت Phone Recorder این برنامه، کاربران میتوانند بدون دردسر از صفحه اندروید خود روی کامپیوتر اسکرینشات بگیرند. علاوه بر این، در مقایسه با بسیاری از ابزارهای شخص ثالثی که این روزها در دسترساند، این ابزار رابط کاربری بسیار ساده و کاربرپسندی دارد که استفاده از آن را برای شما دشوار نخواهد کرد.
مرحله ۱. ابتدا FVC Screen Recorder را روی کامپیوتر خود دانلود و اجرا کنید.
مرحله ۲. حالا روی گزینه Phone recorder کلیک کنید. این گزینه را در سمت راست پنجره برنامه، کنار ۳ گزینه دیگر، پیدا میکنید.
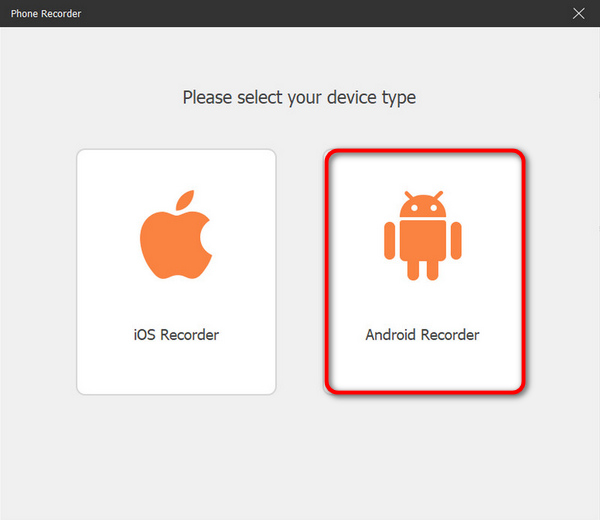
مرحله ۳. سپس روی Android Recorder کلیک کنید.
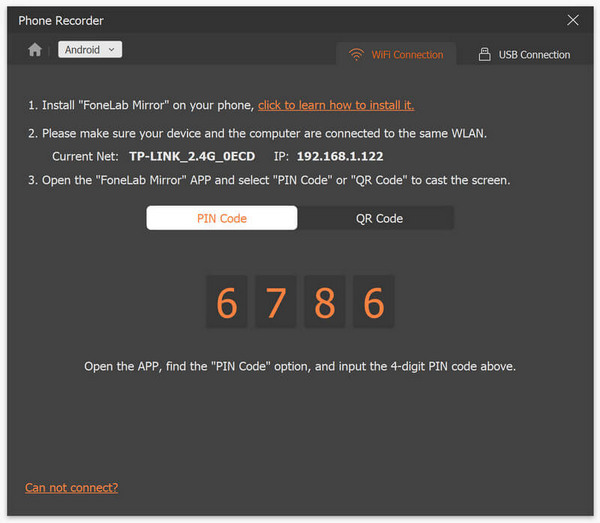
مرحله ۴. برای کَست کردن صفحه گوشی خود، میتوانید از WiFi یا کابل USB استفاده کنید. با این حال، اگر WiFi را انتخاب کنید، میتوانید خیلی راحت از طریق PIN Code یا QR Code گوشی خود را به قابلیت Phone Recorder برنامه روی کامپیوتر متصل کنید.
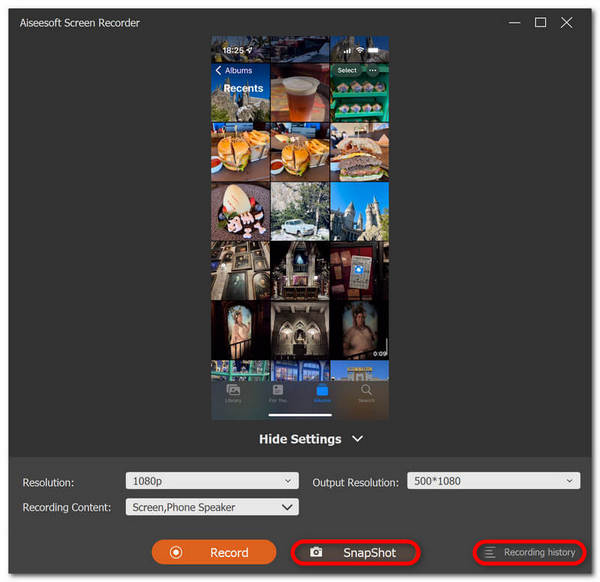
مرحله ۵. وقتی آینهکردن (Mirroring) صفحه فعال شد، برای گرفتن اسکرینشات روی کامپیوتر از صفحه اندروید، کافی است روی آیکن Snapshot کلیک کنید.
مرحله ۶. در نهایت، تصاویر اسکرینشات خود را مستقیماً در پوشهای که روی کامپیوتر ویندوزیتان برای آن تعیین شده است، پیدا کنید.
FVC Screen Recorder یک ابزار عالی برای زمانی است که می خواهید با کامپیوتر در اندروید اسکرین شات بگیرید. با استفاده از قابلیت ضبط گوشی، همه چیز برای شما آسان خواهد بود، از تنظیم دستگاه ها و گرفتن عکس های واقعی. این ابزار همه چیز مورد نیاز شما را دارد.
قسمت 4: نحوه گرفتن اسکرین شات اسکرول در اندروید
اگر می خواهید از یک صفحه وب یا یک مکالمه طولانی در اندروید در یک شات اسکرین شات بگیرید، به جای گرفتن تعدادی اسکرین شات، مراحل زیر را دنبال کنید:
مرحله ۱. ابتدا روی گوشی اندرویدی خود یک اسکرینشات بگیرید.
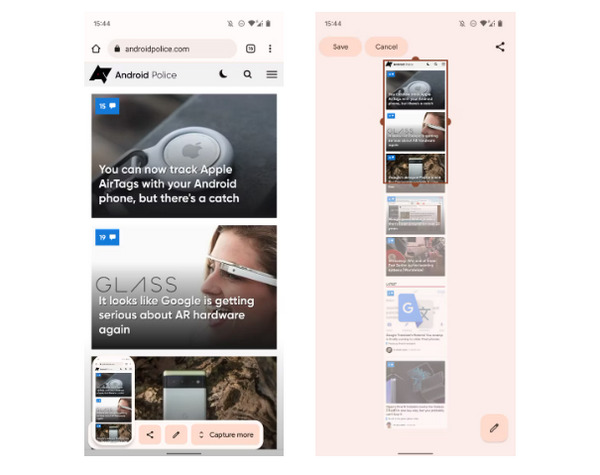
مرحله ۲. سپس بعد از ظاهر شدن پیشنمایش اسکرینشات، روی دکمه Capture More ضربه بزنید.
توجه: وقتی از پنجره مخصوص برای گسترش اسکرینشات استفاده میکنید، سیستم برای دقت بیشتر یک ذرهبین روی صفحه نشان میدهد.
مرحله ۳. در پایان، برای ذخیره اسکرینشات روی Save ضربه بزنید.
دیگر فقط برای نمایش کل صفحه وب یا کل مکالمه اسکرین شات، یک دسته اسکرین شات نمی گیرید.
قسمت 5: سوالات متداول در مورد گرفتن اسکرین شات در اندروید
آیا می توانم پوشه پیش فرض اسکرین شات را در دستگاه اندروید خود تغییر دهم؟
آره. در صورت تمایل می توانید پوشه پیش فرض اسکرین شات را تغییر دهید. تنها کاری که باید انجام دهید این است که یک پوشه جدید ایجاد کنید یا یک پوشه دیگر را برای اسکرین شات های خود در گوشی اندروید خود انتخاب کنید.
اگر دکمههای سختافزاری گوشی اندرویدی کار نمیکنند، چگونه از صفحهنمایش عکس بگیریم؟
ابتدا، اگر نمیپرسید که اگر دکمههای سختافزاری گوشی اندرویدی شما کار نمیکنند، هنوز هم میتوانید از صفحهنمایش عکس بگیرید، پاسخ آن بله است. بنابراین در مواردی مانند این، بهتر است از یک ابزار ضبط صفحه شخص ثالث مانند ضبط صفحه FVC استفاده کنید که به کاربران اجازه می دهد تا با استفاده از قابلیت ضبط گوشی آندروید خود از صفحه نمایش عکس بگیرند.
آیا می توانم اسکرین شات ها را در دستگاه اندروید خود حاشیه نویسی یا ویرایش کنم؟
آره. می توانید اسکرین شات ها و عکس های خود را در دستگاه اندروید خود حاشیه نویسی یا ویرایش کنید. این را می توان مستقیماً پس از گرفتن اسکرین شات با استفاده از ویژگی های ویرایش داخلی آنها انجام داد. می توانید متن، نقاشی، فلش و اشکال را به اسکرین شات های خود اضافه کنید، همچنین می توانید برش، تغییر اندازه و اعمال فیلترها را انجام دهید.
نتیجه
همین بود. از حالا گرفتن اسکرینشات در اندروید برای شما مثل آب خوردن است. کافی است بدانید کدام روش با دستگاه شما سازگار است تا همهچیز بهخوبی پیش برود. پس روش مناسب خود را انتخاب کنید و همین امروز شروع کنید به ثبت و ذخیره کردن لحظههای خاطرهانگیز روی گوشی اندرویدی خود!
-
 چگونه با این راهنمای اولیه به راحتی در مک اسکرین شات بگیرید
 آیا می خواهید در مک خود اسکرین شات بگیرید اما نمی دانید چگونه؟ ما تو را گرفتیم! ما سادهترین و سریعترین راهها را برای گرفتن اسکرین شات و ذخیره تصاویر از صفحه نمایش به شما نشان میدهیم.
-
 چگونه با این راهنمای اولیه به راحتی در مک اسکرین شات بگیرید
 آیا می خواهید در مک خود اسکرین شات بگیرید اما نمی دانید چگونه؟ ما تو را گرفتیم! ما سادهترین و سریعترین راهها را برای گرفتن اسکرین شات و ذخیره تصاویر از صفحه نمایش به شما نشان میدهیم.
-
 با این راهنمای اولیه به راحتی از یک ویدیو عکس بگیرید [2024]
 یاد بگیرید که چگونه با این روش های ساده به راحتی از ویدیوها عکس بگیرید. راهنمای ما را دنبال کنید و همین حالا شروع به گرفتن اسکرین شات از ویدیوهای مورد علاقه خود کنید!