


نحوه ویرایش فایل های WAV برای ویرایش سریع صوتی با کیفیت بالا
WAV files are the most popular audio file format and are considered the ideal way to contain music or recordings with different bitrates. Better file formats equate to better quality, and editing WAV files can contribute to making it much better. But how can you ensure you’re not ruining your WAV file quality unknowingly? Worry not, as this guide will provide you with answers about what software or tools are best used to edit your WAV files. We have come up with four methods straight out of our experience using them. Moreover, in this guide, whether you are just a novice or an experienced individual, you’ll get to learn step-by-step how to edit WAV files effectively without ruining them.

بخش 1. بهترین راه برای ویرایش WAV با ویرایشگر WAV با امکانات کامل
FVC has browsed the internet to find the perfect way to edit WAV worthy to be featured in this article so that you won’t have to. To our surprise, we came across this FVC-picked Video Converter Ultimate that is easy to use and has a simple interface that offers full-featured tools such as the ability to cut, split, merge, volume booster, etc. Editing WAV files through this exceptional software for both Windows and Mac, with over five million downloads garnering trust not just for WAV editing but also works as a converter and video editing tool.
ویژگیهای کلیدی:
• ویرایشگر WAV همه کاره و آسان برای استفاده.
• ابزارهای ویژه مانند برش صدا، ادغام، کمپرسور، حذف نویز، تقویت کننده صدا و غیره.
• پشتیبانی از بیش از 1000 فرمت صوتی/تصویری مانند MP3، AAC، WMA، WAV و غیره.
• بدون محدودیت اندازه فایل هنگام آپلود WAV.
Step 1. Download and install the FVC-picked Video Converter Ultimate here.
دانلود رایگانبرای ویندوز 7 یا بالاتردانلود امن
دانلود رایگانبرای MacOS 10.7 یا بالاتردانلود امن
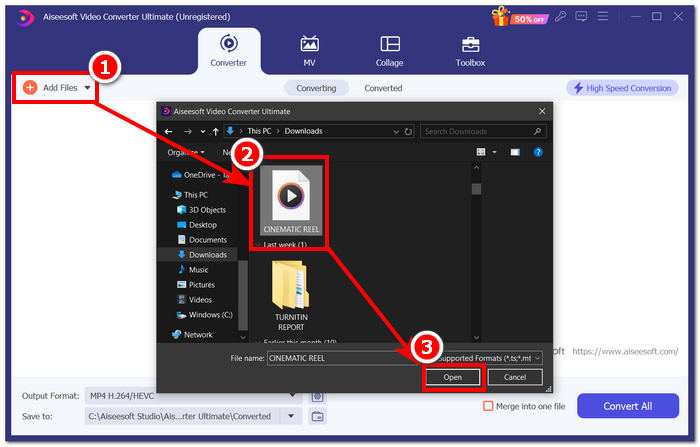
Step 2. On the tool interface, click on the Add Files button to add your WAV file to the software.
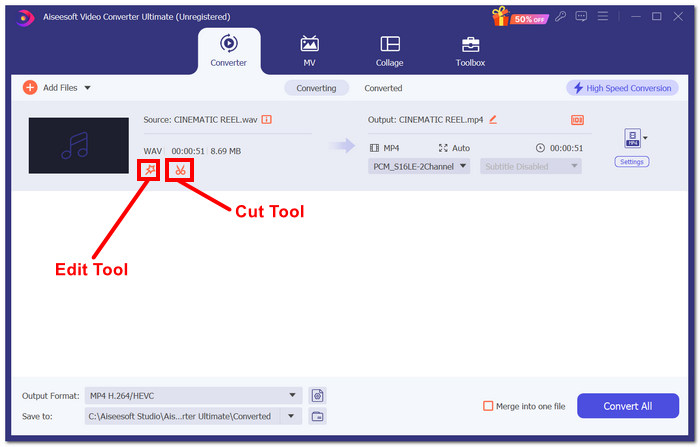
Step 3. Once your WAV file is in the tool, you can edit it by clicking on the Edit and Cut tool located right beside your uploaded WAV file.
نکته:
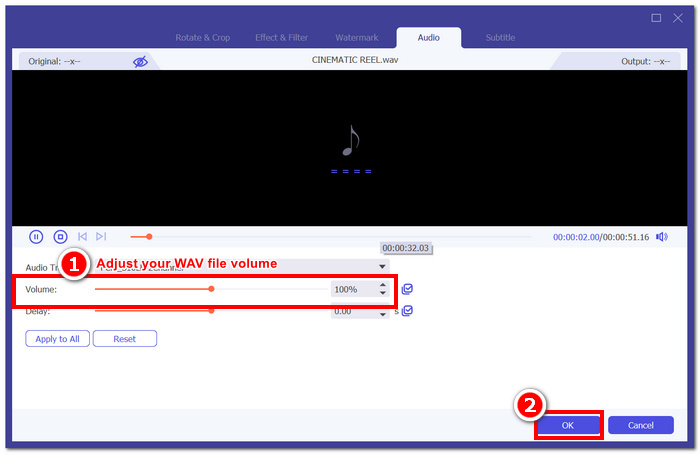
ابزار ویرایش نمادی شبیه به عصای جادویی است و این ابزار ویژگیهای افزایش صدا و تاخیر صدا را در خود جای داده است.
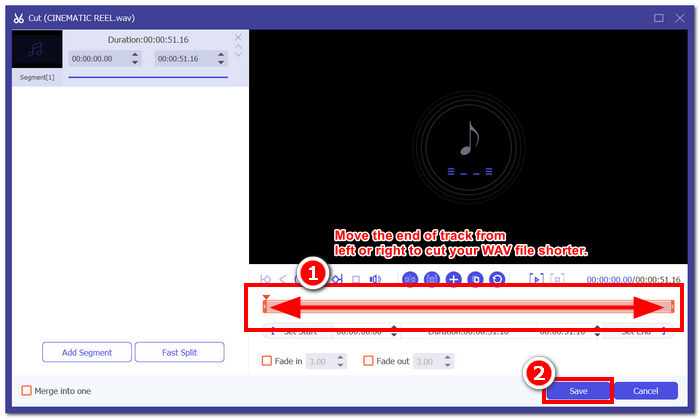
ابزار برش نماد قیچی است و شامل جلوههای Cut، Split، Merge و Add Fade است.
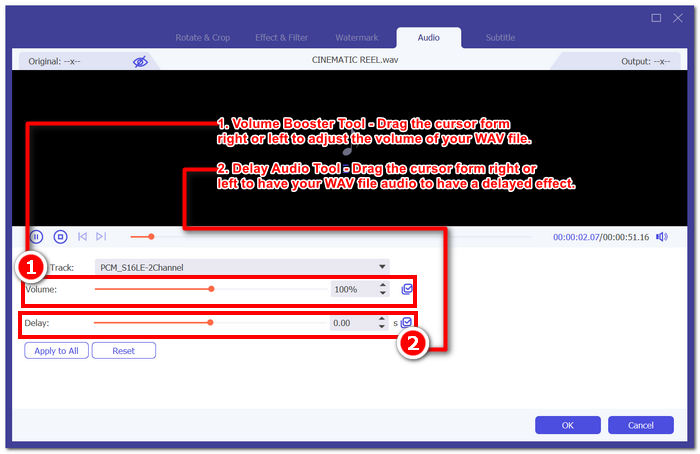
Step 4. To edit your WAV file, click on the magic-looking icon for the volume booster features and drag the volume cursor left or right to adjust the volume, or directly enter the volume you want. If you want to fix the audio delay, drag the delay cursor to adjust the audio delay. Once you've done this, click on the OK button.
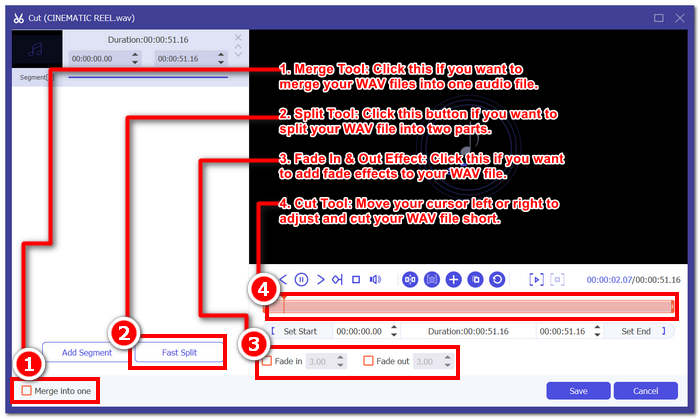
از طرف دیگر، برای برش فایل WAV خود، روی دکمه قیچی کلیک کنید و به سادگی مکان نما خود را به مسیر از چپ به راست بکشید تا فایل WAV خود را کوتاه کنید. پس از اتمام برش فایل WAV، بر روی دکمه ذخیره کلیک کنید.
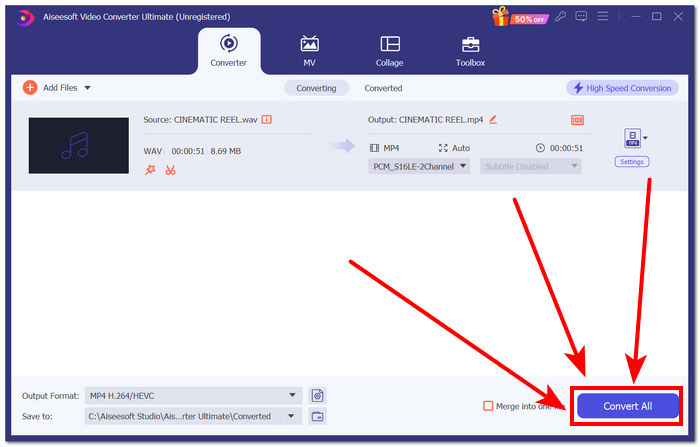
Step 5. Once you have successfully Edit and Cut your WAV file to your liking, click on the Convert All button to have it downloaded to your desktop download designated folder.
تجربه ما در ویرایش یک فایل WAV با استفاده از نرمافزار انتخابشده FVC باعث صرفهجویی در زمان و اعتبار آن میشود، زیرا پیروی از مراحل بالا به ما کمک میکند تا کار را بدون مشکل انجام دهیم. علاوه بر این، هنگام استفاده از نرم افزار، متوجه شدیم که دارای ویژگی های دیگری برای ویرایش ویدیو و صدا است. به طور کلی، این به ما گزینه های زیادی را در انتخاب کارهایی که می توانیم برای ویرایش فایل های WAV خود انجام دهیم، می دهد.
قسمت 2. ویرایش یک فایل WAV در ویندوز 7/8/10/11 با ابزار داخلی
روش 1. فایل های WAV را در Windows Media Player با یک پلاگین ویرایش کنید
Windows Media Player، یک پخش کننده رسانه داخلی در دستگاه های ویندوز، همچنین می تواند به عنوان یک ویرایشگر فایل WAV با استفاده از یک افزونه استفاده شود. برای انجام این کار، افزونه SolveigMM WMP Trimmer برای بارگیری در فروشگاه مایکروسافت به صورت رایگان در دسترس است تا بتوانید فایل WAV خود را برش داده و ویرایش کنید.
Step 1. Go to your Windows Microsoft Store and download the SolveigMM WMP Trimmer Plugin from there.
Step 2. Once the plug-in is installed, open your Windows Media Player click on the Tools section located on the top-most part of the player, and then click on the Plug-ins to enable the SolveigMM WMP Trimmer Plugin.
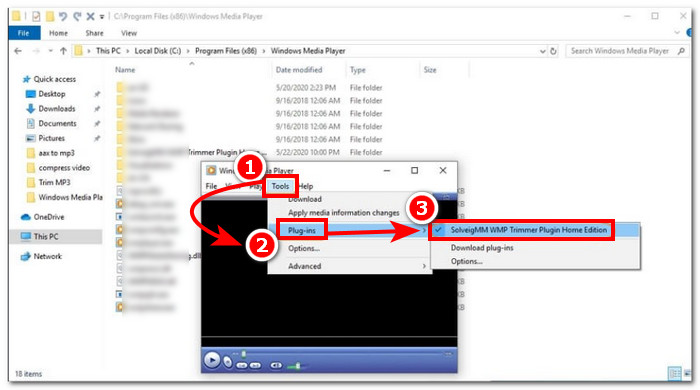
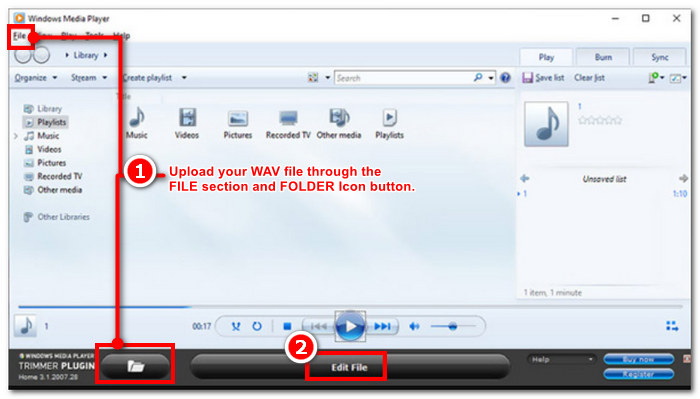
Step 3. Once the plug-in is enabled, proceed to upload your WAV file by clicking on the File folder located in the top-most left corner of the player or the Folder icon located in the lower-left part of the player to upload your WAV file. Once the WAV file is uploaded to the player, click the Edit File button to proceed to actual WAV editing.
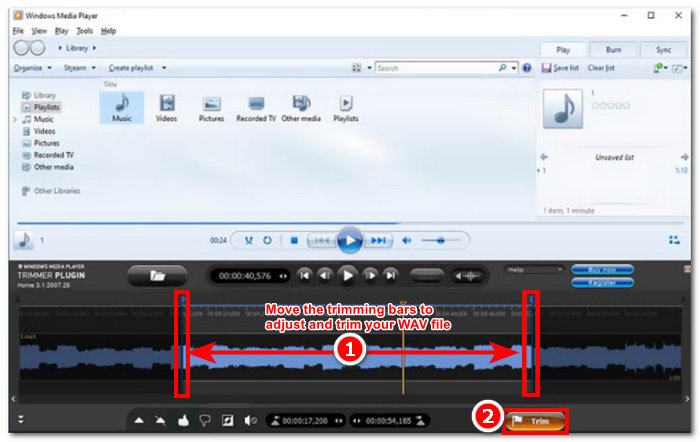
Step 4. You can now perform editing tasks, such as trimming your WAV file by adjusting the trimming bars from left to right. Once you are satisfied with the length of your WAV file, click on the Trim button to have it saved by default in the same file as your WAV.
اکنون که فایل WAV خود را ویرایش کرده اید، در این مورد، با کمک افزونه ها، از طریق Windows Media Player برش را انجام دهید. اکنون می توانید فایل WAV خود را از طریق پخش کننده داخلی ویرایش کنید. افزونهها ممکن است برای راحتی کاربر مفید باشند، اما کاملاً رایگان نیستند زیرا در مقایسه با نسخه پولی خود فقط دارای ویژگیهای ویرایش محدودی هستند.
روش 2. ویژگی های فایل های WAV را با File Explorer ویرایش کنید
If you find software tools difficult to navigate in general, we also have something for you to edit WAV files using the built-in tool in your Windows 7/8/10/11. Believe it or not, Windows doesn’t have pre-built-in software or features that can freely edit your WAV file, but it is still possible to edit your WAV file information properties by using the default method. To cut the story short, using the default method is a way of editing your WAV file information by tweaking the properties when you view the file. Hence, we are going to list the methods for editing your WAV file information properties below.
Step 1. Open your File Explorer and locate the WAV file you want to edit.
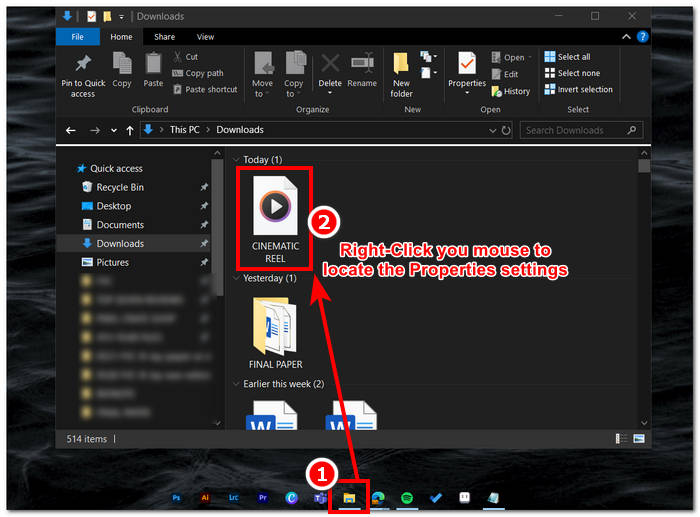
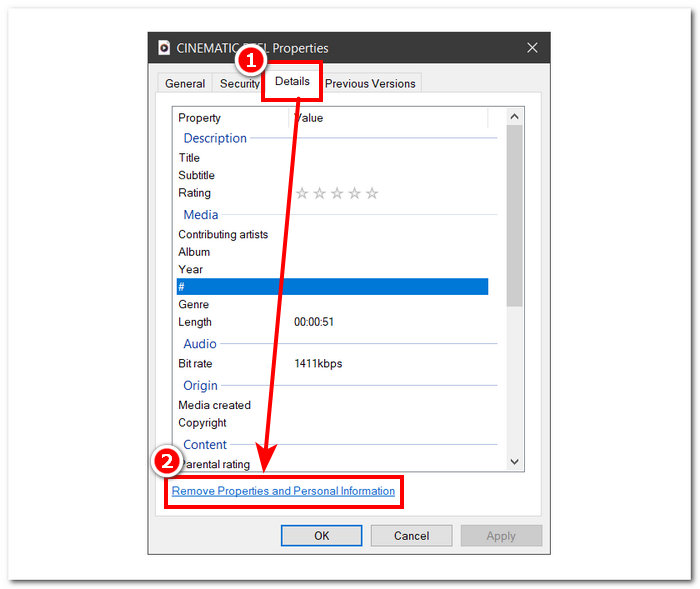
Step 2. Once you locate the Properties, click on it, and a window will appear with the information about your WAV file.
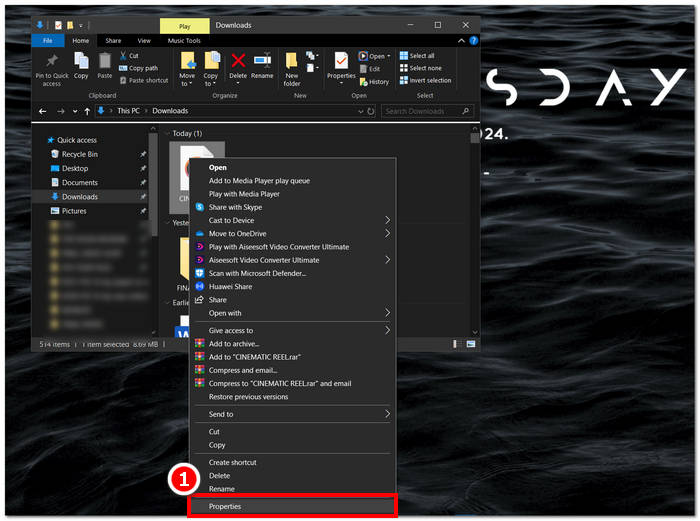
Step 3. In the newly opened window, click on Details and proceed to click on Remove Properties and Personal Information in the lower part of the window.
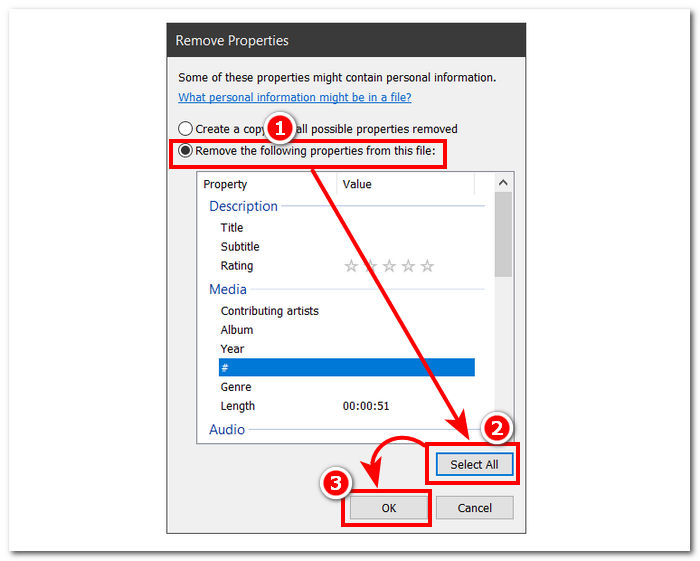
Step 4. Select the second option - Remove the following properties from this file, then click the Select All button. Lastly, click the OK button to reset your WAV file information details to its default setting.
به یاد داشته باشید که این روش منحصرا برای کاربران ویندوز است و به کاربران اجازه نمی دهد فایل صوتی را تنظیم کنند، بلکه ویژگی های اطلاعات را تنظیم کنند. به طور کلی، استفاده از روش پیش فرض برای تنظیم مجدد اطلاعات فایل WAV راحت است. با این حال، زمانی که می خواهید جزئیات اطلاعات فایل WAV خود را پر کنید، راهی جز استفاده از نرم افزار برای آن وجود ندارد، در این مورد، نرم افزار انتخاب شده FVC.
قسمت 3. ویرایش فایل های WAV در مک با GarageBand
به طور اتفاقی به نرم افزاری برخوردیم که نسخه اپلیکیشن موبایلی هم دارد. GarageBand یک ابزار محبوب برای دستگاههای macOS و iOS است که یک ویرایشگر صوتی با امکانات کامل ارائه میکند. این ابزار تنظیمات از پیش ساخته شده را ارائه می دهد و با کنترل های هوشمند ادغام می شود. علاوه بر این، ما یک روش ساده را در زیر برای استفاده از GarageBand فهرست کرده ایم. در این صورت از نسخه macOS استفاده خواهیم کرد.
Step 1. Download GarageBand to your macOS device, and once you have completely installed the software, open it.
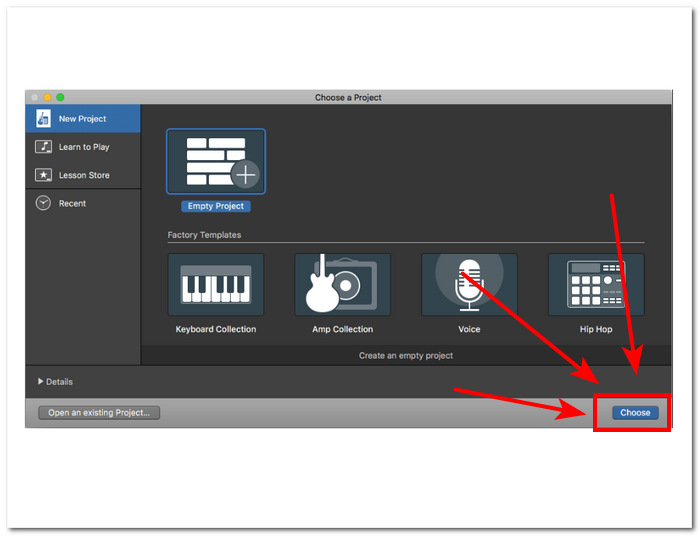
Step 2. Load your WAV file into the software by clicking on the Choose button. Once your WAV file is loaded in the tool, proceed to double-click on the track for the Audio Editor window to appear at the bottom of the interface.
Step 3. Edit your WAV file by exploring the Track and Region section located at the lower part of the software.
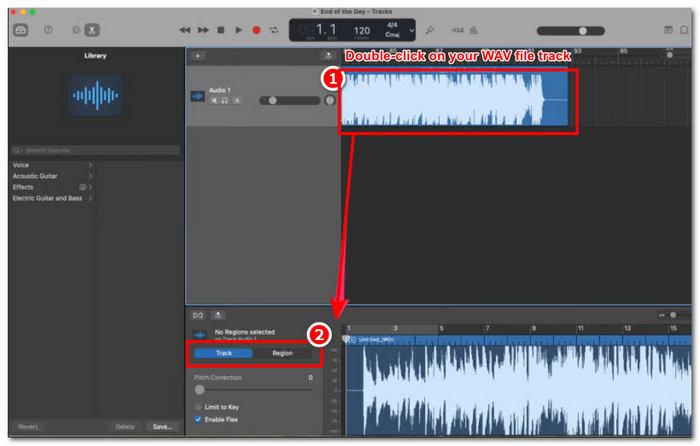
بخش Track وظیفه ویرایش زیر و بم فایل WAV شما را بر عهده دارد و به عنوان تصحیح کننده عمل می کند.
بخش Region تنظیمات جابجایی را در خود جای می دهد، این می تواند به کاربر کمک کند پخش فایل WAV را معکوس کند.
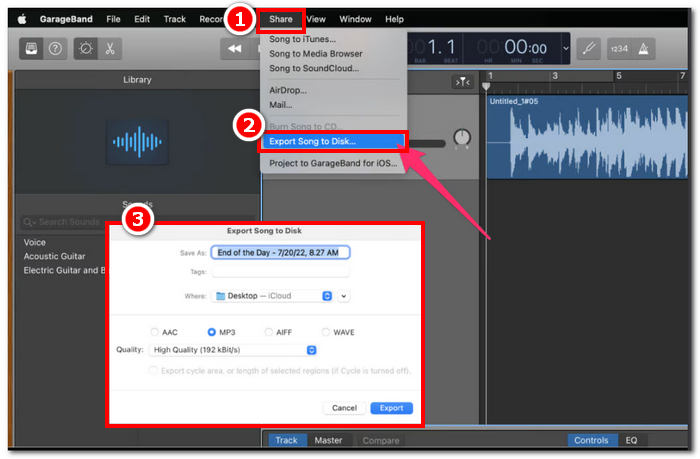
Step 4. Once you are satisfied with the changes you made in your WAV file, export your file by clicking on Share > Export Songs to Disk, and choose where you want your edited WAV file to be saved.
GarageBand نرم افزار قابل اعتمادی برای ویرایش فایل WAV شما در macOS و iOS است. از این رو، اگر به دنبال ویژگی های پیشرفته تری هستید، توصیه می کنیم از نسخه macOS GarageBand استفاده کنید. به طور کلی، هر دو نسخه در ویرایش صوتی پایه تا متوسط عالی هستند، اما لطفاً توجه داشته باشید که برای جلوگیری از سردرگمی باید دانش خاصی از رابط ابزار داشته باشید.
قسمت 4. فایل های WAV را با یک ویرایشگر آنلاین ویرایش کنید
روش دیگر برای ویرایش فایل WAV استفاده از یک ابزار آنلاین است که می تواند ویرایش اولیه را انجام دهد. TwistedWave به عنوان یک ویرایشگر صوتی مبتنی بر وب ظاهر شد که نه تنها به عنوان یک ویرایشگر آنلاین کار می کند بلکه به کاربران امکان ویرایش صدای WAV را نیز می دهد. علاوه بر این، با وجود رابط قدیمی آن، یک ابزار WAV قابل اعتماد است و یکی از سادهترین طرحها را در میان ابزارهای ویرایشگر WAV مبتنی بر وب که ما پیدا کردیم، دارد.
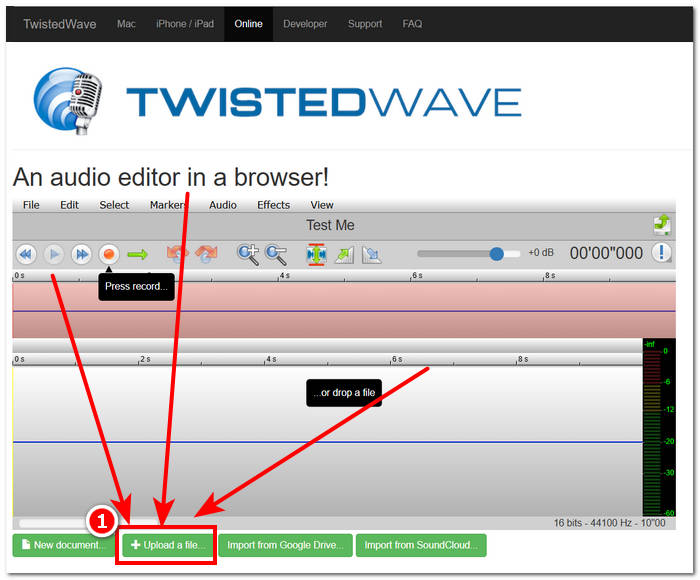
Step 1. Go to TwistedWave official website and click on the Upload a file button to select your WAV file on your desktop to edit in the tool.
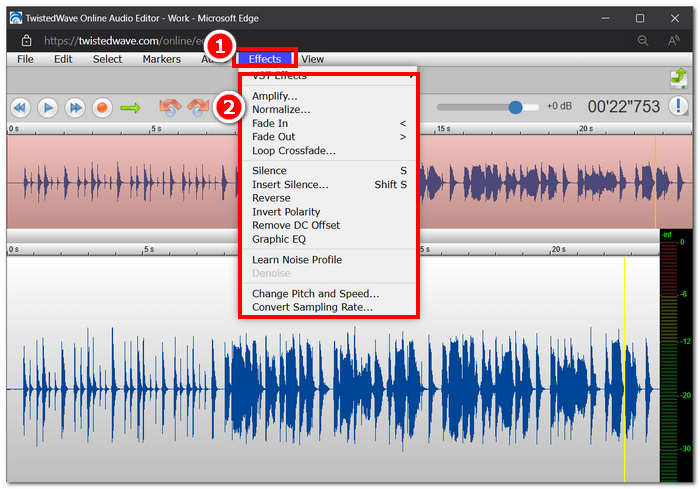
Step 2. Once your WAV file is in the tool, click on the Effect section located at the top of the tool interface. Choose your desired actions on the available effects that you want to apply to your WAV file.
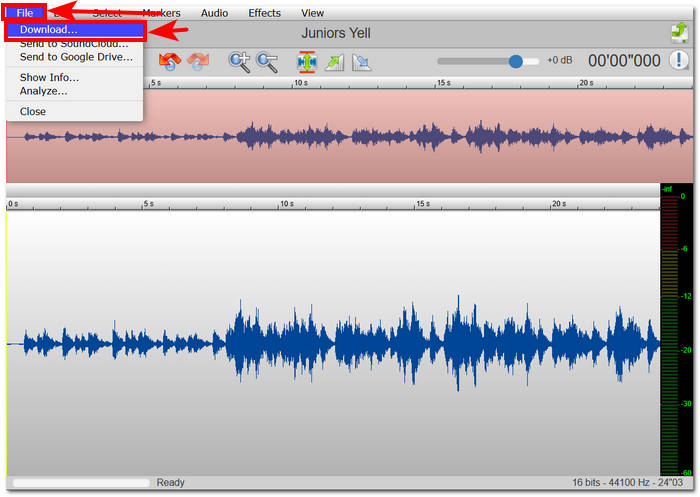
Step 3. Once you have selected the effects you want in your file, proceed to download your edited WAV. To do this, click on the File section in the top-left corner of the tool and click Download to export the WAV file to your download folder.
برای ویرایش آنلاین فایلهای WAV، TwistedWave سادهترین راه برای پردازش یک فایل WAV بر روی سرور است، بنابراین نیاز به دانلود نرمافزار غیرضروری خواهد بود. علیرغم استفاده راحت از آن، فقط به کاربر اجازه می دهد یک فایل را در حساب رایگان حداکثر به مدت پنج دقیقه ویرایش کند.
بخش 5. سوالات متداول در مورد ویرایش فایل های WAV
آیا مایکروسافت نرم افزار ویرایش صدا دارد؟
مایکروسافت از زمان ایجاد این راهنما، مانند ویرایشگر فایل WAV، نرم افزار ویرایش صدا اختصاصی ندارد. برای کارهایی مانند تغییر صدا و اعمال افکت ها، استفاده از نرم افزار FVC-picked و Audacity توصیه می شود.
آیا می توانید یک فایل WAV را در Windows Media Player برش دهید؟
No, the Windows Media Player doesn’t have the capabilities to do such a task. Trimming your WAV file on your desktop is through third-party software such as GarageBand for macOS and the FVC-picked software for Windows.
ساده ترین برنامه ویرایش صدا برای مک چیست؟
GarageBand قطعا ساده ترین است، با طراحی رابط کاربری ساده. در میان کاربران macOS خود بسیار شناخته شده است، چه رسد به علاقه مندان به موسیقی و تولیدکنندگان تازه کار. این ابزار ویژگیهای پیشرفته قوی را ارائه میکند و از قبل روی macOS برای دسترسی فوری به این سرویس از قبل نصب شده است.
فایل های WAV معمولا برای چه مواردی استفاده می شوند؟
فایلهای WAV معمولاً با استفاده حرفهای در فرآیندهای صدا، ضبط و ویرایش مرتبط هستند. WAV که به دلیل کیفیت بدون اتلاف و ماهیت غیر فشردهاش شناخته شده است، فرمتی ایدهآل برای صادرات WAV و سایر پروژههای صوتی است.
فایل WAV دیجیتال است یا آنالوگ؟
یک فایل WAV یک فرمت دیجیتال برای ذخیره داده های صوتی است که می تواند از طریق رایانه و سایر دستگاه ها به اشتراک گذاشته شود. از این رو، حاوی امواج صوتی آنالوگ اما به شکل دیجیتال است.
نتیجه
Editing WAV files using the right software and tools ensures higher-quality audio. Thus, follow the various steps to edit WAV files, including the recommended full-featured software, built-in methods for Windows, GarageBand for macOS and iOS users, and finally, web-based tool users.
-
 WAV Player - 5 برنامه برتر WAV Player برای Android ، iPhone ، PC و Mac
 چگونه می توان فایل های WAV را در تلفن Android بازی کرد؟ کدام بازیکن می تواند WAV بازی کند؟ این پست 5 بهترین پخش کننده WAV رایگان برای Android ، iPhone ، Mac و PC را به اشتراک می گذارد.
-
 6 ضبط کننده WAV رایگان برتر موجود در ویندوز و مک
 بهترین نرم افزار ضبط WAV که در این مقاله به اشتراک می گذاریم دارای انواع ویژگی های مفید است که به شما در ضبط صدا و صدا مانند متخصصان کمک می کند.
-
 5 بهترین ضبط کننده ماوس و صفحه کلید برای ویندوز و مک
 در اینجا پنج برنامه برتر ضبط ماوس و صفحه کلید وجود دارد که می توانند حرکات موس و کلیک صفحه کلید را ذخیره کرده و وقایع را تکرار کنند.