

Découvrez tout le potentiel de Final Cut Pro dans la création de vidéos au ralenti
Final Cut Pro est un puissant outil de montage vidéo de post‑production disponible uniquement pour les utilisateurs Mac. Le montage vidéo et audio, l’étalonnage colorimétrique avancé, le sous‑titrage codé et bien plus encore sont possibles avec ce programme. Comme d’autres logiciels de montage et de diffusion, Final Cut Pro inclut tout ce dont vous avez besoin du début à la fin. Ce logiciel est également excellent pour créer des vidéos au ralenti, grâce à l’un de ses outils qui permet d’ajuster la vitesse de lecture de la vidéo. Afin d’obtenir l’effet de ralenti que vous souhaitez, continuez à lire pour connaître tous les détails pour créer des vidéos au ralenti avec Final Cut Pro. Poursuivez votre lecture pour en savoir plus.

Partie 1. Comment faire des vidéos au ralenti sur Final Cut Pro ?
Lorsqu'il est utilisé dans une vidéo ou un film, le ralenti peut aider à attirer l'attention sur une action particulière ou à renforcer l'impact dramatique ou émotionnel de l'œuvre en question. Réduire la vitesse d'un clip a l'air cool, peu importe l'utilisation que vous en faites. Nous allons vous montrer comment créer des effets de ralenti Final Cut Pro en quelques étapes simples. Allons-y, d'accord ?
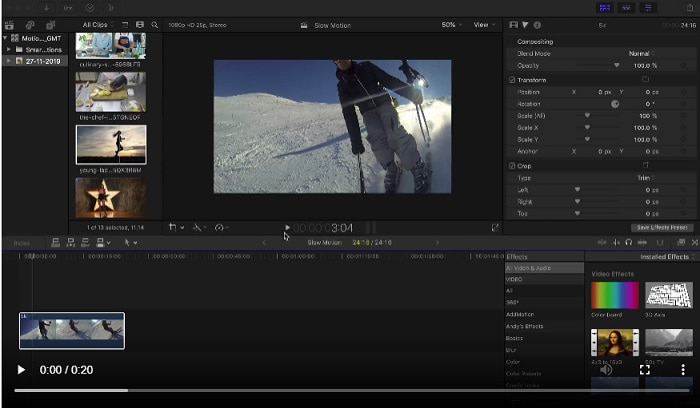
Étape 1. Dans la Timeline, repérez et cliquez sur le clip que vous souhaitez modifier.
Étape 2. Pour accéder au menu Retime, cliquez soit sur l’icône Speed Meter dans la fenêtre de visualisation, soit appuyez sur Commande + R sur votre clavier.
Étape 3. Sélectionnez entre deux niveaux de vitesse : Slow et Fast. Vous pouvez également appuyer sur Commande + R sur votre clavier pour faire apparaître un menu déroulant au‑dessus de votre clip.
Étape 4. Modifier le timing du clip est aussi simple que d’ajuster les pourcentages de vitesse indiqués sous chaque option. Si vous accélérez, le clip sera raccourci, et si vous ralentissez, il sera allongé. La durée du clip variera donc en fonction de la vitesse.
Partie 2. Excellentes options à utiliser pour faire des ralentis sous Windows
Méthode 1. Utiliser Video Converter Ultimate
Si l’on considère que Final Cut Pro est un logiciel très difficile à utiliser pour créer une vidéo au ralenti, nous vous recommandons alors d’utiliser Video Converter Ultimate. Ce logiciel est gratuit au téléchargement et disponible à la fois sur Windows et Mac, vous n’avez donc pas à vous inquiéter de sa compatibilité. Il propose différents outils capables de monter votre vidéo comme le fait Final Cut Pro.
Parmi ces outils, il y a un Video Speed Controller qui permet de créer des vidéos au ralenti en ajustant la vitesse de lecture d’une vidéo à vitesse normale. Contrairement à Final Cut Pro, ce logiciel est facile d’accès et ne demande pas beaucoup de temps pour apprendre à utiliser chaque outil. De plus, il prend en charge de nombreux formats vidéo afin que vous n’ayez pas de mal à trouver le logiciel adapté au format que vous devez convertir. Maintenant que vous avez une idée de tout ce que Video Converter Ultimate peut offrir, passons aux étapes pour créer un ralenti avec ce logiciel.
Étape 1. Vous devez d’abord télécharger et installer le logiciel avant de pouvoir l’utiliser. Pour ce faire, cliquez simplement sur le bouton Free Download situé ci‑dessous. Téléchargez‑le sur votre ordinateur de bureau, puis commencez l’installation en cliquant sur le bouton Start Now.
Téléchargement gratuit pour Windows 7 ou version ultérieure Téléchargement sécurisé
Téléchargement gratuit pour macOS 10.7 ou version ultérieure - Téléchargement sécurisé
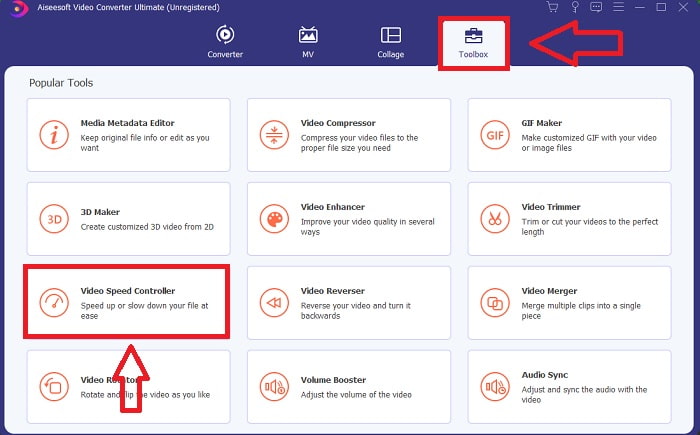
Étape 2. Une fois le programme installé, vous verrez le menu de démarrage sur l’interface principale du logiciel. En cliquant sur l’onglet Toolbox dans le menu, vous pouvez afficher rapidement et facilement tous les outils mis en avant que ce logiciel propose. Et si vous souhaitez ralentir votre vidéo ou changer sa vitesse, choisissez Video Speed Controller dans la liste des outils disponibles.
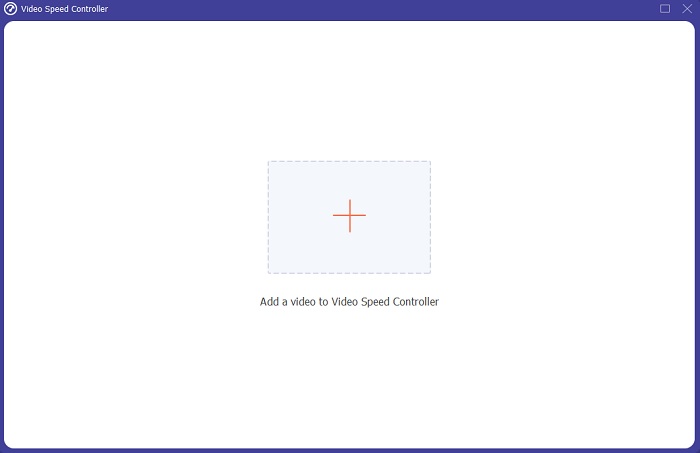
Étape 3. Si vous choisissez de continuer, une autre fenêtre apparaîtra sur l’écran de votre ordinateur. Vous pourrez commencer à importer votre vidéo et à modifier sa vitesse de lecture en cliquant sur le signe plus +.
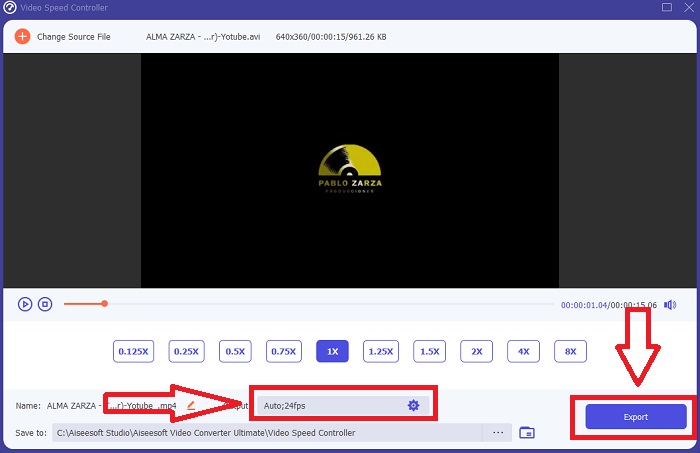
Étape 4. Contrairement à Final Cut Pro, vous pouvez transformer une vidéo à vitesse normale en ralenti en un seul clic. Pour créer une vidéo au ralenti avec cet outil, vous allez diminuer la vitesse de lecture de votre vidéo en cliquant sur toutes les valeurs inférieures à 1 ; ces entiers serviront de multiplicateur indiquant à quel point vous allez réduire le nombre d’images par seconde de votre vidéo.
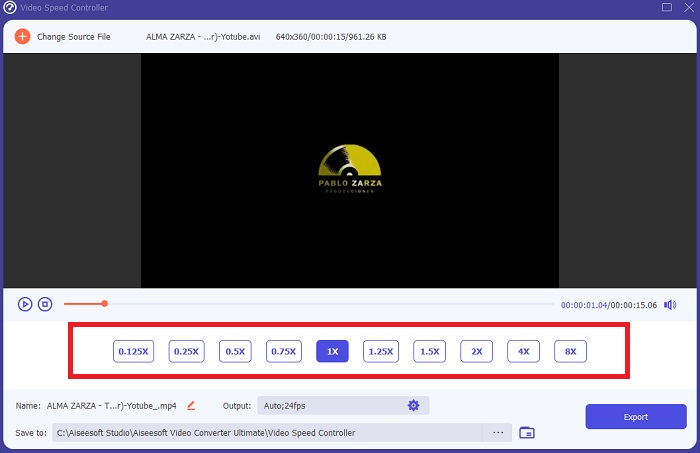
Étape 5. Vous pouvez maintenant peaufiner la qualité de votre vidéo en ajustant son format, sa résolution, sa fréquence d’images et d’autres paramètres si vous êtes satisfait de sa vitesse globale. Vous aurez également la possibilité de renommer votre vidéo de sortie si vous le souhaitez. Vous pouvez enregistrer votre travail en sélectionnant Export dans le menu Fichier, puis en choisissant un emplacement dans le système de fichiers de votre ordinateur.
Méthode 2. Utiliser Motion 5
Motion est un puissant outil d'animation graphique conçu pour les éditeurs vidéo qui permet de créer facilement des titres cinématographiques 2D et 3D, des transitions fluides et des effets réalistes en temps réel. Motion est conçu pour les éditeurs vidéo. Motion est également une autre alternative à Final Cut Pro pour la réalisation de vidéos au ralenti puisqu'il est également disponible sur Mac. Grâce à ses outils utiles, vous pouvez désormais créer facilement des vidéos au ralenti. Pour en savoir plus sur la façon de faire un ralenti à l'aide de Motion 5, voici les étapes fournies.
Étape 1. Ouvrez Motion 5 et faites glisser le fichier vidéo vers la Timeline.
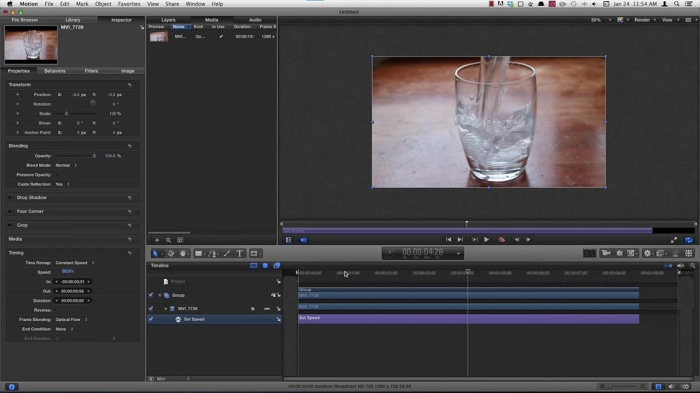
Étape 2. Sélectionnez le clip vidéo et repérez l’icône en forme de Gear dans les outils de montage au‑dessus de la piste vidéo. Ensuite, cliquez sur Retiming puis sur Set Speed.
Étape 3. Après cela, dans le coin gauche de l’interface, cliquez sur Properties et ouvrez la fenêtre Inspector. Vous verrez alors le réglage Retiming en bas. Définissez la vitesse en dessous de 100 pour obtenir l’effet de ralenti. Et pour que votre vidéo au ralenti soit fluide, cliquez sur Frame Blending et choisissez Optical Flow.
En rapport:
Comment ralentir des vidéos MP4
Meilleurs changeurs de vitesse pour GIF
Partie 3. FAQ sur Final Cut Pro
Comment égaliser l'audio dans Final Cut Pro ?
Sélectionnez la vidéo dans la timeline dans Final Cut Pro. Sélectionnez un autre paramètre d'égalisation dans le menu local Égalisation de la section Améliorations audio de l'inspecteur audio. Choisissez l'option Flat si vous souhaitez supprimer tous les égaliseurs.
Comment stabiliser une vidéo dans Final Cut Pro ?
L'inspecteur vidéo est accessible en sélectionnant un plan dans la timeline dans Final Cut Pro, puis en cliquant sur le bouton de l'inspecteur. Basculez entre Stabilisation et Volet roulant en cochant la case appropriée. Vous pouvez utiliser la fonction de stabilisation de Final Cut Pro en cochant la case, et Final Cut Pro recherchera la meilleure méthode de stabilisation en fonction de son analyse.
Comment équilibrer l'audio gauche et droite dans Final Cut Pro ?
Sélectionnez Stéréo gauche/droite dans le menu local Mode de la section Pan de l'inspecteur audio. L'un des éléments suivants entraînera un déplacement du son vers la gauche ou la droite : Pan Amount est l'endroit où vous placez votre argent. Assurez-vous simplement de ne pas le dépasser.
Conclusion
En dernière analyse, Final Cut Pro est le meilleur logiciel disponible sur Mac. Il propose différents outils qui peuvent rendre votre post‑production un peu plus extraordinaire. Mais comme il n’est disponible que sur Mac, comment allez‑vous créer des vidéos au ralenti si vous utilisez Windows ? Video Converter Ultimate est la réponse à votre problème ; tous les détails concernant ce logiciel sont déjà donnés ci‑dessus, ainsi que la manière dont il peut transformer vos vidéos en ralenti.
-
 3 façons d'accélérer la vidéo sur iPhone [Prouvé]
 Vous avez du mal à régler la vitesse de lecture de votre vidéo car vous utilisez un iPhone ? Ceci est un excellent article pour vous aider avec votre problème.
-
 Comment ralentir une vidéo : astuces parfaites [Téléphone de bureau/mobile]
 Êtes-vous fatigué de chercher les meilleurs outils pour ralentir une vidéo en ligne ? Lisez cet article particulier pour vous éclairer avec les informations énumérées ci-dessous.
-
 Lecteur Windows Media | Apprenez à accélérer les vidéos [Prouvé]
 Vous souhaitez ralentir votre clip vidéo à l'aide de votre Windows Media Player, mais vous ne savez pas comment faire ? Cet article est idéal pour la lecture et peut éclairer votre point de vue sur la façon d'accélérer les vidéos à l'aide de Windows Media Player.